Manage Licenses on citrix.com
This article describes how to manage licenses from the citrix.com site. You can use Manage Licenses on citrix.com to easily find, allocate, download, modify, return, hide, and unhide licenses.
Note:
You can perform several licensing actions from Citrix Studio and Citrix Licensing Manager.
To access Manage Licenses on citrix.com
- From a web browser, go to http://www.citrix.com.
- Select Sign In > My Account and type your user ID and password.
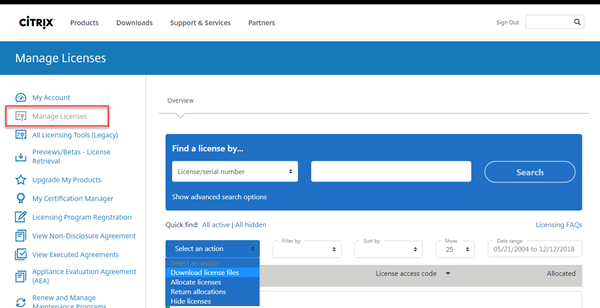
- Select Manage Licenses.

Note:
The Manage Licenses tab is visible only if you have the required permissions to access it.
Search for licenses
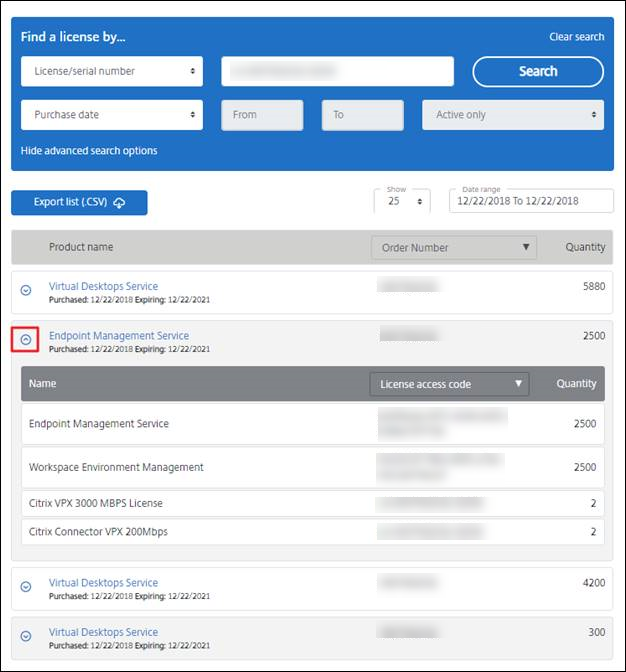
In the Find a license by… menu, choose the search criterion, type the search text, and select Search. You can select Show advanced search options to narrow down your search further.
Allocate licenses
-
Select the licenses you want to allocate. The landing page displays only new licenses within 30 days and expiring term licenses. You can use the Find a license by… search to find all licenses using one of the search criteria and then the Filter by menu to narrow the display down to specific types of licenses or you can select Quick find: All active to see all licenses.
-
From the Select an action menu, choose Allocate licenses.
-
Enter the Binding ID (for example: Host name or Ethernet address) and how many licenses to allocate, and click Create license file.
-
Select Yes, create license file. If you want to make a change before creating the license file, select No, modify the allocation, and make your change. Then select Yes, create license file.
-
Select Download license file, and save the file to a temporary location. Remember the file name and location where you downloaded the file. You need this location.
-
Install the license. See Install licenses.
Download licenses
- Select the licenses you want to download. The landing page displays only new licenses within 30 days and expiring term licenses. You can use the Find a license by… search to find all licenses using one of the search criteria and then the Filter by menu to narrow the display down to specific types of licenses or you can select Quick find: All active to see all licenses.
- From the Select an action menu, choose Download all licenses and save the file to a temporary location (mostly the downloads folder).
-
Copy the downloaded license files to the
MyFilesfolder:-
C:\Program Files\Citrix\Licensing\MyFileson a 32-bit computer -
C:\Program Files (x86)\Citrix\Licensing\MyFileson a 64-bit computer
Ensure that the license file retains the lower case .lic file name extension. Some copy processes don’t recognize a file type for that extension and add a “.txt” file name extension during the copy. You can’t import license files that have the wrong file name extension.
-
-
At a command prompt, navigate to the
C:\Program Files (x86)\Citrix\Licensing\LSorC:\Program Files\Citrix\Licensing\LSfolder and type the following command:lmreread -c @localhost -all
For more information about the lmreread command, see Reread license and options files (lmreread).
Installing licenses
For information about installing licenses for specific solutions from Citrix, see the following:
- Licensing guide for Citrix Virtual Apps and Desktops
- Licensing guide for Citrix ADC
- Licensing guide for Citrix Gateway
- Licensing guide for Citrix Hypervisor
- Licensing guide for XenMobile Server
- Licensing guide for Citrix Provisioning
- Licensing guide for Citrix SD-WAN
- Licensing guide for Citrix SD-WAN Orchestrator
For information about installing licenses using the Citrix Licensing Manager, see Install licenses.
Display asset components
To display asset components, click View my products at the top of the page. Choose a license and click the down arrow to expand and view the details. You can toggle between the order number and the license access code view.

Return allocations
Returning allocations puts the licenses back in the licensing pool. You can then allocate these licenses in any quantity at any time. For example, you’re decommissioning a License Server, but you’re not ready to deploy existing licenses elsewhere.
- Select the check box of the licenses you want to return.
- From the Select an action menu, choose Return allocations.
- Select Yes, process return. If you choose this option, you cannot undo it.
Modify licenses
Modifying a license returns a single license file and allows for allocation to another server. For example, you have 5000 licenses installed on license server1. You want to move 1000 licenses to license server2. Modify allocations and then allocate 4000 licenses to license server1 and 1000 licenses to license server2.
- To select a product, click the link, and view the product license details page.
- Select the check box of the allocated license to modify.
- From the Select an action menu, choose Modify allocations.
- Type a new server host address.
- Select Modify license file.
- Select Yes, create license file. If you want to make a change before creating the license file, select No, modify the allocation, and make your change. Then select Yes, create license file.
- Select Download license file, and save the file to a temporary location. Remember the file name and location where you downloaded the file. You need this location.
- Install the license. See Install licenses.
Upgrade licenses
If you are eligible for a version upgrade as a benefit of your maintenance, you can download your CSS Renewal license and add it to the License Server.
- At the bottom of the landing page, select Upgrade my licenses.
- Follow the site options and instructions for upgrading your product edition licenses.
- Either download or order new media. An email message provides you with instructions to return to citrix.com to allocate or receive more feature licenses.
- Log on to www.citrix.com to allocate your licenses, generate a license file, download the license file to your License Server, and reread the file.
Hide and unhide licenses
Hiding licenses doesn’t remove them from an account. When you hide licenses, it removes them from view. You might want to hide legacy product licenses. Hiding those licenses increases the visibility of product licenses that you want to view.
- Select the licenses you want to hide.
- From the Select an action menu, choose Hide licenses.
- To unhide licenses, choose Quick find: All hidden and select licenses.
- From the Select an action menu, choose Unhide licenses.
Manage multiple licenses (bulk actions)
You can apply actions to multiple licenses at the same time. Select the check boxes of different licenses and then select and action.
To apply actions to multiple licenses successfully, be aware of the following conditions:
-
You can apply certain actions only to licenses with the same attributes. For example, you can only allocate licenses that have the same binding type. An error message appears when you select licenses that are not compatible for the bulk action. The first license you select is what subsequent selections are compared to for compatibility.
-
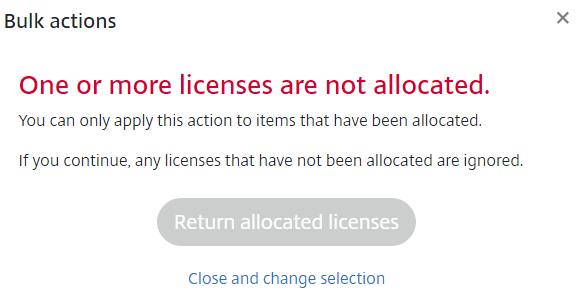
If you select licenses that can’t have an action applied to all of them, some actions might be disabled or not displayed, and a message might appear. For example, if you select two licenses, one that has been allocated and one that has not, a message appears. The message states that the action can apply only to allocated licenses.

Filter licenses
Use the Filter by menu to narrow your list to expired licenses, new licenses, available allocations, or trial licenses. From the Filter by menu, choose how you want to filter your output.
Create a product license report - Export to Excel (CSV)
Select this option to export your full list of assets and data to Excel.
- Select the licenses you want in the report.
- Choose the Export to Excel (.CSV) link. In the View my product page, it’s above the list of products. In the Manage my licenses page, it’s at the bottom of the list.
- Save the file.
In this article
- To access Manage Licenses on citrix.com
- Search for licenses
- Allocate licenses
- Download licenses
- Installing licenses
- Display asset components
- Return allocations
- Modify licenses
- Upgrade licenses
- Hide and unhide licenses
- Manage multiple licenses (bulk actions)
- Filter licenses
- Create a product license report - Export to Excel (CSV)