Easy install
Easy install is supported as of Version 7.13 of the Linux VDA. This feature helps you set up a running environment of the Linux VDA by installing the necessary packages and customizing the configuration files automatically.
Use easy install
To use this feature, do the following:
- Prepare configuration information and the Linux machine.
- Install the Linux VDA package.
Go to the Citrix Virtual Apps and Desktops download page. Expand the appropriate version of Citrix Virtual Apps and Desktops and click Components to download the Linux VDA package that matches your Linux distribution. - Set up the runtime environment to complete the Linux VDA installation.
Step 1: Prepare configuration information and the Linux machine
Collect the following configuration information needed for easy install:
- Host name - Host name of the machine on which the Linux VDA is to be installed
- IP address of Domain Name Server
- IP address or string name of NTP Server
- Domain Name - The NetBIOS name of the domain
- Realm Name - The Kerberos realm name
- FQDN of Active Domain - Fully qualified domain name
Important:
- To install the Linux VDA, verify that the repositories are added correctly on the Linux machine.
- To launch a session, verify that the X Window system and desktop environments are installed.
Considerations
-
The workgroup name, by default, is the domain name. To customize the workgroup in your environment, do the following:
a. Create the /tmp/ctxinstall.conf file on the Linux VDA machine.
b. Add the workgroup=<your workgroup> line to the file and save your changes. -
Centrify does not support pure IPv6 DNS configuration. At least one DNS server using IPv4 is required in /etc/resolv.conf for
adclientto find AD services properly.Log:
 ADSITE   : Check that this machine's subnet is in a site known by AD   : Failed
          : This machine's subnet is not known by AD.
          : We guess you should be in the site Site1.
 <!--NeedCopy-->
This issue is unique to Centrify and its configuration. To resolve this issue, do the following:
a. Open Administrative Tools on the domain controller.
b. Select Active Directory Sites and Services.
c. Add a proper subnet address for Subnets. -
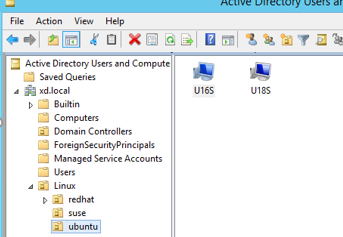
To join your VDA to a specific OU, do the following:
-
Ensure that the specific OU exists on the domain controller.
For an example OU, see the following screen capture
- Create the /tmp/ctxinstall.conf file on the VDA.
-
Add the ou=<your ou> line to the /tmp/ctxinstall.conf file.
OU values vary with different AD methods. See the following table.
OS Winbind SSSD Centrify PBIS RHEL 8 ou=”OU=redhat,OU=Linux” ou=”OU=redhat,OU=Linux” ou=”XD.LOCAL/Linux/redhat” NOT SUPPORTED RHEL 7 ou=”Linux/redhat” ou=”Linux/redhat” ou=”XD.LOCAL/Linux/redhat” ou=”Linux/redhat” Ubuntu ou=”Linux/ubuntu” ou=”Linux/ubuntu” ou=”XD.LOCAL/Linux/ubuntu” ou=”Linux/ubuntu” SUSE 12.5 ou=”Linux/suse” ou=”Linux/suse” ou=”XD.LOCAL/Linux/suse” NOT SUPPORTED Debian ou=”Linux/debian” ou=”Linux/debian” ou=”XD.LOCAL/Linux/debian” ou=”Linux/debian”
-
-
Easy install supports pure IPv6 as of Linux VDA 7.16. The following preconditions and limitations apply:
- Your Linux repository must be configured to ensure that your machine can download required packages over pure IPv6 networks.
- Centrify is not supported on pure IPv6 networks.
Note:
If your network is pure IPv6 and all your input is in proper IPv6 format, the VDA registers with the Delivery Controller™ through IPv6. If your network has a hybrid IPv4 and IPv6 configuration, the type of the first DNS IP address determines whether IPv4 or IPv6 is used for registration.
-
If you choose Centrify as the method to join a domain, the ctxinstall.sh script requires the Centrify package. There are two ways for ctxinstall.sh to get the Centrify package:
-
Easy install helps download the Centrify package from the Internet automatically. The following are the URLs for each distribution:
-
Fetch the Centrify package from a local directory. To designate the directory of the Centrify package, do the following:
a. Create the /tmp/ctxinstall.conf file on the Linux VDA server if it does not exist.
b. Add the “centrifypkgpath=<path name>” line to the file.For example:
 cat /tmp/ctxinstall.conf
 set “centrifypkgpath=/home/mydir”
 ls  -ls  /home/mydir
     9548 -r-xr-xr-x. 1 root root  9776688 May 13  2016 adcheck-rhel4-x86_64
     4140 -r--r--r--. 1 root root  4236714 Apr 21  2016 centrifyda-3.3.1-rhel4-x86_64.rpm
     33492 -r--r--r--. 1 root root 34292673 May 13  2016 centrifydc-5.3.1-rhel4-x86_64.rpm
     4 -rw-rw-r--. 1 root root     1168 Dec  1  2015 centrifydc-install.cfg
     756 -r--r--r--. 1 root root   770991 May 13  2016 centrifydc-ldapproxy-5.3.1-rhel4-x86_64.rpm
     268 -r--r--r--. 1 root root   271296 May 13  2016 centrifydc-nis-5.3.1-rhel4-x86_64.rpm
     1888 -r--r--r--. 1 root root  1930084 Apr 12  2016 centrifydc-openssh-7.2p2-5.3.1-rhel4-x86_64.rpm
     124 -rw-rw-r--. 1 root root   124543 Apr 19  2016 centrify-suite.cfg
     0 lrwxrwxrwx. 1 root root       10 Jul  9  2012 install-express.sh -> install.sh
     332 -r-xr-xr--. 1 root root   338292 Apr 10  2016 install.sh
     12 -r--r--r--. 1 root root    11166 Apr  9  2015 release-notes-agent-rhel4-x86_64.txt
     4 -r--r--r--. 1 root root     3732 Aug 24  2015 release-notes-da-rhel4-x86_64.txt
     4 -r--r--r--. 1 root root     2749 Apr  7  2015 release-notes-nis-rhel4-x86_64.txt
     12 -r--r--r--. 1 root root     9133 Mar 21  2016 release-notes-openssh-rhel4-x86_64.txt
 <!--NeedCopy-->
-
-
If you choose PBIS as the method to join a domain, the ctxinstall.sh script requires the PBIS package. There are two ways for ctxinstall.sh to get the PBIS package:
-
Easy install helps download the PBIS package from the Internet automatically. The following are the URLs for each distribution:
RHEL 7 / CentOS 7: wget https://github.com/BeyondTrust/pbis-open/releases/download/8.8.0/pbis-open-8.8.0.506.linux.x86_64.rpm.sh
Ubuntu/Debian: wget https://github.com/BeyondTrust/pbis-open/releases/download/8.8.0/pbis-open-8.8.0.506.linux.x86_64.deb.sh
-
Fetch a specific version of the PBIS package from the Internet. To do so, change the “pbisDownloadPath” line in the /opt/Citrix/VDA/sbin/ctxinstall.sh file to designate the URL of the PBIS package.
For an example, see the following screen capture:

-
Step 2: Install the Linux VDA package
To set up the environment for the Linux VDA, run the following commands.
For RHEL and CentOS distributions:
sudo yum  -y localinstall   <PATH>/<Linux VDA RPM>
<!--NeedCopy-->
For Ubuntu/Debian distributions:
sudo dpkg -i <PATH>/<Linux VDA deb>
sudo apt-get install -f
<!--NeedCopy-->
Note:
To install the necessary dependencies for a Debian distribution, add the
deb http://deb.debian.org/debian/ oldstable mainline to the /etc/apt/sources.list file.
For SUSE distributions:
zypper -i install <PATH>/<Linux VDA RPM>
<!--NeedCopy-->
Step 3: Set up the runtime environment to complete the installation
Note:
Before setting up the runtime environment, ensure that the
en_US.UTF-8locale has been installed in your OS. If the locale is not available in your OS, run thesudo locale-gen en_US.UTF-8command. For Debian, edit the/etc/locale.genfile by uncommenting the# en_US.UTF-8 UTF-8line and then run thesudo locale-gencommand.
After installing the Linux VDA package, configure the running environment by using the ctxinstall.sh script. You can run the script in interactive mode or silent mode.
Note:
Easy install might seem unresponsive while it downloads .NET Core Runtime that is over 27 MB in size. For the downloading progress, check /var/log/ctxinstall.log.
Interactive mode:
To do a manual configuration, run the following command and type the relevant parameter at each prompt.
sudo /opt/Citrix/VDA/sbin/ctxinstall.sh
<!--NeedCopy-->
Silent mode:
To use easy install in silent mode, set the following environment variables before running ctxinstall.sh.
- CTX_EASYINSTALL_HOSTNAME=host-name – Denotes the host name of the Linux VDA server.
- CTX_EASYINSTALL_DNS=ip-address-of-dns – IP address of DNS.
- CTX_EASYINSTALL_NTPS=address-of-ntps – IP address or string name of the NTP server.
- CTX_EASYINSTALL_DOMAIN=domain-name – The NetBIOS name of the domain.
- CTX_EASYINSTALL_REALM=realm-name – The Kerberos realm name.
- CTX_EASYINSTALL_FQDN=ad-fqdn-name
- CTX_EASYINSTALL_ADINTEGRATIONWAY=winbind | sssd | centrify | pbis – Denotes the Active Directory integration method.
- CTX_EASYINSTALL_USERNAME=domain-user-name – Denotes the name of the domain user; used to join the domain.
- CTX_EASYINSTALL_PASSWORD=password – Specifies the password of the domain user; used to join the domain.
The ctxsetup.sh script uses the following variables:
- CTX_XDL_SUPPORT_DDC_AS_CNAME=Y | N – The Linux VDA supports specifying a Delivery Controller name using a DNS CNAME record.
- CTX_XDL_DDC_LIST=‘list-ddc-fqdns’ – The Linux VDA requires a space-separated list of Delivery Controller Fully Qualified Domain Names (FQDNs) to use for registering with a Delivery Controller. At least one FQDN or CNAME must be specified.
- CTX_XDL_VDA_PORT=port-number – The Linux VDA communicates with Delivery Controllers through a TCP/IP port.
- CTX_XDL_REGISTER_SERVICE=Y | N – The Linux VDA services are started after machine startup.
- CTX_XDL_ADD_FIREWALL_RULES=Y | N – The Linux VDA services require incoming network connections to be allowed through the system firewall. You can automatically open the required ports (by default ports 80 and 1494) in the system firewall for the Linux Virtual Desktop.
- CTX_XDL_HDX_3D_PRO=Y | N – The Linux VDA supports HDX 3D Pro, a set of GPU acceleration technologies designed to optimize the virtualization of rich graphics applications. If HDX 3D Pro is selected, the VDA is configured for VDI desktops (single-session) mode - (that is, CTX_XDL_VDI_MODE=Y).
- CTX_XDL_VDI_MODE=Y | N – Whether to configure the machine as a dedicated desktop delivery model (VDI) or hosted shared desktop delivery model. For HDX 3D Pro environments, set the value to Y.
- CTX_XDL_SITE_NAME=dns-name – The Linux VDA discovers LDAP servers through DNS. To limit the DNS search results to a local Site, specify a DNS Site name. If unnecessary, set to <none>.
- CTX_XDL_LDAP_LIST=‘list-ldap-servers’ – The Linux VDA queries DNS to discover LDAP servers. If DNS cannot provide LDAP service records, you can provide a space-separated list of LDAP FQDNs with LDAP ports. For example, ad1.mycompany.com:389. If unnecessary, set to <none>.
- CTX_XDL_SEARCH_BASE=search-base-set – The Linux VDA queries LDAP through a search base set to the root of the Active Directory Domain (for example, DC=mycompany,DC=com). To improve search performance, you can specify a search base (for example, OU=VDI,DC=mycompany,DC=com). If unnecessary, set to <none>.
- CTX_XDL_FAS_LIST=‘list-fas-servers’ – The Federated Authentication Service (FAS) servers are configured through AD Group Policy. The Linux VDA does not support AD Group Policy, but you can provide a semicolon-separated list of FAS servers instead. The sequence must be the same as configured in AD Group Policy. If any server address is removed, fill its blank with the <none> text string and do not modify the order of server addresses.
-
CTX_XDL_DOTNET_RUNTIME_PATH=path-to-install-dotnet-runtime – The path to install .NET Core Runtime 3.1 for supporting the new broker agent service (
ctxvda). The default path is /usr/bin. - CTX_XDL_START_SERVICE=Y | N – Whether or not the Linux VDA services are started when the configuration is complete.
- CTX_XDL_TELEMETRY_SOCKET_PORT – The socket port for listening for Citrix Scout. The default port is 7503.
- CTX_XDL_TELEMETRY_PORT – The port for communicating with Citrix Scout. The default port is 7502.
If any parameters are not set, the installation rolls back to interactive mode, with a prompt for user input. When all parameters are already set through the environment variables, the ctxinstall.sh script still prompts for user input for the path to install .NET Core Runtime 3.1.
In silent mode, you must run the following commands to set environment variables and then run the ctxinstall.sh script.
export CTX_EASYINSTALL_HOSTNAME=host-name

export CTX_EASYINSTALL_DNS=ip-address-of-dns

export CTX_EASYINSTALL_NTPS=address-of-ntps

export CTX_EASYINSTALL_DOMAIN=domain-name

export CTX_EASYINSTALL_REALM=realm-name

export CTX_EASYINSTALL_FQDN=ad-fqdn-name

export CTX_EASYINSTALL_ADINTEGRATIONWAY=winbind | sssd | centrify | pbis

export CTX_EASYINSTALL_USERNAME=domain-user-name

export CTX_EASYINSTALL_PASSWORD=password

export CTX_XDL_SUPPORT_DDC_AS_CNAME=Y | N

export CTX_XDL_DDC_LIST=‘list-ddc-fqdns’

export CTX_XDL_VDA_PORT=port-number

export CTX_XDL_REGISTER_SERVICE=Y | N

export CTX_XDL_ADD_FIREWALL_RULES=Y | N

export CTX_XDL_HDX_3D_PRO=Y | N

export CTX_XDL_VDI_MODE=Y | N

export CTX_XDL_SITE_NAME=dns-site-name | '<none>'

export CTX_XDL_LDAP_LIST=‘list-ldap-servers’ | '<none>'

export CTX_XDL_SEARCH_BASE=search-base-set | '<none>'

export CTX_XDL_FAS_LIST=‘list-fas-servers’ | '<none>'

export CTX_XDL_DOTNET_RUNTIME_PATH=path-to-install-dotnet-runtime

export CTX_XDL_TELEMETRY_SOCKET_PORT=port-number

export CTX_XDL_TELEMETRY_PORT=port-number

export CTX_XDL_START_SERVICE=Y | N

sudo -E /opt/Citrix/VDA/sbin/ctxinstall.sh
<!--NeedCopy-->
When running the sudo command, type the -E option to pass the existing environment variables to the new shell it creates. We recommend that you create a shell script file from the preceding commands with #!/bin/bash as the first line.
Alternatively, you can specify all parameters by using a single command:
sudo CTX_XDL_SUPPORT_DDC_AS_CNAME=Y|N \

CTX_XDL_DDC_LIST=‘list-ddc-fqdns’ \

CTX_XDL_VDA_PORT=port-number \

CTX_XDL_REGISTER_SERVICE=Y|N \

CTX_XDL_ADD_FIREWALL_RULES=Y|N \

CTX_XDL_AD_INTEGRATION=1|2|3|4 \

CTX_XDL_HDX_3D_PRO=Y|N \

CTX_XDL_VDI_MODE=Y|N \

CTX_XDL_SITE_NAME=dns-name \

CTX_XDL_LDAP_LIST=‘list-ldap-servers’ \

CTX_XDL_SEARCH_BASE=search-base-set \

CTX_XDL_FAS_LIST=‘list-fas-servers’ \

CTX_XDL_DOTNET_RUNTIME_PATH=path-to-install-dotnet-runtime \

CTX_XDL_TELEMETRY_SOCKET_PORT=port-number \

CTX_XDL_TELEMETRY_PORT=port-number \

CTX_XDL_START_SERVICE=Y|N \

/opt/Citrix/VDA/sbin/ctxsetup.sh
<!--NeedCopy-->
Troubleshooting
Use the information in this section to troubleshoot issues that can arise from using this feature.
Joining a domain by using SSSD fails
An error might occur when you attempt to join a domain, with the output similar to the following (verify logs for screen printing):
Step 6: join Domain!Enter ctxadmin's password:Failed to join domain: failed to lookup DC info for domain 'CITRIXLAB.LOCAL' over rpc: The network name cannot be found
/var/log/xdl/vda.log:
2016-11-04 02:11:52.317 [INFO ] - The Citrix Desktop Service successfully obtained the following list of 1 delivery controller(s) with which to register: 'CTXDDC.citrixlab.local (10.158.139.214)'.
2016-11-04 02:11:52.362 [ERROR] - RegistrationManager.AttemptRegistrationWithSingleDdc: Failed to register with http://CTXDDC.citrixlab.local:80/Citrix/CdsController/IRegistrar. Error: General security error (An error occurred in trying to obtain a TGT: Client not found in Kerberos database (6))
2016-11-04 02:11:52.362 [ERROR] - The Citrix Desktop Service cannot connect to the delivery controller 'http://CTXDDC.citrixlab.local:80/Citrix/CdsController/IRegistrar' (IP Address '10.158.139.214')
Check the following:- The system clock is in sync between this machine and the delivery controller.
-  The Active Directory provider (e.g. winbind daemon) service is running and correctly configured.
-  Kerberos is correctly configured on this machine.
If the problem persists, please refer to Citrix Knowledge Base article CTX117248 for further information.
Error Details:
Exception 'General security error (An error occurred in trying to obtain a TGT: Client not found in Kerberos database (6))' of type 'class javax.xml.ws.soap.SOAPFaultException'.
2016-11-04 02:11:52.362 [INFO ] - RegistrationManager.AttemptRegistrationWithSingleDdc: The current time for this VDA is Fri Nov 04 02:11:52 EDT 2016.
Ensure that the system clock is in sync between this machine and the delivery controller.
Verify the NTP daemon is running on this machine and is correctly configured.
2016-11-04 02:11:52.364 [ERROR] - Could not register with any controllers. Waiting to try again in 120000 ms. Multi-forest - false
2016-11-04 02:11:52.365 [INFO ] - The Citrix Desktop Service failed to register with any controllers in the last 470 minutes.
<!--NeedCopy-->
/var/log/messages:
Nov 4 02:15:27 RH-WS-68 [sssd[ldap_child[14867]]]: Failed to initialize credentials using keytab [MEMORY:/etc/krb5.keytab]: Client 'RH-WS-68$@CITRIXLAB.LOCAL' not found in Kerberos database. Unable to create GSSAPI-encrypted LDAP connection.Nov 4 02:15:27 RH-WS-68 [sssd[ldap_child[14867]]]: Client 'RH-WS-68$@CITRIXLAB.LOCAL' not found in Kerberos database
To resolve this issue:
- Run the
rm -f /etc/krb5.keytabcommand. - Run the
net ads leave $REALM -U $domain-administratorcommand. - Remove the machine catalog and delivery group on the Delivery Controller.
- Run /opt/Citrix/VDA/sbin/ctxinstall.sh.
- Create the machine catalog and delivery group on the Delivery Controller.
Ubuntu desktop sessions show a gray screen
This issue occurs when you launch a session that is then blocked in a blank desktop. In addition, the console of the machine also shows a gray screen when you log on by using a local user account.
To resolve this issue:
- Run the
sudo apt-get updatecommand. - Run the
sudo apt-get install unity lightdmcommand. - Add the following line to
/etc/lightdm/lightdm.conf:
greeter-show-manual-login=true
Attempts to launch Ubuntu desktop sessions fail due to a missing home directory
/var/log/xdl/hdx.log:
2016-11-02 13:21:19.015 <P22492:S1> citrix-ctxlogin: StartUserSession: failed to change to directory(/home/CITRIXLAB/ctxadmin) errno(2)

2016-11-02 13:21:19.017 <P22227> citrix-ctxhdx: logSessionEvent: Session started for user ctxadmin.

2016-11-02 13:21:19.023 <P22492:S1> citrix-ctxlogin: ChildPipeCallback: Login Process died: normal.

2016-11-02 13:21:59.217 <P22449:S1> citrix-ctxgfx: main: Exiting normally.
<!--NeedCopy-->
Tip:
The root cause of this issue is that the home directory is not created for the domain administrator.
To resolve this issue:
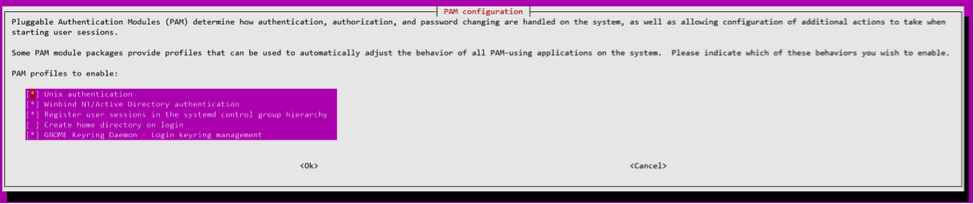
-
From a command line, type pam-auth-update.
-
In the resulting dialog, verify that Create home directory login is selected.
Session does not launch or ends quickly with dbus error
/var/log/messages (for RHEL or CentOS):
Oct 27 04:17:16 CentOS7 citrix-ctxhdx[8978]: Session started for user CITRIXLAB\ctxadmin.

Oct 27 04:17:18 CentOS7 kernel: traps: gnome-session[19146] trap int3 ip:7f89b3bde8d3 sp:7fff8c3409d0 error:0

Oct 27 04:17:18 CentOS7 gnome-session[19146]: ERROR: Failed to connect to system bus: Exhausted all available authentication mechanisms (tried: EXTERNAL, DBUS_COOKIE_SHA1, ANONYMOUS) (available: EXTERNAL, DBUS_COOKIE_SHA1, ANONYMOUS)#012aborting...

Oct 27 04:17:18 CentOS7 gnome-session: gnome-session[19146]: ERROR: Failed to connect to system bus: Exhausted all available authentication mechanisms (tried: EXTERNAL, DBUS_COOKIE_SHA1, ANONYMOUS) (available: EXTERNAL, DBUS_COOKIE_SHA1, ANONYMOUS)

Oct 27 04:17:18 CentOS7 gnome-session: aborting...

Oct 27 04:17:18 CentOS7 citrix-ctxgfx[18981]: Exiting normally.

Oct 27 04:17:18 CentOS7 citrix-ctxhdx[8978]: Session stopped for user CITRIXLAB\ctxadmin.
<!--NeedCopy-->
Or, alternately for Ubuntu distributions, use the log /var/log/syslog:
Nov  3 11:03:52 user01-HVM-domU pulseaudio[25326]: [pulseaudio] pid.c: Stale PID file, overwriting.

Nov  3 11:03:52 user01-HVM-domU pulseaudio[25326]: [pulseaudio] bluez5-util.c: Failed to get D-Bus connection: Did not receive a reply. Possible causes include: the remote application did not send a reply, the message bus security policy blocked the reply, the reply timeout expired, or the network connection was broken.

Nov  3 11:03:52 user01-HVM-domU pulseaudio[25326]: [pulseaudio] hashmap.c: Assertion 'h' failed at pulsecore/hashmap.c:116, function pa_hashmap_free(). Aborting.

Nov  3 11:03:52 user01-HVM-domU pulseaudio[25352]: [pulseaudio] core-util.c: Failed to connect to system bus: Did not receive a reply. Possible causes include: the remote application did not send a reply, the message bus security policy blocked the reply, the reply timeout expired, or the network connection was broken.

Nov  3 11:03:52 user01-HVM-domU pulseaudio[25352]: message repeated 10 times: [ [pulseaudio] core-util.c: Failed to connect to system bus: Did not receive a reply. Possible causes include: the remote application did not send a reply, the message bus security policy blocked the reply, the reply timeout expired, or the network connection was broken.]

Nov  3 11:03:52 user01-HVM-domU pulseaudio[25352]: [pulseaudio] pid.c: Daemon already running.Nov  3 11:03:58 user01-HVM-domU citrix-ctxgfx[24693]: Exiting normally
<!--NeedCopy-->
Some groups or modules do not take effect until a restart. If the dbus error messages appear in the log, we recommend that you restart the system and retry.
SELinux prevents SSHD from accessing the home directory
The user can launch a session but cannot log on.
/var/log/ctxinstall.log:
Jan 25 23:30:31 yz-rhel72-1 setroubleshoot[3945]: SELinux is preventing /usr/sbin/sshd from setattr access on the directory /root. For complete SELinux messages. run sealert -l 32f52c1f-8ff9-4566-a698-963a79f16b81

Jan 25 23:30:31 yz-rhel72-1 python[3945]: SELinux is preventing /usr/sbin/sshd from setattr access on the directory /root.

*****  Plugin catchall_boolean (89.3 confidence) suggests   ******************

If you want to allow polyinstantiation to enabled

   Then you must tell SELinux about this by enabling the 'polyinstantiation_enabled' boolean.

You can read 'None' man page for more details.

    Do

       setsebool -P polyinstantiation_enabled 1

*****  Plugin catchall (11.6 confidence) suggests   **************************

If you believe that sshd should be allowed setattr access on the root directory by default.

Then you should report this as a bug.

You can generate a local policy module to allow this access.

      Do

       allow this access for now by executing:

       # grep sshd /var/log/audit/audit.log | audit2allow -M mypol

# semodule -i mypol.pp
<!--NeedCopy-->
To resolve this issue:
-
Disable SELinux by making the following change to /etc/selinux/config.
SELINUX=disabled
-
Restart the VDA.