Configure Linux Streaming
You can provision Linux virtual desktops directly in the XenDesktop environment. Consider the following:
- In some cases, the client drive cannot be mapped to a provisioned Linux VM session. To resolve this issue, halt the CDM service (service ctxcdm stop) before installing the PVS target device, then run the pvs-imager command to convert it.
- Linux streaming only supports winbind as the tool for joining a Windows domain.
- When you enable RAM cache for the Linux device, set the cache size to 8 MB (the minimum value). Linux uses as much RAM as necessary, including all available memory, for the write cache. The amount specified in the console is the amount reserved up front. Citrix recommends that you reserve as little as possible, which effectively allows Linux to manage memory usage.
- The target device name in the Provisioning Services imager UI typically defaults to im_localhost which must be changed when you create more than one vDisk. Using the same target device name may cause the Provisioning Services imager command to fail.
- Installation (and subsequent updates) must be done in super user mode. There are two ways to do this:
- Enter user mode in a terminal using the su command. You must do this once for a terminal session.
- Enter sudo before the command. For example, sudo yum install tdb-tools; do this for every command.
- The Linux client’s system clock must be synchronized by using the active directory controller.
- UEFI is not supported.
- VMM is not supported.
- The write cache drive must have the label PVS_Cache for it to be used as a write cache. The entire partition is used.
- English localizations are displayed on non-English installations.
- SE Linux is not supported.
- Targets running on XenServer must run in HVM mode.
- When booting SUSE targets on ESX, the targets may intermittently fail on boot, with an error message indicating an I/O error related to attempts to send data on a closed socket. This issue eventually halts the boot operation and shuts down the file system. Forcefully rebooting causes the target to boot successfully. This issue may occur when the hypervisor’s clock offset for the new VM does not match the offset for the original VM; the NTP configuration prevents it from updating the clock if the skew is greater and the default maximum. In these cases, the administrator should configure images to perform an initial clock set with ntpdate early in the boot process. For more information, refer to the NTP article concerning clock variations and the NTP information provided here.
Tip
XenServer supports SUSE distributions, however, the SUSE template does not provide support for PXE booting. PVS only supports those distributions that work with the hypervisor.
- After booting a Linux target device, a warning message might display indicating a SE Linux Alert Browser.
- The following Linux distributions are now supported:
- Ubuntu 16.04, 16.04.01 and 16.04.02 with the 4.4.x kernel. When using these distributions for Linux streaming, consider that the PVS installer requires that the Linux kernel package be version be greater than or equal to version 4.4.0.53. The PVS installer automatically provides the correct version during the installation process.
- RedHat Enterprise Linux Server 7.2
- CentOS 7.2
- SUSE Linux Enterprise Server (SLES) 12.1, 12.2
Important
The default kernel used for Ubuntu 16.04.2 is version 4.8; this kernel version is not currently supported.
Installation options
To install the Linux Streaming component, you must be logged in while an administrator. If installing, consider that the following commands must be issued in a root shell, or by using sudo privileges.
Note
A self-signed certificate must be created if streaming Provisioning Services Linux target devices. The link among the Provisioning Services Soap server uses an SSL connection which requires that you configure an X.509 certificate on the Soap server.
The certificate’s CA must also be present on the Provisioning Services server and the Linux target device. For information on creating a self-signed certificate, see Creating self-signed certificates for Linux streaming.
For RedHat/CentOS distributions:
yum --nogpgcheck localinstall pvs_RED_HAT_<package version>.rpm
Installation is done using a GUI or through the command line. To use the GUI, you must install PyQT4 using your preferred method for installing third party Python modules.
Note
See the Python Wiki for more information on PyQT4 bindings.
For Ubuntu desktop distributions:
sudo dpkg -i pvs-<version>.deb

sudo apt-get -yf install
Tip
A self-signed certificate must be created if streaming Provisioning Services Linux target devices. The link among the Provisioning Services Soap server uses an SSL connection which requires that you configure an X.509 certificate on the Soap server.
The certificate’s CA must also be present on the Provisioning Services server and the Linux target device. For information on creating a self-signed certificate, see Creating self-signed certificates for Linux streaming.
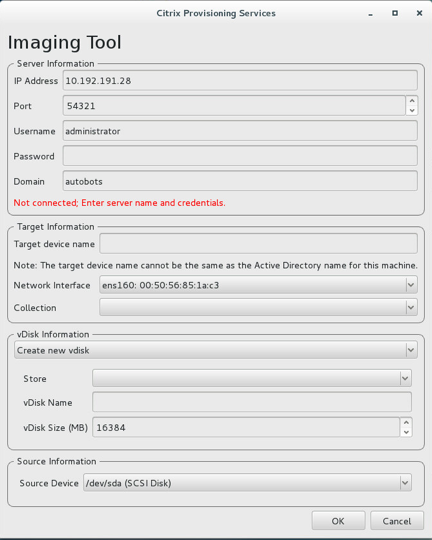
Using the GUI to create a Linux golden image
To invoke the GUI to install this feature:
- Log in while an administrator.
- Execute the following:
pvs-imager
Tip
When the pvs-imager command fails due to a hostname issue, verify that your network configuration is correct. The system’s hostname should not be set to localhost.
After executing the command, the UI page displays:
Using the command line interface to install the Linux streaming feature
To invoke the command line to install this feature:
- Log in while an administrator.
- Execute the following command:
pvs-imager -C
The command-line installation includes two options:
- -C allows you to create a vDisk
- -U allows you to update an existing vDisk
The image below illustrates non-GUI related installation options for the Linux Streaming feature:
Usage: ./pvs-imager [-hCU] [-a|--address=<IPaddr>] [-u|--username=<username>] [-p|--password=<password>] [-P|--port=<port>] [-d|--domain=<domain] [-S|--store=<store>] [-v|--vdisk=<vdisk name>] [-s|--size=<vdisk size] [-D|--device=<sourceDevice>] [-c|--collection=<collection>] [-n|--name=<name>]

  Non-GUI Modes:
    -C            -    Create a new vDisk
        ---OR----
    -U            -    Update an existing vDisk

  General Options:
    -a <server IP>  -    Address or hostname of PVS server
    -u <username>   -    Username for API login
    -p <password>   -    Password for API login
    -d <domain>     -    AD domain for API login
    -P <port>       -    Base port for API login (default: 54321)
    -S <store>      -    Store containing vDisk
    -c <collection> -    Collection to store imaging device in
    -n <name>       -    Device name for imaging device
    -v <name>       -    vDisk name
    -s <size>       -    vDisk size (Create Mode only, default: sourceDevice size)
    -D <sourceDev>  -    devnode to clone
    -V              -    increment debug verbosity (up to 5 times)
    -g <grubMode>   -    Supported Grub settings ( 'debug' )
Note
Supported file systems for imaging are ext4, xfs, or btrfs.
Tip
Log files related to Provisioning Services can be found in /run/pvs/pvsvdd.log.
About disk caching
If you are not using the XenDesktop Setup Wizard, to use hard disk caching or hard disk overflow caching, the target device must have a disk by using a formatted partition by using the label ‘PVS_Cache.’ This object can be created with the mkfs –L ‘PVS_Cache’ command on the target device. Any case-sensitive file system can be used for the cache, but XFS is recommended.
Tip
An administrator can create any cache disk selection logic for their environment by writing a bash script that runs at launch time. The script would look for a cache device candidate by whatever mechanism is best suited to the environment, running mkfs on it, and rebooting.