-
-
-
Selecting the write cache destination for standard vDisk images
-
Converting BIOS vDisks to UEFI
-
-
This content has been machine translated dynamically.
Dieser Inhalt ist eine maschinelle Übersetzung, die dynamisch erstellt wurde. (Haftungsausschluss)
Cet article a été traduit automatiquement de manière dynamique. (Clause de non responsabilité)
Este artículo lo ha traducido una máquina de forma dinámica. (Aviso legal)
此内容已经过机器动态翻译。 放弃
このコンテンツは動的に機械翻訳されています。免責事項
이 콘텐츠는 동적으로 기계 번역되었습니다. 책임 부인
Este texto foi traduzido automaticamente. (Aviso legal)
Questo contenuto è stato tradotto dinamicamente con traduzione automatica.(Esclusione di responsabilità))
This article has been machine translated.
Dieser Artikel wurde maschinell übersetzt. (Haftungsausschluss)
Ce article a été traduit automatiquement. (Clause de non responsabilité)
Este artículo ha sido traducido automáticamente. (Aviso legal)
この記事は機械翻訳されています.免責事項
이 기사는 기계 번역되었습니다.책임 부인
Este artigo foi traduzido automaticamente.(Aviso legal)
这篇文章已经过机器翻译.放弃
Questo articolo è stato tradotto automaticamente.(Esclusione di responsabilità))
Translation failed!
Converting BIOS vDisks to UEFI
This article explains how to convert the BIOS vDisks to UEFI. This conversion is important because BIOS support is removed in Citrix Provisioning version 2311 and onwards.
There are two approaches to convert an existing vDisk from BIOS format to UEFI:
-
Convert the vDisk directly: Copy the
VHD(X)file, mount it, convert, and then import the new file. - Convert the vDisk using reverse imaging: Reverse image the vDisk to a master VM, reboot from the local disk, convert, and then create a new image.
Important:
In both the approaches, ensure that:
- There is sufficient free space
- The disk is defragmented before starting. You can do this step either after reverse imaging or before merging the vDisk to a single version.
Image Portability Service can be used to automate the conversion to UEFI. For more information, see Convert to UEFI.
Convert the vDisk directly
Do the following steps to convert the vDisk directly:
- Ensure that the disk is defragmented and merged down to a single base version.
- Copy the
.VHD(X)file to a new file in the store. - Run disk management in windows and attach the
VHD. -
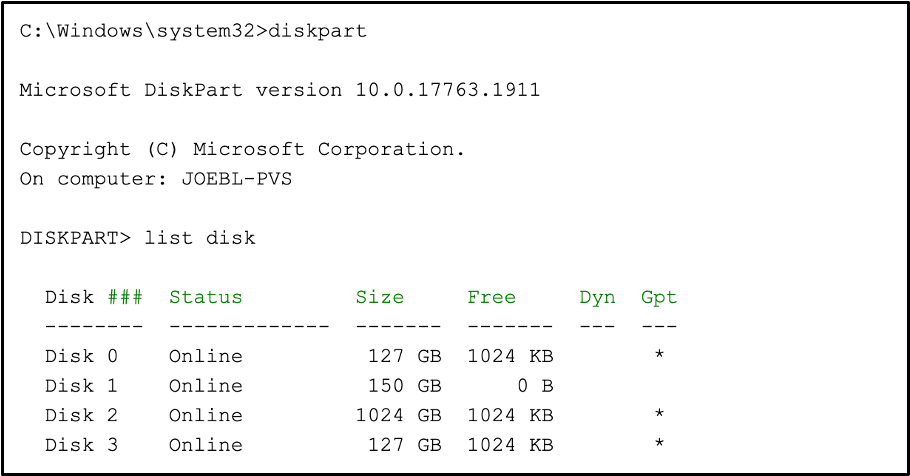
Run
diskpartto determine the disk number of the mounted disk.
-
Run the following command to convert the mounted vdisk file to UEFI (GPT).
mbr2gpt /convert /disk:3 /allowFullOS <!--NeedCopy--> - Unmount the
VHDfile and import into the Citrix Provisioning store.
Convert the vDisk using reverse imaging
Do the following steps to Convert the vDisk using reverse imaging:
- Reverse image to a master VM setup as BIOS with a local disk that is large enough.
- Reboot the VM from the local disk (change the boot order) and log on as an administrator.
- Run
diskpartto confirm the disk number. The number must be zero. -
Run the following command to convert the disk to UEFI (GPT).
mbr2gpt /convert /disk:0 /allowFullOS <!--NeedCopy--> - Shut down the VM.
-
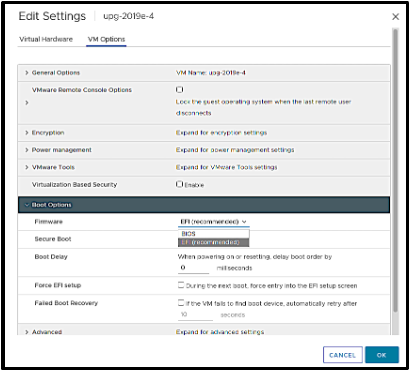
Update the hypervisor configuration for the VM to use UEFI. For example:
- With VMware as a hypervisor, go to the VM Edit Settings and from the VM Options tab> Boot Options section, select the firmware type as EFI.

-
With XenServer as the hypervisor:
-
Determine the UUID of the original VM. You can get the UUID from XenCenter or use the
xe vm-list name-label="VM NAME"as shown:[root@xenserver01 ~]# xe vm-list name-label="Windows 10 BIOS" uuid ( RO) : e98a0a89-2fb9-886b-a843-b8a08642afa4 name-label ( RW): Windows 10 BIOS power-state ( RO): halted <!--NeedCopy--> -
Set the VM to use UEFI boot with
xe vm-param-set uuid=UUID HVM-boot-params:firmware=uefias shown:[root@xenserver01 ~]# xe vm-param-set uuid=e98a0a89-2fb9-886b-a843-b8a08642afa4 HVM-boot-params:firmware=uefi <!--NeedCopy-->
-
- Boot the VM and run the Imaging Wizard to create a new vDisk for the converted disk.
Share
Share
In this article
This Preview product documentation is Citrix Confidential.
You agree to hold this documentation confidential pursuant to the terms of your Citrix Beta/Tech Preview Agreement.
The development, release and timing of any features or functionality described in the Preview documentation remains at our sole discretion and are subject to change without notice or consultation.
The documentation is for informational purposes only and is not a commitment, promise or legal obligation to deliver any material, code or functionality and should not be relied upon in making Citrix product purchase decisions.
If you do not agree, select I DO NOT AGREE to exit.