Data Loss Prevention
Data Loss Prevention (DLP) features in ShareFile let you restrict access and sharing based on the content found within a file.
You can scan the documents uploaded to your storage zone using any third-party DLP security suite that supports ICAP, a standard network protocol for inline content scanning. Then you adjust the sharing and access privileges based on the results of the DLP scan and your preferences for how strictly you want to control access.
Supported DLP systems
Storage zones controller uses the ICAP protocol to interact with third-party DLP solutions. Using ShareFile with an existing DLP solution requires no changes to existing policies or servers. You might want, however, to dedicate ICAP servers for processing ShareFile data if you expect the load to be significant.
Popular ICAP-compliant DLP solutions include:
- Symantec Data Loss Prevention
- McAfee DLP Prevent
- Websense TRITON AP-DATA
Because ShareFile uses your existing DLP security suite, you can maintain a single point of policy management for data inspection and security alerts. If you already use one of the preceding solutions for scanning outgoing email attachments or web traffic for sensitive data, you can point the ShareFile storage zones controller to the same server. For these existing DLP systems, we also support secure ICAP (ICAPS) if the underlying DLP system itself supports ICAPS.
Enable DLP
To enable DLP for ShareFile and storage zones controller, perform the following three actions:
- Enable DLP capabilities on your ShareFile account.
- Enable DLP on your storage zones controller server.
- Configure the allowed actions for each file classification.
These actions are described in detail in the following sections.
Enable DLP capabilities on your ShareFile account
To request or confirm that your ShareFile subdomain is enabled for DLP, send a request to Citrix Support.
For some accounts, enabling DLP might also require enabling a newer user experience for the ShareFile website. After your account is enabled for DLP, you can proceed with enabling DLP on your storage zones controller server.
Enable DLP on your storage zones controller server
Use the following steps to configure DLP settings on your storage zones controller deployment:
- Install or upgrade to storage zones controller 5.3 or later.
- In the storage zones controller console
http://*localhost*/configservice/login.aspx, click the ShareFile Data tab. Click Modify if the zone exists. -
Select the Enable DLP Integration check box and type the ICAP address of your DLP server in the ICAP REQMOD URL field. The address format is:
icap://\<*name or IP address of your DLP server*\>:\<*port*\>/reqmod OR *icaps://\<name or IP address of your DLP server\>:\<port\>/reqmod* The default ICAP port is 1344 (non-secure DLP) and the default ICAPS port is 11344 (secure DLP). For example, if your DLP server is dlp-server.example.com, type the following into the ICAP REQMOD URL field: icap://*dlp-server.example.com*:1344/reqmod OR *icaps://dlp-server.example.com:11344/reqmod* <!--NeedCopy--> - Click Save or Register.
After enabling DLP, confirm that the DLP server is reachable by checking the DLP ICAP Server Status entry on the Monitoring tab.
Control access based on DLP scan results
After DLP is enabled on the account and storage zones controller, every version of every file uploaded to the DLP-enabled storage zone will be scanned for sensitive content. The results of the scan are stored in the ShareFile database as a data classification.
DLP settings constrain the normal permissions and sharing controls available for files based on their DLP classification. When sharing a document, a user can still choose to block anonymous access even if DLP settings would allow them to share it anonymously. But if the user attempts to share a file in a way that would violate DLP settings, ShareFile prevents them from doing so.
The data classifications are:
- Scanned: OK – Files that were scanned by a DLP system and passed OK.
- Scanned: Rejected – Files that were scanned by a DLP system and were found to contain sensitive data.
- Unscanned – Files that have not been scanned.
The Unscanned classification applies to all documents stored in Citrix-managed storage zones or other storage zones where DLP is not enabled. The classification also applies to files in the DLP-enabled storage zones that were uploaded before DLP is configured. The classification also applies to files that are waiting to be scanned because the external DLP system is unavailable or slow to respond.
Each item’s classification is determined by the ICAP server response rule. If the DLP ICAP server responds with a message that the content should be blocked or removed, the file is marked as Scanned: Rejected. Otherwise, the file is marked as Scanned: OK.
For each data classification, you can set different access and sharing restrictions. For each of the three categories, the ShareFile administrator chooses which actions to allow:
- Employees can download or share the file.
- Third-party client users can download or share the file. Client sharing is disabled by default but can be enabled under Admin > Advanced Preferences > Allow clients to share files.
- Anonymous users can download the file
When a user shares a file, only users with download permissions can receive the file. Therefore, when you enable the sharing permission for a data classification, you must also grant at least one class of user download permission.
To configure DLP settings in ShareFile
- In the ShareFile web interface, click Admin > Data Loss Prevention.
- Change the option for Limit access to files based on their content to Yes.
- Configure the allowed actions for each data classification.
Important:
The ShareFile On-Demand Sync tool requires download permissions for normal operation. Enable employee downloads for all content classifications if your deployment includes ShareFile On-Demand Sync.
When the storage zones controller sends a file to the DLP system, it includes metadata indicating the owner of the file. The file also includes the folder path where the file resides in ShareFile. This information allows the DLP server administrator to view details specific to ShareFile about files that contain sensitive content.
Advanced settings for DLP
To adjust the DLP scanning process, edit the settings file found on your storage zones controller at wwwroot\Citrix\StorageCenter\SCDLPScanSvc\appSettings.config. The following table describes each setting related to DLP.
| Setting | Description | Default value |
|---|---|---|
| scan-interval | How frequently the DLP service checks the DLP queue for new files and sends them to the DLP ICAP server for processing. | 30 seconds |
| icap-response-timeout | How long the storage zones controller waits for an ICAP response before marking the ICAP server as unavailable. | 30 seconds |
| icap-exclude-extensions | Comma-separated list of extensions to exclude from DLP scanning. The DLP server does not process files with names ending in one of these extensions, but marks the files as Scanned: OK. Example value: “exe,jpg,bin,mov” | None |
| icap-max-file-size-bytes | Maximum size of file (in bytes) to send to the DLP server for processing. A value of 0 means that there is no maximum and all file sizes are sent. When configured with a non-zero value, the DLP server does not process files larger than the configured size, but are marked as Scanned: OK. | 31457280 (30 MB) |
| x-queue-items-to-process | The maximum number of queued items to scan per each scan-interval iteration. Decrease this value to mitigate the impact on your DLP server when a large number of files is added to the StorageZone. | 512 |
| max-queue-processing-threads | Maximum number of concurrent processor threads to use for draining the DLP scan queue. Set this value based on the maximum number of simultaneous connections allowed to your ICAP server. It should be within reasonable limits to avoid blocking other network services that use the same ICAP server. | 4 |
| Icap-reqmod-http-request-verb | By default, network calls are made with the PUT verb. You might change this setting to POST if needed. | PUT |
DLPExistingFiles tool
ShareFile storage zones controller provides options to integrate the storage center with Data Loss Prevention (DLP) providers through ICAP.
ICAP services, however, work through queues which get populated only by newly created files. This means files existing in a zone before ICAP is enabled won’t be scanned by the services. This tool helps queue up those files for scanning, and also can queue up scanned files for rescanning.
As the name states, the tool only works for the DLP ICAP service.
Requirements
The tool is a PowerShell script and hence needs PowerShell to run. PsExec or a similar tool is also needed as the script needs to be run as Network Service for access to the network share location.
Location
For an installed storage zones controller, the tool can be found at <storage zones controller installation location>\Tools\DLPExistingFiles\DLPExistingFiles.ps1. The storage zones controller installation location is by default C:\inetpub\wwwroot\Citrix\StorageCenter.
Considerations before running the tool
The tool might need to run multiple times for a single operation depending on the following.
- The limitations provided for the queue size limit.
- The number of items for the given criteria. This consideration is true unless the queue size limit is set to zero or less. In that case, the tool assumes a maximum size of 200,000 items in the queue directory.
For instance, if the tool is being used to queue up unscanned items, the queue size limit is set at 500 items. When there are more than 500 unscanned items, the tool stops after 500 items get filled up in the queue. To track of where it stopped, the tool stores the creation date of the last retrieved item. The tool stores the date in a temporary file at <storage zones controller installation location>\SC with the name DLPExistingFiles-enddate.temp.
Before each run, the tool looks for this file. If the file is present, the tool uses the creation date in it as the marker for the next batch of files. The tool doesn’t delete the temp file on completion of a certain operation. Instead, the zone administrator can delete the file once all batches for a certain operation are completed. Due to this situation, when a full operation is completed, the temporary file, if present, should be manually removed before performing another different operation.
Running the tool with PsExec
Open a Command window and run PsExec using the following command.
PsExec.exe -i -u "nt authority\network service"

"C:\WINDOWS\SysWOW64\WindowsPowerShell\v1.0\powershell.exe"
<!--NeedCopy-->
This opens up PowerShell running as Network Service. To verify that it is indeed running as Network Service, run whoami and check the result.
Once PowerShell is open, run the tool there directly to perform any necessary task.
<storage zones controller installation location>\Tools\DLPExistingFiles\DLPExistingFiles.ps1 <options>
<!--NeedCopy-->
Command-line options
The following options are available for running the tool:
-
-runscan (Required): This option is used to specify which kind of files to queue up for scanning. Suboptions:
- Unscanned: Unscanned files. For example, pre-DLP era files that weren’t scanned.
- ScannedOK: Scanned files that have been marked as clean.
- ScannedRejected: Scanned files that have been marked as not clean.
- Scanned: All scanned files.
- -queueLimit (Optional): This option is used to specify the number of items allowed in the queue before the tool stops.
- -date (Optional): The maximum creation date of the items to be queued up for scanning. For instance if the date is specified as “10/30/2017 11:30 AM”, only those files which were created before this date/time will be queued up for scanning.
Examples:
For all the examples, open PowerShell as Network Service through PsExec. For instructions, see the steps earlier in this article.
To queue up unscanned items in a zone, run the following command.
<storage zones controller installation location>\Tools\DLPExistingFiles\DLPExistingFiles.ps1 -runscan Unscanned
<!--NeedCopy-->
To queue up all scanned items within a zone with a queue limit of 100, run the following command.
<storage zones controller installation location>\Tools\DLPExistingFiles\DLPExistingFiles.ps1 -runscan Scanned -queueLimit 100
<!--NeedCopy-->
To queue up all scanned items created before 11:30 AM on 10/30/2017 with the following characteristics: marked as clean, in a zone with a queue limit of 200, run the following command.
<storage zones controller installation location>\Tools\DLPExistingFiles\DLPExistingFiles.ps1 -runscan ScannedOK -queueLimit 200 -date "10/30/2017 11:30 AM"
<!--NeedCopy-->
Disable DLP
To disable DLP for ShareFile and storage zones controller, perform the following actions:
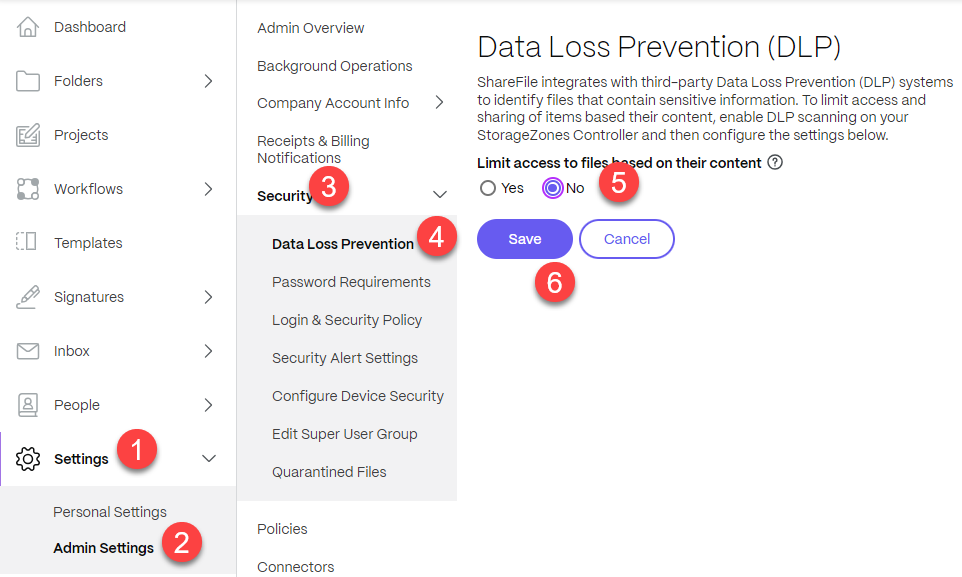
- Log into your Sharefile account and click on Settings.
- From the drop-down list that opens, select Admin Settings.
- From the menu that opens click on Security.
- From the Security menu, choose the Data Loss Prevention option.
- From the DLP screen, go to the Limit access to files based on their content section and click on No.
- Select Save.