Enable VNC for Linux VMs
VMs might not be set up to support Virtual Network Computing (VNC), which XenServer uses to control VMs remotely, by default. Before you can connect with XenCenter, ensure that the VNC server and an X display manager are installed on the VM and properly configured. This section describes how to configure VNC on each of the supported Linux operating system distributions to allow proper interactions with XenCenter.
For CentOS-based VMs, use the instructions for the Red Hat-based VMs below, as they use the same base code to provide graphical VNC access. CentOS X is based on Red Hat Enterprise Linux X.
Enable a graphical console on Debian VMs
Note:
Before enabling a graphical console on your Debian VM, ensure that you have installed the XenServer VM Tools for Linux. For more information, see Install the XenServer VM Tools for Linux.
The graphical console for Debian virtual machines is provided by a VNC server running inside the VM. In the recommended configuration, a standard display manager controls the console so that a login dialog box is provided.
-
Install your Debian guest with the desktop system packages, or install GDM (the display manager) using apt (following standard procedures).
-
Install the Xvnc server using
apt-get(or similar):apt-get install vnc4server <!--NeedCopy-->Note:
The Debian Graphical Desktop Environment, which uses the Gnome Display Manager version 3 daemon, can take significant CPU time. Uninstall the Gnome Display Manager
gdm3package and install thegdmpackage as follows:apt-get install gdm apt-get purge gdm3 <!--NeedCopy--> -
Set up a VNC password (not having one is a serious security risk) by using the
vncpasswdcommand. Pass in a file name to write the password information to. For example:vncpasswd /etc/vncpass <!--NeedCopy--> -
Modify your
gdm.conffile (/etc/gdm/gdm.conf) to configure a VNC server to manage display0by extending the[servers]and[daemon]sections as follows:[servers] 0=VNC [daemon] VTAllocation=false [server-VNC] name=VNC command=/usr/bin/Xvnc -geometry 800x600 -PasswordFile /etc/vncpass BlacklistTimeout=0 flexible=true <!--NeedCopy--> -
Restart GDM, and then wait for XenCenter to detect the graphical console:
/etc/init.d/gdm restart
<!--NeedCopy-->
Note:
You can check that the VNC server is running using a command like
ps ax | grep vnc.
Enable a graphical console on Red Hat, CentOS, or Oracle Linux VMs
Note:
Before setting up your Red Hat VMs for VNC, be sure that you have installed the XenServer VM Tools for Linux. For more information, see Install the XenServer VM Tools for Linux.
To configure VNC on Red Hat VMs, modify the GDM configuration. The GDM configuration is held in a file whose location varies depending on the version of Red Hat Linux you are using. Before modifying it, first determine the location of this configuration file. This file is modified in several subsequent procedures in this section.
Determine the location of your VNC configuration file
If you are using Red Hat Linux, the GDM configuration file is /etc/gdm/custom.conf. This file is a split configuration file that contains only user-specified values that override the default configuration. This type of file is used by default in newer versions of GDM. It is included in these versions of Red Hat Linux.
Configure GDM to use VNC
-
As root on the text CLI in the VM, run the command
rpm -q vnc-server gdm. The package namesvnc-serverandgdmappear, with their version numbers specified.The package names that are displayed show the packages that are already installed. If you see a message that says that a package is not installed, you might have not selected the graphical desktop options during installation. Install these packages before you can continue. For details regarding installing more software on your VM, see the appropriate Red Hat Linux x86 Installation Guide.
-
Open the GDM configuration file with your preferred text editor and add the following lines to the file:
    [server-VNC]
    name=VNC Server
    command=/usr/bin/Xvnc -SecurityTypes None -geometry 1024x768 -depth 16 \
    -BlacklistTimeout 0
    flexible=true
<!--NeedCopy-->
With configuration files on Red Hat Linux, add these lines into the empty
[servers]section. -
Modify the configuration so that the
Xvncserver is used instead of the standard X server:-
0=StandardModify it to read:
0=VNC -
If you are using Red Hat Linux, add the above line just below the
[servers]section and before the[server-VNC]section.
-
-
Save and close the file.
Restart GDM for your change in configuration to take effect, by running the command /usr/sbin/gdm-restart.
Note:
Red Hat Linux uses runlevel 5 for graphical startup. If your installation starts up in runlevel 3, change this configuration for the display manager to be started and get access to a graphical console. For more information, see Check Run levels.
Firewall settings
The firewall configuration by default does not allow VNC traffic to go through. If you have a firewall between the VM and XenCenter, allow traffic over the port that the VNC connection uses. By default, a VNC server listens for connections from a VNC viewer on TCP port 5900 + n, where n is the display number (usually zero). So a VNC server setup for Display-0 listens on TCP port 5900, Display-1 is TCP-5901, and so on. Consult your firewall documentation to ensure that these ports are open. For more information, see Communication Ports Used by XenServer.
If you want to use IP connection tracking or limit the initiation of connections to be from one side only, further configure your firewall.
To configure Red Hat-base VMS firewall to open the VNC port:
-
For Red Hat Linux, use
system-config-securitylevel-tui. -
Select Customize and add
5900to the other ports list.
Alternatively, you can disable the firewall until the next reboot by running the command service iptables stop, or permanently by running chkconfig iptables off. This configuration can expose extra services to the outside world and reduce the overall security of your VM.
VNC screen resolution
After connecting to a VM with the graphical console, the screen resolution sometimes doesn’t match. For example, the VM display is too large to fit comfortably in the Graphical Console pane. Control this behavior by setting the VNC server geometry parameter as follows:
-
Open the GDM configuration file with your preferred text editor. For more information, see Determine the Location of your VNC Configuration File.
-
Find the
[server-VNC]section you added above. -
Edit the command line to read, for example:
command=/usr/bin/Xvnc -SecurityTypes None -geometry 800x600
<!--NeedCopy-->
The value of the
geometryparameter can be any valid screen width and height. -
Save and close the file.
Enable VNC for RHEL, CentOS, or OEL VMs
If you are using Red Hat Linux, the GDM configuration file is /etc/gdm/custom.conf. This file is a split configuration file that contains only user-specified values that override the default configuration. By default, this type of file is used in newer versions of GDM and is included in these versions of Red Hat Linux.
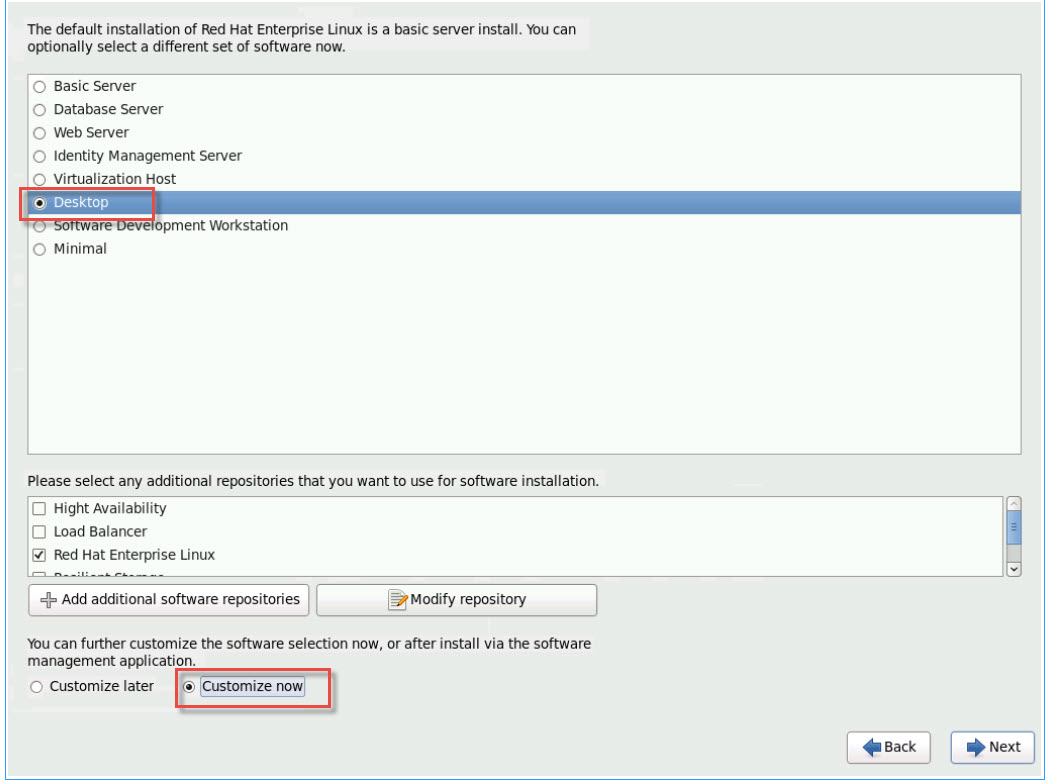
During the operating system installation, select Desktop mode. On the RHEL installation screen, select Desktop > Customize now and then click Next:
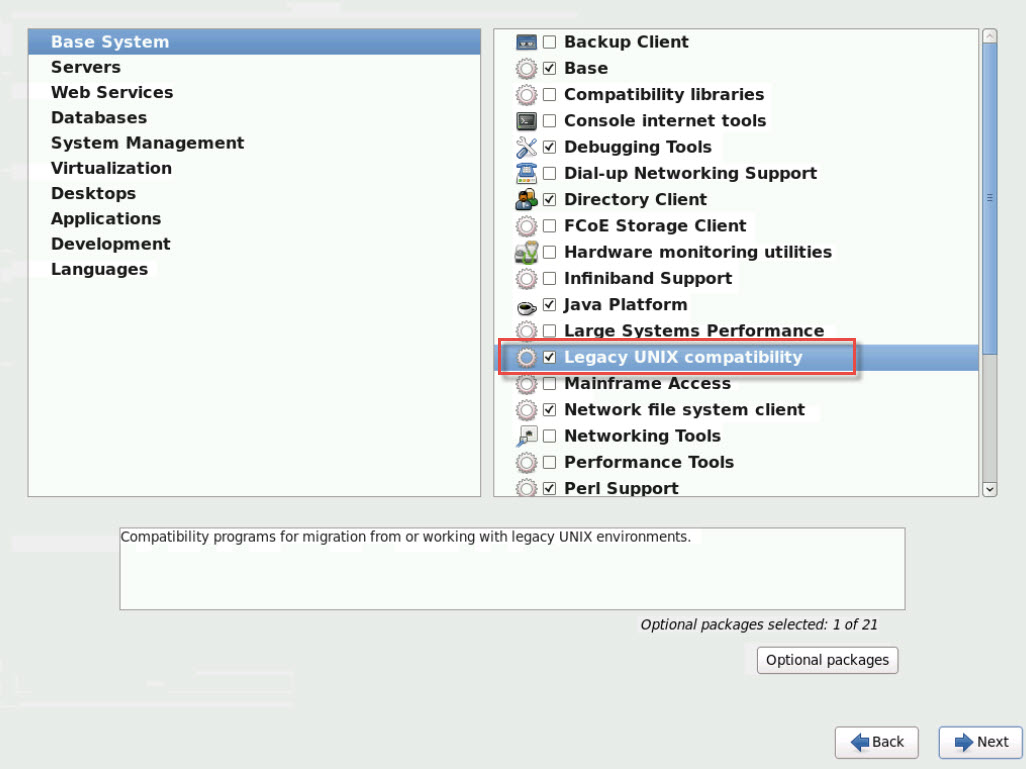
This action displays the Base System screen, ensure that Legacy UNIX compatibility is selected:
Select Desktops > Optional packages, then click Next:
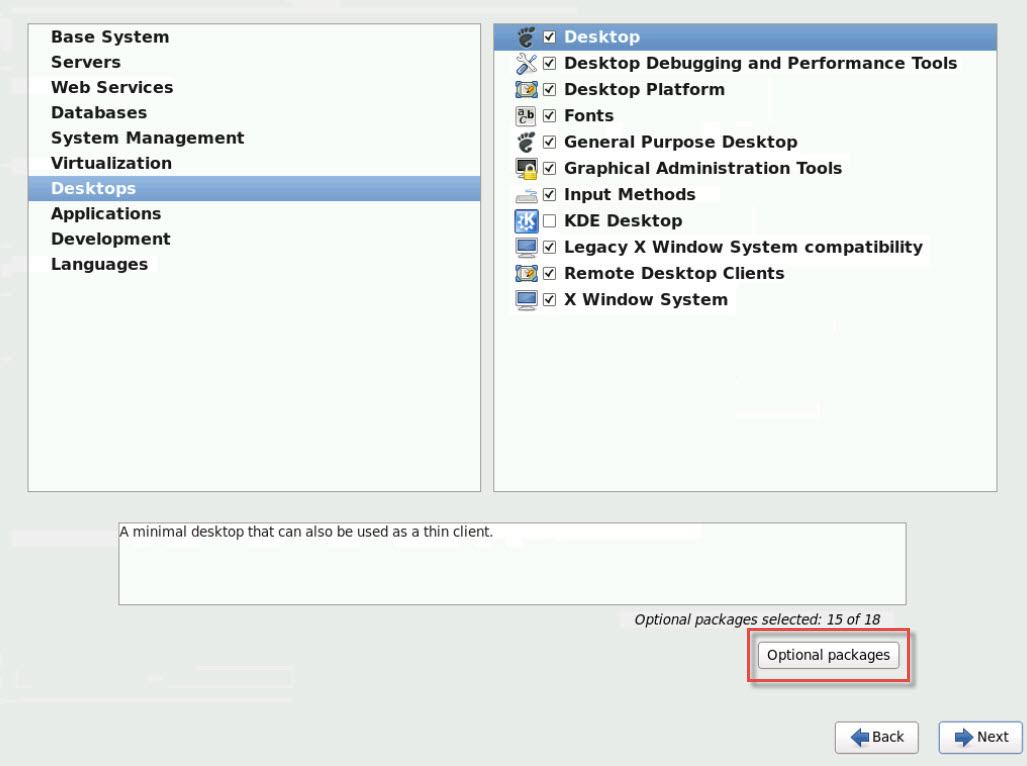
This action displays the Packages in Desktop window, select tigervnc-server-<version_number> and then click Next:

Work through the following steps to continue the setup of your RHEL VMs:
-
Open the GDM configuration file with your preferred text editor and add the following lines to the appropriate sections:
[security] DisallowTCP=false [xdmcp] Enable=true <!--NeedCopy--> -
Create the file,
/etc/xinetd.d/vnc-server-stream:service vnc-server { id = vnc-server disable = no type = UNLISTED port = 5900 socket_type = stream wait = no user = nobody group = tty server = /usr/bin/Xvnc server_args = -inetd -once -query localhost -SecurityTypes None \ -geometry 800x600 -depth 16 } <!--NeedCopy--> -
Enter the following command to start the
xinetdservice:# service xinetd start <!--NeedCopy--> -
Open the file
/etc/sysconfig/iptables. Add the following line above the line reading,-A INPUT -j REJECT --reject-with icmp-host-prohibited:-A INPUT -m state --state NEW -m tcp -p tcp --dport 5900 -j ACCEPT <!--NeedCopy--> -
Enter the following command to restart
iptables:# service iptables restart <!--NeedCopy--> -
Enter the following command to restart
gdm:# telinit 3 # telinit 5 <!--NeedCopy-->
Note:
Red Hat Linux uses runlevel 5 for graphical startup. If your installation starts up in runlevel 3, change this configuration for the display manager be started and to get access to a graphical console. For more information, see Check run levels.
Set up SLES-based VMs for VNC
Note:
Before setting up your SUSE Linux Enterprise Server VMs for VNC, be sure that you have installed the XenServer VM Tools for Linux. See Install the XenServer VM Tools for Linux for details.
SLES has support for enabling “Remote Administration” as a configuration option in YaST. You can select to enable Remote Administration at install time, available on the Network Services screen of the SLES installer. This feature allows you to connect an external VNC viewer to your guest to allow you to view the graphical console. The method for using the SLES remote administration feature is slightly different than the method provided by XenCenter. However, it is possible to modify the configuration files in your SUSE Linux VM such that it is integrated with the graphical console feature.
Check for a VNC server
Before making configuration changes, verify that you have a VNC server installed. SUSE ships the tightvnc server by default. This server is a suitable VNC server, but you can also use the standard RealVNC distribution.
You can check that you have the tightvnc software installed by running the command:
rpm -q tightvnc
<!--NeedCopy-->
Enable remote administration
If Remote Administration was not enabled during installation of the SLES software, you can enable it as follows:
-
Open a text console on the VM and run the
YaSTutility:yast <!--NeedCopy--> -
Use the arrow keys to select Network Services in the left menu. Tab to the right menu and use the arrow keys to select Remote Administration. Press Enter.
-
In the Remote Administration screen, Tab to the Remote Administration Settings section. Use the arrow keys to select Allow Remote Administration and press Enter to place an X in the check box.
-
Tab to the Firewall Settings section. Use the arrow keys to select Open Port in Firewall and press Enter to place an X in the check box.
-
Tab to the Finish button and press Enter.
-
A message box is displayed, telling you to restart the display manager for your settings to take effect. Press Enter to acknowledge the message.
-
The original top-level menu of
YaSTappears. Tab to the Quit button and press Enter.
Modify the xinetd configuration
After enabling Remote Administration, modify a configuration file if you want to allow XenCenter to connect. Alternatively, use a third party VNC client.
-
Open the file
/etc/xinetd.d/vncin your preferred text editor. -
The file contains sections like the following:
service vnc1 { socket_type = stream protocol = tcp wait = no user = nobody server = /usr/X11R6/bin/Xvnc server_args = :42 -inetd -once -query localhost -geometry 1024x768 -depth 16 type = UNLISTED port = 5901 } <!--NeedCopy--> -
Edit the
portline to readport = 5900 <!--NeedCopy--> -
Save and close the file.
-
Restart the display manager and
xinetdservice with the following commands:/etc/init.d/xinetd restart rcxdm restart <!--NeedCopy-->
SUSE Linux uses runlevel 5 for graphical startup. If your remote desktop does not appear, verify that your VM is configured to start up in runlevel 5. For more information, see Check Run levels.
Firewall settings
By default the firewall configuration does not allow VNC traffic to go through. If you have a firewall between the VM and XenCenter, allow traffic over the port that the VNC connection uses. By default, a VNC server listens for connections from a VNC viewer on TCP port 5900 + n, where n is the display number (usually zero). So a VNC server setup for Display-0 listens on TCP port 5900, Display-1 is TCP-5901, and so forth. Consult your firewall documentation to ensure that these ports are open. For more information, see Communication Ports Used by XenServer.
If you want to use IP connection tracking or limit the initiation of connections to be from one side only, further configure your firewall.
To Open the VNC Port on SLES 11.x VMs Firewall:
-
Open a text console on the VM and run the
YaSTutility:yast <!--NeedCopy--> -
Use the arrow keys to select Security and Users in the left menu. Tab to the right menu and use the arrow keys to select Firewall. Press Enter.
-
In the Firewall screen, use the arrow keys to select Custom Rules in the left menu and then press Enter.
-
Tab to the Add button in the Custom Allowed Rules section and then press Enter.
-
In the Source Network field, enter 0/0. Tab to the Destination Port field and enter 5900.
-
Tab to the Add button and then press Enter.
-
Tab to the Next button and press Enter.
-
In the Summary screen Tab to the Finish button and press Enter.
-
On the top-level
YaSTscreen Tab to the Quit button and press Enter. -
Restart the display manager and
xinetdservice with the following commands:/etc/init.d/xinetd restart rcxdm restart <!--NeedCopy-->
Alternatively, you can disable the firewall until the next reboot by running the rcSuSEfirewall2 stop command, or permanently by using YaST. This configuration can expose extra services to the outside world and reduce the overall security of your VM.
VNC screen resolution
After connecting to a Virtual Machine with the Graphical Console, the screen resolution sometimes does not match. For example, the VM display is too large to fit comfortably in the Graphical Console pane. Control this behavior by setting the VNC server geometry parameter as follows:
-
Open the
/etc/xinetd.d/vncfile with your preferred text editor and find theservice_vnc1section (corresponding todisplayID1). -
Edit the
geometryargument in theserver-argsline to the desired display resolution. For example,server_args = :42 -inetd -once -query localhost -geometry 800x600 -depth 16 <!--NeedCopy-->The value of the
geometryparameter can be any valid screen width and height. -
Save and close the file.
-
Restart the VNC server:
/etc/init.d/xinetd restart
rcxdm restart
<!--NeedCopy-->
Check run levels
Red Hat and SUSE Linux VMs use runlevel 5 for graphical startup. This section describes how to verify that your VM starts up in runlevel 5 and how to change this setting.
-
Check
/etc/inittabto see what the default runlevel is set to. Look for the line that reads:id:n:initdefault: <!--NeedCopy-->If n is not 5, edit the file to make it so.
-
You can run the command
telinit q ; telinit 5after this change to avoid having to reboot to switch run levels.