LDAP authentication policies
As with other types of authentication policies, a Lightweight Directory Access Protocol (LDAP) authentication policy comprises an expression and an action. After creating an authentication policy, you bind it to an authentication virtual server and assign a priority to it. When binding it, you also designate it as either a primary or a secondary policy. In addition to standard authentication functions, LDAP can search other active directory (AD) servers for user accounts for users that do not exist locally. This function is called referral support or referral chasing.
Normally you configure the Citrix ADC to use the IP address of the authentication server during authentication. With LDAP authentication servers, you can also configure the ADC to use the FQDN of the LDAP server instead of its IP address to authenticate users. Using an FQDN can simplify an otherwise much more complex authentication, authorization, and auditing configuration in environments where the authentication server might be at any of several IP addresses, but always uses a single FQDN. To configure authentication by using a server’s FQDN instead of its IP address, you follow the normal configuration process except when creating the authentication action. When creating the action, you use the serverName parameter instead of the serverIP parameter, and substitute the server’s FQDN for its IP address.
Before you decide whether to configure the ADC to use the IP or the FQDN of your LDAP server to authenticate users, consider that configuring authentication, authorization, and auditing to authenticate to an FQDN instead of an IP address adds an extra step to the authentication process. Each time the ADC authenticates a user, it must resolve the FQDN. If a great many users attempt to authenticate simultaneously, the resulting DNS lookups might slow the authentication process.
LDAP referral support is disabled by default and cannot be enabled globally. It must be explicitly enabled for each LDAP action. You must also make sure that the AD server accepts the same binddn credentials that are used with the referring (GC) server. To enable referral support, you configure an LDAP action to follow referrals, and specify the maximum number of referrals to follow.
If referral support is enabled, and the Citrix ADC receives an LDAP_REFERRAL response to a request, authentication, authorization, and auditing follows the referral to the active directory (AD) server contained in the referral and performs the update on that server. First, authentication, authorization, and auditing looks up the referral server in DNS, and connects to that server. If the referral policy requires SSL/TLS, it connects via SSL/TLS. It then binds to the new server with the binddn credentials that it used with the previous server, and performs the operation which generated the referral. This feature is transparent to the user.
The port numbers for LDAP connections are:
- 389 for unsecured LDAP connections (for plain text LDAP)
- 636 for secure LDAP connections (for SSL LDAP)
- 3268 for Microsoft unsecure LDAP connections (for plain text Global Catalog Server)
- 3269 for Microsoft secure LDAP connections (for SSL Global Catalog Server)
The following table contains examples of user attribute fields for LDAP servers:
| LDAP server | User attribute | Case sensitive |
|---|---|---|
| Microsoft Active Directory Server | sAMAccountName | No |
| Novell eDirectory | ou | Yes |
| IBM Directory Server | uid | Yes |
| Lotus Domino | CN | Yes |
| Sun ONE directory (formerly iPlanet) | uid or cn | Yes |
This table contains examples of the base DN:
| LDAP server | Base DN |
|---|---|
| Microsoft Active Directory Server | DC=citrix,DC=local |
| Novell eDirectory | ou=users,ou=dev |
| IBM Directory Server | cn=users |
| Lotus Domino | OU=City,O=citrix, C=US |
| Sun ONE directory (formerly iPlanet) | ou=People,dc=citrix,dc=com |
The following table contains examples of bind DN:
| LDAP server | Bind DN |
|---|---|
| Microsoft Active Directory Server | CN=Administrator, CN=Users, DC=citrix, DC=local |
| Novell eDirectory | cn=admin, o=citrix
|
| IBM Directory Server | LDAP_dn |
| Lotus Domino | CN=Notes Administrator, O=Citrix, C=US |
| Sun ONE directory (formerly iPlanet) | uid=admin,ou=Administrators, ou=TopologyManagement,o=NetscapeRoot |
For more information about setting up authentication policies in general, see Authentication Policies. For more information about Citrix ADC expressions, which are used in the policy rule, see Policies and Expressions.
To create an LDAP authentication server by using the CLI
At the command prompt, type the following commands:
add authentication ldapAction <name> {-serverIP} <ip\_addr|ipv6\_addr|> | {-serverName <string>}}
Example
add authentication ldapAction ldap_server -serverip 1.1.1.1 -serverName ldap_test
To create an LDAP authentication server by using the GUI
-
Navigate to System > Authentication > Basic Policies > LDAP > Servers > Add.

- On the Create Authentication LDAP Server page, configure the parameters for the LDAP server.
- Click Create.
To enable an authentication policy by using the CLI
add authentication ldappolicy <name> <rule> [<reqAction>]
Example:
add authentication ldappolicy ldap-service-policy ns_true ldap_Server
To create an LDAP authentication policy by using the GUI
- Navigate to System > Authentication > Basic Policies > LDAP > Policies > Add
-
On the Create Authentication LDAP Policy page, configure the parameters for LDAP policy.

- Click Create.
Note
You can configure LDAP servers/policies from the Security tab. Navigate to Security > AAA - Application Traffic > Policies > Authentication > Basic Policies > LDAP > Servers / Policies.
To enable an LDAP referral support by using the CLI
At the command prompt, type the following commands:
set authentication ldapAction <name> -followReferrals ON

set authentication ldapAction <name> -maxLDAPReferrals <integer>
<!--NeedCopy-->
Example
set authentication ldapAction ldapAction-1 -followReferrals ON

set authentication ldapAction ldapAction-1 -maxLDAPReferrals 2
<!--NeedCopy-->
Key-based authentication support for LDAP users
With key-based authentication, you can now fetch the list of public keys that are stored on the user object in the LDAP server through SSH. The Citrix ADC appliance during the role-based authentication (RBA) process must extract public SSH keys from the LDAP server. The retrieved public key, which is compatible with SSH, must allow you to log in through the RBA method.
A new attribute “sshPublicKey” is introduced in the “add authentication ldapAction” and “set authentication ldapAction” commands. By using this attribute, you can obtain the following benefits:
- Can store the retrieved public key, and the LDAP action uses this attribute to retrieve SSH key information from the LDAP server.
- Can extract attribute names of up to 24 KB.
Note:
The external authentication server, such as LDAP is used only to retrieve SSH key information. It is not used for the authentication purpose.
Following is an example of the flow of events through SSH:
- SSH daemon sends an AAA_AUTHENTICATE request with password field empty to authentication, authorization, and auditing daemon port.
- If LDAP is configured to store the SSH public key, authentication, authorization, and auditing responds with the “sshPublicKey” attribute along with other attributes.
- SSH daemon verifies these keys with the client keys.
- SSH daemon passes the user name in the request payload, and authentication, authorization, and auditing returns the keys specific to this user along with generic keys.
To configure the sshPublicKey attribute, at the command prompt type the following commands:
-
With add operation, you can add the “sshPublicKey” attribute while configuring the
ldapActioncommand.add authentication ldapAction <name> {-serverIP <ip_addr|ipv6_addr|*> | {-serverName <string>}} [-serverPort <port>] … [-Attribute1 <string>] … [-Attribute16 <string>][-sshPublicKey <string>][-authentication off] <!--NeedCopy--> -
With set operation, you can configure the “sshPublicKey” attribute to an already added ldapAction command.
 set authentication ldapAction <name> [-sshPublicKey <string>][-authentication off]
 <!--NeedCopy-->
Name-value attribute support for LDAP authentication
You can now configure the attributes of LDAP authentication with a unique name along with values. The names are configured in the LDAP action parameter and the values are obtained by querying for the name. By using this feature, a Citrix ADC appliance administrator can now achieve the following benefits:
- Minimizes the effort for administrators by remembering the attribute by name (not just by value)
- Enhances the search to query the attribute value associated with a name
- Provides an option to extract multiple attributes
To configure this feature at the Citrix ADC appliance command prompt, type:
add authentication ldapAction <name> [-Attribute1 <string>]
<!--NeedCopy-->
Example
add authentication ldapAction ldapAct1 attribute1 mail
<!--NeedCopy-->
Support for validating end-to-end LDAP authentication
The Citrix ADC appliance can now validate end-to-end LDAP authentication through the GUI. To validate this feature, a new “test” button is introduced in the GUI. A Citrix ADC appliance administrator can use this feature to achieve the following benefits:
- Consolidates the complete flow (packet engine – Citrix ADC AAA daemon – external server) to provide better analysis
- Reduces time on validating and troubleshooting issues related to individual scenarios
You have two options to configure and view the test results of LDAP end-to-end authentication by using the GUI.
From system option
- Navigate to System > Authentication > Basic Policies > LDAP, click Servers tab.
- Select the available LDAP action from the list.
- On the Configure Authentication LDAP Server page, you have two options under Connections Settings section.
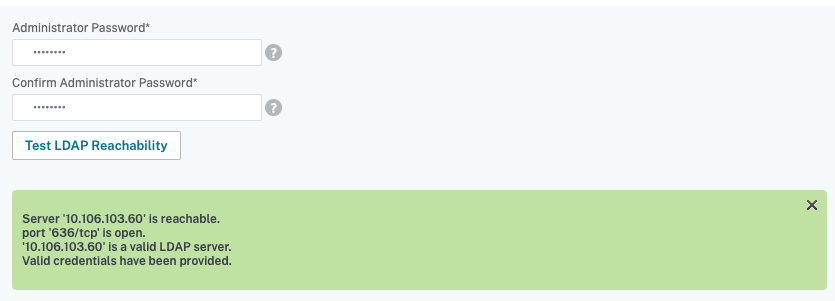
-
To check the LDAP server connection, click Test LDAP Reachability tab. You can view a pop-up message of successful connection to the LDAP server with TCP port details and authenticity of valid credentials.
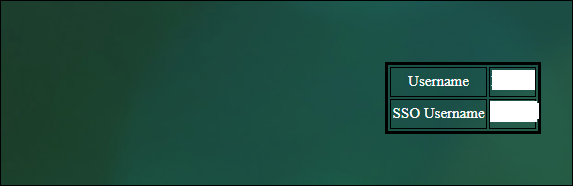
- To view the end-to-end LDAP authentication, click Test End User Connection link.
- On the Test End User Connection page, click Test.
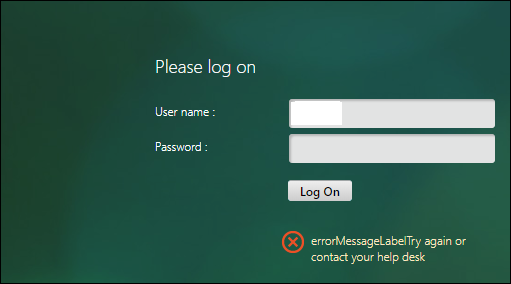
- On the authentication page, enter the valid credentials to log in. The success screen is displayed.
- If the authentication fails, the error screen is displayed.
From the Authentication option
- Navigate to Authentication > Dashboard, select the available LDAP action from the list.
- On the Configure Authentication LDAP Server page, you have two options under Connections Settings section.
- To check the LDAP server connection, click Test LDAP Reachability tab. You can view a pop-up message of successful connection to the LDAP server with TCP port details and authenticity of valid credentials.
- To view the end-to-end LDAP authentication status, click Test End User Connection link.
- On the Test End User Connection page, click Test.
- On the authentication page, enter the valid credentials to log in. The success screen is displayed.
- If the authentication fails, the error screen is displayed.
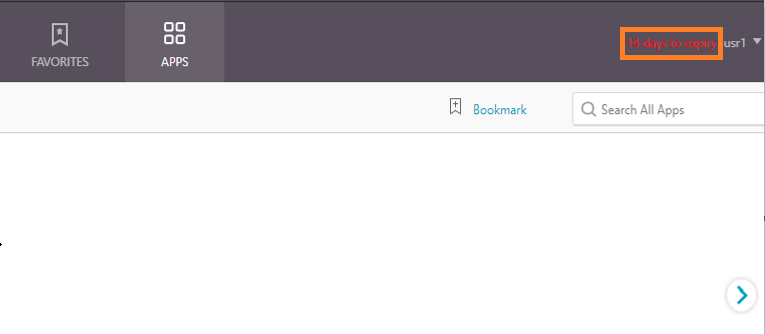
14-day password expiry notification for LDAP authentication
The Citrix ADC appliance now supports 14-day password expiry notification for LDAP based authentication. By using this feature, administrators can notify the end users about the password expiry threshold time in days. The 14-day password expiry notification is a precursor to self-service password reset (SSPR).
Note
The maximum value or threshold time in days for password expiry notification is 255 days.
Advantages of password expiry notification
- Permit users to reset their passwords on their own and provide administrators a flexible way to notify the end user about their password expiry in days.
- Eliminates end user dependence to track their password expiration days.
- Sends notifications to the VPN portal page to the users (based on the number of days) to change their password before expiry.
Note
This feature is applicable only for LDAP based authentication schemes, not for RADIUS or TACACS.
Understanding the 14-day password notification
The Citrix ADC appliance fetches two attributes (Max-Pwd-Age and Pwd-Last-Set) from the LDAP authentication server.
- Max-Pwd-Age. This attribute denotes the maximum amount of time, in 100-nanosecond intervals, until the password is valid. The value is stored as a large integer that represents the number of 100-nanosecond intervals from the time the password was set before the password expires.
- Pwd-Last-Set. This attribute determines the date and time at which the password for an account was last changed.
By fetching the two attributes from the LDAP authentication server, the Citrix ADC appliance determines the time left for the password to expire for a particular user. This information is collected when any user credentials are validated on the authentication server and a notification is sent back to the user.
A new parameter “pwdExpiryNotification” is introduced in the “set Citrix ADC AAA parameter” command. By using this parameter, an administrator can keep track the number of days left for password expiry. The Citrix ADC appliance can now start notifying the end user about their password expiry.
Note
Currently, this feature works only for authentication servers having Microsoft AD servers with LDAP implementation. Support for OpenLDAP based servers is targeted later.
Following is an example of the flow of events for setting a 14-day password expiry notification:
- An administrator, by using the Citrix ADC appliance, sets a time (14-days) for password expiration.
- The user sends an HTTP or HTTPS request to access a resource on the back-end server.
- Before providing access, the Citrix ADC appliance validates the user credentials with what is configured on the LDAP authentication server.
- Along with this query to the authentication server, the Citrix ADC appliance carries the request to fetch the details of two attributes (
Max-Pwd-AgeandPwd-Last-Set). - Based on the time left for the password to expire, an expiry notification is displayed.
- The user then takes appropriate action to update the password.
To configure 14-day expiry notification by using the CLI
The 14-day expiry notification can be configured for clientless VPN and Full VPN use cases and not for ICA Proxy.
At the command prompt, type the following commands:
```set aaa parameter –pwdExpiryNotificationDays
show aaa parameter
Example

    ```
    > set aaa parameter -pwdExpiryNotificationDays 14
    Done
    > show aaa parameter                        Configured AAA parameters
    EnableStaticPageCaching: YES
    EnableEnhancedAuthFeedback: NO
    DefaultAuthType: LOCAL MaxAAAUsers:         Unlimited
     AAAD nat ip: None
     EnableSessionStickiness : NO
     aaaSessionLoglevel : INFORMATIONAL             AAAD Log Level : INFORMATIONAL                 Dynamic address: OFF
       GUI mode: ON
       Max Saml Deflate Size: 1024        Password Expiry Notification Days: 14
    <!--NeedCopy-->
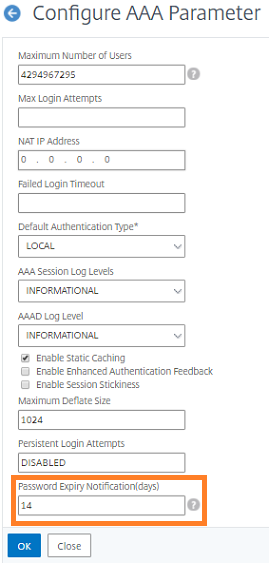
To configure a 14-day expiry notification by using GUI
- Navigate to Security > AAA - Application Traffic > Authentication Settings.
- Click Change authentication AAA settings.
-
On the Configure AAA Parameter page, specify the days in the Password Expiry Notification(days) field.
-
Click OK.
The notification appears on the top right corner of the VPN portal page.
In this article
- To create an LDAP authentication server by using the CLI
- To create an LDAP authentication server by using the GUI
- To create an LDAP authentication policy by using the GUI
- To enable an LDAP referral support by using the CLI
- Key-based authentication support for LDAP users
- Name-value attribute support for LDAP authentication
- Support for validating end-to-end LDAP authentication
- 14-day password expiry notification for LDAP authentication