Enable SSO for Basic, Digest, and NTLM authentication
From Citrix ADC feature release 12.1 build 60.16 and above, the following SSO types are disabled globally.
- Basic authentication
- Digest Access authentication
- NTLM without Negotiate NTLM2 Key or Negotiate Sign
Single Sign-On (SSO) configuration in Citrix ADC and Citrix Gateway can be enabled at global level and also per traffic level. By default the SSO configuration is OFF and an administrator can enable the SSO per traffic or globally. From a security point of view, Citrix recommends administrators to turn SSO globally OFF and enable per traffic basis. This enhancement is to make SSO configuration more secure by disabling certain type of SSO methods globally.
StoreFront SSO configuration is impacted (disabled) only for 13.0 build 64.35. The configuration will not be impacted in the future 13.0 builds.
Non-impacted SSO types
The following SSO types are not impacted with this enhancement.
- Kerberos authentication
- SAML authentication
- Form based authentication
- OAuth bearer authentication
- NTLM with Negotiate NTLM2 Key or Negotiate Sign
Impacted SSO configurations
Following are the impacted (disabled) SSO configurations.
Global configurations
set tmsessionparam -SSO ON
set vpnparameter -SSO ON
add tmsessionaction tm_act -SSO ON
add vpn sessionaction tm_act -SSO ON
You can enable/disable SSO as a whole and cannot modify individual SSO types.
Security measures to be applied
As part of the security measures, security sensitive SSO types are disabled in the global configuration but are allowed only through a Traffic action configuration. So, if a back-end server expects Basic, Digest, or NTLM without Negotiate NTLM2 Key or Negotiate Sign, the administrator can allow SSO only through the following configuration.
Traffic Action
add vpn trafficaction tf_act  http -SSO ON
add tm trafficaction tf_act -SSO ON
Traffic Policy
add tm trafficpolicy <name> <rule> tf_act
add vpn trafficpolicy <name> <rule> tf-act
Administrator must have an appropriate rule configured for traffic policy to make sure SSO is enabled for only trusted back-end server.
AAA-TM
Scenarios based on global configuration:
set tmsessionparam -SSO ON
Workaround:
add tm trafficaction tf_act -SSO ON
add tm trafficpolicy tf_pol true tf_act
Bind the following traffic policy to all LB virtual server where SSO is expected:
bind lb vserver <LB VS Name> -policy tf_pol -priority 65345
Scenarios based on session Policy configuration:
add tmsessionaction tm_act -SSO ON
add tmsession policy <name> <rule> tm_act
add tm trafficaction tf_act -SSO ON
add tm trafficpolicy tf_pol <same rule as session Policy> tf_act
Points of note:
- Citrix ADC AAA user/group for the preceding session policy must be replaced by traffic policy.
- Bind the following policy to the load balancing virtual servers for the preceding session policy,
bind lb vserver [LB VS Name] -policy tf_pol -priority 65345 - If a traffic policy with other priority is configured, the preceding command does not serve good.
The following section deals with scenarios based on conflict with multiple traffic policies associated with a traffic:
For a particular TM traffic, only one TM traffic policy is applied. Because of global setting of SSO feature changes, applying an additional TM traffic policy with low priority might not be applicable in case a TM traffic policy with high priority (that does not have required SSO configuration) is already applied. The following section describes method to ensure that such cases are handled.
Consider that the following three traffic policies with higher priority are applied to load balancing (LB) virtual server:
add tm trafficaction tf_act1 <Addition config>
add tm trafficaction tf_act2 <Addition config>
add tm trafficaction tf_act3 <Addition config>

add tm trafficpolicy tf_pol1 <rule1> tf_act1
add tm trafficpolicy tf_pol2 <rule2> tf_act2
add tm trafficpolicy tf_pol3 <rule3> tf_act3

bind lb vserver <LB VS Name> -policy tf_pol1 -priority 100
bind lb vserver <LB VS Name> -policy tf_pol2 -priority 200
bind lb vserver <LB VS Name> -policy tf_pol3 -priority 300
Error prone method - To resolve the Global SSO configuration, you add the following configuration:
add tm trafficaction tf_act_default -SSO ON
add tm trafficpolicy tf_pol_default true tf_act_default

bind lb vserver <LB VS Name> -policy tf_pol_default -priority 65345
Note: The preceding modification can break SSO for traffic which hits <tf_pol1/tf_pol2/tf_pol3> as for these traffic, traffic policy
Correct method - To mitigate this, the SSO property must be applied individually for each of the corresponding traffic actions:
For example, in the preceding scenario, for SSO to happen for the traffic hitting tf_pol1/tf_pol3, the following configuration must be applied along with
add tm trafficaction tf_act1 <Addition config> -SSO ON
add tm trafficaction tf_act3 <Addition config> -SSO ON
Citrix Gateway cases
Scenarios based on global configuration:
set vpnparameter -SSO ON
Workaround:
add vpn trafficaction vpn_tf_act http  -SSO ON
add vpn trafficpolicy vpn_tf_pol  true vpn_tf_act
Bind the following traffic policy to all VPN virtual server where SSO is expected:
bind vpn vserver vpn_vs -policy vpn_tf_pol -priority 65345
Scenarios based on session Policy configuration:
add vpn sessionaction vpn_sess_act -SSO ON
add vpnsession policy <name> <rule> vpn_sess_act
Points to note:
-
Citrix ADC AAA user/group for the preceding session policy must be replaced by traffic policy.
-
Bind the following policy to the LB virtual servers for the preceding session policy,
bind lb virtual server [LB VS Name] -policy tf_pol -priority 65345. -
If a traffic policy with other priority is configured, the preceding command does not serve good. The following section deals with scenarios based on conflict with multiple traffic policies associated with traffic.
Functional scenarios based on conflict with multiple traffic policies associated with a traffic:
For a particular Citrix Gateway traffic, only one VPN traffic policy is applied. Because of global setting of SSO feature changes, applying an additional VPN traffic policy with low priority might not be applicable if there are other VPN traffic policies with high priority that does not have a required SSO configuration.
The following section describes method to ensure such cases are handled:
Consider there are three traffic policies with higher priority applied to a VPN virtual server:
add vpn trafficaction tf_act1 <Addition config>
add vpn trafficaction tf_act2 <Addition config>
add vpn trafficaction tf_act3 <Addition config>

add vpn trafficpolicy tf_pol1 <rule1> tf_act1
add vpn trafficpolicy tf_pol2 <rule2> tf_act2
add vpn trafficpolicy tf_pol3 <rule3> tf_act3

bind vpn vserver <VPN VS Name> -policy tf_pol1 -priority 100
bind vpn vserver <VPN VS Name> -policy tf_pol2 -priority 200
bind vpn vserver <VPN VS Name> -policy tf_pol3 -priority 300
Error prone method: To resolve the Global SSO configuration, you add the following configuration:
add vpn trafficaction tf_act_default -SSO ON
add vpn trafficpolicy tf_pol_default true tf_act_default

bind vpn vserver <VPN VS Name> -policy tf_pol_default -priority 65345
Note: The preceding modification can break SSO for the traffic that hits <tf_pol1/tf_pol2/tf_pol3> as for these traffic, traffic policy
Correct method: To mitigate this, the SSO property must be applied individually for each of the corresponding traffic actions.
For example in the preceding scenario, for SSO to happen for traffic hitting tf_pol1/tf_pol3, the following configuration must be applied along with
add vpn trafficaction tf_act1 [Additional config] -SSO ON

add vpn trafficaction tf_act3 [Additional config] -SSO ON
Configure SSO using GUI
-
Navigate to Security > AAA – Application Traffic > Policies > Session, Select Session Profiles tab, and click Add.
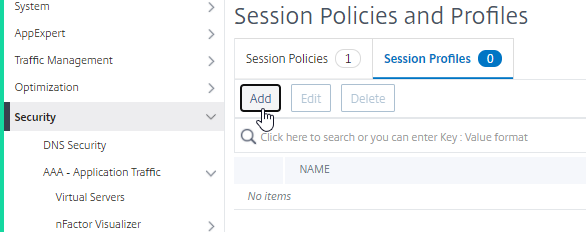
-
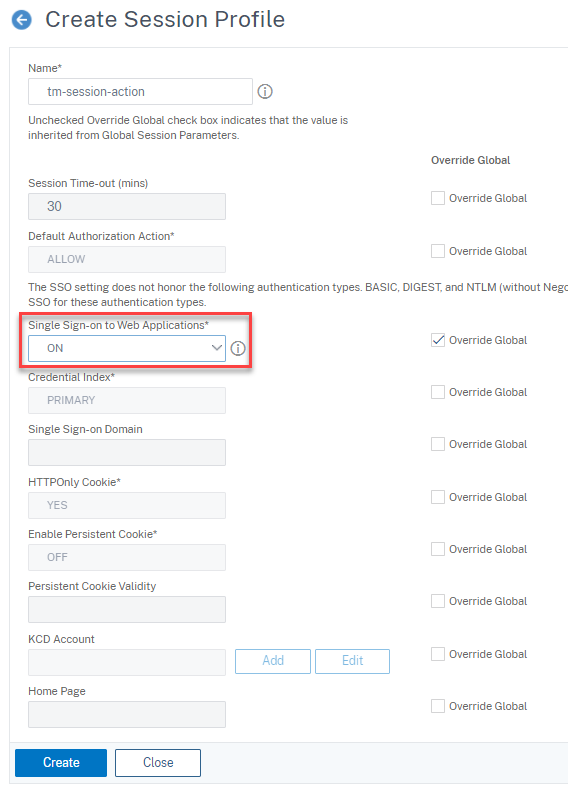
Enter a name for the session profile, click Override Global check box next to Single Sign-on to Web Applications field, and click Create.
-
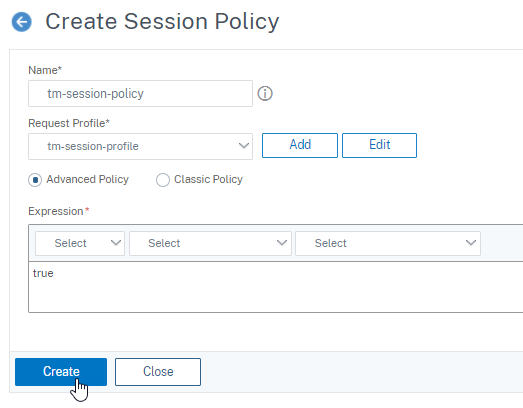
Navigate to Security > AAA – Application Traffic > Policies > Session, Select Session Policies tab, and click Add.
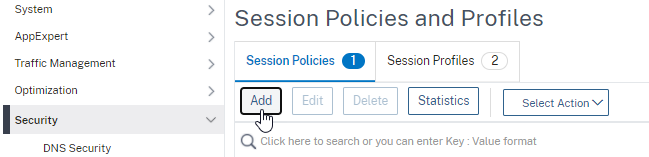
-
Enter a name for the session policy, enter “True” in the Expression field and click Create.
-
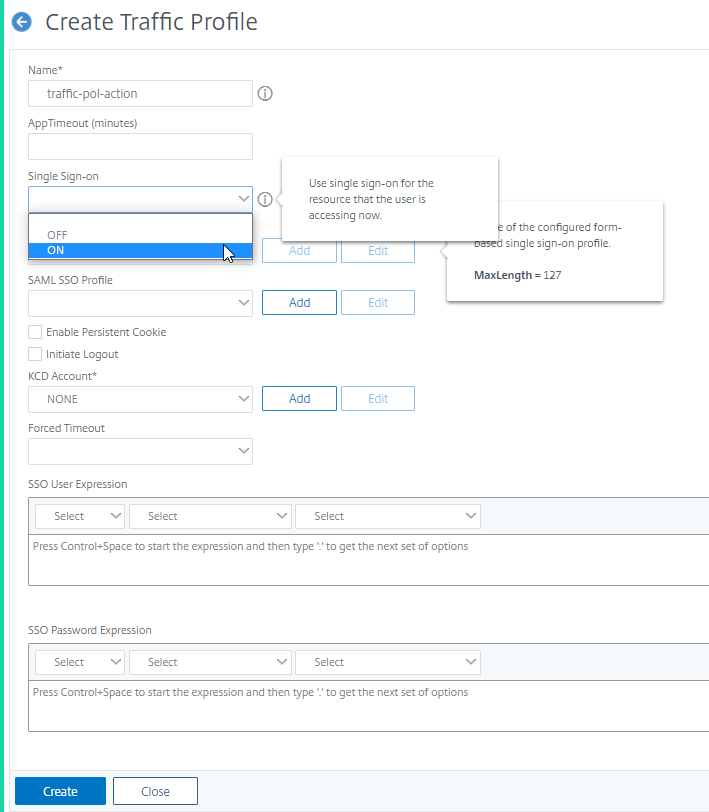
Navigate to Security > AAA – Application Traffic > Policies > Traffic, Select Traffic Profiles tab, and click Add.

-
Enter a name for the traffic profile, select ON in the Single Sign-on drop-down menu, and click Create.
-
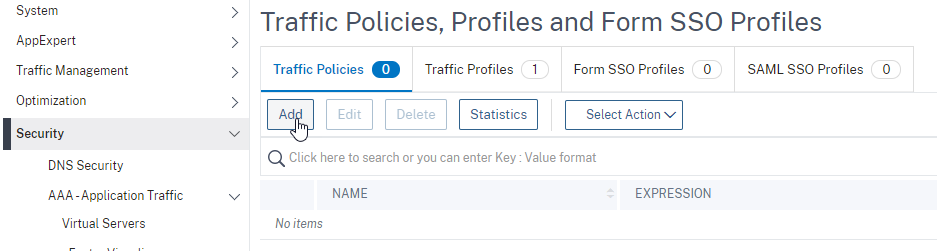
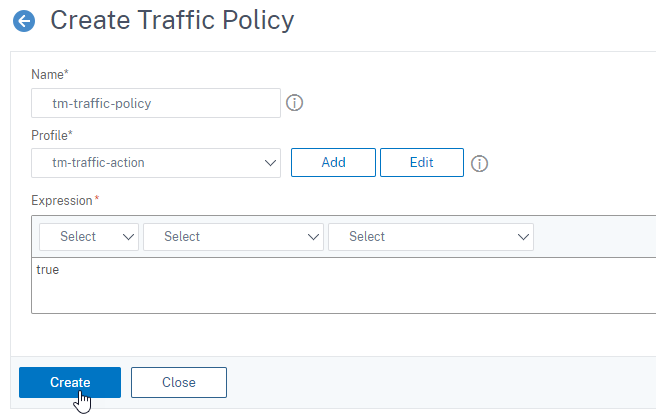
Navigate to Security > AAA – Application Traffic > Policies> Traffic, Select Traffic Policies tab, and click Add.
-
Enter a name for the traffic policy, enter “True” in the Expression field and click Create.
-
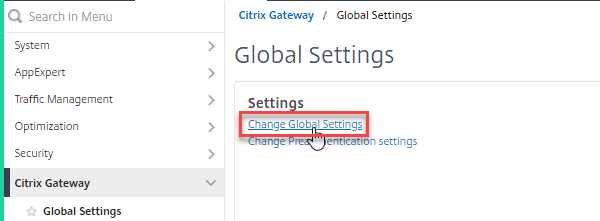
Navigate to Citrix Gateway > Global Settings, and click Change Global Settings.
-
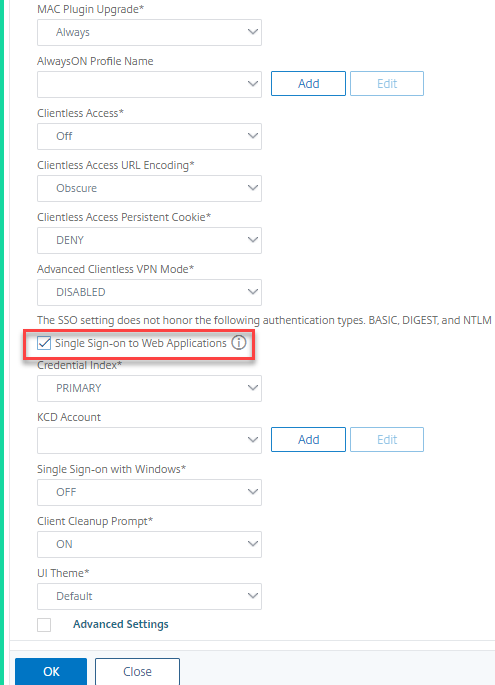
on Global Citrix Gateway Settings page, select Client Experience tab, and check Single Sign-on to Web Applications field.
-
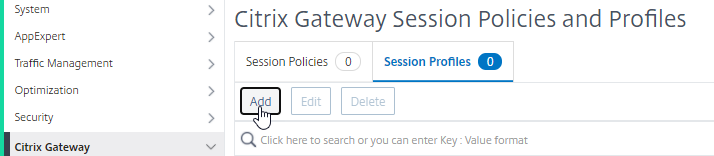
Navigate to Citrix Gateway > Policies> Session, Select Session Profiles tab, and click Add.
-
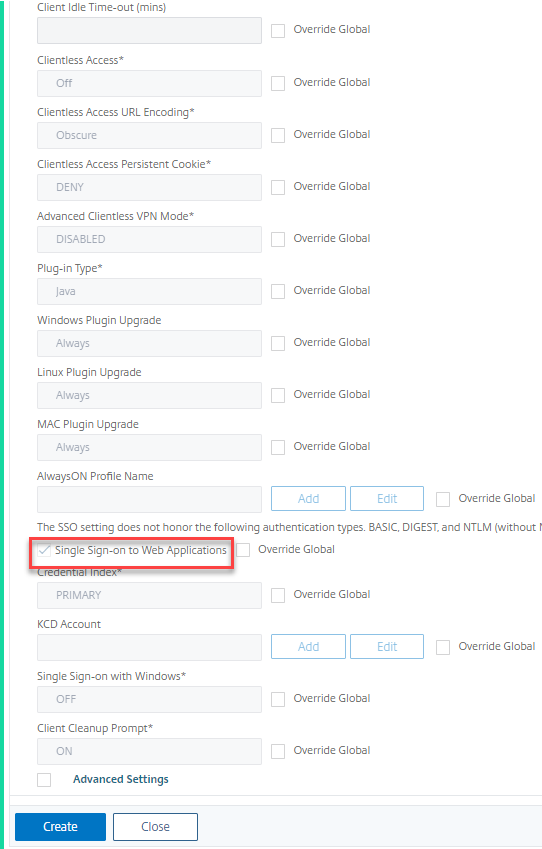
On Create Citrix Gateway Session Profile page, select Client Experience tab, and check Single Sign-on to Web Applications field.
-
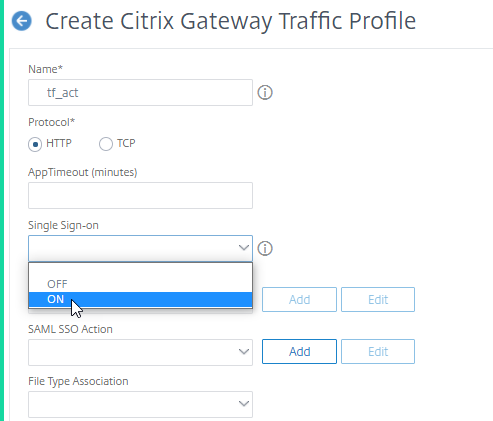
Navigate to Citrix Gateway > Policies > Traffic, select Traffic Profiles tab, and click Add.

-
Enter a name for the traffic profile, select ON in the Single Sign-on drop-down menu, and click Create.
-
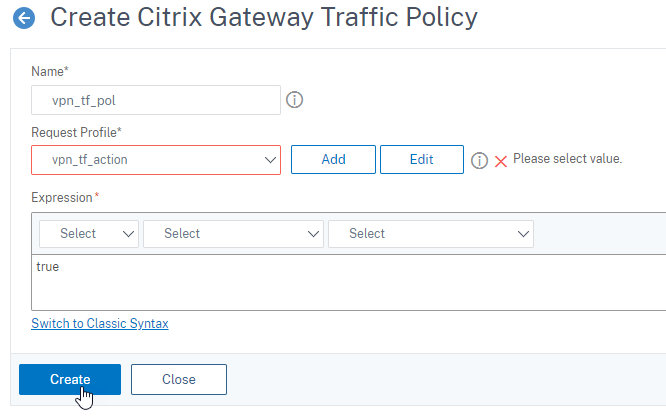
Navigate to Citrix Gateway > Policies> Traffic, Select Traffic Policies tab, and click Add.
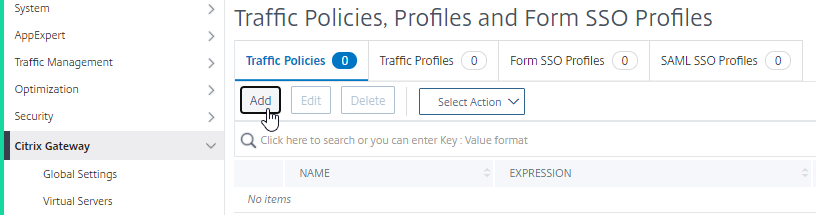
-
On Create Citrix Gateway Traffic Policy page, enter name for the traffic policy, enter “True” in the Expression field and click Create.