Configuring VRRP Communication Intervals
In an active-active deployment, all Citrix ADC nodes use the Virtual Router Redundancy Protocol (VRRP) to advertise their master VIP addresses and the corresponding priorities in VRRP advertisement packets (hello messages) at regular intervals.
VRRP uses the following communication intervals:
- Hello Interval. Interval between the VRRP hello messages that a node of a master VIP address sends to its peer nodes.
- Dead Interval. Time after which a node of a backup VIP address considers the state of the master VIP address as DOWN if VRRP hello messages are not received from the node of the master VIP address. After the dead interval, the backup VIP address takes over and becomes the master VIP address.
You can change these intervals to a desired value. Both of these communication intervals are per node setting for all VIP addresses in that node.
To configure VRRP communication intervals by using the CLI:
At the command prompt, type:
- set vrIDParam [-helloInterval <msecs>] [-deadInterval <secs>]
- sh vrIDParam
Example:
> set vrIDParam -helloInterval 500 -deadInterval 2
 Done
<!--NeedCopy-->
To configure VRRP communication intervals by using the GUI:
- Navigate to System > Network, in the Settings group, click Virtual Router Parameters.
- In Configure Virtual Router Parameter, set the Hello Interval and Dead Interval parameters.
- Click OK.
Example 1: Nodes with the Same VRRP Dead Intervals
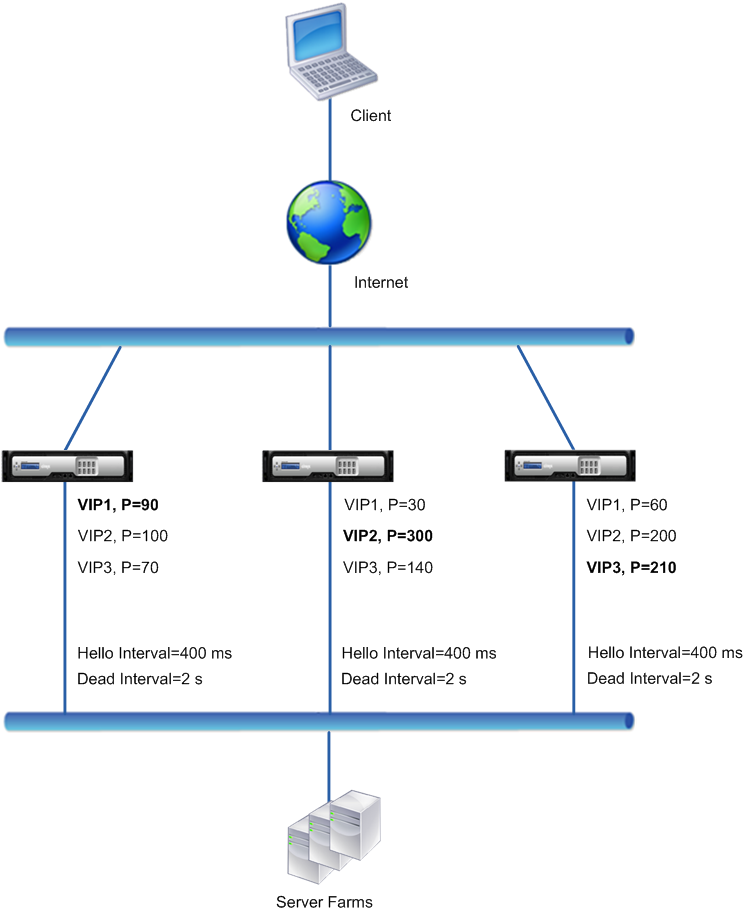
Consider an active-active deployment consisting of Citrix ADCs NS1, NS2, and NS3. Virtual IP addresses VIP1, VIP2, VIP3 are configured on each of these ADCs. Because of their priorities, VIP1 is active on NS1, VIP2 is active on NS2, and VIP3 is active on NS3.
As shown in the table below, the dead interval is set to the same value (2 seconds) on all the three nodes. The VRRP communication intervals (hello interval and dead interval) of a node apply to all the VRIDs configured on the node, and in turn, apply to all VIP addresses associated with the VRIDs on the node.
On each node, the VIP addresses that are active (master) on that node use the hello interval, and the dead interval is used by the VIP addresses that are inactive (backup) on that node. Preemption is disabled for the VIP addresses in all the three nodes.
The following table lists the settings used in this example: VRRP interval example 1 settings.

The execution flow is as follows:
- NS1 sends hello messages at a set hello interval of 400 ms to NS2 and NS3 for the VIP1 address, because VIP1 is active (the master) on NS1. Similarly, NS2 sends hello messages for VIP2, and NS3 sends hello messages for VIP3.
- On NS1, the set dead interval applies to VIP2 and VIP3, because they are inactive (backups) on NS1. Similarly, on NS2, the set dead interval applies to VIP1 and VIP3, and on NS3, the set dead interval applies to VIP1 and VIP2.
- If NS1 goes down, NS2 and NS3 consider NS1 to be down if they receive no hello messages from NS1 for 2 seconds (the dead interval). VIP1 on NS3 takes over and becomes active (master) because its VRID priority (60) is higher than that of VIP1 of NS2 (30).
Example 2: Nodes with Different VRRP Dead Intervals
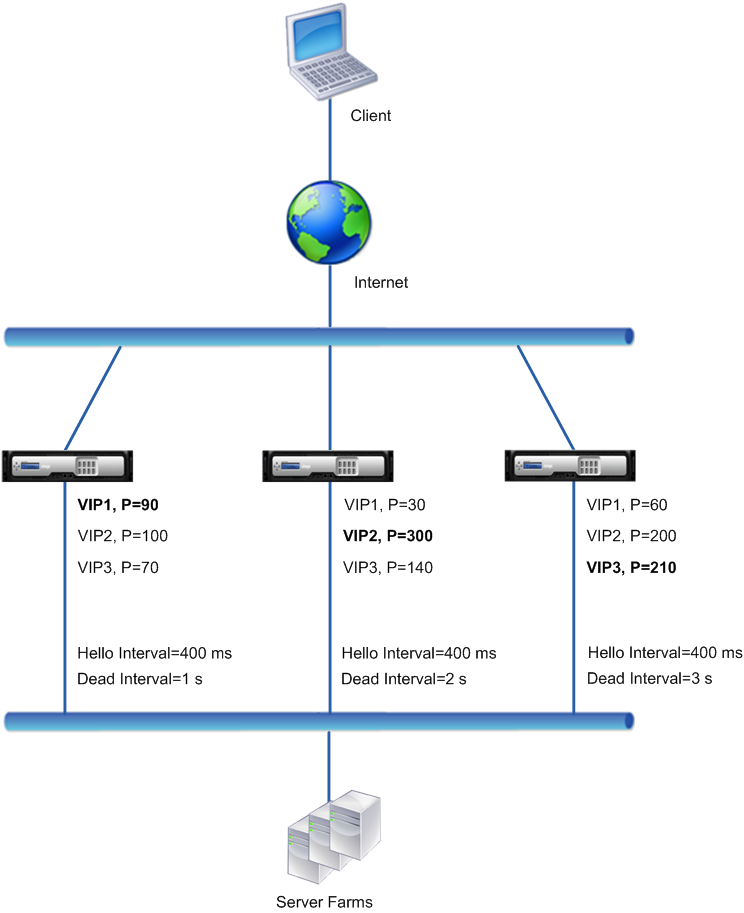
Consider a VRRP deployment similar to the deployment described in Example1 but with a different dead interval on each node (NS1, NS2, and NS3). Preemption is disabled for the VIP addresses in all the three nodes.
The following table lists the settings used in this example: VRRP interval example 2 settings.

The execution flow is as follows when NS1 goes down:
- NS2 considers NS1 to be down after not receiving any hello messages from NS1 for 2 seconds (NS2’s dead interval).
- VIP1 on NS2 takes over and becomes active (master). NS2 now starts sending hello messages for VIP1.
Even though VIP1 on NS3 has a higher VRIP priority (60) than does VIP1 on NS2 (30), NS3’s larger dead interval (3 seconds, vs. 2 seconds for NS2), prevents VIP1 on NS3 from taking over before VIP 1 on NS2 has already done so.
Example 3: Nodes with Different Dead Intervals and Preemption Enabled
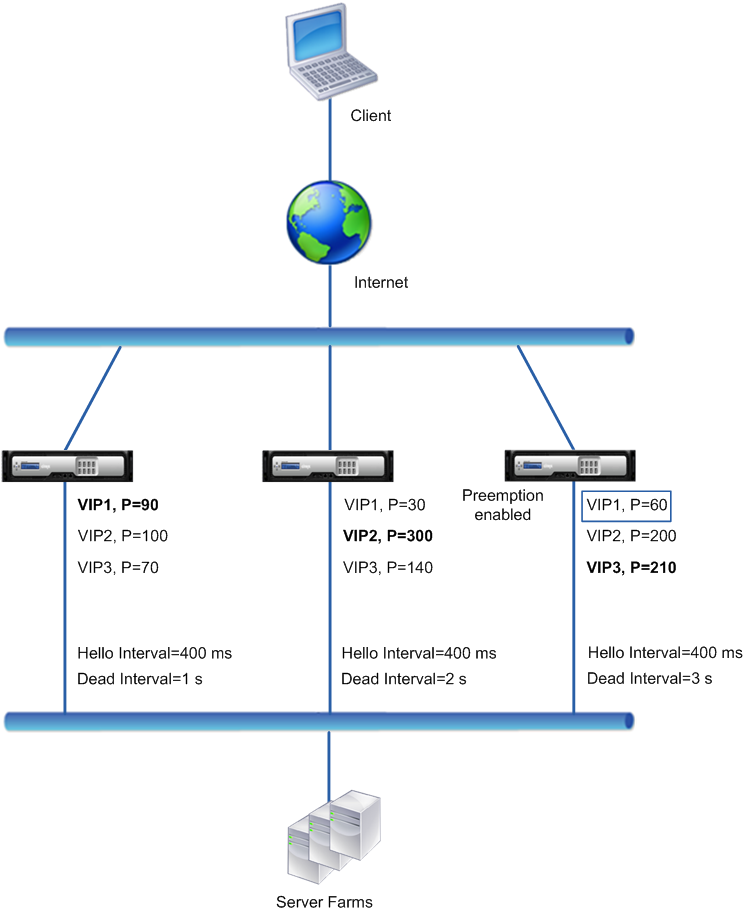
Consider a VRRP deployment similar to the deployment described in Example1 but with different dead intervals on the three nodes, NS1, NS2, and NS3, and with preemption enabled for the VIP1 address on NS3.
The following table lists the settings used in this example: VRRP interval example 3 settings.

The execution flow is as follows when NS1 goes down:
- NS2 considers NS1 to down after not receiving any hello messages from NS1 for 2 seconds (NS2’s set dead interval). At this time, NS3, with a dead interval of 3 seconds, does not consider NS1 to be down.
- VIP1 on NS2 takes over and becomes active (master). NS2 now starts sending hello messages for VIP1.
- Upon receiving hello messages from NS2 for VIP1, NS3 preempts NS2 for VIP1 because preemption is enabled for VIP1 of NS3 and the VRID priority (60) of VIP1 of NS3 is higher than that (30) of VIP1 of NS2.
- VIP1 on NS3 takes over and becomes active (master). NS3 now starts sending hello messages for VIP1.