RNAT
In Reverse Network Address Translation (RNAT), the Citrix ADC appliance replaces the source IP addresses in the packets generated by the servers with public NAT IP addresses. By default, the appliance uses a SNIP address as the NAT IP address. You can also configure the appliance to use a unique NAT IP address for each subnet. You can also configure RNAT by using Access Control Lists (ACLs). Use Source IP (USIP), Use Subnet IP (USNIP), and Link Load Balancing (LLB) modes affect the operation of RNAT. You can display statistics to monitor RNAT.
Note: The ephemeral port range for RNAT on the Citrix ADC appliance is 1024-65535.
You can use either a network address or an extended ACL as the condition for an RNAT entry:
-
Using a Network address. When you use a network address, RNAT processing is performed on all of the packets coming from the specified network.
-
Using Extended ACLs. When you use ACLs, RNAT processing is performed on all packets that match the ACLs. To configure the Citrix ADC appliance to use a unique IP address for traffic that matches an ACL, you must perform the following three tasks:
- Configure the ACL.
- Configure RNAT to change the source IP address and Destination Port.
- Apply the ACL.
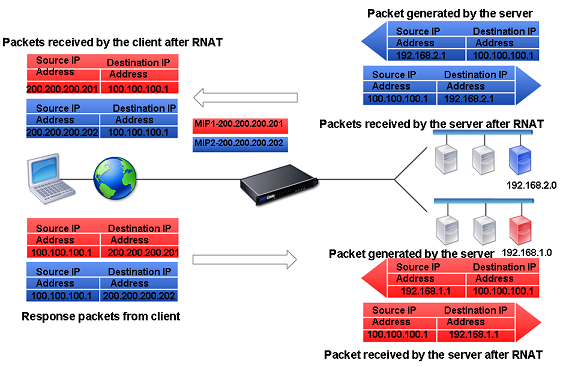
The following diagram illustrates RNAT configured with an ACL.
Figure 1. RNAT with an ACL

You have the following basic choices for the type of NAT IP address:
-
Using a SNIP as the NAT IP Address. When using a SNIP as the NAT IP address, the Citrix ADC appliance replaces the source IP addresses of server-generated packets with the a SNIP. Therefore, the SNIP address must be a public IP address. If Use Subnet IP (USNIP) mode is enabled, the Citrix ADC can use a subnet IP address (SNIP) as the NAT IP address.
-
Using a Unique IP Address as the NAT IP Address. When using a unique IP address as the NAT IP address, the Citrix ADC appliance replaces the source IP addresses of server-generated packets with the unique IP address specified. The unique IP address must be a public Citrix ADC-owned IP address. If multiple NAT IP addresses are configured for a subnet, NAT IP selection uses the round robin algorithm.
This configuration is illustrated in the following diagram.
Figure 2. Using a Unique IP Address as the NAT IP Address
Before you begin
Before configuring a RNAT rule, consider the following points:
-
When RNAT and Use Source IP (USIP) are both configured on the Citrix ADC appliance, RNAT takes precedence. In other words, the source IP address of the packets, which matches a RNAT rule, is replaced according to the setting in the RNAT rule.
-
In a topology where the Citrix ADC appliance performs both Link Load Balancing (LLB) and RNAT for traffic originating from the server, the appliance selects the source IP address based on the router. The LLB configuration determines selection of the router. For more information about LLB, see Link Load Balancing.
Configure RNAT
The following instructions provide separate command-line procedures for creating RNAT entries that use different conditions and different types of NAT IP addresses. In the GUI, all of the variations can be configured in the same dialog box, so there is only one procedure for GUI users.
CLI procedures
To create an RNAT entry by using the CLI:
At the command prompt, type one the following commands to create, respectively, an RNAT entry that uses a network address as the condition and a SNIP as the NAT IP address, an RNAT entry that uses a network address as the condition and a unique IP address as the NAT IP address, an RNAT entry that uses an ACL as the condition and a SNIP as the NAT IP address, or an RNAT entry that uses an ACL as a condition and a unique IP address as the NAT IP address:
- set rnat <IPAddress> <netmask>
- set rnat IPAddress <netMask> -natip <NATIPAddress>
- set rnat <aclname> [-redirectPort <port>]
- set rnat <aclname> [-redirectPort <port>] -natIP <NATIPAddress>
Use the following command to verify the configuration:
- show rnat
Examples:
A network address as the condition and a  SNIP as the NAT IP address:

> set rnat 192.168.1.0 255.255.255.0
 Done

A network address as the condition and a unique IP address as the NAT IP address:

> set rnat 192.168.1.0 255.255.255.0 -natip 10.102.29.50
 Done

If instead of a single NAT IP address you specify a range, RNAT entries are created with all the Citrix ADC-owned IP addresses, except the NSIP, that fall within the range specified:

> set rnat 192.168.1.0 255.255.255.0  -natIP 10.102.29.[50-110]
 Done

An ACL as the condition and a  SNIP as the NAT IP address:

> set rnat acl1
 Done

An ACL as a condition and a unique IP address as the NAT IP address:

> set rnat acl1  -natIP 209.165.202.129
Done

If instead of a single NAT IP address you specify a range, RNAT entries are created with all the Citrix ADC-owned IP addresses, except the NSIP, that fall within the range specified:

> set rnat acl1  -natIP 10.102.29.[50-70]
 Done

<!--NeedCopy-->
GUI procedures
To create an RNAT entry by using the GUI:
- Navigate to System > Network > NATs, and then click the RNAT tab.
- In the Action list, select Configure RNAT to create or modify an RNAT entry.
Monitor RNAT
You can display RNAT statistics to troubleshoot issues related to IP address translation.
The following table describes the statistics associated with RNAT and RNAT IP.
| Statistic | Description |
|---|---|
| Bytes received | Bytes received during RNAT sessions |
| Bytes sent | Bytes sent during RNAT sessions |
| Packets received | Packets received during RNAT sessions |
| Packets sent | Packets sent during RNAT sessions |
| Syn sent | Requests for connections sent during RNAT sessions |
| Current sessions | Currently active RNAT sessions |
To view RNAT statistics by using the CLI:
At the command prompt, type:
- stat rnat
Example:
> stat rnat

RNAT summary
                               Rate (/s)            Total
Bytes Received                   0                    0
Bytes Sent                       0                    0
Packets Received                 0                    0
Packets Sent                     0                    0
Syn Sent                         0                    0
Current RNAT sessions           --                    0
 Done
>
<!--NeedCopy-->
To monitor RNAT by using the GUI:
Navigate to System > Network > NATs, click the RNAT tab, and then click Statistics.
Configure RNAT6
Reverse Network Address Translation (RNAT) rules for IPv6 packets are called RNAT6s. When an IPv6 packet generated by a server matches the conditions specified in the RNAT6 rule, the appliance replaces the source IPv6 address of the IPv6 packet with a configured NAT IPv6 address before forwarding it to the destination. The NAT IPv6 address is one of the Citrix ADC owned SNIP6 or VIP6 addresses.
When configuring an RNAT6 rule, you can specify either an IPv6 prefix or an ACL6 as the condition:
- Using a IPv6 network address. When you use an IPv6 prefix, the appliance performs RNAT processing on those IPv6 packets whose IPv6 address matches the prefix.
- Using ACL6s. When you use an ACL6, the appliance performs RNAT processing on those IPv6 packets that match the conditions specified in the ACL6.
You have one of the following options to set the NAT IP address:
-
Specify a set of Citrix ADC owned SNIP6 and VIP6 addresses for an RNAT6 rule. The Citrix ADC appliance uses any one of the IPv6 addresses from this set as a NAT IP address for each session. The selection is based on the round robin algorithm and is done for each session.
-
Do not specify any Citrix ADC owned SNIP6 or VIP6 address for an RNAT6 rule. The Citrix ADC appliance uses any one of the Citrix ADC owned SNIP6 or VIP6 addresses as a NAT IP address. The selection is based on the next hop network to which an IPv6 packet that matches the RNAT rule is destined.
CLI procedures
To create an RNAT6 rule by using the CLI:
At the command prompt, to create the rule and verify the configuration, type:
- **add rnat6** <name> (<network> | (<acl6name> [-**redirectPort** <port>]))
- bind rnat6 <name> <natIP6>@ …
- show rnat6
To modify or remove an RNAT6 rule by using the CLI:
- To modify an RNAT6 rule whose condition is an ACL6, type the set rnat6 <name> command, followed by a new value for the redirectPort parameter.
- To remove an RNAT6 rule, type the clear rnat6 <name> command.
- show rnat6
GUI procedures
To configure an RNAT6 rule by using the GUI:
Navigate to System > Network > NATs, click the RNAT6 tab, and add a new RNAT6 rule, or edit an existing rule.
Monitor RNAT6
You can display statistics related to the RNAT6 feature to monitor the performance or to troubleshoot problems related to RNAT6 feature. You can display a summary of statistics of the RNAT6 rules or of a particular RNAT6 rule. The statistical counters reflect events since the Citrix ADC appliance was last restarted. All these counters are reset to 0 when the Citrix ADC appliance is restarted.
The following lists some of the statistics counters associated with the RNAT6 feature:
- Bytes received - Total bytes received during RNAT6 sessions.
- Bytes sent - Total number of bytes sent during RNAT6 sessions.
- Packets received - Total number of packets received during RNAT6 sessions.
- Packets sent - Total number of packets sent during RNAT6 sessions.
- Syn sent - Total number of requests for connections sent during RNAT6 sessions
- Current sessions - Currently active RNAT6 sessions
To display a summarized statistics of all RNAT6 rules by using the CLI:
At the command prompt, type:
- stat rnat6
To display statistics for a specified RNAT6 rule by using the CLI:
At the command prompt, type:
- stat rnat6 [<rnat6 rule name>]
To display RNAT6 statistics by using the GUI:
Navigate to System > Network > NATs, click the RNAT6 tab, and then click Statistics.
> stat rnat6

RNAT6 summary

                           Rate (/s)                Total

Bytes Received              178                20644

Bytes Sent                  178                20644

Packets Received             5                  401

Packets Sent                 5                  401

Syn Sent                     0                    2

Current RNAT6 sessions      --                    1

Done

<!--NeedCopy-->
Log Start Time and Connection Closure Reasons in RNAT Log Entries
For diagnosing or troubleshooting problems related to RNAT, the Citrix ADC appliance logs RNAT sessions whenever they are closed.
A log message for an RNAT session consists of the following information:
- Citrix ADC owned IP address (NSIP address or SNIP address) from which the log message is sourced
- Time stamp of log creation
- Protocol of the RNAT session
- Source IP address
- RNAT IP address
- Destination IP address
- Start time of the RNAT session
- Closing time of the RNAT session
- Total bytes sent by the Citrix ADC appliance for this RNAT session
- Total bytes received by the Citrix ADC appliance for this RNAT session
- Reason for closure of the RNAT session. The Citrix ADC appliance logs closure reason for TCP RNAT sessions that do not use the TCP proxy (TCP proxy disabled) of the appliance. The following are the type of closure reasons that are logged for TCP RNAT sessions:
- TCP FIN. The RNAT session was closed because of a TCP FIN sent by either the source or destination device.
- TCP RST. The RNAT session was closed because of a TCP Reset that was sent by either the source or destination device.
- TIMEOUT. The RNAT session timed out.
The following table shows some sample log entries for RNAT sessions.
| Type of Entry | Sample Log Entry |
|---|---|
| Sample log entry for UDP RNAT session | Dec 1 15:28:12 |
| Sample log entry for TCP RNAT session. The log entry shows that the session closed because of TCP Reset | Dec 1 15:29:59 |
| Sample log entry for TCP RNAT session. The log entry shows that the session timed out | Dec 1 15:30:12 |
Stateful Connection Failover for RNAT
Connection failover helps prevent disruption of access to applications deployed in a distributed environment. The Citrix ADC appliance now supports stateful connection failover for connections related to RNAT rules in a Citrix ADC High Availability (HA) setup. In an HA setup, connection failover (or connection mirroring) refers to the process of keeping an established TCP or UDP connection active when a failover occurs.
The primary appliance sends messages to the secondary appliance to synchronize current information about the RNAT connections. The secondary appliance uses this connection information only in the event of a failover. When a failover occurs, the new primary Citrix ADC appliance has information about the connections established before the failover and hence continues to serve those connections even after the failover. From the client’s perspective this failover is transparent. During the transition period, the client and server may experience a brief disruption and retransmissions.
Connection failover can be enabled per RNAT rule. For enabling connection failover on an RNAT rule, you enable the connFailover (Connection Failover) parameter of that specific RNAT rule by using either CLI or GUI.
To enable connection failover for a RNAT rule by using the CLI:
At the command prompt, type:
- **set rnat** <name> -**connfailover** (**ENABLED** | **DISABLED**)
- show rnat
To enable connection failover for a RNAT rule by using the GUI:
- Navigate to System > Network > NATs, and then click the RNAT tab.
- Select Connection Failover while adding a new RNAT rule, or while editing an existing rule.
Removing RNAT Sessions
You can remove any unwanted or inefficient RNAT sessions from the Citrix ADC appliance. The appliance immediately releases resources (such as the port of the NAT IP address, and memory) allocated for these sessions, making the resources available for new sessions. The appliance also drops all the subsequent packets related to these removed sessions. You can remove all or selected RNAT sessions from the Citrix ADC appliance.
To clear all RNAT sessions by using the CLI:
At the command prompt, type:
- flush rnatsession
To clear selective RNAT sessions by using the CLI:
At the command prompt, type:
- **flush rnatsession** ((-**network** <ip_addr> -**netmask** <netmask>) | -**natIP** <ip_addr> | -**aclname** <string>)
To clear all or selective RNAT sessions by using the GUI:
- Navigate to System > Network > NATs, and then click the RNAT tab.
- In the Actions Menu, click Flush RNAT Sessions to remove all or selective RNAT sessions (for example, removing RNAT sessions with a specific RNAT IP, or belonging to a specific Network or ACL based RNAT rule).
Sample Configurations:
Clear all RNAT sessions existing on a Citrix ADC appliance

> flush rnatsession

Done

Clear all RNAT sessions belonging to network based RNAT rules that has 203.0.113.0/24 network as the matching condition.

> flush rnatsession -network 203.0.113.0 -netmask 255.255.255.0

Done

Clear all RNAT sessions with RNAT IP 192.0.2.90.

> flush rnatsession -natIP 192.0.2.90

Done

Clear all RNAT sessions belonging to ACL based RNAT rules that has ACL-RNAT-1 as the matching condition.

> flush rnatsession -aclname ACL-RNAT-1

Done
<!--NeedCopy-->