Client Authentication or Mutual TLS (mTLS)
In a typical SSL transaction, the client that is connecting to a server over a secure connection checks the validity of the server by checking the server’s certificate before initiating the SSL transaction. Sometimes, however, you might want to configure the server to authenticate the client that is connecting to it.
With client authentication enabled on an SSL virtual server, the Citrix ADC appliance asks for the client certificate during the SSL handshake. The appliance checks the certificate presented by the client for normal constraints, such as the issuer signature and expiration date.
Note
For the appliance to verify issuer signatures, the certificate of the CA that issued the client certificate must be:
- Installed on the appliance.
- Bound to the virtual server that the client is transacting with.
If the certificate is valid, the appliance allows the client to access all secure resources. But if the certificate is invalid, the appliance drops the client request during the SSL handshake.
The appliance verifies the client certificate by first forming a chain of certificates, starting with the client certificate, and ending with the root CA certificate for the client (for example, Verisign). The root CA certificate might contain one or more intermediate CA certificates (if the client certificate is not directly issued by the root CA).
Before you enable client authentication on the Citrix ADC appliance, make sure that a valid client certificate is installed on the client. Then, enable client authentication for the virtual server that handles the transactions. Finally, bind the certificate of the CA that issued the client certificate to the virtual server on the appliance.
Note
A Citrix ADC MPX appliance supports a certificate-key pair size from 512 bits to 4096 bits. The certificate must be signed by using one of the following hash algorithms:
- MD5
- SHA-1
- SHA-224
- SHA-256
- SHA-384
- SHA-512
On an SDX appliance, if an SSL chip is assigned to a VPX instance, the certificate-key pair size support of an MPX appliance applies. Otherwise, the normal certificate-key pair size support of a VPX instance applies.
A Citrix ADC virtual appliance (VPX instance) supports certificates of at least 512 bits, up to the following sizes:
- 4096-bit server certificate on the virtual server
- 4096-bit client certificate on the service
- 4096-bit CA certificate
- 4096-bit certificate on the physical server
- 2048-bit client certificate (if client authentication is enabled on the virtual server)
Provide the client certificate
Before you configure client authentication, a valid client certificate must be installed on the client. A client certificate includes details about the specific client system that creates secure sessions with the Citrix ADC appliance. Each client certificate is unique and only one client system must use it.
Whether you obtain the client certificate from a CA, use an existing client certificate, or generate a client certificate on the Citrix ADC appliance, you must convert the certificate to the correct format. On the Citrix ADC appliance, certificates are stored in either the PEM or DER format and must be converted to PKCS#12 format before they are installed on the client system. After converting the certificate and transferring it to the client, system, make sure that it is installed on that system and configured for the client application that will be part of the SSL transactions (for example, the web browser).
For instructions on how to convert a certificate from PEM or DER format to PKCS#12 format, see Import and convert SSL files.
For instructions on how to generate a client certificate, see Create a certificate.
Enable client-certificate based authentication
By default, client authentication is disabled on the Citrix ADC appliance, and all SSL transactions proceed without authenticating the client. You can configure client authentication to be either optional or mandatory as part of the SSL handshake.
If client authentication is optional, the appliance requests the client certificate but proceeds with the SSL transaction even if the client presents an invalid certificate. If client authentication is mandatory, the appliance terminates the SSL handshake if the SSL client does not provide a valid certificate.
Caution: Citrix recommends that you define proper access control policies before changing the client-certificate-based authentication check to optional.
Note: Client authentication is configured for individual SSL virtual servers, not globally.
Enable client-certificate based authentication by using the CLI
At the command prompt, type the following commands to enable the client-certificate-based authentication and verify the configuration:
set ssl vserver <vServerName> [-clientAuth (ENABLED | DISABLED)] [-clientCert (MANDATORY | OPTIONAL)]
show ssl vserver <vServerName>
<!--NeedCopy-->
Example:
set ssl vserver vssl -clientAuth ENABLED -clientCert Mandatory
Done
show ssl vserver vssl

Advanced SSL configuration for VServer vssl:
DH: DISABLED
Ephemeral RSA: ENABLED Refresh Count: 0
Session Reuse: ENABLED Timeout: 120 seconds
Cipher Redirect: DISABLED
SSLv2 Redirect: DISABLED
ClearText Port: 0
Client Auth: ENABLED Client Cert Required: Mandatory
SSL Redirect: DISABLED
Non FIPS Ciphers: DISABLED
        SNI: DISABLED
        OCSP Stapling: DISABLED
        HSTS: DISABLED
        HSTS IncludeSubDomains: NO
        HSTS Max-Age: 0
SSLv2: DISABLED SSLv3: ENABLED TLSv1.0: ENABLED TLSv1.2: ENABLED TLSv1.2: ENABLED

1) CertKey Name: sslckey Server Certificate

1) Policy Name: client_cert_policy Priority: 0

1) Cipher Name: DEFAULT
Description: Predefined Cipher Alias
Done
<!--NeedCopy-->
Enable client-certificate based authentication by using the GUI
- Navigate to Traffic Management > Load Balancing > Virtual Servers, and open a virtual server.
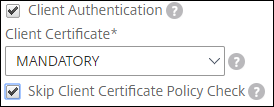
- In the SSL Parameters section, select Client Authentication, and in the Client Certificate list, select Mandatory.
Note:
If client authentication is set to mandatory and if the client certificate contains policy extensions, certificate validation fails. From release 12.0-56.x, you can set a parameter in the front-end SSL profile to skip this check. The parameter is disabled by default. That is, the check is performed by default.
Skip the policy extension check during client authentication by using the CLI
At the command prompt, type:
set ssl profile ns_default_ssl_profile_frontend -clientauth ENABLED -skipClientCertPolicyCheck ENABLED

Parameter

skipClientCertPolicyCheck

              Control policy extension check, if present inside the X509 certificate chain. Applicable only if client authentication is enabled and client certificate is set to mandatory. Possible values functions as follows:

- ENABLED: Skip the policy check during client authentication.

- DISABLED: Perform policy check during client authentication.

Possible values: ENABLED, DISABLED

Default: DISABLED
<!--NeedCopy-->
Skip the policy extension check during client authentication by using the GUI
- Navigate to System > Profiles > SSL Profiles.
- Create a new front-end profile or edit an existing front-end profile.
- Verify that client authentication is enabled and client certificate is set to mandatory.
- Select Skip Client Certificate Policy Check.
Bind CA certificates to the virtual server
A CA whose certificate is present on the Citrix ADC appliance must issue the client certificate used for client authentication. Bind this certificate to the Citrix ADC virtual server that performs client authentication.
Bind the CA certificate to the SSL virtual server in such a way that the appliance can form a complete certificate chain when it verifies the client certificate. Otherwise, certificate chain formation fails and the client is denied access even if its certificate is valid.
You can bind CA certificates to the SSL virtual server in any order. The appliance forms the proper order during client certificate verification.
For example, if the client presents a certificate issued by CA_A, where CA_A is an intermediate CA whose certificate is issued by CA_B, whose certificate is in turn issued by a trusted root CA, Root_CA, a chain of certificates that contain all three of these certificates must be bound to the virtual server on the Citrix ADC appliance.
For instructions on binding one or more certificates to the virtual server, see Bind the certificate-key pair to the SSL virtual server.
For instructions on creating a chain of certificates, see Create a chain of certificates.
Stricter control on client certificate validation
The Citrix ADC appliance accepts valid Intermediate-CA certificates if one Root-CA issues the certificates. That is, if only the Root-CA certificate is bound to the virtual server, and any intermediate certificate sent with the client certificate is validated by that Root-CA, the appliance trusts the certificate chain and the handshake is successful.
However, if a client sends a chain of certificates in the handshake, none of the intermediate certificates can be validated by using a CRL or OCSP responder unless that certificate is bound to the SSL virtual server. Therefore, even if one of the intermediate certificates is revoked, the handshake is successful. As part of the handshake, the SSL virtual server sends the list of CA certificates that are bound to it. For stricter control, you can configure the SSL virtual server to accept only a certificate signed by one of the CA certificates bound to that virtual server. To do so, you must enable the ClientAuthUseBoundCAChain setting in the SSL profile bound to the virtual server. The handshake fails if one of the CA certificates bound to the virtual server has not signed the client certificate.
For example, say intermediate certificates Int-CA-A and Int-CA-B sign the two client certificates, clientcert1 and clientcert2, respectively. The root certificate Root-CA signs the intermediate certificates. Int-CA-A and Root-CA are bound to the SSL virtual server. In the default case (ClientAuthUseBoundCAChain disabled), both clientcert1 and clientcert2 are accepted. However, if ClientAuthUseBoundCAChain is enabled, the Citrix ADC appliance only accepts clientcert1.
Enable stricter control on client certificate validation by using the CLI
At the command prompt, type:
set ssl profile <name> -ClientAuthUseBoundCAChain Enabled
<!--NeedCopy-->
Enable stricter control on client certificate validation by using the GUI
- Navigate to System > Profiles, select the SSL Profiles tab, and create an SSL profile, or select an existing profile.
- Select Enable Client Authentication using bound CA Chain.