Install, link, and update certificates
To install a certificate, see Add or update a certificate-key pair.
Link certificates
Many server certificates are signed by multiple hierarchical Certificate Authorities (CAs), which means that the certificates form a chain like the following:

Sometimes, the Intermediate CA is split into a primary and secondary intermediate certificate authority. Then the certificates form a chain like the following:

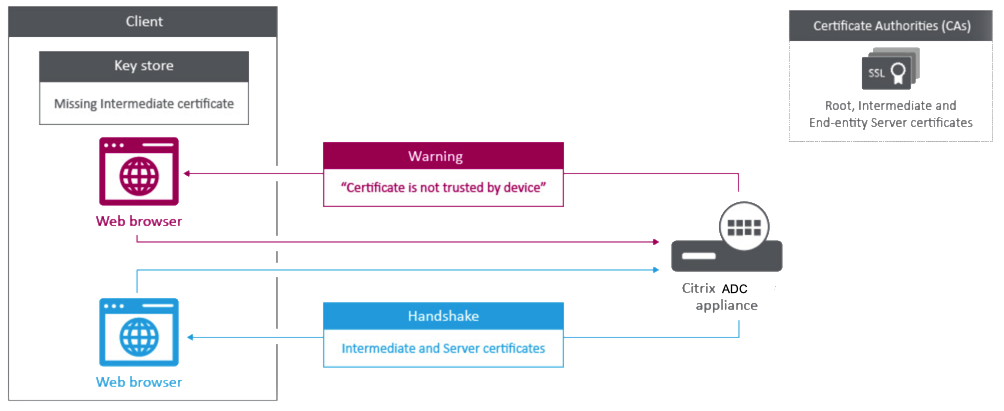
Client machines usually contain the root CA certificate in their local certificate store, but not one or more the intermediate CA certificates. The ADC appliance must send one or more intermediate CA certificates to the clients.
Note: The appliance must not send the root CA certificate to the client. The Public Key Infrastructure (PKI) trust relationship model requires root CA certificates to be installed on clients through an out-of-band method. For example, the certificates are included with the operating system or web browser. The client ignores a root CA certificate sent by the appliance.
Sometimes, an intermediate CA that standard web browsers do not recognize as a trusted CA, issues the server certificate. In this case, one or more CA certificates must be sent to the client with the server’s own certificate. Otherwise, the browser terminates the SSL session because it fails to authenticate the server certificate.
Video link to How do I link an intermediate authority certificate.
There are two ways to add the server and intermediate certificates:
- Create a certificate set that contains the chain of certificates.
- Create a chain of certificates manually by adding and linking the certificates individually.
Add and link a certificate set
Note: This feature is not supported on the Citrix ADC FIPS platform and in a cluster setup.
Instead of adding and linking individual certificates, you can now group a server certificate and up to nine intermediate certificates in a single file. You can specify the file’s name when adding a certificate-key pair. Before you do so, make sure that the following prerequisites are met.
- The certificates in the file are in the following order:
- Server certificate (must be the first certificate in the file)
- Optionally, a server key
- Intermediate certificate 1 (ic1)
- Intermediate certificate 2 (ic2)
- Intermediate certificate 3 (ic3), and so on Note: Intermediate certificate files are created for each intermediate certificate with the name “<certificatebundlename>.pem_ic< n>” where n is between 1 and 9. For example, bundle.pem_ic1, where bundle is the name of the certificate set and ic1 is the first intermediate certificate in the set.
- Bundle option is selected.
- No more than nine intermediate certificates are present in the file.
The file is parsed and the server certificate, intermediate certificates, and server key (if present) are identified. First, the server certificate and key are added. Then, the intermediate certificates are added, in the order in which they were added to the file, and linked accordingly.
An error is reported if any of the following conditions exist:
- A certificate file for one of the intermediate certificates exists on the appliance.
- The key is placed before the server certificate in the file.
- An intermediate certificate is placed before the server certificate.
- Intermediate certificates are not in placed in the file in the same order as they are created.
- No certificates are present in the file.
- A certificate is not in the proper PEM format.
- The number of intermediate certificates in the file exceeds nine.
Add a certificate set by using the CLI
At the command prompt, type the following commands to create a certificate set and verify the configuration:
add ssl certKey <certkeyName> -cert <string> -key <string> -bundle (YES | NO)

show ssl certKey

show ssl certlink
In the following example, the certificate set (bundle.pem) contains the following files:
Server certificate (bundle) linked to bundle_ic1
First intermediate certificate (bundle_ic1) linked to bundle_ic2
Second intermediate certificate (bundle_ic2) linked to bundle_ic3
Third intermediate certificate (bundle_ic3)
add ssl certKey bundletest -cert bundle9.pem -key bundle9.pem -bundle yes

sh ssl certkey

1)      Name: ns-server-certificate
        Cert Path: ns-server.cert
        Key Path: ns-server.key
        Format: PEM
        Status: Valid,   Days to expiration:5733
        Certificate Expiry Monitor: ENABLED
        Expiry Notification period: 30 days
        Certificate Type: Server Certificate
        Version: 3
        Serial Number: 01
        Signature Algorithm: sha256WithRSAEncryption
        Issuer:  C=US,ST=California,L=San Jose,O=Citrix ANG,OU=NS Internal,CN=default OULLFT
        Validity
                Not Before: Apr 21 15:56:16 2016 GMT
                Not After : Mar  3 06:30:56 2032 GMT
        Subject:  C=US,ST=California,L=San Jose,O=Citrix ANG,OU=NS Internal,CN=default OULLFT
        Public Key Algorithm: rsaEncryption
        Public Key size: 2048

2)      Name: servercert
        Cert Path: complete/server/server_rsa_1024.pem
        Key Path: complete/server/server_rsa_1024.ky
        Format: PEM
        Status: Valid,   Days to expiration:7150
        Certificate Expiry Monitor: ENABLED
        Expiry Notification period: 30 days
        Certificate Type: Server Certificate
        Version: 3
        Serial Number: 1F
        Signature Algorithm: sha1WithRSAEncryption
        Issuer:  C=IN,ST=KAR,O=Citrix R&D Pvt Ltd,CN=Citrix
        Validity
                Not Before: Sep  2 09:54:07 2008 GMT
                Not After : Jan 19 09:54:07 2036 GMT
        Subject:  C=IN,ST=KAR,O=Citrix Pvt Ltd,CN=Citrix
        Public Key Algorithm: rsaEncryption
        Public Key size: 1024

3)      Name: bundletest
        Cert Path: bundle9.pem
        Key Path: bundle9.pem
        Format: PEM
        Status: Valid,   Days to expiration:3078
        Certificate Expiry Monitor: ENABLED
        Expiry Notification period: 30 days
        Certificate Type: Server Certificate
        Version: 3
        Serial Number: 01
        Signature Algorithm: sha256WithRSAEncryption
        Issuer:  C=IN,ST=ka,O=sslteam,CN=ICA9
        Validity
                Not Before: Nov 28 06:43:11 2014 GMT
                Not After : Nov 25 06:43:11 2024 GMT
        Subject:  C=IN,ST=ka,O=sslteam,CN=Server9
        Public Key Algorithm: rsaEncryption
        Public Key size: 2048

4)      Name: bundletest_ic1
        Cert Path: bundle9.pem_ic1
        Format: PEM
        Status: Valid,   Days to expiration:3078
        Certificate Expiry Monitor: ENABLED
        Expiry Notification period: 30 days
        Certificate Type: Intermediate CA
        Version: 3
        Serial Number: 01
        Signature Algorithm: sha256WithRSAEncryption
        Issuer:  C=IN,ST=ka,O=sslteam,CN=ICA8
        Validity
                Not Before: Nov 28 06:42:56 2014 GMT
                Not After : Nov 25 06:42:56 2024 GMT
        Subject:  C=IN,ST=ka,O=sslteam,CN=ICA9
        Public Key Algorithm: rsaEncryption
        Public Key size: 2048

5)      Name: bundletest_ic2
        Cert Path: bundle9.pem_ic2
        Format: PEM
        Status: Valid,   Days to expiration:3078
        Certificate Expiry Monitor: ENABLED
        Expiry Notification period: 30 days
        Certificate Type: Intermediate CA
        Version: 3
        Serial Number: 01
        Signature Algorithm: sha256WithRSAEncryption
        Issuer:  C=IN,ST=ka,O=sslteam,CN=ICA7
        Validity
                Not Before: Nov 28 06:42:55 2014 GMT
                Not After : Nov 25 06:42:55 2024 GMT
        Subject:  C=IN,ST=ka,O=sslteam,CN=ICA8
        Public Key Algorithm: rsaEncryption
        Public Key size: 2048

6)      Name: bundletest_ic3
        Cert Path: bundle9.pem_ic3
        Format: PEM
        Status: Valid,   Days to expiration:3078
        Certificate Expiry Monitor: ENABLED
        Expiry Notification period: 30 days
        Certificate Type: Intermediate CA
        Version: 3
        Serial Number: 01
        Signature Algorithm: sha256WithRSAEncryption
        Issuer:  C=IN,ST=ka,O=sslteam,CN=ICA6
        Validity
                Not Before: Nov 28 06:42:53 2014 GMT
                Not After : Nov 25 06:42:53 2024 GMT
        Subject:  C=IN,ST=ka,O=sslteam,CN=ICA7
        Public Key Algorithm: rsaEncryption
        Public Key size: 2048

7)      Name: bundletest_ic4
        Cert Path: bundle9.pem_ic4
        Format: PEM
        Status: Valid,   Days to expiration:3078
        Certificate Expiry Monitor: ENABLED
        Expiry Notification period: 30 days
        Certificate Type: Intermediate CA
        Version: 3
        Serial Number: 01
        Signature Algorithm: sha256WithRSAEncryption
        Issuer:  C=IN,ST=ka,O=sslteam,CN=ICA5
        Validity
                Not Before: Nov 28 06:42:51 2014 GMT
                Not After : Nov 25 06:42:51 2024 GMT
        Subject:  C=IN,ST=ka,O=sslteam,CN=ICA6
        Public Key Algorithm: rsaEncryption
        Public Key size: 2048

8)      Name: bundletest_ic5
        Cert Path: bundle9.pem_ic5
        Format: PEM
        Status: Valid,   Days to expiration:3078
        Certificate Expiry Monitor: ENABLED
        Expiry Notification period: 30 days
        Certificate Type: Intermediate CA
        Version: 3
        Serial Number: 01
        Signature Algorithm: sha256WithRSAEncryption
        Issuer:  C=IN,ST=ka,O=sslteam,CN=ICA4
        Validity
                Not Before: Nov 28 06:42:50 2014 GMT
                Not After : Nov 25 06:42:50 2024 GMT
        Subject:  C=IN,ST=ka,O=sslteam,CN=ICA5
        Public Key Algorithm: rsaEncryption
        Public Key size: 2048

9)      Name: bundletest_ic6
        Cert Path: bundle9.pem_ic6
        Format: PEM
        Status: Valid,   Days to expiration:3078
        Certificate Expiry Monitor: ENABLED
        Expiry Notification period: 30 days
        Certificate Type: Intermediate CA
        Version: 3
        Serial Number: 01
        Signature Algorithm: sha256WithRSAEncryption
        Issuer:  C=IN,ST=ka,O=sslteam,CN=ICA3
        Validity
                Not Before: Nov 28 06:42:48 2014 GMT
                Not After : Nov 25 06:42:48 2024 GMT
        Subject:  C=IN,ST=ka,O=sslteam,CN=ICA4
        Public Key Algorithm: rsaEncryption
        Public Key size: 2048

10)     Name: bundletest_ic7
        Cert Path: bundle9.pem_ic7
        Format: PEM
        Status: Valid,   Days to expiration:3078
        Certificate Expiry Monitor: ENABLED
        Expiry Notification period: 30 days
        Certificate Type: Intermediate CA
        Version: 3
        Serial Number: 01
        Signature Algorithm: sha256WithRSAEncryption
        Issuer:  C=IN,ST=ka,O=sslteam,CN=ICA2
        Validity
                Not Before: Nov 28 06:42:46 2014 GMT
                Not After : Nov 25 06:42:46 2024 GMT
        Subject:  C=IN,ST=ka,O=sslteam,CN=ICA3
        Public Key Algorithm: rsaEncryption
        Public Key size: 2048

11)     Name: bundletest_ic8
        Cert Path: bundle9.pem_ic8
        Format: PEM
        Status: Valid,   Days to expiration:3078
        Certificate Expiry Monitor: ENABLED
        Expiry Notification period: 30 days
        Certificate Type: Intermediate CA
        Version: 3
        Serial Number: 01
        Signature Algorithm: sha256WithRSAEncryption
        Issuer:  C=IN,ST=ka,O=sslteam,CN=ICA1
        Validity
                Not Before: Nov 28 06:42:45 2014 GMT
                Not After : Nov 25 06:42:45 2024 GMT
        Subject:  C=IN,ST=ka,O=sslteam,CN=ICA2
        Public Key Algorithm: rsaEncryption
        Public Key size: 2048

12)     Name: bundletest_ic9
        Cert Path: bundle9.pem_ic9
        Format: PEM
        Status: Valid,   Days to expiration:3078
        Certificate Expiry Monitor: ENABLED
        Expiry Notification period: 30 days
        Certificate Type: Intermediate CA
        Version: 3
        Serial Number: 01
        Signature Algorithm: sha256WithRSAEncryption
        Issuer:  C=IN,ST=ka,O=sslteam,CN=RootCA4096
        Validity
                Not Before: Nov 28 06:42:43 2014 GMT
                Not After : Nov 25 06:42:43 2024 GMT
        Subject:  C=IN,ST=ka,O=sslteam,CN=ICA1
        Public Key Algorithm: rsaEncryption
        Public Key size: 2048
Done

sh ssl certlink

1)      Cert Name: bundletest    CA Cert Name: bundletest_ic1
2)      Cert Name: bundletest_ic1        CA Cert Name: bundletest_ic2
3)      Cert Name: bundletest_ic2        CA Cert Name: bundletest_ic3
4)      Cert Name: bundletest_ic3        CA Cert Name: bundletest_ic4
5)      Cert Name: bundletest_ic4        CA Cert Name: bundletest_ic5
6)      Cert Name: bundletest_ic5        CA Cert Name: bundletest_ic6
7)      Cert Name: bundletest_ic6        CA Cert Name: bundletest_ic7
8)      Cert Name: bundletest_ic7        CA Cert Name: bundletest_ic8
9)      Cert Name: bundletest_ic8        CA Cert Name: bundletest_ic9
Done
Add a certificate set by using the GUI
- Navigate to Traffic Management > SSL > Certificates > CA Certifcates.
- In the details pane, click Install.
- In the Install Certificate dialog box, type the details, such as the certificate and key file name, and then select Certificate Bundle.
- Click Install, and then click Close.
Create a chain of certificates
Instead of using a set of certificates (a single file), you can create a chain of certificates. The chain links the server certificate to its issuer (the intermediate CA). This approach requires that the intermediate CA certificate file is installed on the ADC appliance, and the client application must trust one of the certificates in the chain. For example, link Cert-Intermediate-A to Cert-Intermediate-B, where Cert-Intermediate-B is linked to Cert-Intermediate-C, which is a certificate trusted by the client application.
Note: The appliance supports sending a maximum of 10 certificates in the chain of certificates sent to the client (one server certificate and nine CA certificates).
Create a certificate chain by using the CLI
At the command prompt, type the following commands to create a certificate chain and verify the configuration. (Repeat the first command for each new link in the chain.)
link ssl certkey <certKeyName> <linkCertKeyName>
show ssl certlink
Example:
link ssl certkey siteAcertkey CAcertkey
Done

show ssl certlink

linked certificate:
       1) Cert Name: siteAcertkey CA Cert Name: CAcertkey
Done
Create a certificate chain by using the GUI
- Navigate to Traffic Management > SSL > Certificates.
- Select a server certificate, and in the Action list, select Link, and specify a CA certificate name.
Update an existing server certificate
To change an existing server certificate manually, you must perform the following steps:
- Unbind the old certificate from the virtual server.
- Remove the certificate from the appliance.
- Add the new certificate to the appliance.
- Bind the new certificate to the virtual server.
To reduce downtime when replacing a certificate-key pair, you can update an existing certificate. If you want to replace a certificate with a certificate that was issued to a different domain, you must disable domain checks before updating the certificate.
To receive notifications about certificates due to expire, you can enable the expiry monitor.
When you remove or unbind a certificate from a configured SSL virtual server or service, the virtual server or service becomes inactive. They are active after a new valid certificate is bound to them. To reduce downtime, you can use the update feature to replace a certificate-key pair that is bound to an SSL virtual server or an SSL service.
Overview diagram of how to update an SSL certificate on the Citrix ADC appliance.

Video link to How do I update an existing certificate.
Update an existing certificate-key pair by using the CLI
At the command prompt, type the following commands to update an existing certificate-key pair and verify the configuration:
update ssl certkey <certkeyName> -cert <string> -key <string>

show ssl certKey <certkeyName>
Example:
update ssl certkey siteAcertkey -cert /nsconfig/ssl/cert.pem -key /nsconfig/ssl/pkey.pem

Done

show ssl certkey siteAcertkey

Name: siteAcertkey       Status: Valid
           Version: 3
           Serial Number: 02
           Signature Algorithm: md5WithRSAEncryption
           Issuer: /C=US/ST=CA/L=Santa Clara/O=siteA/OU=Tech
           Validity
                Not Before: Nov 11 14:58:18 2001 GMT
                Not After: Aug 7 14:58:18 2004 GMT
           Subject: /C=US/ST-CA/L=San Jose/O=CA/OU=Security
           Public Key Algorithm: rsaEncryption
           Public Key size: 2048
Done
Update an existing certificate-key pair by using the GUI
-
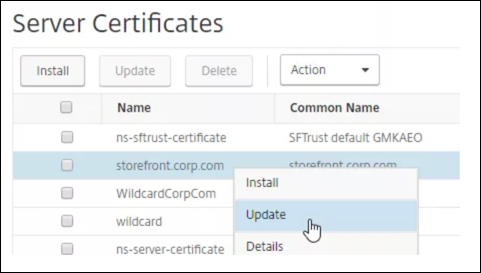
Navigate to Traffic Management > SSL > Certificates > Server Certificates.
-
Select the certificate that you want to update, and click Update.
-
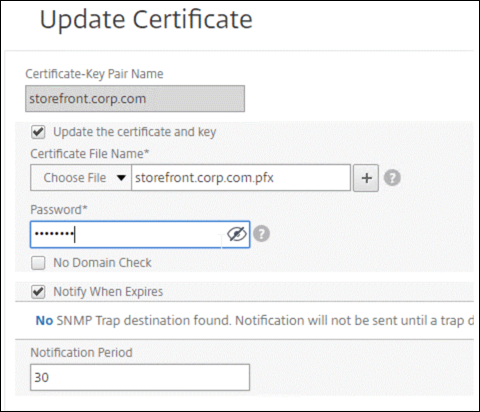
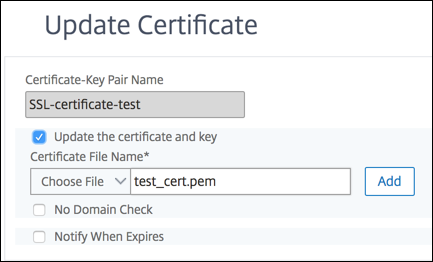
Select Update the certificate and key.
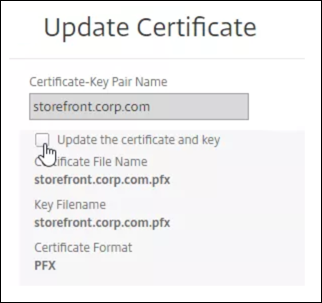
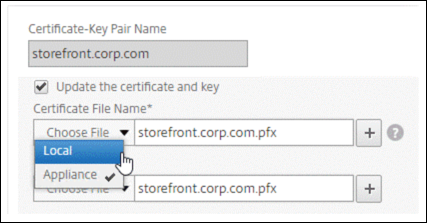
-
In Certificate File Name, click Choose File > Local, and browse to the updated .pfx file or certificate PEM file.
-
If you upload a .pfx file, you are prompted to specify the .pfx file password.
-
If you upload a certificate pem file, you must also upload a certificate key file. If the key is encrypted, you must specify the encryption password.
-
-
If the common name of the new certificate does not match the old certificate, then select No Domain Check.
-
Click OK. All the SSL virtual servers to which this certificate is bound are automatically updated.
-
After replacing the certificate, you might have to update the certificate link to a new intermediate certificate. For more information about updating an intermediate certificate without breaking the links, see Update an intermediate certificate without breaking the links.
-
Right-click the updated certificate, and click Cert Links, to see if it is linked to an intermediate certificate.
-
If the certificate is not linked, then right-click the updated certificate, and click Link to link it to an intermediate certificate. If you don’t see an option to link, then you must first have to install a new intermediate certificate on the appliance under the CA Certificates node.

-
Update an existing CA certificate
The steps to update an existing CA certificate are the same as updating an existing server certificate. The only difference is that you do not need a key in the case of CA certificates.
Disable domain checks
When an SSL certificate is replaced on the appliance, the domain name mentioned on the new certificate must match the domain name of the certificate being replaced. For example, if you have a certificate issued to abc.com, and you are updating it with a certificate issued to def.com, the certificate update fails.
However, if you want the server that has been hosting a particular domain to now host a new domain, disable the domain check before updating its certificate.
Disable the domain check for a certificate by using the CLI
At the command prompt, type the following commands to disable the domain check and verify the configuration:
update ssl certKey <certkeyName> -noDomainCheck

show ssl certKey <certkeyName>
Example:
update ssl certKey sv -noDomainCheck

Done

show ssl certkey sv

Name: sv
Cert Path: /nsconfig/ssl/complete/server/server_rsa_512.pem
Key Path: /nsconfig/ssl/complete/server/server_rsa_512.ky
Format: PEM
Status: Valid,   Days to expiration:9349
Certificate Expiry Monitor: DISABLED
Done
Disable the domain check for a certificate by using the GUI
- Navigate to Traffic Management > SSL > Certificates, select a certificate, and click Update.
- Select No Domain Check.
Replace the default certificate of an ADC appliance with a trusted CA certificate that matches the host name of the appliance
The following procedure assumes that the default certificate (ns-server-certificate) is bound to the internal services.
- Navigate to Traffic Management > SSL > SSL Certificates > Create Certificate Request.
- In common name, type
test.citrixadc.com. - Submit the CSR to a trusted certificate authority.
- After receiving the certificate from the trusted CA, copy the file to the
/nsconfig/ssldirectory. - Navigate to Traffic Management > SSL > Certificates > Server Certificates.
- Select the default server certificate (
ns-server-certificate) and click Update. - In the Update Certificate dialog box, in Certificate File Name, browse to the certificate received from the CA after signing.
- In the Key File Name field, specify the default private key file name (
ns-server.key). - Select No Domain Check.
- Click OK.
Enable the expiry monitor
An SSL certificate is valid for a specific period. A typical deployment includes multiple virtual servers that process SSL transactions, and the certificates bound to them can expire at different times. An expiry monitor configured on the appliance creates entries in the appliance’s syslog and ns audit logs when a certificate configured is due to expire.
If you want to create SNMP alerts for certificate expiration, you must configure them separately.
Enable an expiry monitor for a certificate by using the CLI
At the command prompt, type the following commands to enable an expiry monitor for a certificate and verify the configuration:
set ssl certKey <certkeyName> [-expiryMonitor ( ENABLED | DISABLED ) [-notificationPeriod <positive_integer>]]

show ssl certKey <certkeyName>
Example:
set ssl certKey sv -expiryMonitor ENABLED –notificationPeriod 60
Done
Enable an expiry monitor for a certificate by using the GUI
- Navigate to Traffic Management > SSL > Certificates, select a certificate, and click Update.
- Select Notify When Expires, and optionally specify a notification period.
Update an intermediate certificate without breaking the links
You can now update an intermediate certificate without breaking any existing links. The ‘AuthorityKeyIdentifier’ extension, in the linked certificate issued by the certificate to be replaced, must not contain an authority certificate serial number (‘authorityCertSerialNumber’) field. If the ‘AuthorityKeyIdentifier’ extension contains a serial number field, then the certificate serial numbers of the old and new certificate must be the same. You can update any number of certificates in the link, one at a time, if the preceding condition is met. Previously, the links broke if an intermediate certificate was updated.
For example, there are four certificates: CertA, CertB, CertC, and CertD. Certificate CertA is the issuer for CertB, CertB is the issuer for CertC, and so on. If you want to replace an intermediate certificate CertB with CertB_new, without breaking the link, the following condition must be met:
The certificate serial number of CertB must match the certificate serial number of CertB_new if both of the following conditions are met:
- The
AuthorityKeyIdentifierextension is present inCertC. - This extension contains a serial number field.
If the common name in a certificate changes, while updating the certificate specify nodomaincheck.
In the preceding example, to change “www.example.com” in CertD to “*.example.com”, select the ‘No Domain Check” parameter.
Update the certificate by using the CLI
At the command prompt, type:
update ssl certKey <certkeyName> -cert <string> [-password] -key <string> [-noDomainCheck]
Example:
update ssl certkey siteAcertkey -cert /nsconfig/ssl/cert.pem -key /nsconfig/ssl/pkey.pem -noDomainCheck
Display a certificate chain
A certificate contains the name of the issuing authority and the subject to whom the certificate is issued. To validate a certificate, you must look at the issuer of that certificate and confirm if you trust the issuer. If you do not trust the issuer, you must see who issued the issuer certificate. Go up the chain until you reach the root CA certificate or an issuer that you trust.
As part of the SSL handshake, when a client requests a certificate, the appliance presents a certificate and the chain of issuer certificates present on the appliance. An administrator can view the certificate chain for the certificates present on the appliance and install any missing certificates.
View the certificate chain for the certificates present on the appliance by using the CLI
At the command prompt, type:
show ssl certchain <cert_name>
Examples
There are 3 certificates: c1, c2, and c3. Certificate c3 is the root CA certificate and signs c2, and c2 signs c1. The following examples illustrate the output of the
show ssl certchain c1 command in different scenarios.
Scenario 1:
Certificate c2 is linked to c1, and c3 is linked to c2.
Certificate c3 is a root CA certificate.
If you run the following command, the certificate links up to the root CA certificate are displayed.
show ssl certchain c1

Certificate chain details of certificate name c1 are:
    1) Certificate name: c2               linked; not a root certificate
    2) Certificate name: c3               linked; root certificate
Done
Scenario 2:
Certificate c2 is linked to c1.
Certificate c2 is not a root CA certificate.
If you run the following command, the information that certificate c3 is a root CA certificate but is not linked to c2 is displayed.
show ssl certchain c1

Certificate chain  details of certificate name c1 are:
    1) Certificate Name: c2               linked; not a root certificate
    2) Certificate Name: c3               not linked; root certificate
    Done
Scenario 3:
Certificate c1, c2, and c3 are not linked but are present on the appliance.
If you run the following command, information about all the certificates starting with the issuer of certificate c1 is displayed. It is also specified that the certificates are not linked.
show ssl certchain c1

Certificate chain details of certificate name c1 are:
    1) Certificate Name: c2               not linked; not a root certificate
    2) Certificate Name: c3               not linked; root certificate
    Done
Scenario 4:
Certificate c2 is linked to c1.
Certificate c3 is not present on the appliance.
If you run the following command, information about the certificate linked to c1 is displayed. You are prompted to add a certificate with the subject name specified in c2. In this case, the user is asked to add the root CA certificate c3.
show ssl certchain c1

Certificate chain details of certificate name c1 are:
    1) Certificate Name: c2               linked; not a root certificate
    2) Certificate Name: /C=IN/ST=ka/O=netscaler/CN=test
       Action: Add a certificate with this subject name.
Done
Scenario 5:
A certificate is not linked to certificate c1 and the issuer certificate of c1 is not present on the appliance.
If you run the following command, you are prompted to add a certificate with the subject name in certificate c1.
sh ssl certchain c1

Certificate chain details of certificate name c1 are:
    1) Certificate Name: /ST=KA/C=IN
       Action: Add a certificate with this subject name.
In this article
- Link certificates
- Add and link a certificate set
- Create a chain of certificates
- Update an existing server certificate
- Update an existing CA certificate
- Disable domain checks
- Replace the default certificate of an ADC appliance with a trusted CA certificate that matches the host name of the appliance
- Enable the expiry monitor
- Update an intermediate certificate without breaking the links
- Display a certificate chain