SSL profile infrastructure
Vulnerabilities in SSLv3 and RC4 implementation have emphasized the need to use the latest ciphers and protocols to negotiate the security settings for a network connection. Implementing any changes to the configuration, such as disabling SSLv3 across thousands of SSL end points, is a cumbersome process. Therefore, settings that were part of the SSL end points configuration have been moved to the SSL profiles, along with the default ciphers. To implement changes in the configuration, including cipher support, you need only modify the profile that is bound to the entities.
The default SSL profiles (default front-end and default back-end) contain all the default ciphers and ECC curves, in addition to the settings that were part of the old profiles. Sample outputs for the default profiles are provided in the appendix. The Enable Default Profile operation automatically binds the default front-end profile to all front-end entities, and the default back-end profile to all back-end entities. You can modify a default profile to suit your deployment. You can also create custom profiles and bind them to SSL entities.
Important:
After the upgrade, if you enable the default profiles, you cannot undo the changes. That is, the profiles cannot be disabled. Save the configuration and create a copy of the configuration file (ns.conf) before enabling the profiles. However, if you do not want to use the features in the default profile, you can continue to use the old SSL profiles. For more information about these profiles, see Legacy SSL profile.
From release 11.1 51.x, in the GUI and CLI, a confirmation prompt is added when you enable the default profile to avoid enabling it by mistake.
Command:
set ssl parameter -defaultProfile ENABLED
    Save your configuration before enabling the Default profile. You cannot undo the changes. Are you sure you want to enable the Default profile? [Y/N]Y
Done
By default, some SSL parameters, called global parameters, apply to all the SSL end points. However, if a profile is bound to an SSL end point, the global parameters do not apply. The settings specified in the profile apply instead.
Points to note
- A profile can be bound to multiple virtual servers, but a virtual server can have only one profile bound to it.
- To delete a profile that is bound to a virtual server, first unbind the profile.
- A cipher or cipher group can be bound to multiple profiles at different priorities.
- A profile can have multiple ciphers and cipher groups bound at different priorities.
- Changes to a cipher group are immediately reflected in all the profiles and in all the virtual servers that one of the profiles is bound to.
- If a cipher suite is part of a cipher group, you cannot remove the cipher suite from the profile without first editing the cipher group to remove the specific cipher suite.
- If you do not assign a priority to a cipher suite or cipher group that you attach to a profile, it is assigned the lowest priority within the profile.
- You can create a custom cipher group (also called a user-defined cipher group) from existing cipher groups and cipher suites. If you create cipher group A and add existing cipher groups X and Y to it, in that order, cipher group Y is assigned at a lower priority than cipher group X. That is, the group that is added first has a higher priority.
- If a cipher suite is already part of a cipher group that is attached to a profile, and the same cipher suite is part of another cipher group that is also attached to the same profile, the cipher suite is not added again as part of the second cipher group. The cipher suite at the higher priority is in effect when traffic is processed.
- Cipher groups are not expanded in the profile. As a result, the number of lines in the configuration file (ns.conf) is greatly reduced. For example, if there are a thousand SSL virtual servers to which two cipher groups are bound, and each cipher group contains 15 ciphers, expansion would result in 30*1000 entries related to ciphers in the configuration file. With the new profile, it would have only two entries: one for each cipher group that is bound to a profile.
- Creating a user defined cipher group from existing ciphers and cipher groups is a copy-paste operation. Any changes in the original group are not reflected in the new group.
- A user-defined cipher group lists all the profiles that it is a part of.
- A profile lists all the SSL virtual server, services, and service groups that it is bound to.
- If the default SSL profile feature is enabled, you must use the profile to set or change any of the attributes of a virtual server, service, service group, or an internal service.
Save the configuration by using the CLI
At the command prompt, type:
save config

shell

root@ns# cd /nsconfig

root@ns# cp ns.conf ns.conf.NS<currentreleasenumber><currentbuildnumber>
Example:
save config
shell
root@ns# cd /nsconfig
root@ns# cp ns.conf ns.conf.NS.11.0.jun.16
Enable the default profile
Important:
Save your configuration before you upgrade the software and enable the default profiles.
From release 11.1 build 51.x, in the GUI and CLI, a confirmation prompt appears when you enable the default profile to avoid enabling it by mistake.
Command: The following command enables the default profile and binds this profile to the SSL entities to which a profile is already bound. That is, if a profile (for example P1) is already bound to an SSL entity, P1 is replaced by the default front-end profile or the default back-end profile. The older profile (P1) is not deleted. It is now an enhanced SSL profile and contains the earlier settings, and the ciphers and ECC curves. If you do not want the default profile, you can explicitly bind P1 to the SSL entity.
set ssl parameter -defaultProfile ENABLED
    Save your configuration before enabling the Default profile. You cannot undo the changes. Are you sure you want to enable the Default profile? [Y/N]Y
Done
Upgrade the software to a build that supports the enhanced profile infrastructure, and then enable the default profiles.
Notes:
If a legacy profile (P1) is already bound to an SSL entity, and you enable the default profile, the default profile overrides the earlier binding. That is, the default profile is bound to the SSL entities. If you do not want the default profile to be bound, you must bind P1 to the SSL entity again.
A single operation (Enable Default Profile or
set ssl parameter -defaultProfile ENABLED) enables (binds) both the default front-end profile and the default back-end profile.
Use case
After you enable the default profiles, they are bound to all the SSL end points. The default profiles are editable. If your deployment uses most of the default settings and changes only a few parameters, you can edit the default profiles. The changes are immediately reflected across all the end points. You can also create custom SSL profiles with some custom and some default parameters and bind it to the SSL entities.
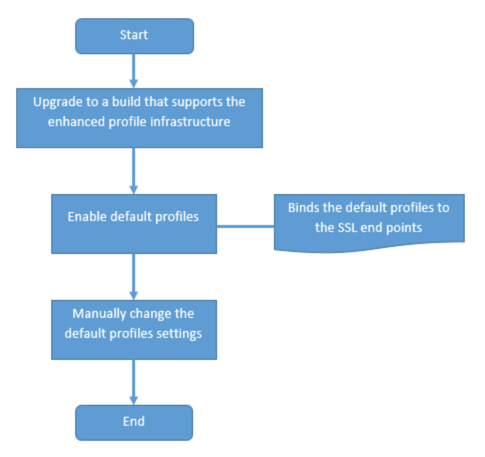
The following flowchart explains the steps that you must perform:
-
For information about upgrading the software, see Upgrading the System Software.
-
Enable the default profiles by using the CLI or GUI.
- At the command line, type:
set ssl parameter -defaultProfile ENABLED - If you prefer to use the GUI, navigate to Traffic Management > SSL > Change advanced SSL settings, scroll down, and select Enable Default Profile.
If a profile was not bound to an end point before the upgrade, a default profile is bound to the SSL end point. If a profile was bound to an end point before the upgrade, the same profile is bound after the upgrade, and default ciphers are added to the profile.
- (Optional) Manually change any settings in the default profile.
- At the command line, type:
set ssl profile <name>followed by the parameters to modify. - If you prefer to use the GUI, navigate to System > Profiles. In SSL Profiles, select a profile and click Edit.
SSL profile parameters
You can set the following SSL parameters in an SSL profile. You can set some of these parameters in an SSL virtual server. For more information about SSL virtual server parameters, see SSL virtual server parameters.
Set SSL profile parameters by using the CLI
At the command prompt, type:
 set ssl profile <name> [-ssllogProfile <string>] [-dh ( ENABLED |
       DISABLED ) -dhFile <string>] [-dhCount <positive_integer>]
       [-dhKeyExpSizeLimit ( ENABLED | DISABLED )] [-eRSA ( ENABLED | DISABLED
       ) [-eRSACount <positive_integer>]] [-sessReuse ( ENABLED | DISABLED )
       [-sessTimeout <positive_integer>]] [-cipherRedirect ( ENABLED |
       DISABLED ) [-cipherURL <URL>]] [-clientAuth ( ENABLED | DISABLED )
       [-clientCert ( Mandatory | Optional )]] [-sslRedirect ( ENABLED |
       DISABLED )] [-redirectPortRewrite ( ENABLED | DISABLED )] [-ssl3 (
       ENABLED | DISABLED )] [-tls1 ( ENABLED | DISABLED )] [-tls11 ( ENABLED
       | DISABLED )] [-tls12 ( ENABLED | DISABLED )] [-tls13 ( ENABLED |
       DISABLED )] [-SNIEnable ( ENABLED | DISABLED )] [-ocspStapling (
       ENABLED | DISABLED )] [-serverAuth ( ENABLED | DISABLED )] [-commonName
       <string>] [-pushEncTrigger <pushEncTrigger>] [-sendCloseNotify ( YES |
       NO )] [-clearTextPort <port|*>] [-insertionEncoding ( Unicode | UTF-8
       )] [-denySSLReneg <denySSLReneg>] [-quantumSize <quantumSize>]
       [-strictCAChecks ( YES | NO )] [-encryptTriggerPktCount
       <positive_integer>] [-pushFlag <positive_integer>]
       [-dropReqWithNoHostHeader ( YES | NO )] [-pushEncTriggerTimeout
       <positive_integer>] [-sslTriggerTimeout <positive_integer>]
       [-clientAuthUseBoundCAChain ( ENABLED | DISABLED )] [-sslInterception (
       ENABLED | DISABLED )] [-ssliReneg ( ENABLED | DISABLED )]
       [-ssliOCSPCheck ( ENABLED | DISABLED )] [-ssliMaxSessPerServer
       <positive_integer>] [-HSTS ( ENABLED | DISABLED )] [-maxage
       <positive_integer>] [-IncludeSubdomains ( YES | NO )] [-sessionTicket (
       ENABLED | DISABLED )] [-sessionTicketLifeTime <positive_integer>]
       [-sessionTicketKeyRefresh ( ENABLED | DISABLED )]
       {-sessionTicketKeyData } [-sessionKeyLifeTime <positive_integer>]
       [-prevSessionKeyLifeTime <positive_integer>] [-cipherName <string>
       -cipherPriority <positive_integer>] [-strictSigDigestCheck ( ENABLED |
       DISABLED )] [-skipClientCertPolicyCheck ( ENABLED | DISABLED )]
       [-zeroRttEarlyData ( ENABLED | DISABLED )]
       [-tls13SessionTicketsPerAuthContext <positive_integer>]
       [-dheKeyExchangeWithPsk ( YES | NO )]
TLS session ticket extension
An SSL handshake is a CPU-intensive operation. If session reuse is enabled, the server/client key exchange operation is skipped for existing clients. They are allowed to resume their sessions. This action improves the response time and increases the number of SSL transactions per second that a server can support. However, the server must store details of each session state, which consumes memory and is difficult to share among multiple servers if requests are load balanced across servers.
Citrix ADC appliances support the SessionTicket TLS extension. Use of this extension indicates that the session details are stored on the client instead of on the server. The client must indicate that it supports this mechanism by including the session ticket TLS extension in the client Hello message. For new clients, this extension is empty. The server sends a new session ticket in the NewSessionTicket handshake message. The session ticket is encrypted by using a key-pair known only to the server. If a server cannot issue a new ticket now, it completes a regular handshake.
This feature is available only in front-end SSL profiles, and only at the front end of communication in which the Citrix ADC appliance acts as a server and generates session tickets.
Limitations
- This feature is not supported on a FIPS platform.
- This feature is supported only with TLS versions 1.1 and 1.2.
- SSL session ID persistency is not supported with session tickets.
Enable TLS session ticket extension by using the CLI
At the command prompt, type:
set ssl profile <name> -sessionTicket (ENABLED | DISABLED ) [-sessionTicketLifeTime <positive_integer>
Arguments:
sessionTicket: State of TLS session ticket extension. Use of this extension indicates that the session details are stored on the client instead of on the server, as defined in RFC 5077.
Possible values: ENABLED, DISABLED
Default value: DISABLED
sessionTicketLifeTime: Specify a time, in seconds, after which the session ticket expires and a new SSL handshake must be initiated.
Default value: 300
Minimum value: 0
Maximum value: 172800
Example:
add ssl profile profile1 -sessionTicket ENABLED -sessionTicketlifeTime 300
Done
Enable TLS session ticket extension by using the GUI
- Navigate to System > Profiles. Select SSL Profiles.
- Click Add and specify a name for the profile.
- Select Session ticket.
- Optionally, specify Session Ticket Lifetime (secs).
Secure implementation of session tickets
By using TLS session tickets, clients can use abbreviated handshakes for faster reconnection to servers. However, if session tickets aren’t encrypted or changed for long periods of time, they can pose a security risk. You can secure session tickets by encrypting them with a symmetric key. To achieve forward secrecy, you can specify a time interval at which the session-ticket key is refreshed.
The appliance generates the session ticket keys by default. However, if multiple appliances in a deployment need to decrypt each other’s session tickets, they must all use the same session-ticket key. Therefore, you must set (add or load) the same session-ticket key data manually on all the appliances. Session-ticket key data includes the following information:
- Session ticket name.
- Session AES key used to encrypt or decrypt the ticket.
- Session HMAC key used to compute the digest of the ticket.
You can now configure session ticket key data of length 64 bytes to support 256-bit HMAC keys as recommended in RFC 5077. Key lengths of 48 bytes are also supported for backward compatibility.
Note:
If you are typing the session-ticket key data manually, ensure that the configuration across all the Citrix ADC appliances in an HA setup or in a cluster setup is the same.
The sessionTicketKeyLifeTime parameter specifies how often a session-ticket key is refreshed. In addition, you can set the prevSessionTicketKeyLifeTime parameter to specify how long the previous session-ticket key will be maintained for decrypting tickets using that key, after a new key is generated. The prevSessionTicketKeyLifeTime setting extends the time for which a client can use an abbreviated handshake to reconnect. For example, if sessionTicketKeyLifeTime is set to 10 minutes and prevSessionTicketKeyLifeTime to 5 minutes, a new key is generated after 10 minutes and used for all new sessions. However, previously connected clients have another 5 minutes for which previously issued tickets are honored for an abbreviated handshake.
Configure SSL session-ticket data by using the CLI
At the command prompt, type:
set ssl profile <name> -sessionTicket ENABLED -sessionTicketLifeTime <positive_integer> -sessionTicketKeyRefresh ( ENABLED | DISABLED )] -sessionTicketKeyLifeTime <positive_integer> [-prevSessionTicketKeyLifeTime <positive_integer>]
Arguments:
sessionTicket: Use session tickets as described by RFC 5077. Establishing the initial handshake requires CPU-intensive public key encryption operations. With the ENABLED setting, a server issues a session ticket to a client, which the client can use to perform an abbreviated handshake.
Possible values: ENABLED, DISABLED. Default: DISABLED
sessionTicketLifeTime: Lifetime, in seconds, of the session ticket. After this time expires, clients cannot use this ticket to resume their sessions.
Maximum value: 172800. Minimum value: 0. Default: 300.
sessionTicketKeyRefresh: When the time specified by the session-ticket key lifetime parameter expires, regenerate the session-ticket key used to encrypt or decrypt the session tickets. Automatically enabled if sessionTicket is enabled. Disabled if the administrator enters the session-ticket data.
Possible values: ENABLED, DISABLED. Default: ENABLED
sessionKeyLifeTime: Lifetime, in seconds, of a symmetric key used to encrypt the session tickets issued by a Citrix ADC appliance.
Maximum value: 86400. Minimum value: 600. Default: 3000
prevSessionKeyLifeTime: Time, in seconds, for which the previous symmetric key used to encrypt session tickets remains valid for existing clients after the session-ticket key lifetime expires. Within this time, existing clients can resume their sessions by using the previous session ticket key. Session tickets for new clients are encrypted by using the new key.
Maximum value: 172800. Minimum value: 0. Default: 0
Example:
set ssl profile ns_default_ssl_profile_frontend -sessionTicket ENABLED -sessionTicketlifeTime 120 -sessionTicketKeyRefresh ENABLED -sessionTicketKeyLifeTime 100 -prevSessionTicketKeyLifeTime 60

Done

show ssl profile ns_default_ssl_profile_frontend

    Session Ticket: ENABLED
    Session Ticket Lifetime: 120 (secs)
    Session Key Auto Refresh: ENABLED
    Session Key Lifetime: 100 (secs)
    Previous Session Key Lifetime: 60 (secs)
Configure SSL session-ticket data by using the GUI
-
Navigate to System > Profiles, and select SSL Profile.
-
Select ns_default_ssl_profile_frontend and click Edit.
-
In the Basic Settings section, click the pencil icon and set the following parameters:
- Session Ticket
- Session Ticket Lifetime (secs)
- Session Ticket Key Auto Refresh
- Session Ticket Key Lifetime (secs)
- Previous Session Ticket Key Lifetime (secs)
-
Click OK.
Type SSL session ticket data manually by using the CLI
At the command prompt, type:
set ssl profile <name> -sessionTicket ENABLED

set ssl profile <name> -sessionTicketKeyData

show ssl profile ns_default_ssl_profile_frontend
Arguments:
sessionTicket: Use of session tickets as described by RFC 5077. Establishing the initial handshake requires CPU-intensive public key encryption operations. With the ENABLED setting, a server issues a session ticket to a client, which the client can use to perform an abbreviated handshake.
Possible values: ENABLED, DISABLED. Default: DISABLED
sessionTicketKeyData: Contains the session ticket name (0–15 bytes), the session AES key used to encrypt or decrypt the session ticket (16–31 bytes), and the session HMAC key used to compute the digest of the ticket (32–63 bytes). Externally generated by an administrator and added to a Citrix ADC appliance.
Maximum length: 64 bytes
Example:
set ssl profile ns_default_ssl_profile_frontend -sessionticket ENABLED

Done

set ssl profile ns_default_ssl_profile_frontend -sessionticketkey 111111111111111111111111111111111111111111111111

Done

show ssl profile ns_default_ssl_profile_frontend

    1) Name: ns_default_ssl_profile_frontend (Front-End)
    SSLv3: ENABLED TLSv1.0: ENABLED TLSv1.1: ENABLED TLSv1.2: ENABLED
    Client Auth: DISABLED
    Use only bound CA certificates: DISABLED
    Strict CA checks: NO
    Session Reuse: ENABLED Timeout: 120 seconds
    DH: DISABLED
    DH Private-Key Exponent Size Limit: DISABLED Ephemeral RSA: ENABLED Refresh Count: 0
    Deny SSL Renegotiation ALL
    Non FIPS Ciphers: DISABLED
    Cipher Redirect: DISABLED
    SSL Redirect: DISABLED
    Send Close-Notify: YES
    Push Encryption Trigger: Always
    PUSH encryption trigger timeout: 1 ms
    SNI: DISABLED
    OCSP Stapling: DISABLED
    Strict Host Header check for SNI enabled SSL sessions: NO
    Push flag: 0x0 (Auto)
    SSL quantum size: 8 kB
    Encryption trigger timeout 100 mS
    Encryption trigger packet count: 45
    Subject/Issuer Name Insertion Format: Unicode
    Session Ticket: ENABLED
    Session Ticket Lifetime: 300 (secs)
    Session Key Auto Refresh: DISABLED
    Session Key Lifetime: 3000 (secs)
    Previous Session Key Lifetime: 0 (secs)
    Session Key Data: 84dad1afc6d56b0deeb0a7fd7f299a207e8d8c15cdd087a5684a11a329fd732e87a0535d90883
    47e8c181ba266f5c8838ae472cb3ab9255b683bf922fad32cee816c329989ef7cdeb278e93ac37882e3

    ECC Curve: P_256, P_384, P_224, P_521

    1) Cipher Name: DEFAULT Priority :4
    Description: Predefined Cipher Alias

    1) Internal Service Name (Front-End): nsrnatsip-127.0.0.1-5061
    2) Internal Service Name (Front-End): nskrpcs-127.0.0.1-3009
    3) Internal Service Name (Front-End): nshttps-::1l-443
    4) Internal Service Name (Front-End): nsrpcs-::1l-3008
    5) Internal Service Name (Front-End): nshttps-127.0.0.1-443
    6) Internal Service Name (Front-End): nsrpcs-127.0.0.1-3008
    7) Vserver Name: v1

Done
Type SSL session ticket data manually by using the GUI
-
Navigate to System > Profiles, and select SSL Profile.
-
Select ns_default_ssl_profile_frontend and click Edit.
-
In the Basic Settings section, click the pencil icon and set the following parameters:
- Session Ticket
- Session Ticket Key Data
- Confirm Session Ticket Key Data
-
Click OK.
Load an old configuration
Enabling the default profiles is not reversible. However, if you decide that your deployment does not require the default profiles, you can load an older configuration that you saved before you enabled the default profiles. The changes are effective after you restart the appliance.
Load an old configuration by using the CLI
At the command prompt, type:
shell

root@ns# clear config

root@ns# cd /nsconfig

root@ns# cp ns.conf.NS.11.0.jun.16 ns.conf

root@ns# reboot