Configure the ADC-Entrust integration
The following flowchart depicts the tasks that you need to perform to use Entrust HSM with a Citrix ADC:
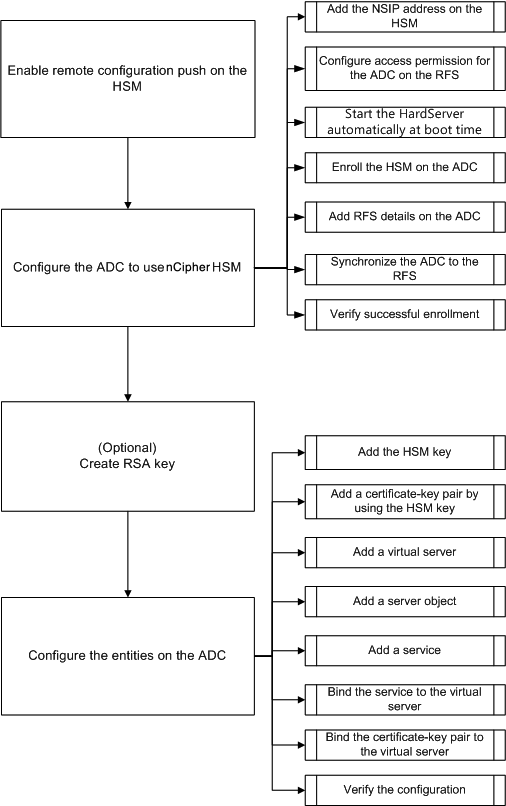
As shown in the preceding flowchart, you perform the following tasks:
- Enable remote configuration push, on the HSM.
- Configure the ADC to use the Entrust HSM.
- Add the NSIP address on the HSM.
- Configure access permission for the ADC on the RFS.
- Configure automatic start of the
Hardserverat boot time. - Enroll the HSM on the ADC.
- Add RFS details on the ADC.
- Synchronize the ADC to the RFS.
- Verify that Entrust HSM is successfully enrolled on the ADC.
- (Optional) Create an HSM RSA key.
- Configure the entities on the Citrix ADC.
- Add the HSM key.
- Add a certificate-key pair by using the HSM key.
- Add a virtual server.
- Add a server object.
- Add a service.
- Bind the service to the virtual server.
- Bind the certificate-key pair to the virtual server.
- Verify the configuration.
Configure the Entrust HSM
Specify the IP address of the RFS on the Entrust HSM so that it accepts the configuration that the RFS pushes to it. Use the nShield Connect front panel on the Entrust HSM to perform the following procedure.
Specify the IP address of a remote computer on the Entrust HSM
- Navigate to System Configuration > Config file options > Allow auto push.
- Select ON, and specify the IP address of the computer (RFS) from which to accept the configuration.
Enable remote configuration push, on the HSM
Specify the IP address of the RFS on the Entrust HSM so that it accepts the configuration that the RFS pushes to it. Use the nShield Connect front panel on the Entrust HSM to perform the following procedure.
Specify the IP address of a remote computer on the Entrust HSM
- Navigate to System Configuration > Config file options > Allow auto push.
- Select ON, and specify the IP address of the computer (RFS) from which to accept the configuration.
Configure the ADC to use the Entrust HSM
Sample values used in this topic:
NSIP address=10.217.2.43
Entrust HSM IP address=10.217.2.112
RFS IP address=10.217.2.6
Add the NSIP address on the HSM
Typically you use the nShield Connect front panel to add clients to the HSM. For more information, see the nShield Connect Quick Start Guide.
Alternately, use the RFS to add the ADC as a client to the HSM. To do so, you must add the NSIP address in the HSM configuration on the RFS, and then push the configuration to the HSM. Before you can do so, you must know the electronic serial number (ESN) of the HSM.
To get the ESN of your HSM, run the following command on the RFS:
root@ns# /opt/nfast/bin/anonkneti <Entrust HSM IP address>
<!--NeedCopy-->
Example:
root@ns# /opt/nfast/bin/anonkneti 10.217.2.112
BD17-C807-58D9 5e30a698f7bab3b2068ca90a9488dc4e6c78d822
<!--NeedCopy-->
The ESN number is BD17-C807-58D9.
After you have the ESN number, use an editor, such as vi, to edit the HSM configuration file on the RFS.
vi /opt/nfast/kmdata/hsm-BD17-C807-58D9/config/config
<!--NeedCopy-->
In the hs_clients section, add the following entries:
# Amount of data in bytes to encrypt with a session key before session key# renegotiation, or 0 for unlimitied. (default=1024*1024*8b=8Mb).
#  datalimit=INT
addr=10.217.2.43
clientperm=unpriv
keyhash=0000000000000000000000000000000000000000
esn=
timelimit=86400
datalimit=8388608
-----
<!--NeedCopy-->
Note: Include one or more hyphens as delimiters to add multiple entries in the same section.
To push the configuration to the HSM, run the following command on the RFS:
/opt/nfast/bin/cfg-pushnethsm --address=<Entrust HSM IP address> --force /opt/nfast/kmdata/hsm-BD17-C807-58D9/config/config
<!--NeedCopy-->
Example:
/opt/nfast/bin/cfg-pushnethsm --address=10.217.2.112 --force
                /opt/nfast/kmdata/hsm-BD17-C807-58D9/config/config
<!--NeedCopy-->
Configure access permission for the ADC on the RFS
To configure access permission for the ADC on the RFS, run the following command on the RFS:
/opt/nfast/bin/rfs-setup --force -g --write-noauth <NetScaler IP address>
<!--NeedCopy-->
Example:
[root@localhost bin]# /opt/nfast/bin/rfs-setup --force -g --write-noauth 10.217.2.43
Adding read-only remote_file_system entries
Ensuring the directory /opt/nfast/kmdata/local exists
Adding new writable remote_file_system entries
Ensuring the directory /opt/nfast/kmdata/local/sync-store exists
Saving the new config file and configuring the hardserver
Done
<!--NeedCopy-->
Verify that the ADC can reach both the RFS and Entrust HSM by using port 9004.
Configure automatic start of the hardserver at boot time
Create a file and then restart the appliance. Now, whenever you restart the appliance, and if this file is found, the Hardserver is automatically started.
At the shell prompt, type:
touch /var/opt/nfast/bin/thales_hsm_is_enrolled
<!--NeedCopy-->
At the command prompt, type:
reboot
<!--NeedCopy-->
Enroll the HSM on the ADC
Change directory to /var/opt/nfast/bin.
To add HSM details into the ADC configuration, run the following command on the ADC:
nethsmenroll --force <Thales_nShield_Connect_ip_address> $(anonkneti <Thales_nShield_Connect_ip_address>)
Example:
root@ns# ./nethsmenroll --force 10.217.2.112 $(anonkneti 10.217.2.112)
OK configuring hardserver's nethsm imports
<!--NeedCopy-->
This step adds the following entries after the line # ntoken_esn=ESN in the nethsm_imports section of the /var/opt/nfast/kmdata/config/config file.
…
local_module=0
remote_ip=10.217.2.112
remote_port=9004
remote_esn=BD17-C807-58D9
keyhash=5e30a698f7bab3b2068ca90a9488dc4e6c78d822
timelimit=86400
datalimit=8388608
privileged=0
privileged_use_high_port=0
ntoken_esn=
<!--NeedCopy-->
Change the directory to /var/opt/nfast/bin and run the following command on the ADC:
touch "thales_hsm_is_enrolled"
<!--NeedCopy-->
Note: To remove an HSM that is enrolled on the ADC, type:
./nethsmenroll –-remove <NETHSM-IP>
<!--NeedCopy-->
Add RFS details on the ADC
To add RFS details, change the directory to /var/opt/nfast/bin/ and then run the following command:
./rfs-sync --no-authenticate --setup <rfs_ip_address>
<!--NeedCopy-->
Example:
./rfs-sync --no-authenticate --setup 10.217.2.6
No current RFS synchronization configuration.
Configuration successfully written; new config details:
Using RFS at 10.217.2.6:9004: not authenticating.
<!--NeedCopy-->
This step adds the following entries after the # local_esn=ESN line in the rfs_sync_client section of the /var/opt/nfast/kmdata/config/config file.
……
remote_ip=10.217.2.6
remote_port=9004
use_kneti=no
local_esn=
<!--NeedCopy-->
Note: To remove an RFS that is enrolled on the ADC, type:
./rfs_sync –remove
<!--NeedCopy-->
Synchronize the ADC to the RFS
To synchronize all the files, change the directory to /var/opt/nfast/bin and then run the following command on the ADC:
./rfs-sync –-update
<!--NeedCopy-->
This command fetches all the World files, module files, and key files from the /opt/nfast/kmdata/local directory on the RFS and puts them into the /var/opt/nfast/kmdata/local directory on the ADC. Citrix recommends that you manually copy the World files, the module_XXXX_XXXX_XXXX files, where XXXX_XXXX_XXXX is the ESN of the enrolled HSM, and only the required RSA key and certificate files.
Verify that the Entrust HSM is successfully enrolled on the ADC
After you synchronize the ADC to the RFS, do the following:
- Verify that the local
Hardserveris UP and running. (nCipher server running). - Get the state of the configured HSMs, and verify that the values for the n_modules (number of modules) field and the km info fields are non-zero.
- Verify that the HSM is enrolled correctly and is usable (state 0x2 Usable) by the ADC.
- Load tests using
sigtestrun properly.
Change the directory to
/var/opt/nfast/bin, and at the shell prompt, run the following commands:
root@ns# ./chkserv root@ns# ./nfkminfo root@ns# ./sigtest
<!--NeedCopy-->
See Appendix for an example.
Create an HSM RSA Key
Only RSA keys are supported as HSM keys.
Note: Skip this step if keys are already present in the
/opt/nfast/kmdata/local folder on the RFS.
Create an RSA key, a self-signed certificate, and a Certificate Signing Request (CSR). Send the CSR to a certificate authority to get a server certificate.
The following files are created in the example:
- Embed RSA key: key_embed_2ed5428aaeae1e159bdbd63f25292c7113ec2c78
- Self-Signed Certificate: example_selfcert
- Certificate Signing Request: example_req
Note: The
generatekey command is supported in strict FIPS 140-2 Level 3 Security World. An administrator card set (ACS) or an operator card set (OCS) is needed to control many operations, including the creation of keys and OCSs. When you run the
generatekey command, you are prompted to insert an ACS or OCS card. For more information about strict FIPS 140-2 Level 3 Security World, see the nShield Connect User Guide.
The following example uses Level-2 Security World. In the example, the commands are in boldface type.
Example:
[root@localhost bin]# ./generatekey embed
size: Key size? (bits, minimum 1024) [1024] > 2048
OPTIONAL: pubexp: Public exponent for RSA key (hex)? []
>
embedsavefile: Filename to write key to? []
> example
plainname: Key name? [] > example
x509country: Country code? [] > US
x509province: State or province? [] > CA
x509locality: City or locality? [] > Santa Clara
x509org: Organisation? [] > Citrix
x509orgunit: Organisation unit? [] > NS
x509dnscommon: Domain name? [] > www.citrix.com
x509email: Email address? [] > example@citrix.com
nvram: Blob in NVRAM (needs ACS)? (yes/no) [no] >
digest: Digest to sign cert req with? (md5, sha1, sha256, sha384, sha512)
  [default sha1] > sha512
key generation parameters:
 operation      Operation to perform               generate
 application    Application                        embed
 verify         Verify security of key             yes
 type           Key type                           RSA
 size           Key size                           2048
 pubexp         Public exponent for RSA key (hex)
 embedsavefile  Filename to write key to           example
 plainname      Key name                           example
 x509country    Country code                       US
 x509province   State or province                  CA
 x509locality   City or locality                   Santa Clara
 x509org        Organisation                       Citrix
 x509orgunit    Organisation unit                  NS
 x509dnscommon  Domain name                        www.citrix.com
 x509email      Email address                      example@citrix.com
 nvram          Blob in NVRAM (needs ACS)          no
 digest         Digest to sign cert req with       sha512
Key successfully generated.
Path to key: /opt/nfast/kmdata/local/key_embed_2ed5428aaeae1e159bdbd63f25292c7113ec2c78
You have new mail in /var/spool/mail/root
<!--NeedCopy-->
Result:
You have created a CSR (example_req), a self-signed certificate (example_selfcert), and an application key token file in embed format (/opt/nfast/kmdata/local/key_embed_2ed5428aaeae1e159bdbd63f25292c7113ec2c78)
Because the ADC supports keys in simple format only, you must convert the embed key to a simple key.
To convert the embed key to a simple key, run the following command on the RFS:
[root@localhost bin]# ./generatekey -r simple
from-application: Source application? (embed, simple) [embed] > embed
from-ident: Source key identifier? (c6410ca00af7e394157518cb53b2db46ff18ce29,
                                    2ed5428aaeae1e159bdbd63f25292c7113ec2c78)
  [default c6410ca00af7e394157518cb53b2db46ff18ce29]
> 2ed5428aaeae1e159bdbd63f25292c7113ec2c78
ident: Key identifier? [] > examplersa2048key
plainname: Key name? [] > examplersa2048key
key generation parameters:
 operation         Operation to perform    retarget
 application       Application             simple
 verify            Verify security of key  yes
 from-application  Source application      embed
 from-ident        Source key identifier   2ed5428aaeae1e159bdbd63f25292c7113ec2c78
 ident             Key identifier          examplersa2048key
 plainname         Key name                examplersa2048key
Key successfully retargetted.
Path to key: /opt/nfast/kmdata/local/key_simple_examplersa2048key
<!--NeedCopy-->
Important:
When prompted for the source key identifier, enter 2ed5428aaeae1e159bdbd63f25292c7113ec2c78 as the embed key.
Result:
A key with the prefix key_simple (for example key_simple_examplersa2048key) is created.
Note: examplersa2048key is the key identifier (ident) and is referred to as the HSM key name on the ADC. A key identifier is unique. All the simple files have the prefix key_simple.
Configure the Entities on the ADC
Before the ADC can process traffic, you must do the following:
- Enable features.
- Add a subnet IP (SNIP) address.
- Add the HSM key to the ADC.
- Add a certificate-key pair by using the HSM key.
- Add a virtual server.
- Add a server object.
- Add a service.
- Bind the service to the virtual server.
- Bind the certificate-key pair to the virtual server.
- Verify the configuration.
Enable features on the ADC
Licenses must be present on the ADC before you can enable a feature.
Enable a feature by using the CLI
At the command prompt, run the following commands:
enable feature lb
enable feature ssl
<!--NeedCopy-->
Enable a feature by using the GUI
Navigate to System > Settings and, in the Modes and Features group, select Configure basic features••, and then select ••SSL Offloading.
Add a subnet IP address
For more information about subnet IP addresses, see Configuring Subnet IP Addresses.
Add a SNIP address and verify the configuration by using the CLI
At the command prompt, run the following commands:
add ns ip <IPAddress> <netmask> -type SNIP
show ns ip
<!--NeedCopy-->
Example:
add ns ip 192.168.17.253 255.255.248.0 -type SNIP
Done
show ns ip
        Ipaddress        Traffic Domain  Type             Mode     Arp      Icmp     Vserver  State
        ---------        --------------  ----             ----     ---      ----     -------  ------
1)      192.168.17.251   0               NetScaler IP     Active   Enabled  Enabled  NA       Enabled
2)      192.168.17.252   0               VIP              Active   Enabled  Enabled  Enabled  Enabled
3)      192.168.17.253   0               SNIP              Active   Enabled  Enabled  NA       Enabled
 Done
<!--NeedCopy-->
Add a SNIP address and verify the configuration by using the GUI
Navigate to System > Network > IPs, add an IP address, and select the IP Type as Subnet IP.
Copy the HSM key and certificate to the ADC
Use a secure file transfer utility to securely copy the key (key_simple_examplersa2048key) to the
/var/opt/nfast/kmdata/local folder, and the certificate (example_selfcert) to the
/nsconfig/ssl folder on the ADC.
Add the key on the ADC
All the keys have a key-simple prefix. When adding the key to the ADC, use the ident as the HSM key name. For example, if the key that you added is key_simple_XXXX, the HSM key name is XXXX.
Important:
- The HSM key name must be the same as the ident that you specified when you converted an embed key to a simple key format.
- The keys must be present in the /var/opt/nfast/kmdata/local/ directory on the ADC.
Add an HSM key by using the CLI
At the shell prompt, run the following command:
add ssl hsmKey <hsmKeyName> -key <string>
<!--NeedCopy-->
Example:
add ssl hsmKey examplersa2048key –key key_simple_examplersa2048key
Done
<!--NeedCopy-->
Add an HSM key by using the GUI
Navigate to Traffic Management > SSL > HSM, and add an HSM key.
Add a certificate-key pair on the ADC
For information about certificate-key pairs, see Add or update a certificate-key pair.
Add a certificate-key pair by using the CLI
At the command prompt, run the following command:
add ssl certKey <certkeyName> -cert <string> -hsmKey <string>
<!--NeedCopy-->
Example:
add ssl certKey key22 -cert example_selfcert -hsmKey examplersa2048key
Done
<!--NeedCopy-->
Add a certificate-key pair by using the GUI
Navigate to Traffic Management > SSL > Certificates, and add a certificate-key pair.
Add a virtual server
For information about a virtual server, see SSL virtual server configuration.
Configure an SSL-based virtual server by using the CLI
At the command prompt, run the following command:
add lb vserver <name> <serviceType> <IPAddress> <port>
<!--NeedCopy-->
Example:
add lb vserver v1 SSL 192.168.17.252 443
<!--NeedCopy-->
Configure an SSL-based virtual server by using the GUI
Navigate to Traffic Management > Load Balancing > Virtual Servers, create a virtual server, and specify the protocol as SSL.
Add a server object
Before you can add a server object on the ADC, make sure that you have created a back-end server. The following example uses the built-in python HTTP Server module on a Linux system.
Example:
%python –m SimpleHTTPServer 80
<!--NeedCopy-->
Add a server object by using the CLI
At the command prompt, run the following command:
add server <name> <IPAddress>
<!--NeedCopy-->
Example:
add server s1 192.168.17.246
<!--NeedCopy-->
Add a server object by using the GUI
Navigate to Traffic Management > Load Balancing > Servers, and add a server.
Add a service
For more information, see Configuring services.
Configure a service by using the CLI
At the command prompt, run the following command:
add service <name> <serverName> <serviceType> <port>
<!--NeedCopy-->
Example:
add service sr1 s1 HTTP 80
<!--NeedCopy-->
Configure a service by using the GUI
Navigate to Traffic Management > Load Balancing > Services, and create a service.
Bind the service to the virtual server
For more information, see Bind services to the SSL virtual server.
Bind a service to a virtual server by using the CLI
At the command prompt, run the following command:
bind lb vserver <name> <serviceName>
<!--NeedCopy-->
Example:
bind lb vserver v1 sr1
<!--NeedCopy-->
Bind a service to a virtual server by using the GUI
- Navigate to Traffic Management > Load Balancing > Virtual Servers.
- Open a virtual server, and click in the Services pane to bind a service to the virtual server.
Bind the certificate-key pair to the virtual server on the ADC
For more information, see Bind the certificate-key pair to the SSL virtual server.
Bind a certificate-key pair to a virtual server by using the CLI
At the command prompt, run the following command:
bind ssl vserver <vServerName> -certkeyName <string>
<!--NeedCopy-->
Example:
bind ssl vserver v1 -certkeyName key22
Warning: Current certificate replaces the previous binding
<!--NeedCopy-->
Bind a certificate-key pair to a virtual server by using the GUI
- Navigate to Traffic Management > Load Balancing > Virtual Servers.
- Open an SSL virtual server and, in Advanced Settings, click SSL Certificate.
- Bind a server certificate to the virtual server.
Verify the configuration
To view the configuration by using the CLI:
At the command prompt, run the following commands:
show lb vserver <name>
show ssl vserver <vServerName>
<!--NeedCopy-->
Example:
show lb vserver v1
        v1 (192.168.17.252:443) - SSL   Type: ADDRESS
        State: UP
        Last state change was at Wed Oct 29 03:11:11 2014
        Time since last state change: 0 days, 00:01:25.220
        Effective State: UP
        Client Idle Timeout: 180 sec
        Down state flush: ENABLED
        Disable Primary Vserver On Down : DISABLED
        Appflow logging: ENABLED
        No. of Bound Services :  1 (Total)       1 (Active)
        Configured Method: LEASTCONNECTION
        Current Method: Round Robin, Reason: Bound service's state changed to UP
        Mode: IP
        Persistence: NONE
        Vserver IP and Port insertion: OFF
        Push: DISABLED  Push VServer:
        Push Multi Clients: NO
        Push Label Rule: none
        L2Conn: OFF
        Skip Persistency: None
        IcmpResponse: PASSIVE
        RHIstate: PASSIVE
        New Service Startup Request Rate: 0 PER_SECOND, Increment Interval: 0
        Mac mode Retain Vlan: DISABLED
        DBS_LB: DISABLED
        Process Local: DISABLED
        Traffic Domain: 0

1) sr1 (192.168.17.246: 80) - HTTP State: UP    Weight: 1
Done
<!--NeedCopy-->
sh ssl vserver v1
        Advanced SSL configuration for VServer v1:
        DH: DISABLED
        Ephemeral RSA: ENABLED          Refresh Count: 0
        Session Reuse: ENABLED          Timeout: 120 seconds
        Cipher Redirect: DISABLED
        SSLv2 Redirect: DISABLED
        ClearText Port: 0
        Client Auth: DISABLED
        SSL Redirect: DISABLED
        Non FIPS Ciphers: DISABLED
        SNI: DISABLED
        SSLv2: DISABLED  SSLv3: DISABLED  TLSv1.0: ENABLED  TLSv1.1: DISABLED  TLSv1.2: DISABLED
        Push Encryption Trigger: Always
        Send Close-Notify: YES

        ECC Curve: P_256, P_384, P_224, P_521

1)      CertKey Name: key22       Server Certificate

1)      Cipher Name: DEFAULT
        Description: Predefined Cipher Alias
 Done
<!--NeedCopy-->
To view the configuration by using the GUI:
Navigate to Traffic Management > Load Balancing > Virtual Servers, and double-click an SSL virtual server to open it and view the configuration.