Active Directory Federation Service Proxy Integration Protocol compliance
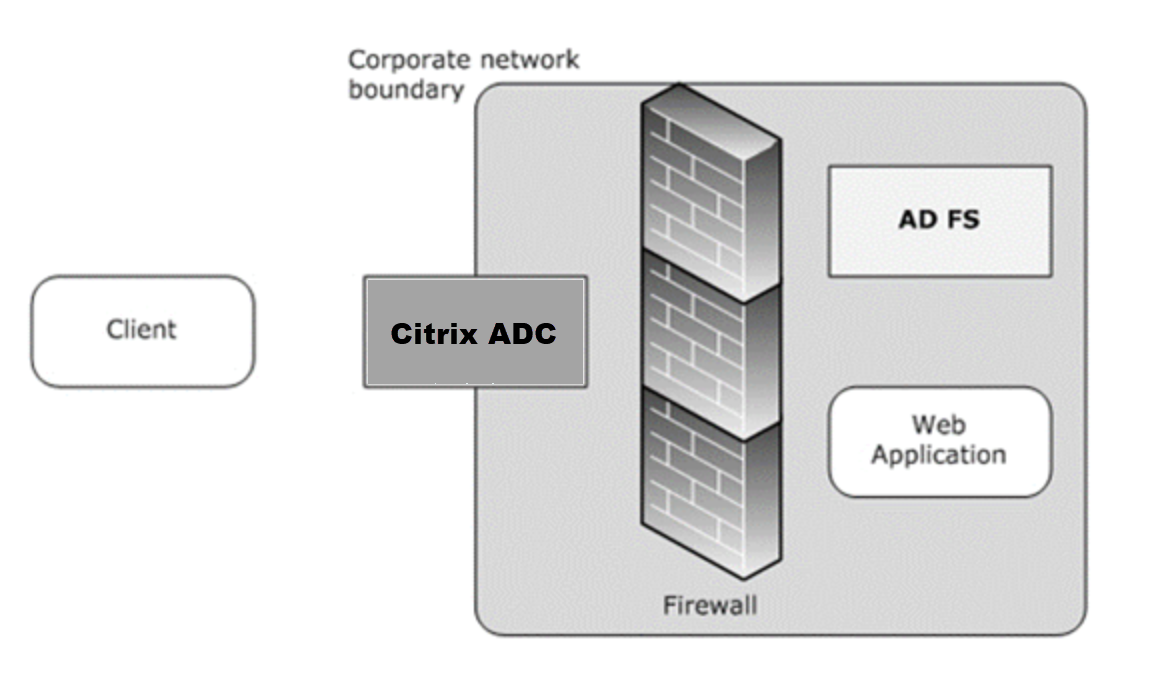
If third party proxies are to be used in place of the Web Application Proxy, they must support the MS-ADFSPIP protocol which specifies the ADFS and WAP integration rules. ADFSPIP integrates Active Directory Federation Services with an authentication and application proxy to enable access to services located inside the boundaries of the corporate network for clients that are located outside of that boundary.
Prerequisites
To successfully establish Trust between the proxy server and the ADFS farm, review the following configuration in the Citrix ADC appliance:
-
Create an SSL profile for the back end and enable SNI in the SSL profile. Disable SSLv3/TLS1. At the command prompt, type the following command:
add ssl profile <new SSL profile> -sniEnable ENABLED -ssl3 DISABLED -tls1 DISABLED -commonName <FQDN of ADFS> <!--NeedCopy--> -
Disable SSLv3/TLS1 for the service. At the command prompt, type the following command:
set ssl service <adfs service name> -sslProfile ns_default_ssl_profile_backend <!--NeedCopy--> -
Enable SNI extension for back-end server handshakes. At the command prompt, type the following command:
 set vpn parameter –backendServerSni ENABLED

 set ssl parameter -denySSLReneg NONSECURE
 <!--NeedCopy-->
Important
For Home Realm Discovery (HRD) scenarios where authentication must be offloaded to the ADFS server, Citrix recommends you disable both authentication and SSO on the Citrix ADC appliance.
Authentication mechanism
The following are the high-level flow of events for the authentication.
-
Establish Trust with ADFS server – The Citrix ADC server establishes Trust with the ADFS server by registering a client certificate. Once the Trust is established, the Citrix ADC appliance re-establishes the trust after reboot without user intervention.
Upon certificate expiry, you must reestablish the trust by removing and adding the ADFS proxy profile again.
-
Published endpoints - The Citrix ADC appliance automatically fetches the list of published endpoints on the ADFS server post trust establishment. These published endpoints filter the requests forwarded to the ADFS server.
-
Insert headers to client requests – When the Citrix ADC appliance tunnels client requests, the HTTP headers related to ADFSPIP are added in the packet while sending them to the ADFS server. You can implement access control at the ADFS server based on these header values. The following headers are supported.
- X-MS-Proxy
- X-MS-Endpoint-Absolute-Path
- X-MS-Forwarded-Client-IP
- X-MS-Proxy
- X-MS-Target-Role
- X-MS-ADFS-Proxy-Client-IP
-
Manage end-user traffic – End-user traffic is routed securely to the desired resources.
Notes:
-
Citrix ADC uses form based authentication.
-
Citrix ADC does not support publishing of an application using the Active Directory Federation Service Proxy Integration Protocol compliance.
-
Configure Citrix ADC to support ADFS server
Prerequisites
-
Configure Context Switching (CS) server as front-end with authentication, authorization, and auditing server behind CS. At the command prompt, type:
 add cs vserver <cs vserver name> SSL 10.220.xxx.xx 443
 -cltTimeout 180 -AuthenticationHost <adfs server hostname> -Authentication OFF -persistenceType NONE
 <!--NeedCopy-->
add cs action <action name1> -targetLBVserver <lb vserver name> <!--NeedCopy-->add cs action <action name2> -targetLBVserver <lb vserver name> <!--NeedCopy-->add cs policy <policy name1> -rule " http.req.url.contains(\"/adfs/services/trust\") || http.req.url.contains(\"federationmetadata/2007-06/federationmetadata.xml\")" -action <action name1> <!--NeedCopy-->add cs policy <policy name2> -rule "HTTP.REQ.URL.CONTAINS(\"/adfs/ls\")" -action <action name2> <!--NeedCopy-->bind cs vserver <cs vserver name> -policyName <policy name1> -priority 100 <!--NeedCopy-->bind cs vserver <cs vserver name> -policyName <policy name2> -priority 110 <!--NeedCopy-->bind cs vserver <cs vserver name> -lbvserver <lb vserver name> <!--NeedCopy--> -
Add an ADFS service. At the command prompt, type:
 add service <adfs service name> <adfs server ip> SSL 443
 <!--NeedCopy-->
set ssl service <adfs service name> -sslProfile ns_default_ssl_profile_backend <!--NeedCopy--> -
Add a load balanced virtual server. At the command prompt, type:
 add lb vserver <lb vserver name> SSL 0.0.0.0 0
 <!--NeedCopy-->
set ssl vserver <lb vserver name> -sslProfile ns_default_ssl_profile_frontend <!--NeedCopy--> -
Bind the service to the load balanced server. At the command prompt, type:
 bind lb vserver <lb vserver name> <adfs service name>
 <!--NeedCopy-->
To configure Citrix ADC to work with ADFS server you need to do the following:
- Create an SSL CertKey profile key to use with ADFS proxy profile
- Create an ADFS proxy profile
- Associate the ADFS proxy profile to the LB virtual server
Create an SSL certificate with private key to use with ADFS proxy profile
At the command prompt, type:
    add ssl certkey <certkeyname> –cert <certificate path> -key <keypath>
<!--NeedCopy-->
Note: The Certificate file and the key file must be present in the Citrix ADC appliance. Create an ADFS proxy profile using CLI
At the command prompt, type:
add authentication adfsProxyProfile  <profile name> -serverUrl <https://<server FQDN or IP address>/> -username <adfs admin user name> -password <password for admin user> -certKeyName <name of the CertKey profile created above>
<!--NeedCopy-->
Where;
Profile name – Name of the AFDS proxy profile to be created
ServerUrl – Fully qualified domain name of the ADFS service including protocol and port. For example, https://adfs.citrix.com
Username – User name of an admin account that exists on ADFS server
Password – Password of the admin account used as user name
certKeyName – Name of the previously created SSL CertKey profile
Associate the ADFS proxy profile to the load balancing virtual server using CLI
In the ADFS deployment, two load balancing virtual severs are used, one for the client traffic and the other one for metadata exchange. The ADFS proxy profile must be associated with the load balancing virtual server that is front-ending the ADFS server.
At the command prompt, type:
set lb vserver <adfs-proxy-lb> -adfsProxyProfile <name of the ADFS proxy profile>
<!--NeedCopy-->
Trust renewal support for ADFSPIP
You can renew the trust of the existing certificates that are nearing to expiry or if the existing certificate is not valid. The trust renewal of certificates is done only when the trust is established between Citrix ADC appliance and ADFS server. To renew the trust of the certificate, you must provide the new certificate.
Important
Manual intervention is required for trust renewal of new certificates.
The following example lists the steps involved in the certificate trust renewal:
- The Citrix ADC appliance sends both old (SerializedTrustCertificate) and new (SerializedReplacementCertificate) certificates in POST request to the ADFS server for trust renewal.
- The ADFS server responds with 200 OK success if trust is renewed successfully.
- The Citrix ADC appliance updates the state as “ESTABLISHED_RENEW_SUCCESS” if the trust renewal is successful. If the trust renewal fails, the state is updated as “ESTABLISHED_RENEW_FAILED” and the Citrix ADC appliance keeps using the old certificate.
Note
You cannot update the cert key if it is already bound to some ADFS proxy profile.
To configure the trust renewal of certificates by using the CLI
At the command prompt, type:
set authentication adfsProxyProfile <name> [-CertKeyName <string>]
<!--NeedCopy-->
Example:
set authentication adfsProxyProfile adfs_2 –CertKeyName ca_cert1
<!--NeedCopy-->
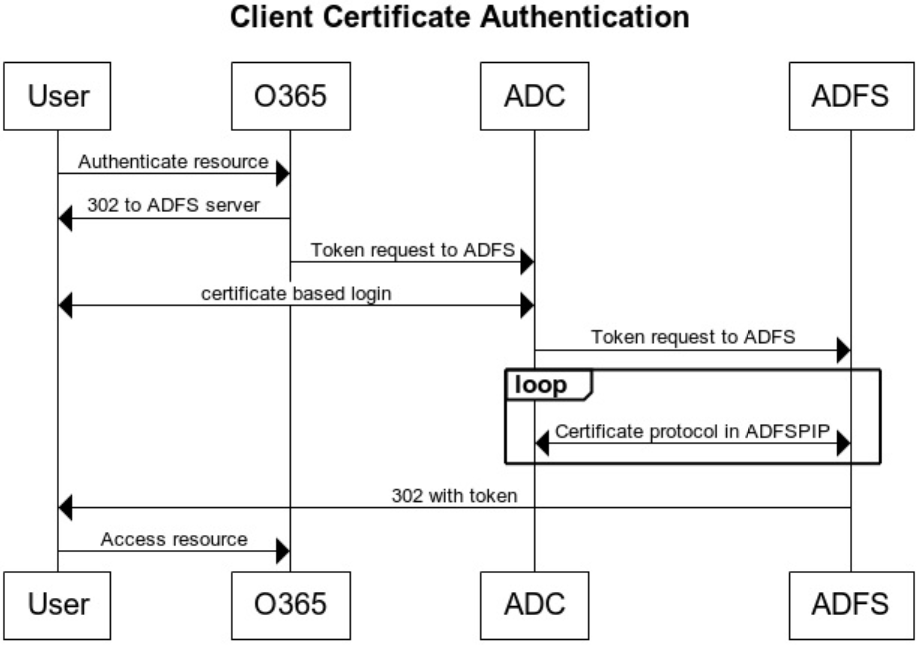
Client certificate based authentication on ADFS server
Starting with Windows server 2016, Microsoft introduced a new way of authenticating users when ADFS is accessed through proxy servers. Now, end users can log in with their certificates thereby avoiding the use of a password.
End users often access ADFS through a proxy, especially when they are not in the premises. Therefore, ADFS proxy servers are required to support client certificate authentication through the ADFSPIP protocol.
When ADFS is load balanced using a Citrix ADC appliance, to support certificate based authentication at the ADFS server, users need to log in to the Citrix ADC appliance using the certificate as well. This allows Citrix ADC to pass the user certificate to ADFS to provide SSO to the ADFS server.
The following diagram depicts the client certificate authentication flow.
Configure SSO for ADFS server using client certificate
To configure SSO for the ADFS server using the client certificate, you must first configure the client certificate authentication on the Citrix ADC appliance. You must then bind the certificate authentication policy to the authentication, authorization, and auditing virtual server.
In addition, you must perform the following steps.
-
An extra context switching virtual server with port 49443 must be configured and this context switching virtual server must point to the same load balancing virtual server which is open for all ports, which you have created earlier.
-
The port 49443 must be opened on the Citrix ADC appliance for authentication.
-
The context switching policy must be bound the same load balancing virtual server with port 443 open that you have created earlier.
-
You must bind the same SSL service that you have created earlier to the load balancing virtual server.
-
If you have already created an SSL profile for the back end, you must use that profile.
At the command prompt, type;
add cs vserver <name> <serviceType> <port>

bind cs vserver <name> (-lbvserver <string> | -vServer <string> | [-targetLBVserver <string>]

set ssl vserver <vServerName [-sslProfile <string>]

bind ssl vserver <vServerName -certkeyName <string>

add authentication certAction <action name>

add authentication Policy <policy name> -rule <expression> -action <action name>

add authentication policylable <label Name>

bind authentication policylabel <label Name> -policyName <name of the policy> -priority<integer>

<!--NeedCopy-->
Example:
add cs vserver srv123_adfsproxy_csvs_tls SSL $VIP_1 49443

bind cs vserver srv123_adfsproxy_csvs_tls -lbvserver srv123_adfs_lbvserver

set ssl vserver srv123_adfsproxy_csvs_tls -sslProfile ns_default_ssl_profile_frontend

bind ssl vserver srv123_adfsproxy_csvs_tls -certkeyName srv123_wildcardcert

add authentication certAction adfsproxy-cert

add authentication Policy cert1 -rule TRUE -action adfsproxy-cert

add authentication policylable certfactor

bind authentication policylabel certfactor –policyName cert1 –priority 100

<!--NeedCopy-->
For information on configuring client certificate on the Citrix ADC appliance, see Configure client certificate authentication using advanced policies.