-
Getting Started with Citrix ADC
-
Deploy a Citrix ADC VPX instance
-
Optimize Citrix ADC VPX performance on VMware ESX, Linux KVM, and Citrix Hypervisors
-
Apply Citrix ADC VPX configurations at the first boot of the Citrix ADC appliance in cloud
-
Install a Citrix ADC VPX instance on Microsoft Hyper-V servers
-
Install a Citrix ADC VPX instance on Linux-KVM platform
-
Prerequisites for Installing Citrix ADC VPX Virtual Appliances on Linux-KVM Platform
-
Provisioning the Citrix ADC Virtual Appliance by using OpenStack
-
Provisioning the Citrix ADC Virtual Appliance by using the Virtual Machine Manager
-
Configuring Citrix ADC Virtual Appliances to Use SR-IOV Network Interface
-
Configuring Citrix ADC Virtual Appliances to use PCI Passthrough Network Interface
-
Provisioning the Citrix ADC Virtual Appliance by using the virsh Program
-
Provisioning the Citrix ADC Virtual Appliance with SR-IOV, on OpenStack
-
Configuring a Citrix ADC VPX Instance on KVM to Use OVS DPDK-Based Host Interfaces
-
-
Deploy a Citrix ADC VPX instance on AWS
-
Deploy a VPX high-availability pair with elastic IP addresses across different AWS zones
-
Deploy a VPX high-availability pair with private IP addresses across different AWS zones
-
Configure a Citrix ADC VPX instance to use SR-IOV network interface
-
Configure a Citrix ADC VPX instance to use Enhanced Networking with AWS ENA
-
Deploy a Citrix ADC VPX instance on Microsoft Azure
-
Network architecture for Citrix ADC VPX instances on Microsoft Azure
-
Configure multiple IP addresses for a Citrix ADC VPX standalone instance
-
Configure a high-availability setup with multiple IP addresses and NICs
-
Configure a high-availability setup with multiple IP addresses and NICs by using PowerShell commands
-
Configure a Citrix ADC VPX instance to use Azure accelerated networking
-
Configure HA-INC nodes by using the Citrix high availability template with Azure ILB
-
Configure a high-availability setup with Azure external and internal load balancers simultaneously
-
Configure address pools (IIP) for a Citrix Gateway appliance
-
Upgrade and downgrade a Citrix ADC appliance
-
Solutions for Telecom Service Providers
-
Load Balance Control-Plane Traffic that is based on Diameter, SIP, and SMPP Protocols
-
Provide Subscriber Load Distribution Using GSLB Across Core-Networks of a Telecom Service Provider
-
Authentication, authorization, and auditing application traffic
-
Basic components of authentication, authorization, and auditing configuration
-
On-premises Citrix Gateway as an identity provider to Citrix Cloud
-
Authentication, authorization, and auditing configuration for commonly used protocols
-
Troubleshoot authentication and authorization related issues
-
-
-
-
-
-
-
Persistence and persistent connections
-
Advanced load balancing settings
-
Gradually stepping up the load on a new service with virtual server–level slow start
-
Protect applications on protected servers against traffic surges
-
Retrieve location details from user IP address using geolocation database
-
Use source IP address of the client when connecting to the server
-
Use client source IP address for backend communication in a v4-v6 load balancing configuration
-
Set a limit on number of requests per connection to the server
-
Configure automatic state transition based on percentage health of bound services
-
-
Use case 2: Configure rule based persistence based on a name-value pair in a TCP byte stream
-
Use case 3: Configure load balancing in direct server return mode
-
Use case 6: Configure load balancing in DSR mode for IPv6 networks by using the TOS field
-
Use case 7: Configure load balancing in DSR mode by using IP Over IP
-
Use case 10: Load balancing of intrusion detection system servers
-
Use case 11: Isolating network traffic using listen policies
-
Use case 12: Configure Citrix Virtual Desktops for load balancing
-
Use case 13: Configure Citrix Virtual Apps for load balancing
-
Use case 14: ShareFile wizard for load balancing Citrix ShareFile
-
Use case 15: Configure layer 4 load balancing on the Citrix ADC appliance
-
-
-
-
Authentication and authorization for System Users
-
-
Configuring a CloudBridge Connector Tunnel between two Datacenters
-
Configuring CloudBridge Connector between Datacenter and AWS Cloud
-
Configuring a CloudBridge Connector Tunnel Between a Datacenter and Azure Cloud
-
Configuring CloudBridge Connector Tunnel between Datacenter and SoftLayer Enterprise Cloud
-
Configuring a CloudBridge Connector Tunnel Between a Citrix ADC Appliance and Cisco IOS Device
-
CloudBridge Connector Tunnel Diagnostics and Troubleshooting
This content has been machine translated dynamically.
Dieser Inhalt ist eine maschinelle Übersetzung, die dynamisch erstellt wurde. (Haftungsausschluss)
Cet article a été traduit automatiquement de manière dynamique. (Clause de non responsabilité)
Este artículo lo ha traducido una máquina de forma dinámica. (Aviso legal)
此内容已经过机器动态翻译。 放弃
このコンテンツは動的に機械翻訳されています。免責事項
이 콘텐츠는 동적으로 기계 번역되었습니다. 책임 부인
Este texto foi traduzido automaticamente. (Aviso legal)
Questo contenuto è stato tradotto dinamicamente con traduzione automatica.(Esclusione di responsabilità))
This article has been machine translated.
Dieser Artikel wurde maschinell übersetzt. (Haftungsausschluss)
Ce article a été traduit automatiquement. (Clause de non responsabilité)
Este artículo ha sido traducido automáticamente. (Aviso legal)
この記事は機械翻訳されています.免責事項
이 기사는 기계 번역되었습니다.책임 부인
Este artigo foi traduzido automaticamente.(Aviso legal)
这篇文章已经过机器翻译.放弃
Questo articolo è stato tradotto automaticamente.(Esclusione di responsabilità))
Translation failed!
Use case: Making enterprise internet access compliant and secure
The director of network security in a financial organization wants to protect the enterprise network from any external threats coming from the web in the form of malware. To do so, the director needs to gain visibility in to otherwise bypassed encrypted traffic and control access to malicious websites. The director is required to do the following:
- Intercept and examine all the traffic, including SSL/TLS (encrypted traffic), coming into and going out of the enterprise network.
- Bypass interception of requests to websites containing sensitive information, such as user financial information or emails.
- Block access to harmful URLs identified as serving harmful or adult content.
- Identify end users (employees) in the enterprise who are accessing malicious websites and block internet access for these users or block the harmful URLs.
To achieve all of the above, the director can set up a proxy server. The proxy server intercepts all the encrypted and unencrypted traffic passing through the enterprise network. It prompts for user authentication, and associates the traffic with a user. URL categories can be specified to block access to Illegal/Harmful, Adult, and Malware and SPAM websites.
Configure the following entities:
- DNS name server to resolve host names.
- Subnet IP (SNIP) address to establish a connection with the origin servers. The SNIP address must have internet access.
- Proxy server in explicit mode to intercept all outbound HTTP and HTTPS traffic.
- SSL profile to define SSL settings, such as ciphers and parameters, for connections.
- CA certificate-key pair to sign the server certificate for SSL interception.
- SSL policy to define the websites to intercept and to bypass.
- Authentication virtual server, policy, and action to ensure that only valid users are granted access.
- AppFlow collector to send data to the Citrix Application Delivery Management (ADM).
Both CLI and GUI procedures are listed for this sample configuration. The following sample values are used. Replace them with valid data for IP addresses, SSL certificate and key, and LDAP parameters.
| Name | Values used in the sample configuration |
|---|---|
| NSIP address | 192.0.2.5 |
| Subnet IP address | 198.51.100.5 |
| LDAP virtual server IP address | 192.0.2.116 |
| DNS name server IP address | 203.0.113.2 |
| Proxy server IP address | 192.0.2.100 |
| MAS IP address | 192.0.2.41 |
| CA certificate for SSL interception |
ns-swg-ca-certkey (certificate: ns_swg_ca.crt and key: ns_swg_ca.key) |
| LDAP base DN | CN=Users,DC=CTXNSSFB,DC=COM |
| LDAP bind DN | CN=Administrator,CN=Users,DC=CTXNSSFB,DC=COM |
| LDAP bind DN password | zzzzz |
Using the SSL forward proxy wizard to configure interception and examination of the traffic to and from the enterprise network
Creating a configuration for intercepting and examining encrypted traffic in addition to the other traffic to and from a network requires configuring proxy, SSL interception, user authentication, and URL Filtering settings. The following procedures include examples of the values entered.
Configure the proxy settings
-
Navigate to Security > SSL Forward Proxy > SSL Forward Proxy Wizard.
-
Click Get Started and then click Continue.
-
In the Proxy Settings dialog box, enter a name for the explicit proxy server.
-
For Capture Mode, select Explicit.
-
Enter an IP address and port number.

-
Click Continue.
Configure the SSL interception settings
-
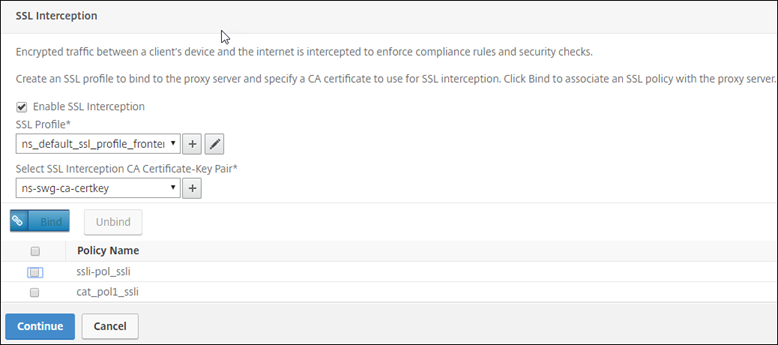
Select Enable SSL Interception.

-
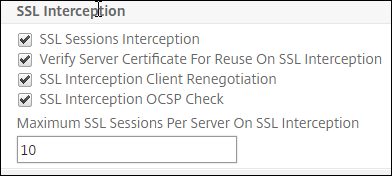
In SSL Profile, click “+” to add a new front-end SSL profile and enable SSL Sessions Interception in this profile.
-
Click OK and then click Done.
-
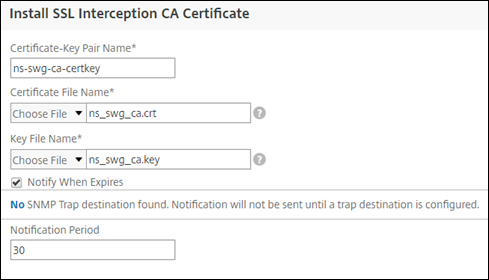
In Select SSL interception CA Certificate-Key Pair, click “+” to install a CA certificate-key pair for SSL interception.
-
Click Install and then click Close.
-
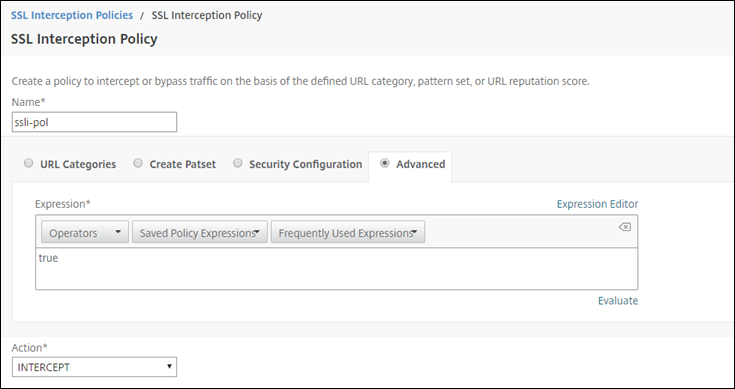
Add a policy to intercept all the traffic. Click Bind and then click Add.

-
Enter a name for the policy and select Advanced. In the Expression editor, enter true.
-
For Action, select INTERCEPT.
-
Click Create and then click Add to add another policy to bypass sensitive information.
-
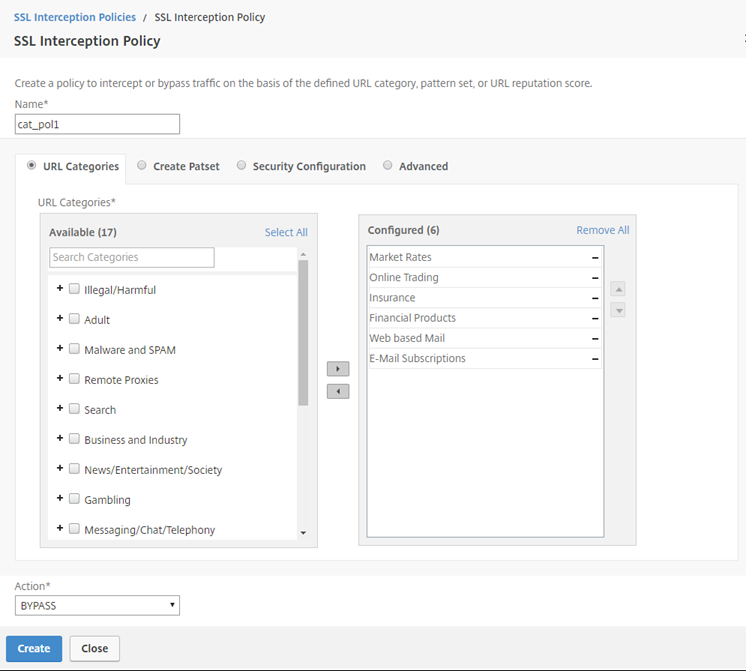
Enter a name for the policy and in URL Categories, click Add.
-
Select the Finance and Email categories and move them to the Configured list.
-
For Action, select BYPASS.
-
Click Create.
-
Select the two policies created earlier, and click Insert.

-
Click Continue.
Configure the user authentication settings
-
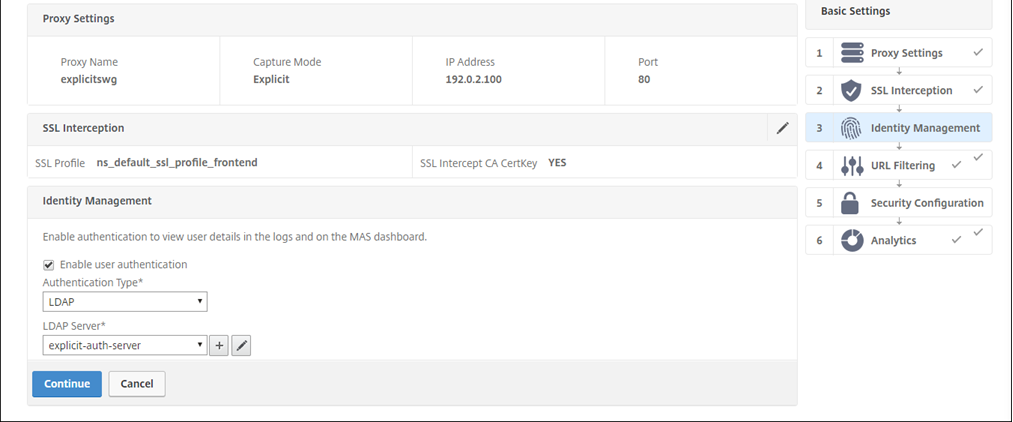
Select Enable user authentication. In the Authentication Type field, select LDAP.
-
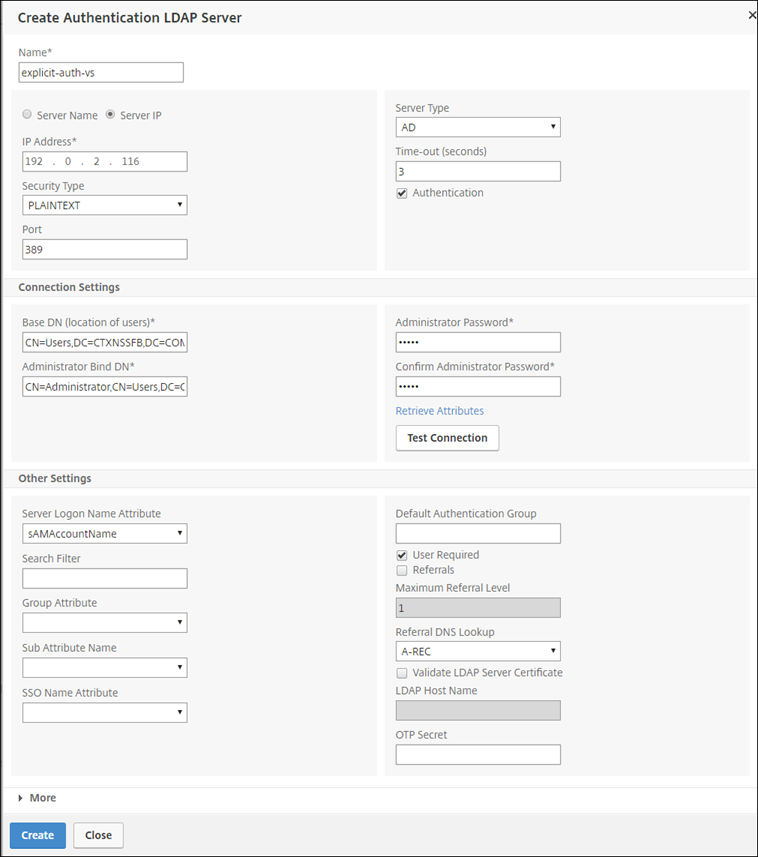
Add LDAP server details.
-
Click Create.
-
Click Continue.
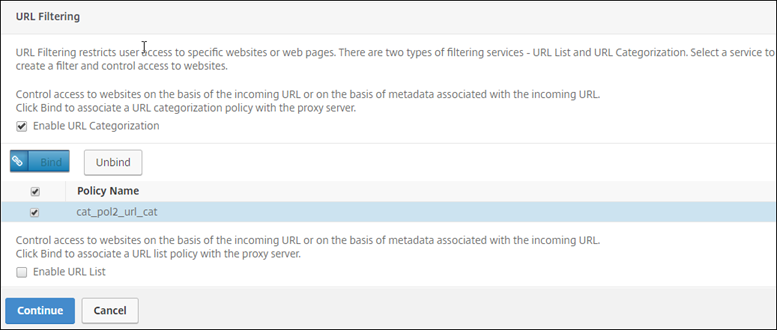
Configure URL Filtering settings
-
Select Enable URL Categorization, and then click Bind.

-
Click Add.

-
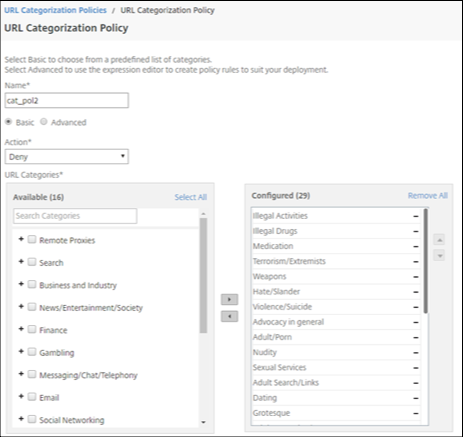
Enter a name for the policy. For Action, select Deny. For URL Categories, select Illegal/Harmful, Adult, and Malware and SPAM, and move them to the Configured list.
-
Click Create.
-
Select the policy and then click Insert.

-
Click Continue.
-
Click Continue.
-
Click Enable Analytics.
-
Enter the IP address of Citrix ADM and for Port, specify 5557.

-
Click Continue.
-
Click Done.
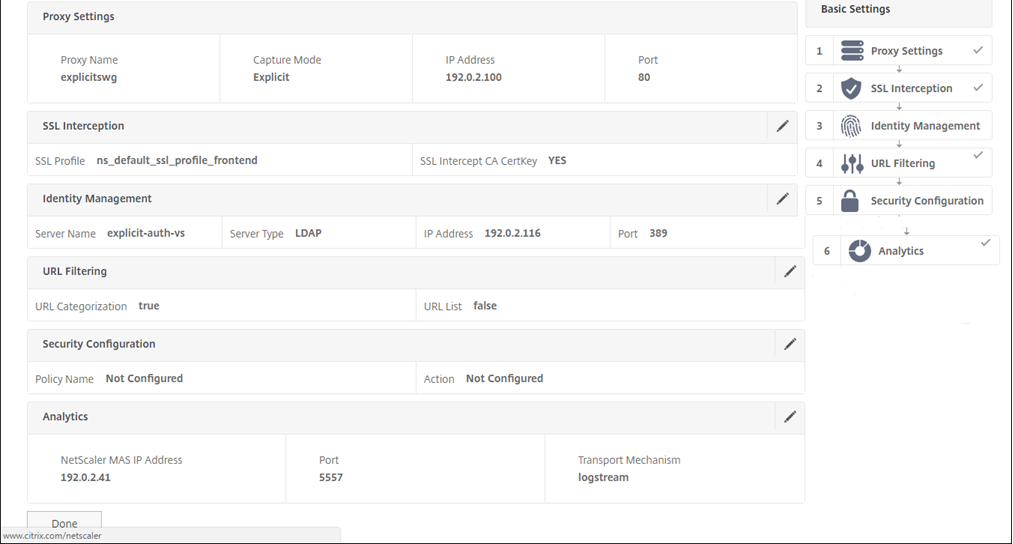
Use Citrix ADM to view key metrics for users and determine the following:
- The browsing behavior of the users in your enterprise.
- URL categories accessed by the users in your enterprise.
- Browsers used to access the URLs or domains.
Use this information to determine whether the user’s system is infected by malware, or understand the bandwidth consumption pattern of the user. You can fine-tune the policies on your Citrix SWG appliance to restrict these users, or block some more websites. For more information about viewing the metrics on MAS, see the “Inspecting Endpoints” use case in ADM use cases.
Note
Set the following parameters by using the CLI.
set syslogparams -sslInterception ENABLED

set cacheparameter -memLimit 100

set appflow param -AAAUserName ENABLED
<!--NeedCopy-->
CLI example
The following example includes all the commands used to configure interception and examination of the traffic to and from the enterprise network.
General configuration:
    add ns ip 192.0.2.5 255.255.255.0

    add ns ip 198.51.100.5 255.255.255.0 -type SNIP

    add dns nameServer 203.0.113.2

    add ssl certKey ns-swg-ca-certkey -cert ns_swg_ca.crt -key ns_swg_ca.key

    set syslogparams -sslInterception ENABLED

    set cacheparameter -memLimit 100

    set appflow param -AAAUserName ENABLED
<!--NeedCopy-->
Authentication configuration:
add authentication vserver explicit-auth-vs SSL

bind ssl vserver explicit-auth-vs -certkeyName ns-swg-ca-certkey

add authentication ldapAction swg-auth-action-explicit -serverIP 192.0.2.116 -ldapBase "CN=Users,DC=CTXNSSFB,DC=COM" -ldapBindDn "CN=Administrator,CN=Users,DC=CTXNSSFB,DC=COM" -ldapBindDnPassword zzzzzz -ldapLoginName sAMAccountName

add authenticationpolicy swg-auth-policy -rule true -action swg-auth-action-explicit

bind authentication vserver explicit-auth-vs -policy swg-auth-policy -priority 1
<!--NeedCopy-->
Proxy server and SSL interception configuration:
add cs vserver explicitswg PROXY 192.0.2.100 80 –Authn401 ENABLED –authnVsName explicit-auth-vs

set ssl parameter -defaultProfile ENABLED

add ssl profile swg_profile -sslInterception ENABLED

bind ssl profile swg_profile -ssliCACertkey ns-swg-ca-certkey

set ssl vserver explicitswg -sslProfile swg_profile

add ssl policy ssli-pol_ssli -rule true -action INTERCEPT

bind ssl vserver explicitswg -policyName ssli-pol_ssli -priority 100 -type INTERCEPT_REQ
<!--NeedCopy-->
URL categories configuration:
add ssl policy cat_pol1_ssli -rule "client.ssl.client_hello.SNI.URL_CATEGORIZE(0,0).GROUP.EQ("Finance") || client.ssl.client_hello.SNI.URL_CATEGORIZE(0,0).GROUP.EQ("Email")" -action BYPASS

bind ssl vserver explicitswg -policyName cat_pol1_ssli -priority 10 -type INTERCEPT_REQ

add ssl policy cat_pol2_ssli -rule "client.ssl.client_hello.sni.url_categorize(0,0).GROUP.EQ("Adult") || client.ssl.client_hello.sni.url_categorize(0,0).GROUP.EQ("Malware and SPAM") || client.ssl.client_hello.SNI.URL_CATEGORIZE(0,0).GROUP.EQ("Illegal/Harmful")" -action RESET

bind ssl vserver explicitswg -policyName cat_pol2_ssli -priority 20 -type INTERCEPT_REQ
<!--NeedCopy-->
AppFlow configuration to pull data into Citrix ADM:
add appflow collector _swg_testswg_apfw_cl -IPAddress 192.0.2.41 -port 5557 -Transport logstream

set appflow param -templateRefresh 60 -httpUrl ENABLED -AAAUserName ENABLED -httpCookie ENABLED -httpReferer ENABLED -httpMethod ENABLED -httpHost ENABLED -httpUserAgent ENABLED -httpContentType ENABLED -httpVia ENABLED -httpLocation ENABLED -httpDomain ENABLED -cacheInsight ENABLED -urlCategory ENABLED

add appflow action _swg_testswg_apfw_act -collectors _swg_testswg_apfw_cl -distributionAlgorithm ENABLED

add appflow policy _swg_testswg_apfw_pol true _swg_testswg_apfw_act

bind cs vserver explicitswg -policyName _swg_testswg_apfw_pol -priority 1
<!--NeedCopy-->
Share
Share
This Preview product documentation is Cloud Software Group Confidential.
You agree to hold this documentation confidential pursuant to the terms of your Cloud Software Group Beta/Tech Preview Agreement.
The development, release and timing of any features or functionality described in the Preview documentation remains at our sole discretion and are subject to change without notice or consultation.
The documentation is for informational purposes only and is not a commitment, promise or legal obligation to deliver any material, code or functionality and should not be relied upon in making Cloud Software Group product purchase decisions.
If you do not agree, select I DO NOT AGREE to exit.