Configure FIPS on appliances in a high availability setup
Important! The MPX 9700/10500/12500/15500 FIPS platform has reached end of life.
You can configure two appliances in a high availability (HA) pair as FIPS appliances.
Prerequisites
- The Hardware Security Module (HSM) must be configured on both the appliances. For more information, see Configure the HSM.
- When using the GUI, ensure that the appliances are already in an HA setup. For more information about configuring an HA setup, see High availability.
Note: Citrix recommends that you use the configuration utility (GUI) for this procedure. If you use the command line (CLI), make sure that you carefully follow the steps as listed in the procedure. Changing the order of steps or specifying an incorrect input file might cause an inconsistency that requires an appliance restart. In addition, if you use the CLI, the create ssl fipskey command is not propagated to the secondary node. When you run the command with the same input values for modulus size and exponent on two different FIPS appliances, the keys generated are not the same. Create the FIPS key on one of the nodes and then transfer it to the other node. But if you use the configuration utility to configure FIPS appliances in an HA setup, the FIPS key that you create is automatically transferred to the secondary node. The process of managing and transferring the FIPS keys is known as secure information management (SIM).
Important: The HA setup must be completed within six minutes. If the procedure fails at any step, do the following:
- Restart the appliance or wait for 10 minutes.
- Remove all the files created by the procedure.
- Repeat the HA setup procedure.
Do not reuse existing file names.
In the following procedure, appliance A is the primary node and appliance B is the secondary node.
Configure FIPS on appliances in a high availability setup by using the CLI
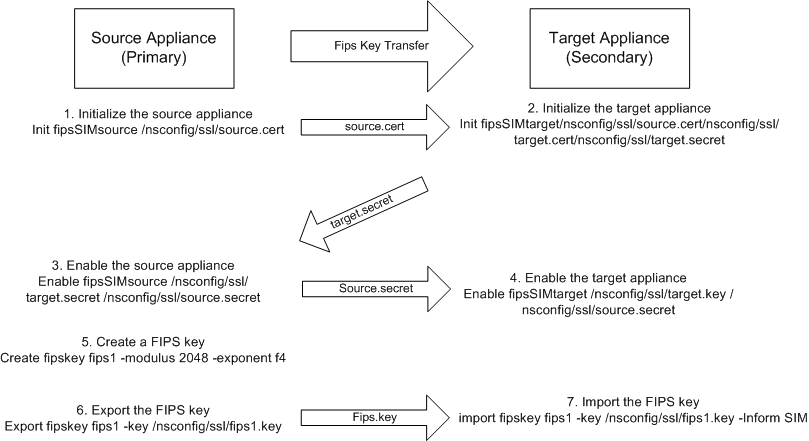
The following diagram summarizes the transfer process on the CLI.
Figure 1. Transfer the FIPS key-summary
-
On appliance A, open an SSH connection to the appliance by using an SSH client, such as PuTTY.
-
Log on to the appliance, using the administrator credentials.
-
Initialize appliance A as the source appliance. At the command prompt, type:
init ssl fipsSIMsource <certFile>
<!--NeedCopy-->
Example:
init fipsSIMsource /nsconfig/ssl/nodeA.cert -
Copy this
<certFile>file to appliance B, in the /nconfig/ssl folder.Example:
scp /nsconfig/ssl/nodeA.cert nsroot@198.51.100.10:/nsconfig/ssl -
On appliance B, open an SSH connection to the appliance by using an SSH client, such as PuTTY.
-
Log on to the appliance, using the administrator credentials.
-
Initialize appliance B as the target appliance. At the command prompt, type:
init ssl fipsSIMtarget <certFile> <keyVector> <targetSecret>
<!--NeedCopy-->
Example:
init fipsSIMtarget /nsconfig/ssl/nodeA.cert /nsconfig/ssl/nodeB.key /nsconfig/ssl/nodeB.secret -
Copy this
<targetSecret>file to appliance A.Example:
scp /nsconfig/ssl/fipslbdal0801b.secret nsroot@198.51.100.20:/nsconfig/ssl -
On appliance A, enable appliance A as the source appliance. At the command prompt, type:
enable ssl fipsSIMSource <targetSecret> <sourceSecret>
<!--NeedCopy-->
Example:
enable fipsSIMsource /nsconfig/ssl/nodeB.secret /nsconfig/ssl/nodeA.secret -
Copy this
<sourceSecret>file to appliance B.Example:
scp /nsconfig/ssl/fipslbdal0801b.secret nsroot@198.51.100.10:/nsconfig/ssl -
On appliance B, enable appliance B as the target appliance. At the command prompt, type:
enable ssl fipsSIMtarget <keyVector> <sourceSecret>
<!--NeedCopy-->
Example:
enable fipsSIMtarget /nsconfig/ssl/nodeB.key /nsconfig/ssl/nodeA.secret -
On appliance A, create a FIPS key, as described in Create a FIPS key.
-
Export the FIPS key to the appliance’s hard disk, as described in Export a FIPS key.
-
Copy the FIPS key to the hard disk of the secondary appliance by using a secure file transfer utility, such as SCP.
-
On appliance B, import the FIPS key from the hard disk into the HSM of the appliance, as described in Import an existing FIPS key.
Configure FIPS on appliances in a high availability setup by using the GUI
- On the appliance to be configured as the source (primary) appliance, navigate to Traffic Management > SSL > FIPS.
- In the details pane, on the FIPS Info tab, click Enable SIM.
- In the Enable SIM for HA Pair dialog box, in the Certificate File Name text box, type the file name. The file name must contain the path to the location at which the FIPS certificate must be stored on the source appliance.
- In the Key Vector File Name text box, type the file name. The file name must contain the path to the location at which the FIPS key vector must be stored on the source appliance.
- In the Target Secret File Name text box, type the location for storing the secret data on the target appliance.
- In the Source Secret File Name text box, type the location for storing the secret data on the source appliance.
- Under Secondary System Login Credential, enter the values for User Name and Password.
- Click OK. The FIPS appliances are now configured in HA mode.
Note: After configuring the appliances in HA, create a FIPS key, as described in Create a FIPS key. The FIPS key is automatically transferred from the primary to the secondary appliance.