Client certificate authentication
Websites that contain sensitive content, such as online banking websites or websites with employee personal information, sometimes require client certificates for authentication. To configure authentication, authorization, and auditing to authenticate users based on client-side certificate attributes, you first enable client authentication on the traffic management virtual server and bind the root certificate to the authentication virtual server. Then, you implement one of two options. You can configure the default authentication type on the authentication virtual server as CERT, or you can create a certificate action that defines what the NetScaler must do to authenticate users based on a client certificate. In either case, your authentication server must support CRLs. You configure the ADC to extract the user name from the SubjectCN field or another specified field in the client certificate.
When the user tries to log on to an authentication virtual server for which an authentication policy is not configured, and a global cascade is not configured, the user name information is extracted from the specified field of the certificate. If the required field is extracted, the authentication succeeds. If the user does not provide a valid certificate during the SSL handshake, or if the user name extraction fails, authentication fails. After it validates the client certificate, the ADC presents a logon page to the user.
The following procedures assume that you have already created a functioning authentication, authorization, and auditing configuration, and therefore they explain only how to enable authentication by using client certificates. These procedures also assume that you have obtained your root certificate and client certificates and have placed them on the ADC in the /nsconfig/ssl directory.
Configure client certificate authentication
Configure client certificate parameters by using the GUI
-
Install a CA certificate and bind it to an authentication virtual server.
- Navigate to Security > AAA - Application Traffic > Virtual Servers.
- In the Authentication Virtual Servers page that appears, select the virtual server that you want to configure to handle client certificate authentication, and then click Edit.
- On the Authentication Virtual Server page, navigate to the Certificate section and click the right arrow “>”.
-
On the CA Certificate Binding page, select a CA certificate, update the other required fields, and click Bind.
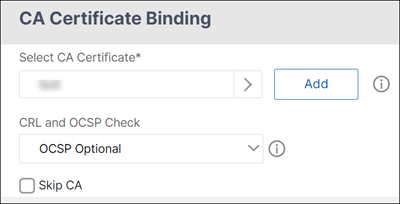
- If a CA certificate is not available, then select Add.
- On the Install Certificate page, update the following fields and click Install and then click Close.
- Certificate-Key Pair Name: Name for the certificate and private-key pair
- Certificate File Name: The name of the certificate file that is used to form the certificate-key pair. The certificate file must be present on the NetScaler’s hard-disk drive or solid-state drive. Storing a certificate in any location other than the default might cause inconsistency in a high availability setup. The default path is /nsconfig/ssl/.
- Notification Period: Number of days before certificate expiration at which NetScaler notifies the admin that the certificate is about to expire.
- Notify When Expires: Enable this option to receive an alert when the certificate is about to expire.

- Once the CA certificate is installed, go to the CA Certificate Binding page, bind it to an authentication virtual server.
- Return to the Security > AAA - Application Traffic > Virtual Servers page.
- Navigate to Security > AAA - Application Traffic > Policies > Authentication > Basic Policies > CERT.
- Select the policy that you want to configure to handle client certificate authentication, and then click Edit.
- On the Configure Authentication CERT Policy page, go to the Server drop-down list and select the virtual server that is configured to handle client certificate authentication.
-
Click OK.
Configure client certificate parameters by using the CLI
At the command prompt, type the following commands, in the order shown, to configure the certificate and verify the configuration:
add ssl certKey <certkeyName> -cert <certFile> -key <keyFile> -password -inform <inform> -expiryMonitor <expiryMonitor> -notificationPeriod <notificationPeriod>

bind ssl certKey [<certkeyName>] [-ocspResponder <string>] [-priority <positive_integer>]

show ssl certKey [<certkeyName>]

set aaa parameter -defaultAuthType CERT

show aaa parameter

set aaa certParams -userNameField "Subject:CN"

show aaa certParams
<!--NeedCopy-->
Configure client certificate advanced authentication policies by using the GUI
-
Install CA certificate and bind it to a certificate-key pair.
- Navigate to Security > AAA - Application Traffic > Virtual Servers.
- In the Authentication Virtual Servers page that appears, select the virtual server that you want to configure to handle client certificate authentication, and then click Edit.
- On the Authentication Virtual Server page, navigate to the Certificate section and click the right arrow “>”.
- On the CA Certificate Binding page, select a CA certificate, update the other required fields, and click Bind.
- If a CA certificate is not available, then select Add.
- On the Install Certificate page, update the following fields and click Install and then click Close.
- Certificate-Key Pair Name: Name for the certificate and private-key pair
- Certificate File Name: The name of the certificate file that is used to form the certificate-key pair. The certificate file must be present on the NetScaler’s hard-disk drive or solid-state drive. Storing a certificate in any location other than the default might cause inconsistency in a high availability setup. The default path is /nsconfig/ssl/.
- Notification Period: Number of days before certificate expiration at which NetScaler notifies the admin that the certificate is about to expire.
- Notify When Expires: Enable this option to receive an alert when the certificate is about to expire.
- Once the CA certificate is installed, go to the CA Certificate Binding page and repeat step 4.
-
Return to the Security > AAA - Application Traffic > Virtual Servers page.
Note:
If you have imported a valid CA certificate and server certificate for the virtual server you can skip steps 1 and 2.
- Navigate to Security > AAA - Application Traffic > Policies > Authentication > Advanced Policies, and then select Policy.
-
On the Authentication Policies page, do one of the following:
- To create a policy, click Add.
- To modify an existing policy, select the policy, and then click Edit.
-
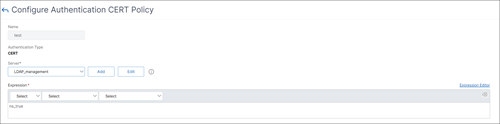
On the Create Authentication Policy or Configure Authentication Policy page, type or select values for the parameters.
- Name: Policy name. You cannot change the name of a previously configured policy.
- Action Type: Type of the authentication action.
- Action: Name of the authentication action to be performed if the policy matches. You can choose an existing authentication action, or click Add and create an action.
- Expression: The rule that selects connections to which you want to apply the action that you specified. The rule can be simple (“true” selects all traffic) or complex. You enter expressions by first choosing the type of expression in the leftmost drop-down list beneath the Expression window, and then by typing your expression directly into the expression text area, or by clicking Add to open Add Expression dialog box and using the drop-down lists in it to define your expression.
- Log Action: Name of the audit action to use when an authentication request matches this policy. You can choose an existing audit action, or click Add to create an action.
- Comment: You can type a comment that describes the type of traffic that this authentication policy applies to. This field is optional.
- Click Create or OK, and then click Close.
Client certificate pass-through
The NetScaler can now be configured to pass client certificates through to protected applications that require client certificates for user authentication. The ADC first authenticates the user, then inserts the client certificate into the request and sends it to the application. This feature is configured by adding appropriate SSL policies.
The exact behavior of this feature when a user presents a client certificate depends upon the configuration of the VPN virtual server.
- If the VPN virtual server is configured to accept client certificates but not require them, the ADC inserts the certificate into the request and then forwards the request to the protected application.
- If the VPN virtual server has client certificate authentication disabled, the ADC renegotiatiates the authentication protocol and reauthenticates the user before it inserts the client certificate in the header and forwards the request to the protected application.
- If the VPN virtual server is configured to require client certificate authentication, the ADC uses the client certificate to authenticate the user, then inserts the certificate in the header and forwards the request to the protected application.
In all of these cases, you configure the client certificate pass-through as follows.
Create and configure client certificate pass-through by using the CLI
At the command prompt, type the following commands:
add vpn vserver <name> SSL <IP> 443
<!--NeedCopy-->
For name, substitute a name for the virtual server. The name must contain from one to 127 ASCII characters, beginning with a letter or underscore (_), and containing only letters, numbers, and the underscore, hash (#), period (.), space, colon (:), at (@), equals (=), and hyphen (-) characters. For <IP>, substitute the IP address assigned to the virtual server.
set ssl vserver <name> -clientAuth ENABLED -clientCert <clientcert>
<!--NeedCopy-->
For <name>, substitute the name of the virtual server that you created. For <clientCert>, substitute one of the following values:
- disabled—disables client certificate authentication on the VPN virtual server.
- mandatory—configures the VPN virtual server to require client certificates to authenticate.
- optional—configures the VPN virtual server to allow client certificate authentication, but not to require it.
bind vpn vserver <name> -policy local
<!--NeedCopy-->
For <name>, replace the name of the VPN virtual server that you created.
bind vpn vserver <name> -policy cert
<!--NeedCopy-->
For <name>, substitute the name of the VPN virtual server that you created.
bind ssl vserver <name> -certkeyName <certkeyname>
<!--NeedCopy-->
For <name>, substitute the name of the virtual server that you created. For <certkeyName>, substitute the client certificate key.
bind ssl vserver <name> -certkeyName <cacertkeyname> -CA -ocspCheck Optional
<!--NeedCopy-->
For <name>, substitute the name of the virtual server that you created. For <cacertkeyName>, substitute the CA certificate key.
add ssl action <actname> -clientCert ENABLED -certHeader CLIENT-CERT
<!--NeedCopy-->
For <actname>, substitute a name for the SSL action.
add ssl policy <polname> -rule true -action <actname>
<!--NeedCopy-->
For <polname>, substitute a name for your new SSL policy. For <actname>, substitute the name of the SSL action that you created.
bind ssl vserver <name> -policyName <polname> -priority 10
<!--NeedCopy-->
For <name>, replace the name of the VPN virtual server.
Example
add vpn vserver vs-certpassthru SSL 10.121.250.75 443
set ssl vserver vs-certpassthru -clientAuth ENABLED -clientCert optional
bind vpn vserver vs-certpassthru -policy local
bind vpn vserver vs-certpassthru -policy cert
bind ssl vserver vs-certpassthru -certkeyName mycertKey
bind ssl vserver vs-certpassthru -certkeyName mycertKey -CA -ocspCheck Optional
add ssl action act-certpassthru -clientCert ENABLED -certHeader CLIENT-CERT
add ssl policy pol-certpassthru -rule true -action act-certpassthru
bind ssl vserver vs-certpassthru -policyName pol-certpassthru -priority 10
<!--NeedCopy-->