nFactor Extensibility
nFactor authentication framework provides the flexibility of adding customizations to make the logon interface more intuitive for rich user experience. You can add custom login labels, custom login credentials, customizing UI displays and so on.
With nFactor, each factor can have its own logon screen. In each logon screen you can present any information from any of the previous factors or more information that is invisible in other factors. For example, your last factor can be an informative page where the user reads the instructions and clicks continue.
Before nFactor, custom login pages were limited and customizations and needed support. It was possible to replace the tmindex.html or apply rewrite rules to change some of its behavior. However, it was not possible to achieve the underlying functionality.
The following nFactor related customizations are captured in detail in this topic.
- Customize login labels
- Customize UI to display images
- Customize NetScaler nFactor logon form
Assumptions
You are familiar with nFactor, Shell commands, XML, and text editors.
Prerequisites
- Customization described in this topic is possible only when the RfWeb UI theme (or theme based) is configured on NetScaler.
- Authentication policy must be bound to the authentication, authorization, and auditing virtual server, else the flow does not work as intended.
- You have the following items related to nFactor
- XML schema
- JavaScript
- Authentication actions
- Authentication virtual server
- NetScaler version 11.1 and later
Customize logon labels
To customize logon labels, you need the following:
- The XML schema that describes how the logon page looks.
- The script.js file that contains the JavaScript that is used to change the rendering process.
Note:
The script.js file can be found in the directory
/var/netscaler/logon/themes/<custom_theme>/.
How it works
The JavaScript parses the XML file, rendering each item inside the <Requirements> tag. Each element corresponds to a line in the HTML form. For example, a login field is a line, the password field is another line, and so is the logon button. To introduce new lines, you must specify them in the XML schema file using the StoreFront SDK. The StoreFront SDK allows the logon page with an XML schema to use the <Requirement> tag and define elements on it. These elements allow to use JavaScript to introduce in that space whatever HTML elements are required. In this case, a line is created with some text in the form of HTML.
The XML that can be used is as follows:
<Requirement>
<Credential>
<Type>nsg-custom-cred</Type>
<ID>passwd</ID>
</Credential>
<Label>
<Type>nsg-custom-label</Type>
</Label>
</Requirement>
<Requirement>: Space provided in the logon page. The credential fills the space, and the other parts route the engine into the correct information. In this case, type nsg-custom-cred. This is defined as plain text and the label is defined for its body.
The requirement XML is paired with the JavaScript code to achieve the required results.
// Custom Label Handler for Self Service Links
CTXS.ExtensionAPI.addCustomAuthLabelHandler({
getLabelTypeName: function () { return "nsg-custom-label"; },
getLabelTypeMarkup: function (requirements) {
return $("< Enter your HTML codes here>");
},
// Instruction to parse the label as if it was a standard type
parseAsType: function () {
return "plain";
}
});
//Custom Credential Handler for Self Service Links
CTXS.ExtensionAPI.addCustomCredentialHandler({
getCredentialTypeName: function () { return "nsg-custom-cred"; },
getCredentialTypeMarkup: function (requirements) {
return $("<div/>");
},
});
Important:
When you are adding the HTML code, ensure that the return value starts with an HTML tag.
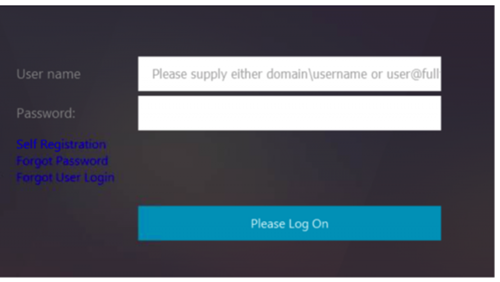
The XML portion indicates the logon page what to display, and the JavaScript code provides the actual text. The credential handler opens up the space and the label fills the space. Because all authentication traffic is now invisible to rewrite and responder, you can change the look and feel of the page. Configuration to customize login labels
-
Create and bind a theme based on RfWeb.
add vpn portaltheme RfWebUI_MOD -basetheme RfWebUI

bind vpn vserver TESTAAA –portaltheme RfWebUI_MOD
The path for the files based on the theme is available in the directory; /var/netscaler/logon/themes/RfWebUI_MOD
-
Add the following snippet to the end of the script.js file:
Note:
Failing to include the preceding lines inside the correct file or missing to include any JavaScript functions prevent the XML from being loaded. The error can only be seen in the Developer Console of the browser with the following text: “Undefined Type
nsg-custom-cred.”// Custom Label Handler for Self Service Links CTXS.ExtensionAPI.addCustomAuthLabelHandler({ getLabelTypeName: function () { return "nsg-custom-label"; }, getLabelTypeMarkup: function (requirements) { return $("<a href=\"https://identity.test.com/identity/faces/register\" style=\"font-size: 16px;\" style=\"text-align: center;\">Self Registration</a><br><a href=\"https://identity.test.com/identity/faces/forgotpassword\" style=\"font-size: 16px;\" style=\"text-align: center;\">Forgot Password</a><br><a href=\"https://identity.test.com/identity/faces/forgotuserlogin\" style=\"font-size: 16px;\" style=\"text-align: center;\">Forgot User Login</a>"); }, // Instruction to parse the label as if it was a standard type parseAsType: function () { return "plain"; } }); //Custom Credential Handler for Self Service Links CTXS.ExtensionAPI.addCustomCredentialHandler({ getCredentialTypeName: function () { return "nsg-custom-cred"; }, getCredentialTypeMarkup: function (requirements) { return $("<div/>"); }, });
Important:
When you are adding the HTML code, ensure that the return value starts with an HTML tag.
Login schema used in this example
<?xml version="1.0" encoding="utf-8"?>
<AuthenticateResponse xmlns="http://citrix.com/authentication/response/1">
<Status>success</Status>
<Result>more-info</Result>
<StateContext/>
<AuthenticationRequirements>
<PostBack>/nf/auth/doAuthentication.do</PostBack>
<CancelPostBack>/Citrix/Authentication/ExplicitForms/CancelAuthenticate</CancelPostBack>
<CancelButtonText>Cancel</CancelButtonText>
<Requirements>
<Requirement>
<Credential>
<ID>login</ID>
<SaveID>Username</SaveID>
<Type>username</Type>
</Credential>
<Label>
<Text>User name</Text>
<Type>plain</Type>
</Label>
<Input>
<AssistiveText>Please supply either domain\username or user@fully.qualified.domain</AssistiveText>
<Text>
<Secret>false</Secret>
<ReadOnly>false</ReadOnly>
<InitialValue></InitialValue>
<Constraint>.+</Constraint>
</Text>
</Input>
</Requirement>
<Requirement>
<Credential>
<ID>passwd</ID>
<SaveID>Password</SaveID>
<Type>password</Type>
</Credential>
<Label>
<Text>Password:</Text>
<Type>plain</Type>
</Label>
<Input>
<Text>
<Secret>true</Secret>
<ReadOnly>false</ReadOnly>
<InitialValue/>
<Constraint>.+</Constraint>
</Text>
</Input>
</Requirement>
<Requirement>
<Credential>
<Type>nsg-custom-cred</Type>
<ID>passwd</ID>
</Credential>
<Label>
<Type>nsg-custom-label</Type>
</Label>
</Requirement>
<Requirement>
<Credential>
<ID>loginBtn</ID>
<Type>none</Type>
</Credential>
<Label>
<Type>none</Type>
</Label>
<Input>
<Button>Please Log On</Button>
</Input>
</Requirement>
</Requirements>
</AuthenticationRequirements>
</AuthenticateResponse>
Run the following commands to load the custom schema to config.
add authentication loginSchema custom -authenticationSchema custom.xml

add authentication loginSchemaPolicy custom -rule true -action custom

bind authentication vserver AAATEST -policy custom -priority 100 -gotoPriorityExpression END
The following figure displays the login page that is rendered with this configuration.
Customize UI to display images
nFactor allows for customized display with the use of login schema files. There might be a requirement for further customizations other than those offered by the built-in login schema files. For example, displaying a hyperlink or writing custom logic in the UI. These can be achieved using ‘custom credentials’ that comprises the login schema extension and corresponding javascript file.
Login schema files can be found in the /nsconfig/loginschema/LoginSchema directory.
For UI customization to display images, a deployment flow in the “NetScaler-Swivel” integration is used as an example.
There are two factors in this flow.
- First factor: Checks user’s AD credentials.
- Second factor: Prompts for user logon based on group membership.
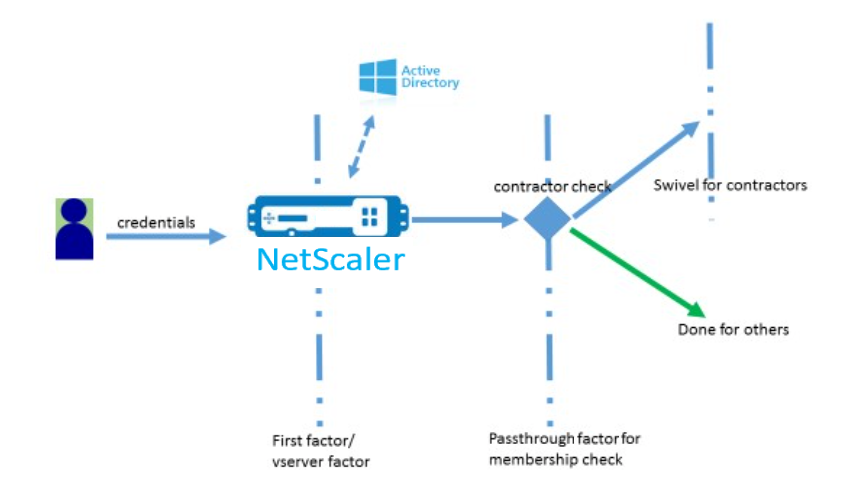
In this flow, all users go through the first factor. Before the second factor, there is a pseudo factor to check if some users can be omitted from the “swivel” factor. If the user requires the “swivel” factor, an image and a text box are displayed to enter the code.
Solution
The solution for customizing the UI to display images contains two parts;
- Login schema extension.
- Custom script to process the login schema extension.
Login schema extension
To control form rendering, a custom ‘id’/’credential’ is injected into the login schema. This can be done by reusing the existing schema and modifying as per the requirement.
In the example, a login schema that has only one text field (such as /nsconfig/loginschema/LoginSchema/OnlyPassword.xml) is considered. The following snippet is added to the login schema.
<Requirement><Credential><ID>swivel_cred</ID><Type>swivel_cred</Type><Input><Text><Hidden>true</Hidden><InitialValue>${http.req.user.name}</InitialValue></Text></Input></Credential></Requirement>
In the snippet, “swivel_cred” is specified as the “Type” of the credential. Because this is not recognized as a built-in ‘credential,’ UI looks for a handler for this type, and calls it if it exists. An initial value is sent for this credential which is an expression that NetScaler dynamically fills. In the example, it is the user’s name used to notify the swivel server of the user name. It might not be needed all the time or it can be augmented with some other data. Those details must be added as required.
Javascript to handle custom credential
When the UI finds a custom credential, it looks for a handler. All custom handlers are written in /var/netscaler/logon/LogonPoint/custom/script.js for the default portal theme.
For the custom portal themes, script.js can be found in the directory /var/netscaler/logon/themes/<custom_theme>/.
The following script is added to render markup for custom credentials.
CTXS.ExtensionAPI.addCustomCredentialHandler({
    // The name of the credential, must match the type returned by the server
    getCredentialTypeName: function () { return "swivel_cred"; },
    // Generate HTML for the custom credential
    getCredentialTypeMarkup: function (requirements) {
        var div = $("<div></div>");
        var image = $("<img/>");
        var username = requirements.input.text.initialValue; //Get the secret from the response
        image.attr({
            "style" : "width:200px;height:200px;",
            "id" : "qrcodeimg",
            "<Enter your server URL here>"
        });
        div.append(image);
        return div;
    }
});
This snippet is for handling the mark-up for ‘swivel_cred’. Credential name highlighted must match the ‘type’ specified earlier in the login schema extension. To generate mark-up, an image whose source points to the swivel server needs to be added. Once this is done, UI loads the image from the specified location. Because this login schema also has a textbox, UI renders that text box.
Note:
Administrator can modify the “style” of the image element to resize the image. Currently it configured for 200x200 pixels.
Configuration for customizing UI to display images
nFactor configuration is better constructed bottom-up, that is the last factor first because when you try to specify ‘nextFactor’ for the previous factors, you require the subsequent factor’s name.
Swivel factor configuration:
add loginschema swivel_image –authenticationSchema /nsconfig/loginschema/SwivelImage.xml

add authentication policylabel SwivelFactor –loginSchema swivel_image

bind authentication policylabel SwivelFactor –policy <policy-to-check-swivel-image> -priority 10
Note:
Download SwivelImage.xml from the login schema used in the example.
Pseudo factor for group check configuration:
add authentication policylabel GroupCheckFactor

add authentication policy contractors_auth_policy –rule ‘http.req.user.is_member_of(“contractors”)’ –action NO_AUTHN

add authentication policy not_contractors _auth_policy–rule true –action NO_AUTHN

bind authentication policylabel GroupCheckFactor –policy contractors_auth_policy –pri 10 –nextFactor SwivelFactor

bind authentication policylabel GroupCheckFactor –policy not_contractors_auth_policy –pri 20
First factor for Active Directory login:
add ldapAction <>

add authentication policy user_login_auth_policy –rule true –action <>

bind authentication vserver <> -policy user_login_auth_policy –pri 10 –nextFactor GroupCheckFactor
In the configuration, three factors are specified of which one is implicit/pseudo.
Login schema used in this example
The following is an example schema with swivel credential and a text box.
Note:
When copying data for a web browser, quotes might be displayed differently. Copy data in editors like notepad before saving them to files.
<?xml version="1.0" encoding="UTF-8"?>
<AuthenticateResponse xmlns="http://citrix.com/authentication/response/1">
<Status>success</Status>
<Result>more-info</Result>
<StateContext></StateContext>
<AuthenticationRequirements>
<PostBack>/nf/auth/doAuthentication.do</PostBack>
<CancelPostBack>/nf/auth/doLogoff.do</CancelPostBack>
<CancelButtonText>Cancel</CancelButtonText>
<Requirements>
<Requirement><Credential><ID>swivel_cred</ID><Type>swivel_cred</Type><Input><Text><Hidden>true</Hidden><InitialValue>${http.req.user.name}</InitialValue></Text></Input></Credential></Requirement>
<Requirement><Credential><ID>passwd</ID><SaveID>ExplicitForms-Password</SaveID><Type>password</Type></Credential><Label><Text>Password:</Text><Type>plain</Type></Label><Input><Text><Secret>true</Secret><ReadOnly>false</ReadOnly><InitialValue></InitialValue><Constraint>.+</Constraint></Text></Input></Requirement>
<Requirement><Credential><Type>none</Type></Credential><Label><Text>Hello ${http.req.user.name}, Please enter passcode from above image.</Text><Type>confirmation</Type></Label><Input /></Requirement>
<Requirement><Credential><ID>saveCredentials</ID><Type>savecredentials</Type></Credential><Label><Text>Remember my password</Text><Type>plain</Type></Label><Input><CheckBox><InitialValue>false</InitialValue></CheckBox></Input></Requirement>
<Requirement><Credential><ID>loginBtn</ID><Type>none</Type></Credential><Label><Type>none</Type></Label><Input><Button>Log On</Button></Input></Requirement>
</Requirements>
</AuthenticationRequirements>
</AuthenticateResponse>
Output
Once the configuration is performed, the following image is displayed.
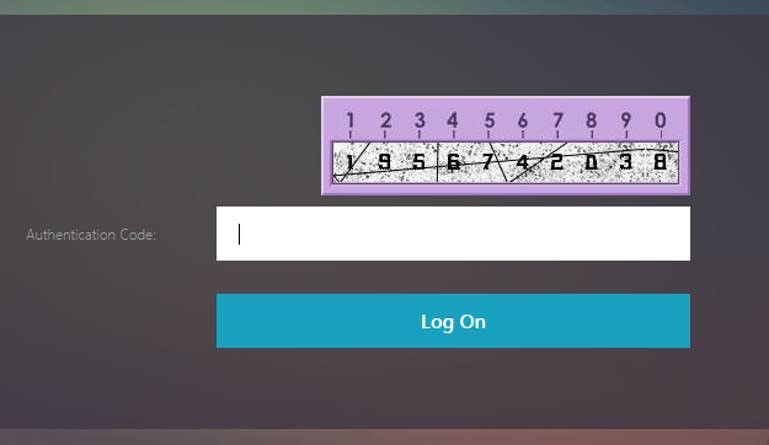
Note:
Image height and placement can be altered in the JavaScript.
Customize NetScaler nFactor logon form to show or hide fields
NetScaler Gateway’s RfWeb UI allows for wide variety of customizations. This capability when combined with the nFactor authentication framework lets customers configure complex flows without compromising existing workflows.
In this example, two authentication options, OAuth and LDAP are available from the Logon Type list. When the form is first loaded, the user name and password fields (LDAP is shown first) are displayed. If OAuth is selected, all the fields are hidden because OAuth implies an offload of authentication to a third party server. This way, an administrator can configure intuitive workflows as per user convenience.
Note:
- The values in the Logon Type list can be modified with simple modifications to the script file.
- This section describes only the UI part of the flow. The run time handling of the authentication is outside the scope of this article. Users are recommended to refer to the nFactor documentation for authentication configuration.
How to customize nFactor logon form
Customizing nFactor logon form can be classified into two parts
- Sending the right login schema to the UI
- Writing a handler to interpret login schema and user selections
Send the correct login schema to the UI
In this example, a simple claim/requirement is sent in the login schema.
For this, the SingleAuth.xml file is modified. The SingleAuth.xml is shipped with NetScaler firmware and can be found in the /nsconfig/loginschema/LoginSchema directory.
Steps to send login schema:
-
Log in via SSH and drop to shell (type ‘shell’).
-
Copy SingleAuth.xml to a different file for modification.
Note:
The destination folder is different from the default NetScaler login schemas folder.
cp /nsconfig/loginschema/LoginSchema/SingleAuth.xml /nsconfig/loginschema/SingleAuthDynamic.xml
-
Add the following claim to SingleAuthDynamic.xml.
<Requirement><Credential><ID>nsg_dropdown</ID><Type>nsg_dropdown</Type></Credential><Label><Text>Logon Type:</Text><Type>plain</Type></Label></Requirement> -
Configure NetScaler to send this login schema to load the first form.
add loginschema single_auth_dynamic –authenticationSchema SingleAuthDynamic.xml

add loginschemaPolicy single_auth_dynamic –rule true –action single_auth_dynamic

bind authentication vserver aaa_nfactor –policy single_auth_dynamic –pri 10
Script changes to load form and handle user events
You can modify the JavaScript that enables an administrator to customize the display for the logon form. In this example, the user name and password field are displayed if LDAP is chosen and are hidden if OAuth is chosen. Administrator can also hide only the password.
Admins must append the following snippet to “script.js” that is at “/var/netscaler/logon/LogonPoint/custom” directory.
Note:
Because this directory is a global directory, create a portal theme and edit the “script.js” file within that folder, at
"/var/netscaler/logon/themes/<THEME_NAME>".
CTXS.ExtensionAPI.addCustomCredentialHandler({
    // The name of the credential, must match the type returned by the server
    getCredentialTypeName: function () { return "nsg_dropdown"; },
    // Generate HTML for the custom credential
    getCredentialTypeMarkup: function (requirements) {
        var div = $("<div></div>");
        var select = $("<select name='nsg_dropdown'></select>").attr("id", "nsg_dropdown");

        var rsa = $("<option></option>").attr("selected", "selected").text("LDAP").val("LDAP");
        var OAuthID = $("<option></option>").text("OAuth").val("OAuth");
        select.append(rsa, OAuthID);

        select.change(function(e) {
            var value = $(this).val();
            var ldapPwd = $($(".credentialform").find(".CredentialTypepassword")[0]);
            var ldapUname = $($(".credentialform").find(".CredentialTypeusername"));
            if(value == "OAuth") {
                if (ldapPwd.length)
                        ldapPwd.hide();
                if (ldapUname.length)
                        ldapUname.hide();
            } else if(value == "LDAP") {
                if (ldapPwd.length)
                        ldapPwd.show();
                if (ldapUname.length)
                        ldapUname.show();
            }
        });
       div.append(select);
        return div;
    }
});
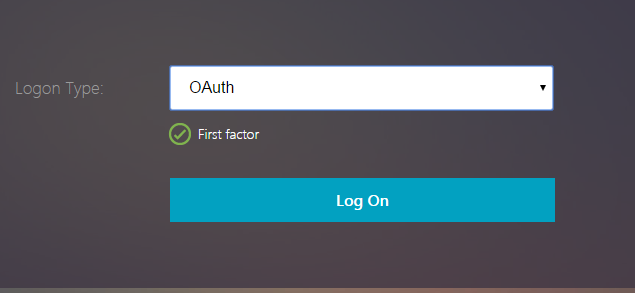
End-user experience
When an end user loads the logon page first time, the following screen appears.
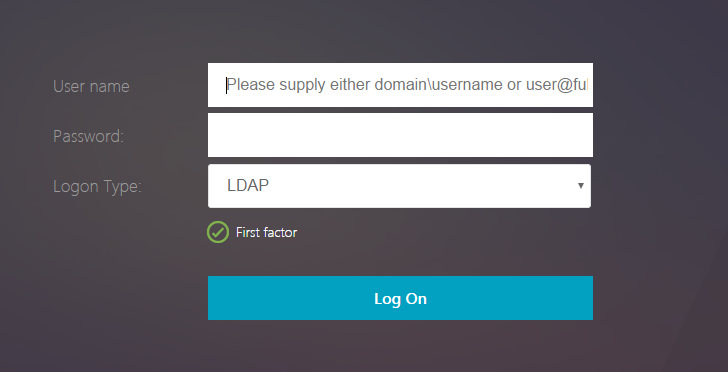
If OAuth is selected in Logon Type, user name and password fields are hidden.
If LDAP is selected, user name and password are displayed. This way, the logon page can be dynamically loaded based on user selection.
Login schema used in this example
<?xml version="1.0" encoding="UTF-8"?>
<AuthenticateResponse xmlns="http://citrix.com/authentication/response/1">
<Status>success</Status>
<Result>more-info</Result>
<StateContext></StateContext>
<AuthenticationRequirements>
<PostBack>/nf/auth/doAuthentication.do</PostBack>
<CancelPostBack>/nf/auth/doLogoff.do</CancelPostBack>
<CancelButtonText>Cancel</CancelButtonText>
<Requirements>
<Requirement><Credential><ID>login</ID><SaveID>ExplicitForms-Username</SaveID><Type>username</Type></Credential><Label><Text>User name</Text><Type>plain</Type></Label><Input><AssistiveText>Please supply either domain\username or user@fully.qualified.domain</AssistiveText><Text><Secret>false</Secret><ReadOnly>false</ReadOnly><InitialValue></InitialValue><Constraint>.+</Constraint></Text></Input></Requirement>
<Requirement><Credential><ID>passwd</ID><SaveID>ExplicitForms-Password</SaveID><Type>password</Type></Credential><Label><Text>Password:</Text><Type>plain</Type></Label><Input><Text><Secret>true</Secret><ReadOnly>false</ReadOnly><InitialValue></InitialValue><Constraint>.+</Constraint></Text></Input></Requirement>
<Requirement><Credential><ID>nsg_dropdown</ID><Type>nsg_dropdown</Type></Credential><Label><Text>Logon Type:</Text><Type>plain</Type></Label></Requirement>
<Requirement><Credential><Type>none</Type></Credential><Label><Text>First factor</Text><Type>confirmation</Type></Label><Input /></Requirement>
<Requirement><Credential><ID>saveCredentials</ID><Type>savecredentials</Type></Credential><Label><Text>Remember my password</Text><Type>plain</Type></Label><Input><CheckBox><InitialValue>false</InitialValue></CheckBox></Input></Requirement>
<Requirement><Credential><ID>loginBtn</ID><Type>none</Type></Credential><Label><Type>none</Type></Label><Input><Button>Log On</Button></Input></Requirement>
</Requirements>
</AuthenticationRequirements>
</AuthenticateResponse>
Note:
For more details about various nFactor related topics, see nFactor authentication.