Configure pre-auth and post-auth EPA scan as a factor in nFactor authentication
On NetScaler Gateway, Endpoint Analysis (EPA) can be configured to check if a user device meets certain security requirements and accordingly allow access of internal resources to the user. The Endpoint Analysis plug-in downloads and installs on the user device when users log on to NetScaler Gateway for the first time. If a user does not install the Endpoint Analysis plug-in on the user device, the user cannot log on with the NetScaler Gateway plug-in.
For understanding EPA in nFactor concepts, see, Concepts, and Entities Used for EPA in nFactor Authentication Through NetScaler.
In this topic, EPA scan is used as an initial check in a nFactor or multifactor authentication, followed by login and EPA scan as the final check.
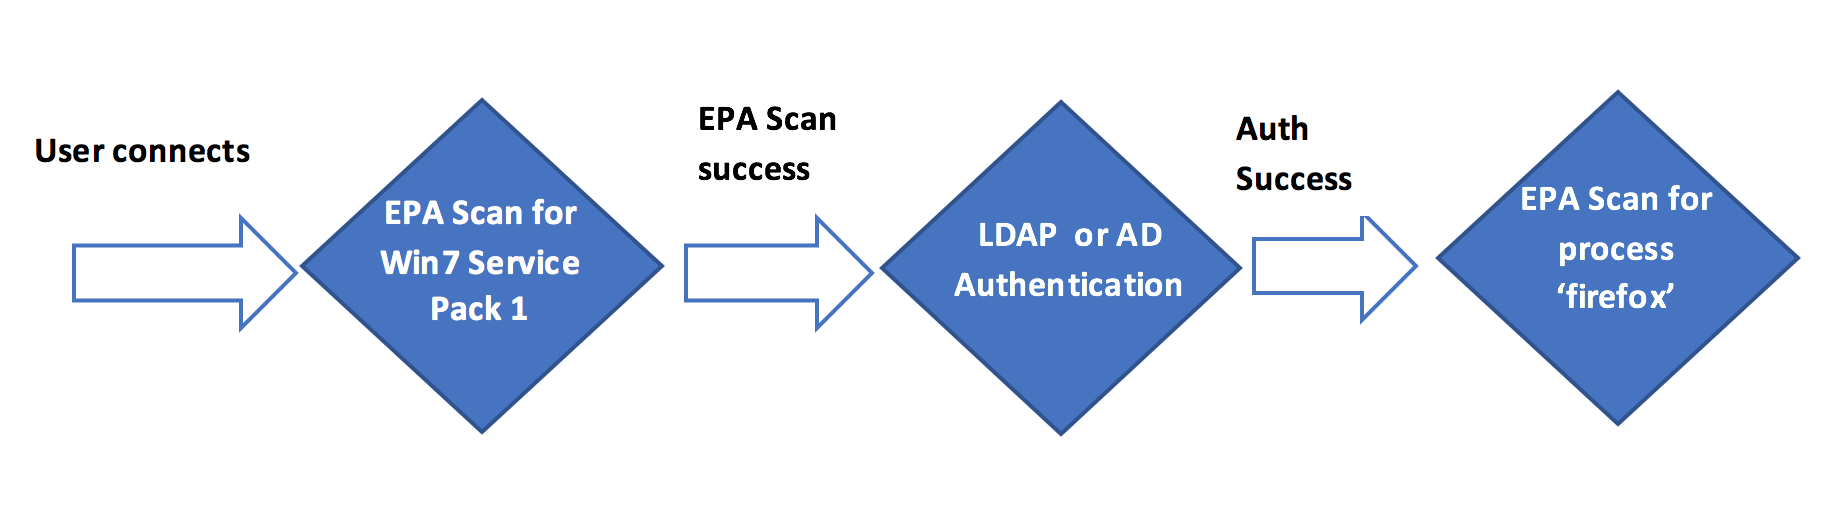
User connects to NetScaler Gateway virtual IP address. An EPA scan is initiated. If EPA scan is successful, the user is rendered the login page with user name and password fields for LDAP or AD (Active Directory) based authentication. Based on the success of the user credentials, the user is redirected to the next EPA factor.
High level steps involved in this configuration
-
If the scan is successful, the user is placed or tagged to a default user group.
-
The next method of authentication (LDAP) is chosen.
-
Based on the result of authentication, the user is presented with the next set of scan.
Pre-requisites
It is assumed that the following configurations are in place.
- VPN virtual server/gateway and authentication virtual server configurations
- Authentication, authorization, and auditing user groups (for default & quarantined user groups) and associated policies
- LDAP server configurations and associated policies
Configuration by using the CLI
-
Create an action to perform an EPA scan and associate it with an EPA scan policy.
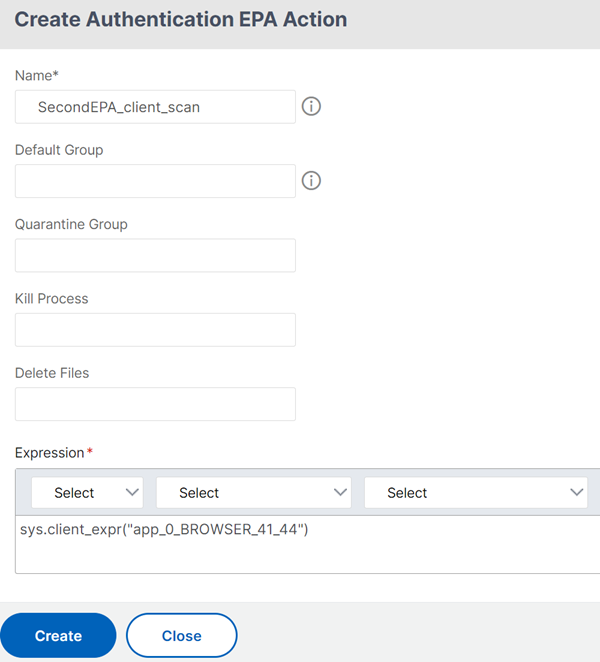
add authentication epaAction SecondEPA_client_scan -csecexpr "sys.client_expr(\"proc_0_firefox\")"The preceding expression scans if the Firefox process is running on the client machine.
add authentication Policy SecondEPA_check -rule true -action SecondEPA_client_scan -
Configure a policy label post-epa-scan that hosts the policy for EPA scan.
add authentication policylabel post-epa-scan -loginSchema LSCHEMA_INTNote: LSCHEMA_INT is an in-built schema with no schema (noschema), meaning no additional webpage is presented to user at this step.
-
Associate policy configured in step 1 with the policy label configured in step 2.
bind authentication policylabel post-epa-scan -policyName SecondEPA_check -priority 100 -gotoPriorityExpression ENDEND indicates end of authentication mechanism.
-
Configure a ldap-auth policy and associate it with an LDAP policy which is configured to authenticate with a particular LDAP server.
add authentication Policy ldap-auth -rule true -action ldap_server1Here ldap_server1 is LDAP policy and ldap-auth is the policy name.
-
Configure a policy label ldap-factor, with login schema to capture a single factor user name and password.
add authentication policylabel ldap-factor -loginSchema LoginSchema/SingleAuth.xmlNote: Replace with the schema that you need, in case you do not want to use in built schema LoginSchema/SingleAuth.xml
-
Associate the policy configured in step 4 with the policy label configured in step 5.
bind authentication policylabel ldap-factor -policyName ldap-auth -priority 100 -gotoPriorityExpression END -nextFactor post-epa-scanEND indicates the end of authentication mechanism for that leg and nextFactor indicates the next factor following authentication.
-
Create an action to perform EPA scan and associate it with an EPA scan policy.
add authentication epaAction FirstEPA_client_scan –csecexpr “sys.client_expr(\"os_0_win7_sp_1\")" -defaultEPAGroup default_groupHere default_group is a pre-configured user group.
The above expression scans if Windows 7 users have Service pack 1 installed.
add authentication Policy FirstEPA-check -rule true -action FirstEPA_client_scan -
Associate an EPA scan policy to authentication, authorization, and auditing virtual server with the next step pointing to the policy label ldap-factor to perform the next step in authentication.
bind authentication vserver MFA_AAA_vserver -policy FirstEPA-check -priority 100 -nextFactor ldap-factor -gotoPriorityExpression NEXT
Configuration by using the GUI
-
Navigate to Security > AAA-Application Traffic > Policies > Authentication > Advanced Policies > Actions > EPA.
First EPA Scan to check for Automatic Windows Update and a default group

Second EPA Scan to check for the Firefox Browser
-
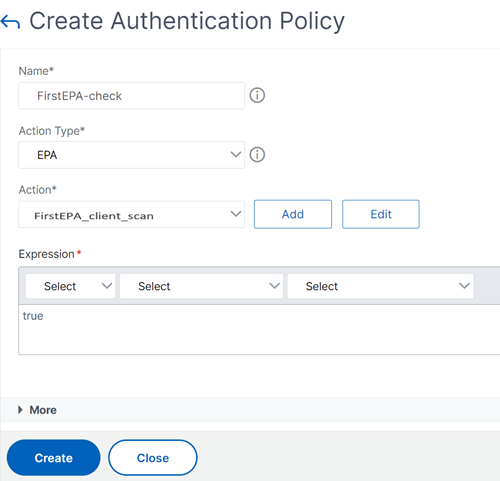
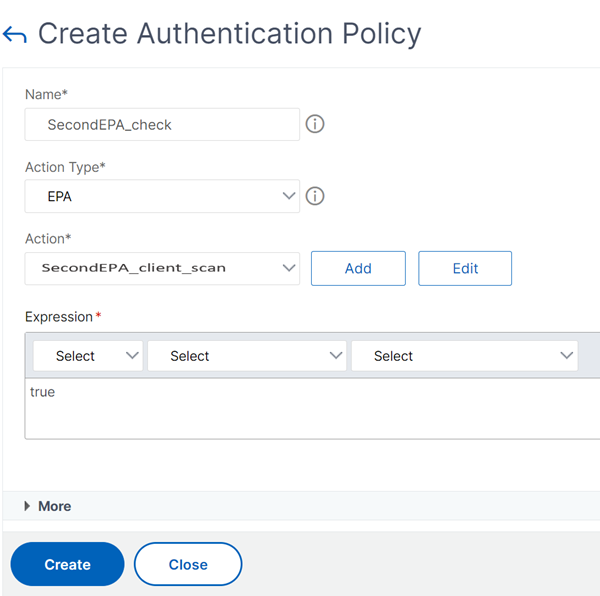
Create an EPA Policy. Navigate to Security > AAA-Application Traffic > Policies > Authentication > Advanced Policies > Policy and bind the action created in step 1.
Policy for first EPA scan
Policy for second EPA Scan
For more information on Advanced EPA see, Advanced Endpoint Analysis Scans
-
Create an nFactor flow. Navigate to Security > AAA-Application Traffic > nFactor Visualizer > nFactor Flow and click Add.
Note: nFactor Visualizer is available on firmware 13.0 and later.
-
Add a factor. The name that you enter is the name of the nFactor flow.
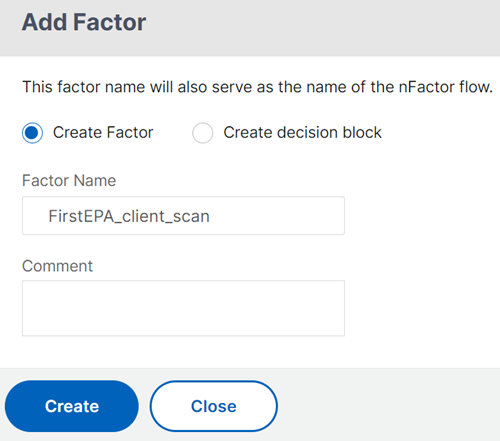
No schema is required for the EPA scan.
-
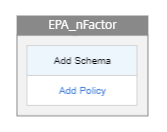
Click Add Policy to add a policy for the first factor.
-
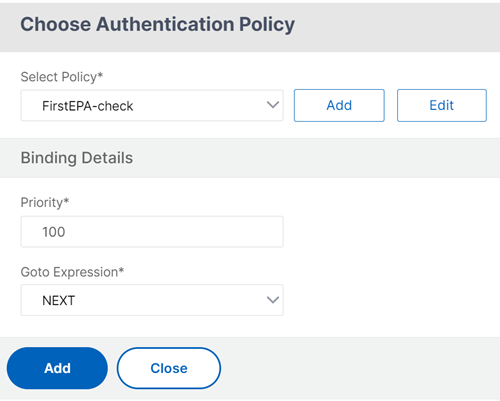
Select the First EPA policy created in step 2.
-
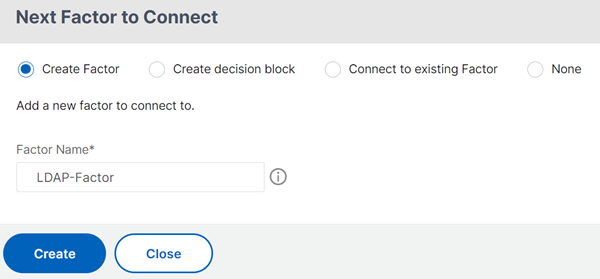
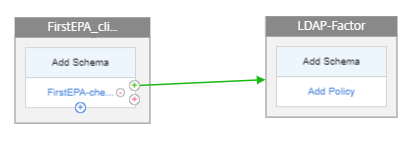
Click the green + sign and add the next factor that is LDAP authentication.
-
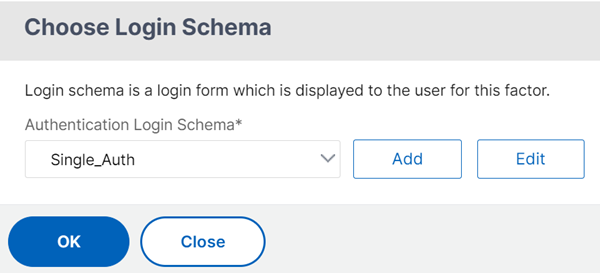
Click Add Schema and then click Add to add a schema for the second factor.
-
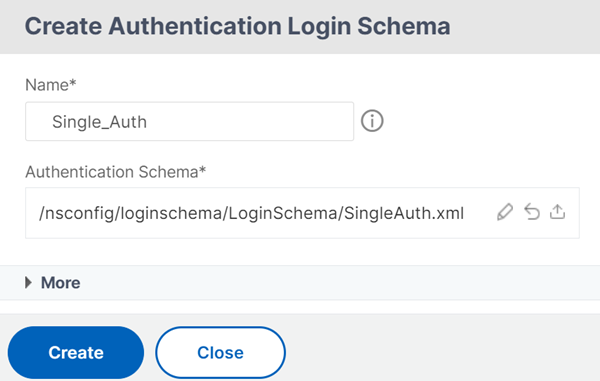
Create a schema, in this example Single_Auth and choose this schema.
-
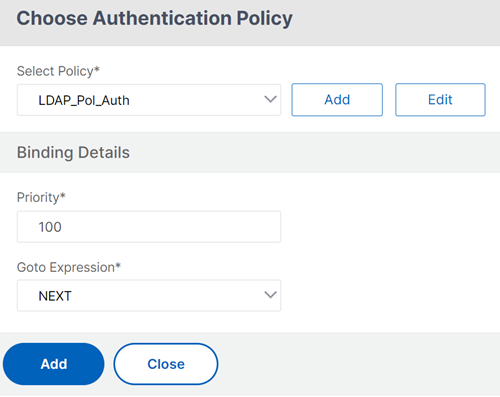
Click Add Policy to add an LDAP policy for authentication.
For more information on creating LDAP authentication see, Configuring LDAP Authentication
-
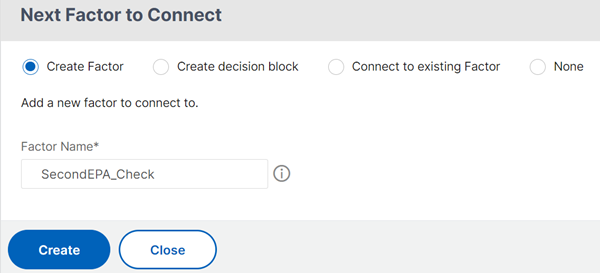
Create Next factor for post authentication EPA scan.
-
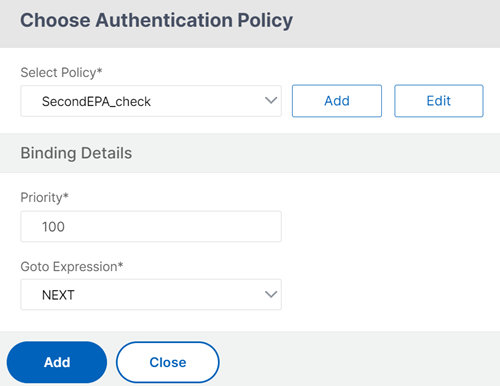
Click Add Policy, select the SecondEPA_Check policy created in step 2, and click Add.
-
Click Done.
-
Click Bind to Authentication Server, select the nFactor flow, and then click Create.
Unbind the nFactor flow
-
Select the nFactor flow and click Show Bindings.
-
Select the authentication virtual server and click Unbind.