Configure pre-authentication Endpoint Analysis scan as a factor in nFactor authentication
On NetScaler Gateway, Endpoint Analysis (EPA) can be configured to check if a user device meets certain security requirements and accordingly allow access of internal resources to the user. The Endpoint Analysis plug-in downloads and installs on the user device when users log on to NetScaler Gateway for the first time. If a user does not install the Endpoint Analysis Plug-in on the user device or chooses to skip the scan, the user cannot log on with the NetScaler Gateway plug-in. Optionally, the user can be put in a quarantine group where the user gets limited access to internal network resources.
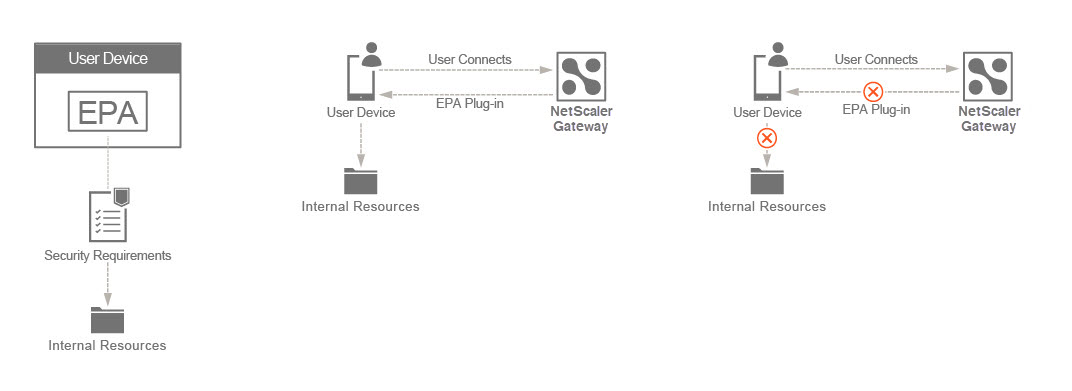
In this topic, an EPA scan is used as an initial check in a nFactor or multifactor authentication.
The user connects to the NetScaler Gateway virtual IP address. An EPA scan is started. If an EPA scan is successful, the user is rendered with the login page with the user name and password fields for RADIUS or OTP-based authentication. Else, the user is rendered with a login page, but this time the user is authenticated using LDAP or AD (Active Directory) based authentication. Based on the success or failure of the user provided credentials, the user is provided access.
Implementing this logic post the EPA:
-
If the EPA scan is successful, the user is placed or tagged to a default user group.
-
If the EPA scan is a failure, then the user is placed or tagged to a quarantine group.
-
The next method of authentication (RADIUS or LDAP) is chosen based on the user group membership as determined in the first two steps.
Prerequisites
Make sure that the following configuration is in place.
- VPN virtual server or gateway and authentication virtual server configurations
- Authentication, authorization, and auditing user groups (for default and quarantined user groups) and associated policies
- LDAP and RADIUS server configurations and associated policies
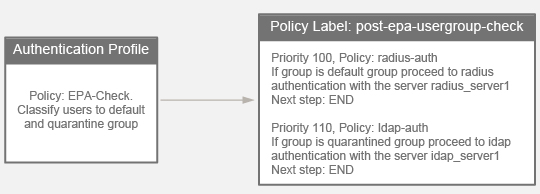
The following figure displays the mapping of policies and policy label. This is the approach used for configuration, but from right to left.
Note: The setup can also be created through the nFactor Visualizer available in NetScaler version 13.0 and later.

Perform the following by using the CLI
-
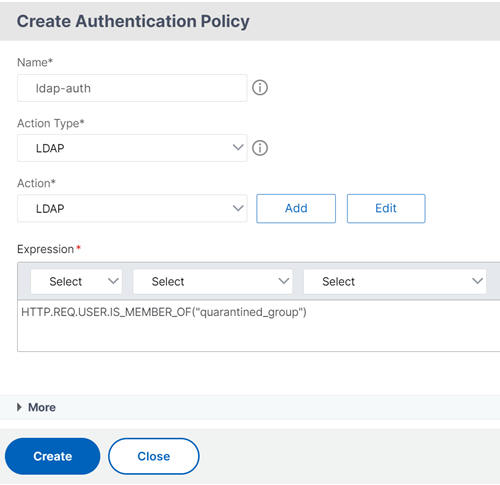
Configure an LDAP-auth policy to check for quarantined_group membership and associate it with an LDAP policy that is configured to authenticate with a particular LDAP server. In the following sample command,
ldap-authis the name of the authentication policy andldap_server1is the name for the LDAP action created.add authentication Policy ldap-auth -rule "AAA.USER.IS_MEMBER_OF (\"quarantined_group\")" -action ldap_server1 <!--NeedCopy--> -
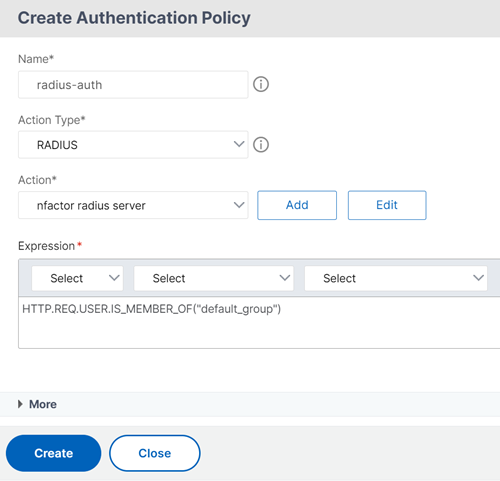
Configure Radius-auth policy to check for default_group membership and associate it with a RADIUS policy that is configured to authenticate with a particular RADIUS server. In the following sample command,
radius-authis the name of the authentication policy andradius_server1is the name for the RADIUS action created.add authentication Policy radius-auth -rule "AAA.USER.IS_MEMBER_OF(\"default_group\")" -action radius_server1 <!--NeedCopy--> -
Configure policy label post-epa-usergroup-check with a login schema to capture single factor user name and password.
add authentication policylabel post-epa-usergroup-check -loginSchema lschema_single_factor_deviceid
<!--NeedCopy-->
Note: If you do not want to use the in-built schema lschema_single_factor_deviceid, you can replace with the schema as per your requirement.
-
Associate policies configured in step 1 and 2 with policy label configured in step 3.
bind authentication policylabel post-epa-usergroup-check -policyName radius-auth -priority 100 -gotoPriorityExpression END

bind authentication policylabel post-epa-usergroup-check -policyName ldap-auth -priority 110 -gotoPriorityExpression END
<!--NeedCopy-->
Note: END indicates end of authentication mechanism for that leg.
-
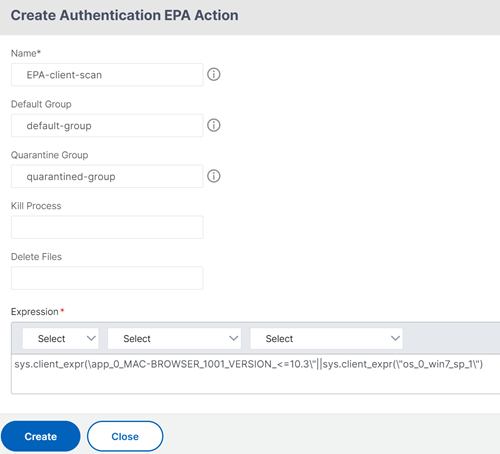
Create an action to perform the EPA scan and associate it with an EPA scan policy.
add authentication epaAction EPA-client-scan -csecexpr "sys.client_expr(\"app_0_MAC- BROWSER_1001_VERSION_<=_10.0.3\")||sys.client_expr(\"os_0_win7_sp_1\")"  -defaultEPAGroup default_group -quarantineGroup quarantined_group
<!--NeedCopy-->
The default_group and quarantined_group are pre-configured user groups. The expression in step 5 scans if macOS users have browser version less than 10.0.3 or if Windows 7 users have Service pack 1 installed.
add authentication Policy EPA-check -rule true -action EPA-client-scan <!--NeedCopy--> -
Associate an EPA scan policy to the authentication, authorization, and auditing virtual server with the next step pointing to the policy label post-epa-usergroup-check. This is to do the next step in authentication.
bind authentication vserver MFA_AAA_vserver -policy EPA-check -priority 100 -nextFactor post-epa-usergroup-check -gotoPriorityExpression NEXT
<!--NeedCopy-->
Configuration by using the nFactor Visualizer
-
Navigate to Security > AAA-Application Traffic > nFactor Visualizer > nFactor Flow and click Add.
-
Click + to add the nFactor flow.
-
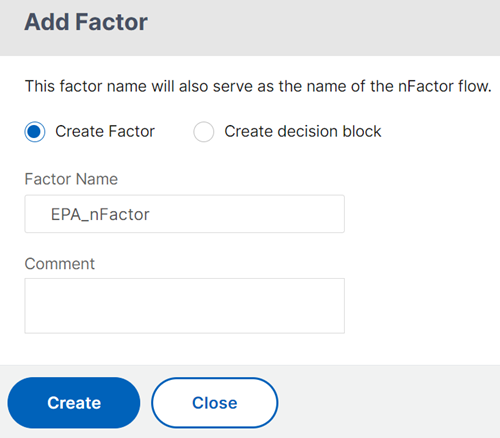
Add a factor. The name that you enter is the name of the nFactor flow.
Note: No schema is required for the first factor.
-
Click Add Policy and then Add to create an authentication policy for EPA check.

-
In Action field, click Add to add the EPA action.
For more details on the EPA, see Configuring Advanced Endpoint Analysis Scan.
-
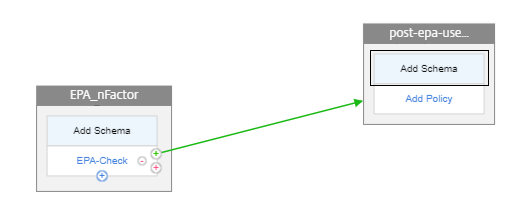
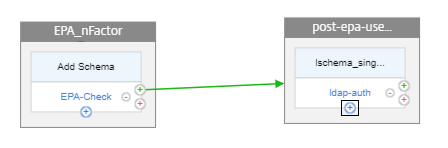
Click the green + sign on the EPA_nFactor block to add the next factor for the post EPA user group check.
-
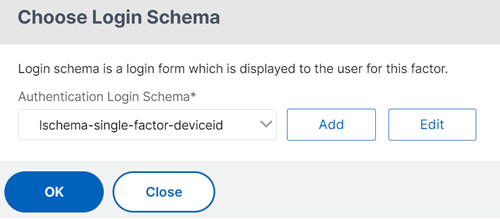
Click Add Schema to add the schema for the second factor. Select the schema lschema_single_factor_deviceid.
-
Click Add policy to select the policy for LDAP authentication.
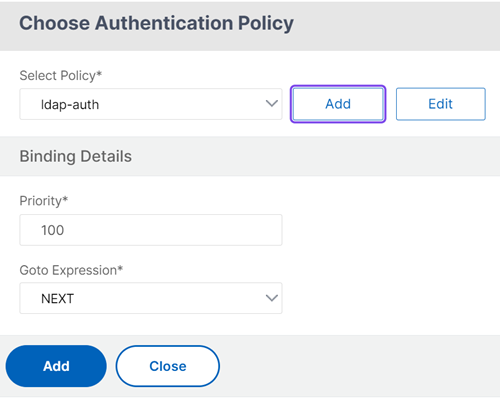
The policy for LDAP checks if the user is part of the quarantined group. For more information on creating LDAP authentication, see, Configuring LDAP Authentication.
-
Click the blue + sign on the EPA_nFactor block to add the second authentication.
-
Click Add to select the policy for the RADIUS authentication. For more information on creating RADIUS authentication, see Configuring RADIUS Authentication.
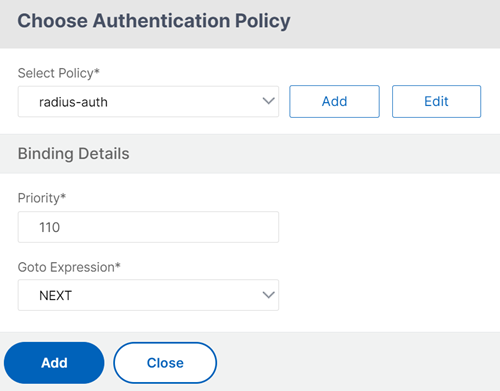
The policy for the LDAP checks if the user is part of the default group.
-
Click Done.
-
After the nFactor flow is complete, bind this flow to the authentication, authorization, and auditing virtual server. Click Bind to Authentication Server then click Create.
Unbind the nFactor flow
-
Select the nFactor flow and click Show Bindings.
-
Select the authentication virtual server and click Unbind.