Creating Web App Firewall profiles
You can create a Web App Firewall profile in one of two ways: by using the command line, and by using the GUI. Creating a profile by using the command line requires that you specify options on the command line. The process is similar to that of configuring a profile, and with a few exceptions the two commands take the same parameters.
Note
Core profile: This profile is available in the build 33.x and later. It contains limited but fundamental security checks enabled by default whereas the basic and advanced profiles have many other security checks enabled by default. The core profile contains the following security checks:
- Grammar-based SQL injection
- Grammar-based CMD injection
- Cross-site scripting
- Buffer overflow
- Block keywords
CVE profile: This profile is available in the build 42.x and later. Use this profile to only add and bind a signature. It disables all checks from the NetScaler Web App Firewall except the CVE check.
When creating a profile, specify one of these options: basic, advanced, core, or CVE. The default configuration for the various security checks and settings that are part of that profile are applied. You can also, optionally, add a comment. After you create the profile, you must then configure it by selecting it in the data pane, and then clicking Edit.
If you plan to use the learning feature or to enable and configure many advanced protections, you must choose advanced defaults. In particular, if you plan to configure either of the SQL injection checks, either of the cross-site scripting checks, any check that provides protection against Web form attacks, or the cookie consistency check, you must plan to use the learning feature. Unless you include the proper exceptions for your protected websites when configuring these checks, they can block legitimate traffic. Anticipating all exceptions without creating any that is too broad is difficult. The learning feature makes this task much easier. Otherwise, basic defaults are quick and must provide the protection that your web applications need.
There are three profile types:
- HTML. Protects standard HTML-based websites.
- XML. Protects XML-based web services and websites.
- Web 2.0 (HTML XML). Protects websites that contain both HTML and XML elements, such as ATOM feeds, blogs, and RSS feeds.
There are also a few restrictions on the name that you can give to a profile. A profile name cannot be the same as the name assigned to any other profile or action in any feature on the NetScaler appliance. Certain action or profile names are assigned to built-in actions or profiles, and can never be used for user profiles. A complete list of disallowed names can be found in the Web App Firewall Profile Supplemental Information. If you attempt to create a profile with a name that has already been used for an action or a profile, an error message is displayed and the profile is not created.
To create a Web App Firewall profile by using the command line interface
At the command prompt, type the following commands:
add appfw profile <name> [-defaults ( basic | advanced | core | cve)]set appfw profile <name> -type ( HTML | XML | HTML XML )set appfw profile <name> -comment "<comment>"save ns config
Example
The following example adds a profile named pr-basic, with basic defaults, and assigns a profile type of HTML. This is the appropriate initial configuration for a profile to protect an HTML website.
add appfw profile pr-basic -defaults basic -comment "Simple profile for websites."
set appfw profile pr-basic -type HTML
save ns config
<!--NeedCopy-->
To create a Web App Firewall profile by using the GUI
Complete the following procedure to create a Web App Firewall profile:
- Navigate to Security > NetScaler Web App Firewall > Profiles.
- In the details pane, click Add.
-
In the Create Web App Firewall Profile page, set the following basic parameters:
- Name
- Profile Type
- Comments
- Defaults
- Description
- Click OK.
- Select the profile that you created and click Edit.
-
In the Advanced Settings section, complete the following configurations:
- Security Checks
- Profile Settings
- Dynamic Profiling
- Relaxation Rules
- Deny Rules
- Learned Rule
- Extended Logging
- In the Security Checks section, select a security protection and click Action Settings.
-
In the security check page, set the parameters.
Note:
The Active Rule setting is available only for HTML SQL Injection check to activate relaxation rule or deny rule for SQL injection check. For more information, see Relaxation and Deny Rules topic.
-
Click OK and Close.
- In the Profile Settings section, set the profile parameters. For more information, see Configure Web App Firewall Profile settings topic.
- In the Dynamic Profiling section, select a security check to add dynamic profile settings. For more information, see Dynamic Profile topic.
- In the Relaxation Rules section, click Edit to add a relaxation rule for a security check. For more information, see Relaxation Rule for details.
- In the Deny Rules section, add a deny rule for the HTML SQL Injection check. For more information, see HTML Deny Rules topic.
- In the Learnt Rule section, set the learning settings. For more information, see Web App Firewall Learning topic.
- In the Extended logging section, click Add for masking sensitive data. For more information, see Extended logging topic.
- Click Done, and then click Close.
Configure fake account detection rules
Fake account creation is an automated process of creating many user accounts that are not associated to a real person or creating user accounts with the real person’s details without their consent. Fake accounts that non-legitimate users create use registration details that do not correspond to a person’s true identify. These accounts are created to abuse services offered by a web application for non-legitimate purposes such as phishing attacks, spreading of fake news, scalping and so forth. Most often, these accounts are created by bots run by malicious users.
The NetScaler appliance is enhanced to detect fake accounts by binding fake account detection rules to a Web App Firewall profile. The rule consists of form URLs and form parameters for each URL. If an incoming request matches an expression or form URL (sign up pages) configured for a fake account detection rule, the evaluation is true for a suspicious sign-up attempt and the request data is sent to the ADM server for further inspection.
Complete the following steps to configure fake account detection by using the command interface:
- Enable fake account detection feature
- Bind fake account rules
Enable fake account detection feature
At the command prompt, type:
add/set appfw profile <name> -FakeAccountDetection ( ON | OFF )
Example:
add appfw profile profile1 -FakeAccountDetection ON
Bind fake account rules
At the command prompt, type:
bind appfw profile <name> -FakeAccount (string|expression) isFieldNameRegex (ON|OFF) -tag <TagExpression> ([-formUrl <FormURL>]| [-formExpression <FormExpression>)]) –state (ENABLED|DISABLED)
Where,
-
formUrl: HTTP form action URL. formExpression: Form expression to be evaluated. -
fakeaccount: Name of the fake account. tag: Tag expression. -
isFieldNameRegex: Specifies whether the fieldName is regex. Default value OFF.
Example:
bind appfw profile profile1 -FakeAccount john -formURL “/signup.php" -tag "smith"
bind appfw profile profile2 -FakeAccount Will -formExpression "HTTP.REQ.HEADER(\"Authorization\").CONTAINS(\"/test_accounts\").NOT && HTTP.REQ.URL.CONTAINS(\"/login.php\")" -fieldName -tag "smith"
Example input for an HTTP post request for example.com signup page.
| S.no | Input | Example |
|---|---|---|
| 1 | Signup HTTP POST request endpoint URL | https://webapi.example.com/account/api/v1.0/contacts/ |
| 2 | Email Field name in HTTP post request | Email address |
| 3 | First name Field name in HTTP post request | First name |
| 4 | Last name Field name in HTTP post request | Last name |
Configure Web App Firewall fake account detection rule by using the GUI
Complete the following steps to configure the fake account detection rule by using the GUI.
- Navigate to Configuration > Security > NetScaler Web App Firewall > Profile.
- Select a profile and click Edit.
- In the NetScaler Web App Firewall Profile page, click Security Checks from Advanced Settings.
- In the Checks Integrated with Citrix Cloud section, select a fake account rule and click Edit.
- In the AppFirewall Fake Account Binding slider, select a rule to edit or click Add.
-
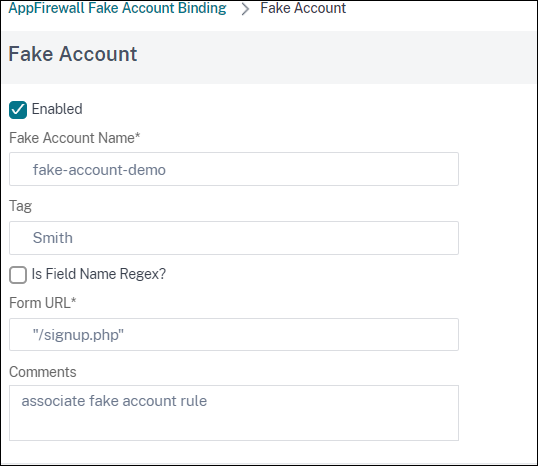
In the Fake Account rule page, set the following parameters:
- Enabled. Select to activate the fake account rule.
- Fake Account Name. Name of the fake account rule.
- Tag. First name in the fake account registration form.
- Is Field Name Regex? Select if the form field is a regular expression.
- Form Expression. Regular expression that defines the fake account.
- Form URL. Enter the fake account detection URL.
- Comments. A brief description about the fake account detection rule.
- Click Create.