Striped, partially striped, and spotted configurations
By virtue of command propagation, all nodes in a cluster have the same configurations. However, you might want some configurations to be available only on certain cluster nodes. While you cannot restrict the nodes on which the configurations are available, you can specify the nodes on which the configurations are active.
For example, you can:
- define a SNIP address to be active on only one node, or
- define a SNIP address to be active on all nodes, or
- define a VIP address to be active on only one node, or
- define a VIP address to be active on all nodes, or
- define a VIP address to be active only on two nodes of a 3-node cluster
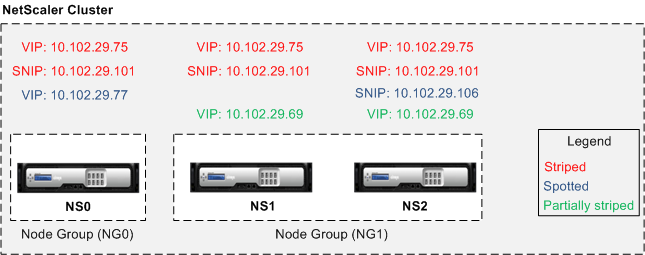
Depending on the number of nodes the configurations are active on, cluster configurations are referred to as striped, partially striped, or spotted configurations.
Figure 1. Three-node cluster with striped, partially striped, and spotted configurations
The following table provides more details on the types of configurations:
| Configuration Type | Active on | Applicable to | Configurations |
|---|---|---|---|
| Striped configuration | All the cluster nodes | All entries | No specific configuration required to make an entity striped. By default, all entities defined on a cluster IP address are striped on all the cluster nodes. |
| Partially striped configuration | A subset of cluster nodes | See Cluster Node groups | Bind the entities that you want to be partially striped, to a node group. The configuration is active only on the cluster nodes that belong to the node group. |
| Spotted configuration | Single cluster node | See List of spotted configuration | A spotted configuration can be defined using one of two approaches. SNIP address When creating the SNIP address, specify the node on which you want the SNIP address to be active, as the owner node. Example, add ns ip 10.102.29.106 255.255.255.0 -type SNIP -ownerNode 2 (assuming node NS2 ID is 2). Note: You cannot change the ownership of a spotted SNIP address at run time. To change the ownership, you must first delete the SNIP address and add it again by specifying the new owner. Entities that can be bound to a node group. By binding the entity to a single-member node group. |
Note
When you disable USIP, we recommend you to use spotted SNIP addresses. You can use striped SNIP addresses only if there is a shortage of IP addresses. The use of striped IP addresses can result in ARP flux issues if no spotted IP addresses are present in the same subnet for ARP resolution.
When you enable USIP, we recommend you to use striped SNIP addresses as a gateway for server initiated traffic.
List of spotted configuration
- IPv4 addresses
- IPv6 addresses
- ARP entries
- Interface settings
- IPv6 Static Routes (Route6)
- IP tunnel
- IPv6 tunnel
- Reverse network address translation (RNAT)
- Policy-based routes for IPv4 (PBR)
- Policy-based routes for IPv6 (PBR6)
- Cluster LAG
- Neighbor discovery protocol (ND6) entries
- Failover interface set (FIS)
- Linksets
- SNMP MIB/engine ID
- Diameters
- NetScaler VPX param
- Hostname
ARP owner support for striped IP
In a cluster setup, you can configure a specific node to respond to the ARP request for a striped IP. The configured node responds to the ARP traffic.
A new parameter “arpOwner” is introduced in the “add, set, and unset IP” commands.
To enable the ARP owner on a node by using the CLI.
At the command prompt, type:
add ns ip <ip_address> -arpOwner <node_id>
Note
The ARP owner parameter is supported only in the L2 cluster.
Neighbor discovery owner support for striped IPv6 address
In a cluster setup, you can configure a specific node as neighbor discovery (ND) owner for the striped IPv6 address to determine the link-layer address. A client sends a Neighbor Solicitation (NS) message to all the nodes in the cluster setup. The ND owner responds with a Neighbor Advertisement (NA) message with the link-layer address for the striped IPv6 address, and serves traffic.
To enable ND owner on a node by using the CLI
At the command prompt, type:
add ns ip6 <IPv6Address> -ndOwner <node id>

set  ns ip6 <IPv6Address> -ndOwner <node id>
<!--NeedCopy-->
Example:
add ns ip6 2001::21/64 -ndOwner 1

set ns ip6 2001::21/64 -ndOwner 1
<!--NeedCopy-->
To enable ND owner on a node by using the GUI
- Navigate to System > Network > IPs.
- In the IPs page, go to the IPv6s tab and click Add.
- In the Create IPv6 page, select one of the node IDs listed in the NdOwner in Cluster drop-down menu.
Note
The ND owner parameter is supported only in the L2 cluster.