Best practices for network configurations
The following sections talk about some best practices for configuring networking features on a NetScaler appliance.
Routing and Default Routes
The following are some best practices for configuring Layer 3 features on a NetScaler appliance.
-
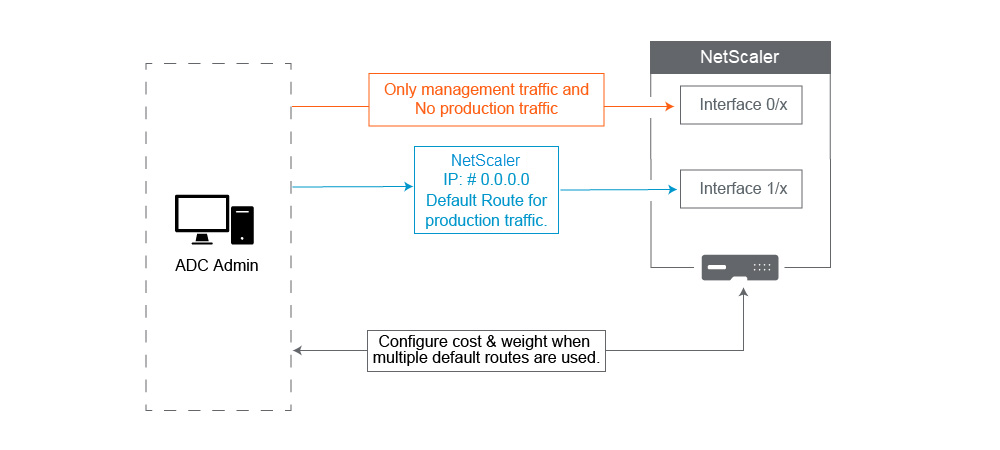
Interface
0/xon a NetScaler appliance or NetScaler SDX appliance must not be used for production traffic. On an MPX or SDX, Interfaces named0/xare referred to the Management Interfaces. This does not mean you must use these interfaces for Management. What it means is that these interfaces are NOT designed for Production traffic. They do not have the hardware buffers and optimization necessary to achieve sustained 1 Gbps throughput. Therefore, If your Default Route is in the same Subnet as your NSIP, you must either change the default route or use a1/xinterface for your Management network as the1/xinterfaces are fully optimized for production 1 Gbps traffic.Note:
This does not apply to a NetScaler VPX appliance.
-
Option 1. Do not connect to Interfaces
0/x– Disconnect the cable from interface0/1. NetScaler listens for the NSIP on the other interfaces. (NOTE: This is not an option for SDX, as the SVM and XenServer can only speak to0/xinterfaces) -
Option 2. change the default route to a different interface as detailed in the next section.
-
-
Default gateway (route 0.0.0.0) should be on a Production network, and not on any
0/xinterface. When first setting up a NetScaler, it asks you for the NSIP, Subnet Mask, and Gateway address. The problem this creates for Administrators is that they just configured their default route to be on their Management Network using Interface 0/1.-
To check what your routes are, run in CLI
show routeand your default gateway is the IP in the line where the Network and Netmask are 0.0.0.0. Here’s an example where the Gateway is on Line 1:> sh route Network Netmask Gateway/OwnedIP State Traffic Domain Type ------- ------- --------------- ----- -------------- ---- 1) 0.0.0.0 0.0.0.0 10.25.213.65 UP 0 STATIC 2) 127.0.0.0 255.0.0.0 127.0.0.1 UP 0 PERMANENT 3) 10.25.213.64 255.255.255.192 10.25.213.68 UP 0 DIRECT 4) 172.16.0.0 255.255.255.0 172.16.0.1 UP 0 DIRECT <!--NeedCopy--> -
To check the Interface and VLAN used for your Default Gateway, check the ARP table using
sh arpin CLI. You can also search for the specific IP usingshow arp | grep 10.25.213.65. Here’s an example where you see the Gateway 10.25.213.65 is using Interface 1/1 and VLAN 1:> sh arp IP MAC Iface VLAN Origin TTL Traffic Domain -- --- ----- ---- ------ --- -------------- 1) 127.0.0.1 02:00:18:a4:00:1e LO/1 1 PERMANENT N/A 0 2) 10.25.213.70 02:00:0f:46:00:28 1/1 1 DYNAMIC 967 0 3) 10.25.213.68 02:00:18:a4:00:1e LO/1 1 PERMANENT N/A 0 4) 10.25.213.67 02:00:0f:46:00:28 1/1 1 DYNAMIC 641 0 5) 10.25.213.65 00:08:e3:ff:fd:90 1/1 1 DYNAMIC 483 0 <!--NeedCopy--> -
Change the default route to use a Gateway on your Production Subnet and Interface. Assume your Management network is 10.0.0.0/24 with gateway 10.0.0.1, and Production network is 10.1.1.0/24 with gateway 10.1.1.1. Set up your config like this:
- SNIP: (Management Access Disabled) 10.1.1.2
- NSIP: (Management Access Enabled) 10.0.0.2
-
Default Route: 0.0.0.0 0.0.0.0 10.1.1.1 (System > Network > Routes). This uses a router on the SNIP network instead of the NSIP network.
Note:
Changing the default gateway might break management traffic unless you configure static routes, a Policy Based Route, or enable MAC Based Forwarding.
-
Interfaces, channels, and VLANs
The following are some best practices for configuring Layer 2 features on a NetScaler appliance.
-
Do not connect multiple interfaces/channels to the same VLAN, including VLAN 1:
-
If you do not properly configure your VLANs, it can cause some unexpected packet routing in your network and Layer 2 looping anytime there are more than one Active interface with the same VLAN (either Native or Tagged).
-
By Default, all Interfaces and Channels are on Native VLAN 1. This creates two possible problems:
-
The NetScaler thinks all traffic received is on the same network, so it uses any interface to send the traffic out on. If you have a different Native VLAN on the interface it sent data out on, then the traffic will not be routed as you expect.
-
If the NetScaler receives broadcast packets on one port, it may retransmit on another port. If both switchports are on the same VLAN, you just created a Layer 2 loop.
-
-
To remove an interface/channel from VLAN 1:
-
If you are not using Native VLANs on your switch interface/port channel. Change the Native VLAN on the NetScaler Interface/Channel to an unused VLAN number such as 999. You should not use the same unused VLAN number for multiple Channels or Interfaces, as it creates a layer 2 loop.
-
If you are using Native VLANs on your switch interface/port channel. Change the Native VLAN on the NetScaler Interface/Channel to match. However take care not to have multiple active Interfaces or Channels on the same VLAN as doing so creates Layer 2 loops.
-
You cannot remove the Native VLAN. Instead, you can change it or set TagAll for the interface or channel. If the switch port isn’t configured with an untagged native VLAN, then enable tagall on the interface so High Availability heartbeat packets will be tagged.
-
-
To view the Native VLAN on an interface, run
sh interfacein CLI. This will also inform you if the interface is using the TAGALL option.
-
-
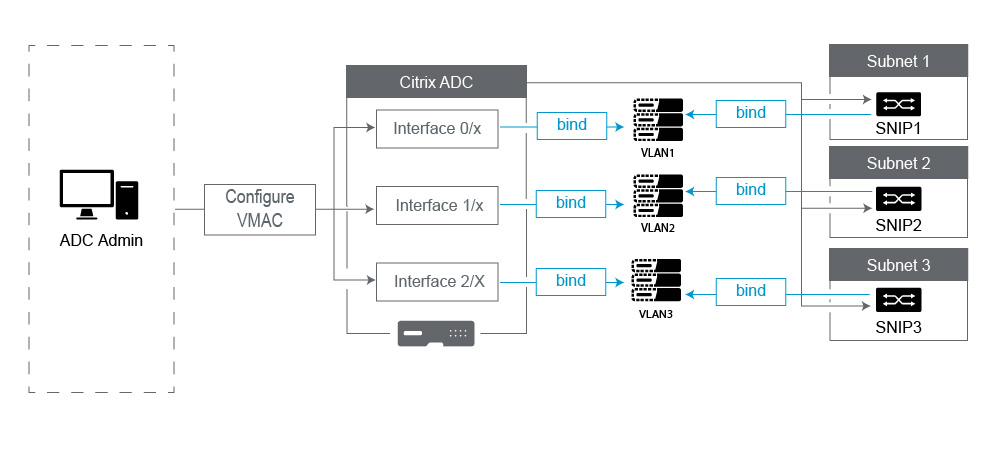
Bind an Interface to your VLAN - The NetScaler, by default, does not attach a new VLAN to an interface. This means the VLAN is not going to be used until you bind it to an interface. When the new VLAN is not bound to an Interface and that VLAN is Tagged, the NetScaler drops all inbound traffic from that VLAN. Also, do not bind the same VLAN to more than one interface.
-
Bind Subnets to your VLANs. The NetScaler does not work like a typical Router. Most Routers attach IPs to Interfaces. On a NetScaler, the IPs float on any Interface unless configured otherwise. Therefore, any Subnet you want to ensure the NetScaler sends over a specific VLAN, especially when the NetScaler is Initiating that traffic, then you must bind a SNIP within that subnet to the VLAN.
-
A common argument we hear against this is that it used to work fine and now it doesn’t without binding the Subnet to the VLAN. This often occurs because the NetScaler learns which VLAN to send traffic out, but this can take time as it builds its ARP tables. After a reboot or firmware upgrade, as it starts building the ARP tables again, it may initially learn and therefore be using a different path than you desire, such as your default route. It’s best to instruct it which path to take by Binding the SNIP to the VLAN. Once a SNIP is bound to a VLAN, the entire subnet for that SNIP will be bound to the VLAN.
-
Ensure every SNIP is bound to a VLAN (except in cases where you have more than 1 SNIP in a subnet, then you only must bind one), and that the VLAN, in turn, is bound to only one Interface or channel. It is also often best to have a SNIP in every Subnet, but that is not required as the most specific Route will be used for any destination Subnet that does not have a SNIP.
-
-
To identify the VLAN and Interface used by a Subnet:
-
Go to System>Network > VLANs.
-
Edit each VLAN configured, in turn, until you find the correct IP address as explained in the next step.
-
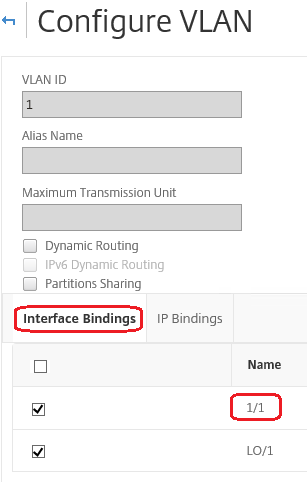
Click the IP Bindings tab to see which IP, and thus which Subnet is bound and thus is using this VLAN.
-
Once you identify the VLAN that has an IP bound to it, where that IP is within the subnet of the Default Route, then click the Interface Bindings. Each Interface or Channel bound to this VLAN will be used.
-
Example
Assume the Default route is 0.0.0.0 0.0.0.0 10.1.1.1.
Assume you have two SNIPs of 10.0.0.5 and 10.1.1.69. Since 10.1.1.69 is in the subnet of the default route, that is the one you want to look for. In the below screenshots, we are reviewing VLAN 1 and we see the IP 10.1.1.69 is bound to this VLAN, so we know we are looking at the correct VLAN.
Now Click Interface Bindings. In the VLAN Interface bindings we see that Interface 1/1 is used for this subnet, and therefore is used for the default route.
NOTE:
If you do not have any IPs bound to your VLANs, then by default it will be sent out VLAN 1, so in that case look at which Interfaces are bound to VLAN 1. This also means the NetScaler will not use your Configured VLANs for traffic it Initiates unless you bind an IP to the new VLAN.
Gratuitous ARP
If GARP does not work, use VMAC - By default, the NetScaler uses GARP to advertise its IP to MAC address bindings to other network devices. This typically works without issue, however, as you create more services in the NetScaler, you may begin to experience issues when failing over on an HA pair. The most common issue is that services remain down in the NetScaler you failed over to due to some network devices not having updated their ARP tables with the new MAC address. You can easily verify this by checking their ARP tables to see if the MAC addresses match those on the now-Primary NetScaler. When this occurs, it is highly likely that some of your network devices are limiting the number of GARP advertisements they honor. In this case it is necessary to configure VMAC on all your active interfaces and/or channels. If you expect to have a large configuration on your NetScaler, it may be best to configure VMAC for all interfaces and channels during the initial deployment.
NOTE:
Do not forget to configure VMAC for the Interface or Channel used by your Default Route.
NetScaler owned IP Addresses
This section talks about the best practices for configuring NetScaler owned IP addresses:
-
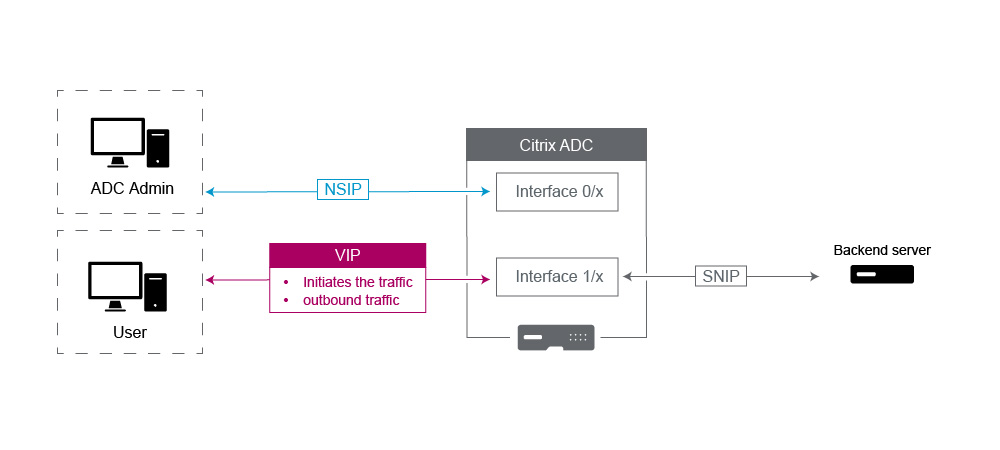
NetScaler IP (NSIP): Generally this IP used for Management because it is the only IP unique to an individual NetScaler in an HA or Cluster environment. Also important to note is that LDAP, RADIUS, and User scripted Monitor traffic (such as the LDAP monitor and StoreFront monitor) will Source from the NSIP and thus route over the VLAN and Interface the NSIP is bound to (Default Native VLAN 1). If you need the LDAP and RADIUS traffic to source from the SNIP, then create an LB virtual server for your back end servers.
-
Subnet IP (SNIP): This IP address is used to initiate communication to back-end servers and is always going to initiate traffic. That said, it can be the destination for traffic in these cases:
-
It can be used as the Gateway address on other devices when doing Layer 3 routing on the NetScaler.
-
It can, when enabled, accept Management services, such as access to the GUI, SSH, and SNMP.
-
-
Virtual IP (VIP): The VIP is unique in that it will never be used to initiate outbound traffic. It is intended to receive Traffic only. Once it receives traffic, it replies and sends traffic outbound back to the client. In other words, the VIP address does not initiate the outbound traffic.
Note this also means it is notused as the source for communicating with back-end servers used in, for example, an LB virtual server.