Binding an SNIP address to an Interface
You can now bind a NetScaler owned SNIP address to an interface without using Layer 3 VLANs. Any packets related to the SNIP address will go only through the bound interface.
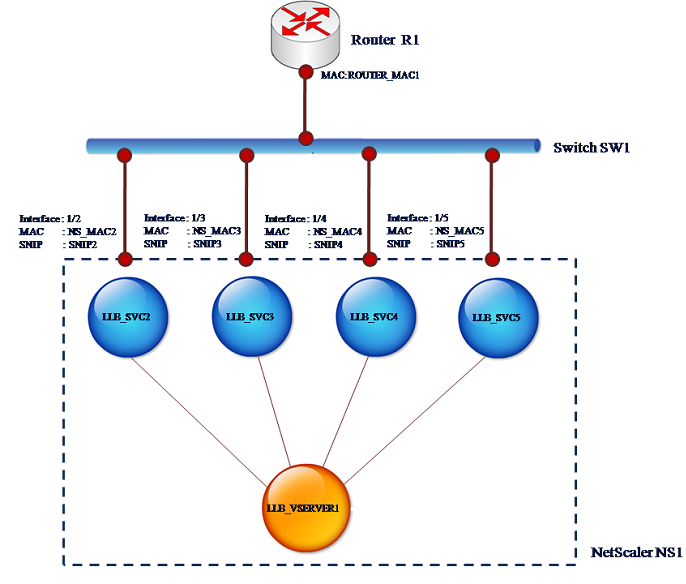
This feature can be useful in a scenario where the upstream switch does not support Link Aggregation channels and you want the NetScaler appliance to load balance traffic, originated from a server, across the four links to the upstream switch as shown in the following illustration.
The following tables describe the example settings for the scenario:
| Entity | Name | Value |
|---|---|---|
| SNIP addresses on NS1 | SNIP2 (for reference purpose only) | 10.10.10.2 |
| SNIP3 (for reference purpose only) | ||
| SNIP4 (for reference purpose only) | ||
| SNIP5 (for reference purpose only) | ||
| LLB virtual server on NS1 | LLB_VSERVER1 | - |
| Transparent monitor on NS1 | TRANS_MON | - |
| LLB services on NS1 | LLB_SVC2 | 10.10.10.240 |
| LLB_SVC3 | ||
| LLB_SVC4 | ||
| LLB_SVC5 | ||
| MAC address of interface 1/2 on NS1 | NS_MAC_2 (for reference purpose only) | 00:e0:ed:0f:bc:e0 |
| MAC address of interface 1/3 on NS1 | NS_MAC_3 (for reference purpose only) | 00:e0:ed:0f:bc:df |
| MAC address of interface 1/4 on NS1 | NS_MAC_4 (for reference purpose only) | 00:e0:ed:0f:bc:de |
| MAC address of interface 1/5 on NS1 | NS_MAC_5 (for reference purpose only) | 00:e0:ed:1c:89:53 |
| IP address of Router R1 | Router_IP (for reference purpose only) | 10.10.10.1 |
| MAC address of interface of R1 | ROUTER_MAC1 (for reference purpose only) | 00:21:a1:2d:db:cc |
To configure the example settings:
-
Add four different SNIPs in different subnet ranges. This is for ARP to be resolved on four different links. For more information on creating a SNIP address, see Configuring Subnet IP Addresses (SNIPs).
CLI example:
> add ns ip 10.10.10.2 255.255.255.0 -type SNIP Done > add ns ip 10.10.10.3 255.255.255.128 –type SNIP Done > add ns ip 10.10.10.4 255.255.255.192 –type SNIP Done > add ns ip 10.10.10.5 255.255.255.224 –type SNIP Done <!--NeedCopy--> -
Add four different dummy services in the added SNIP subnets. This is to ensure that the traffic is sent out with source IP as one of the four configured SNIPs. For more information on creating a service, see Set up basic load balancing.
CLI example:
> add service LLB_SVC2 10.10.10.240 any * Done > add service LLB_SVC3 10.10.10.120 any * Done > add service LLB_SVC4 10.10.10.60 any * Done > add service LLB_SVC5 10.10.10.30 any * Done <!--NeedCopy--> -
Add a transparent ping monitor for monitoring the gateway. Bind the monitor to each of the configured dummy services. This is to make the state of the services as UP. For more information on creating a transparent monitor, see Configure monitors in a load balancing setup.
CLI example:
> add monitor TRANS_MON ping -destIP 10.10.10.1 -transparent YES Done > bind monitor TRANS_MON LLB_SVC2 Done > bind monitor TRANS_MON LLB_SVC3 Done > bind monitor TRANS_MON LLB_SVC4 Done > bind monitor TRANS_MON LLB_SVC5 Done <!--NeedCopy--> -
Add a link load balancing (LLB) virtual server and bind the dummy services to it. For more information on creating an LLB virtual server, see Configuring a Basic LLB Setup.
CLI example:
> add lb vserver LLB_VSERVER1 any Done > set lb vserver LLB_VSERVER1 -lbmethod ROUNDROBIN Done > bind lb vserver LLB_VSERVER1 LLB_SVC2 Done > bind lb vserver LLB_VSERVER1 LLB_SVC2 Done > bind lb vserver LLB_VSERVER1 LLB_SVC2 Done > bind lb vserver LLB_VSERVER1 LLB_SVC2 Done <!--NeedCopy--> -
Add the LLB virtual server as the default LLB route. For more information on creating an LLB route see Configuring a Basic LLB Setup.
CLI example:
> add lb route 0.0.0.0 0.0.0.0 LLB_VSERVER1 Done <!--NeedCopy--> -
Add an ARP entry for each of the dummy services with the MAC address of the gateway. This way the gateway is reachable through these dummy services. For more information on adding an ARP entry, see Configuring Static ARP.
CLI example:
> add arp -ipaddress 10.10.10.240 -mac 00:21:a1:2d:db:cc -ifnum 1/2 Done > add arp -ipaddress 10.10.10.120 -mac 00:21:a1:2d:db:cc -ifnum 1/3 Done > add arp -ipaddress 10.10.10.60 -mac 00:21:a1:2d:db:cc -ifnum 1/4 Done > add arp -ipaddress 10.10.10.30 -mac 00:21:a1:2d:db:cc -ifnum 1/5 Done <!--NeedCopy--> -
Bind a specific interface to an SNIP by adding an ARP entry for each of these SNIPs. This is to ensure that the response traffic will reach the same interface through which the request went out. For more information on adding an ARP entry, see Configuring Static ARP.
CLI example:
> add arp -ipAddress 10.10.10.2 -mac 00:e0:ed:0f:bc:e0 -ifnum 1/2
 Done
> add arp -ipAddress 10.10.10.3 -mac 00:e0:ed:0f:bc:df -ifnum 1/3
 Done
> add arp -ipAddress 10.10.10.4 -mac 00:e0:ed:0f:bc:de -ifnum 1/4
 Done
> add arp -ipAddress 10.10.10.5 -mac 00:e0:ed:1c:89:53 -ifnum 1/5
 Done
<!--NeedCopy-->