MPX 14000 FIPS appliances
Important:
The MPX 9700/10500/12500/15500 FIPS platform has reached end of life.
Configuration steps for NetScaler MPX 14000 FIPS and NetScaler MPX 9700/10500/12500/15500 FIPS appliances are different. MPX 14000 FIPS appliances do not use firmware v2.2. A FIPS key created on the Hardware Security Module (HSM) of the MPX 9700 platform cannot be transferred to the HSM of the MPX 14000 platform. The other way round is also not supported. However, if you have imported an RSA key as a FIPS key, you can copy the RSA key to the MPX 14000 platform. Then import it as a FIPS key. Only 2048-bit and 3072-bit keys are supported.
The firmware versions listed under “NetScaler Release 12.1-FIPS” and “NetScaler Release 12.1-NDcPP” in the NetScaler downloads page are not supported on the MPX 14000 FIPS or SDX 14000 FIPS platforms. These platforms can use other latest NetScaler firmware versions available on the downloads page.
A FIPS appliance is equipped with a tamper-proof (tamper-evident) cryptographic module—a Cavium CNN3560-NFBE-G—designed to comply with the FIPS 140-2 Level-3 specifications. The Critical Security Parameters (CSPs), primarily the server’s private-key, are securely stored and generated inside the cryptographic module, also referred to as the HSM. The CSPs are never accessed outside the boundaries of the HSM. Only the superuser (nsroot) can perform operations on the keys stored inside the HSM.
Before configuring a FIPS appliance, you must check the state of the FIPS card and then initialize the card. Create a FIPS key and server certificate, and add any additional SSL configuration.
For information about the FIPS ciphers supported, see FIPS Approved Algorithms and Ciphers.
For information about configuring FIPS appliances in an HA setup, see Configure FIPS on appliances in an HA setup.
Limitations
- SSL renegotiation using the SSLv3 protocol is not supported on the back end of an MPX FIPS appliance.
- 1024-bit and 4096-bit keys and exponent value of 3 aren’t supported.
- 4096-bit server certificate isn’t supported.
- 4096-bit client certificate isn’t supported (if client authentication is enabled on the back-end server).
Configure the HSM
Before configuring the HSM on an MPX 14000 FIPS appliance, check the state of your FIPS card to verify that the driver loaded correctly. Then initialize the card.
At the command prompt, type:
show fips

FIPS Card is not configured
<!--NeedCopy-->
The message “ERROR: Operation not permitted - no FIPS card present in the system” appears if the driver is not loaded correctly.
Initialize the FIPS card
The appliance must be restarted three times for proper initialization of the FIPS card.
Important
- Verify that the
/nsconfig/fipsdirectory has been successfully created on the appliance.- Do not save the configuration before you restart the appliance for the third time.
Perform the following steps to initialize the FIPS card:
- Reset the FIPS card (
reset fips). - Restart the appliance (
reboot). -
Set the security officer password for partitions 0 and 1, and the user password for partition (
set fips -initHSM Level-2 <soPassword> <oldsoPassword> <userPassword> -hsmLabel NSFIPS).Note: The set or reset command takes more than 60 seconds to run.
- Save the configuration (
saveconfig). - Verify that the password-encrypted key for the main partition (master_pek.key) has been created in the
/nsconfig/fips/directory. - Restart the appliance (
reboot). - Verify that the password-encrypted key for the default partition (default_pek.key) has been created in the
/nsconfig/fips/directory. - Restart the appliance (
reboot). - Verify that the FIPS card is UP (
show fips).
Initialize the FIPS card by using the CLI
The set fips command initializes the Hardware Security Module (HSM) on the FIPS card and sets a new security officer password and user password.
Caution: This command erases all data on the FIPS card. You are prompted before proceeding with the command execution. A restart is required before and after running this command for the changes to apply. Save the configuration after running this command and before restarting the appliance.
At the command prompt, type the following commands:
reset fips

reboot

set fips -initHSM Level-2 so12345 so12345 user123 -hsmLabel NSFIPS

This command will erase all data on the FIPS card. You must save the configuration (saveconfig) after executing this command. Do you want to continue?(Y/N)y

<!--NeedCopy-->
Note: The following message appears when you run the set fips command:
This command will erase all data on the FIPS card. You must save the configuration (saveconfig) after executing this command. [Note: On MPX/SDX 14xxx FIPS platform, the FIPS security is at Level-3 by default, and the -initHSM Level-2 option is internally converted to Level-3]  Do you want to continue?(Y/N)y

saveconfig

reboot

reboot

show fips

        FIPS HSM Info:
                 HSM Label              : NetScaler FIPS
                 Initialization         : FIPS-140-2 Level-3
                 HSM Serial Number      : 3.1G1836-ICM000136
                 HSM State              : 2
                 HSM Model              : NITROX-III CNN35XX-NFBE
                 Hardware Version       : 0.0-G
                 Firmware Version       : 1.0
                 Firmware Build         : NFBE-FW-1.0-48
                 Max FIPS Key Memory    : 102235
                 Free FIPS Key Memory   : 102231
                 Total SRAM Memory      : 557396
                 Free SRAM Memory       : 262780
                 Total Crypto Cores     : 63
                 Enabled Crypto Cores   : 63

<!--NeedCopy-->
Create a FIPS key
You can create a FIPS key on your MPX 14000 FIPS appliance or import an existing FIPS key to the appliance. The MPX 14000 FIPS appliance supports only 2048-bit and 3072-bit keys and an exponent value of F4 (whose value is 65537). For PEM keys, an exponent is not required. Verify that the FIPS key is created correctly. Create a certificate signing request and a server certificate. Finally, add the certificate-key pair to your appliance.
Specify the key type (RSA or ECDSA). For ECDSA keys, specify only the curve. ECDSA key creation with curve P_256 and P_384 are supported.
Note:
1024-bit and 4096-bit keys and an exponent value of 3 are not supported.
Create a FIPS key by using the CLI
At the command prompt, type:
create ssl fipsKey <fipsKeyName> -keytype ( RSA | ECDSA ) [-exponent ( 3 | F4 )] [-modulus <positive_integer>] [-curve ( P_256 | P_384 )]
<!--NeedCopy-->
Example1:
create fipsKey f1 -keytype RSA -modulus 2048 -exponent F4


show ssl fipskey f1

FIPS Key Name: f1  Key Type: RSA Modulus: 2048   Public Exponent: F4 (Hex: 0x10001)

<!--NeedCopy-->
Example2:
> create fipskey f2 -keytype ECDSA -curve P_256


> sh fipskey f2
    FIPS Key Name: f2   Key Type: ECDSA Curve: P_256

<!--NeedCopy-->
Create a FIPS key by using the GUI
- Navigate to Traffic Management > SSL > FIPS.
- In the details pane, on the FIPS Keys tab, click Add.
-
In the Create FIPS Key dialog box, specify values for the following parameters:
- FIPS Key Name*—fipsKeyName
- Modulus*—modulus
- Exponent*—exponent
*A required parameter
- Click Create, and then click Close.
- On the FIPS Keys tab, verify that the settings displayed for the FIPS key that you created are correct.
Import a FIPS key
To use an existing FIPS key with your FIPS appliance, you need to transfer the FIPS key from the hard disk of the appliance into its HSM.
Note: To avoid errors when importing a FIPS key, ensure that the name of the key imported is the same as the original key name when it was created.
Import a FIPS key by using the CLI
At the command prompt, type:
import ssl fipsKey <fipsKeyName> -key <string> [-inform <inform>] [-wrapKeyName <string>] [-iv<string>] -exponent  F4 ]
<!--NeedCopy-->
Example:
import fipskey Key-FIPS-2 -key Key-FIPS-2.key -inform SIM -exponent F4


import fipskey Key-FIPS-2 -key Key-FIPS-2.key -inform PEM

<!--NeedCopy-->
Verify that the FIPS key is created or imported correctly by running the show fipskey command.
show fipskey
1)      FIPS Key Name: Key-FIPS-2

<!--NeedCopy-->
Import a FIPS key by using the GUI
-
Navigate to Traffic Management > SSL > FIPS.
-
In the details pane, on the FIPS Keys tab, click Import.
-
In the Import as a FIPS Key dialog box, select FIPS key file and set values for the following parameters:
- FIPS Key Name*
- Key File Name* — To put the file in a location other than the default, specify the complete path or click Browse and navigate to a location.
- Exponent*
*A required parameter
-
Click Import, and then click Close.
-
On the FIPS Keys tab, verify that the settings displayed for the FIPS key that you imported are correct.
Export a FIPS key
Citrix recommends that you create a backup of any key created in the FIPS HSM. If a key in the HSM is deleted, you cannot create the same key again, and all the certificates associated with it are rendered useless.
In addition to exporting a key as a backup, you might need to export a key for transfer to another appliance.
The following procedure provides instructions on exporting a FIPS key to the /nsconfig/ssl folder on the appliance’s CompactFlash and securing the exported key by using a strong asymmetric key encryption method.
Export a FIPS key by using the CLI
At the command prompt, type:
export ssl fipsKey <fipsKeyName> -key <string>
<!--NeedCopy-->
Example:
export fipskey Key-FIPS-1 -key Key-FIPS-1.key
<!--NeedCopy-->
Export a FIPS key by using the GUI
-
Navigate to Traffic Management > SSL > FIPS.
-
In the details pane, on the FIPS Keys tab, click Export.
-
In the Export FIPS key to a file dialog box, specify values for the following parameters:
- FIPS Key Name*—fipsKeyName
- File Name*—key (To put the file in a location other than the default, you can either specify the complete path or click the Browse button and navigate to a location.)
*A required parameter
-
Click Export, and then click Close.
Import an external key
You can transfer FIPS keys that are created within the NetScaler appliance’s HSM. You can also transfer external private keys (such as keys created on a standard NetScaler, Apache, or IIS) to a NetScaler FIPS appliance. External keys are created outside the HSM, by using a tool such as OpenSSL. Before importing an external key into the HSM, copy it to the appliance’s flash drive under /nsconfig/ssl.
On the MPX 14000 FIPS appliances, the -exponent parameter in the import ssl fipskey command is not required while importing an external key. The correct public exponent is detected automatically when the key is imported, and the value of the -exponent parameter is ignored.
The NetScaler FIPS appliance does not support external keys with a public exponent other than 3 or F4.
You do not need a wrap key on the MPX 14000 FIPS appliances.
You cannot import an external, encrypted FIPS key directly to an MPX 14000 FIPS appliance. To import the key you need to first decrypt the key, and then import it. To decrypt the key, at the shell prompt, type:
openssl rsa -in <EncryptedKey.key> > <DecryptedKey.out>
<!--NeedCopy-->
Note: If you import an RSA key as a FIPS key, Citrix recommends that you delete the RSA key from the appliance for security purposes.
Import an external key as a FIPS key by using the CLI
- Copy the external key to the appliance’s flash drive.
-
If the key is in .pfx format, you must first convert it to PEM format. At the command prompt, type:
convert ssl pkcs12 <output file> -import -pkcs12File <input .pfx file name> -password <password> <!--NeedCopy--> -
At the command prompt, type the following commands to import the external key as a FIPS key and verify the settings:
import ssl fipsKey <fipsKeyName> -key <string> -informPEM
show ssl fipskey<fipsKeyName>
<!--NeedCopy-->
Example:
convert ssl pkcs12 iis.pem -password 123456 -import -pkcs12File iis.pfx

import fipskey Key-FIPS-2 -key iis.pem -inform PEM

show ssl fipskey key-FIPS-2

FIPS Key Name: Key-FIPS-2 Modulus: 0   Public Exponent: F4 (Hex value 0x10001)
<!--NeedCopy-->
Import an external key as a FIPS key by using the GUI
-
If the key is in .pfx format, you must first convert it to PEM format.
- Navigate to Traffic Management > SSL.
- In the details pane, under Tools, click Import PKCS#12.
- In the Import PKCS12 File dialog box, set the following parameters:
- Output File Name*
- PKCS12 File Name*—Specify the .pfx file name.
- Import Password*
- Encoding Format *A required parameter
-
Navigate to Traffic Management > SSL > FIPS.
-
In the details pane, on the FIPS Keys tab, click Import.
-
In the Import as a FIPS Key dialog box, select PEM file, and set values for the following parameters:
- FIPS Key Name*
- Key File Name*—To put the file in a location other than the default, you can either specify the complete path or click Browse and navigate to a location.
*A required parameter
-
Click Import, and then click Close.
-
On the FIPS Keys tab, verify that the settings displayed for the FIPS key that you imported are correct.
Configure FIPS on appliances in an HA setup
You can configure two appliances in an HA pair as FIPS appliances.
Prerequisites
- The Hardware Security Module (HSM) must be configured on both the appliances. For more information, see Configure the HSM.
- When using the GUI, ensure that the appliances are already in an HA setup. For more information about configuring an HA setup, see High availability.
Note:
Citrix recommends that you use the configuration utility (GUI) for this procedure. If you use the command line (CLI), make sure that you carefully follow the steps as listed in the procedure. Changing the order of steps or specifying an incorrect input file might cause an inconsistency that requires an appliance restart. In addition, if you use the CLI, the
create ssl fipskeycommand is not propagated to the secondary node. When you run the command with the same input values for modulus size and exponent on two different FIPS appliances, the keys generated are not the same. Create the FIPS key on one of the nodes and then transfer it to the other node. But if you use the configuration utility to configure FIPS appliances in an HA setup, the FIPS key that you create is automatically transferred to the secondary node. The process of managing and transferring the FIPS keys is known as secure information management (SIM).
Important: The HA setup must be completed within six minutes. If the procedure fails at any step, do the following:
- Restart the appliance or wait for 10 minutes.
- Remove all the files created by the procedure.
- Repeat the HA setup procedure.
Do not reuse existing file names.
In the following procedure, appliance A is the primary node and appliance B is the secondary node.
Configure FIPS on appliances in an HA setup by using the CLI
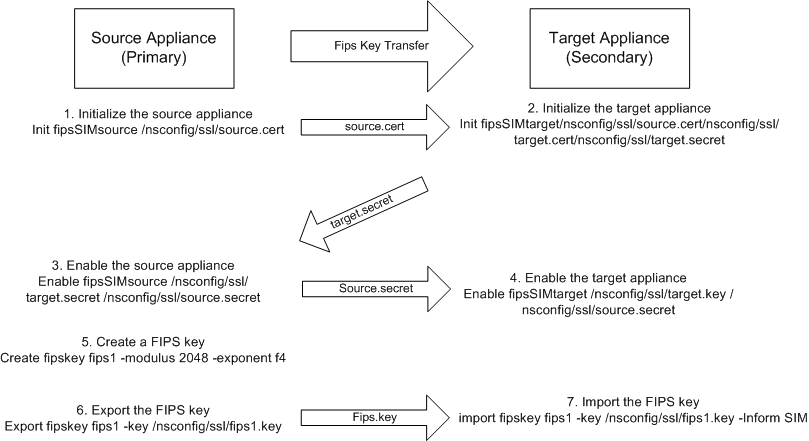
The following diagram summarizes the transfer process on the CLI.
Figure 1. Transfer the FIPS key-summary
-
On appliance A, open an SSH connection to the appliance by using an SSH client, such as PuTTY.
-
Log on to the appliance, using the administrator credentials.
-
Initialize appliance A as the source appliance. At the command prompt, type:
init ssl fipsSIMsource <certFile>
<!--NeedCopy-->
Example:
init fipsSIMsource /nsconfig/ssl/nodeA.cert -
Copy this
<certFile>file to appliance B, in the /nconfig/ssl folder.Example:
scp /nsconfig/ssl/nodeA.cert nsroot@198.51.100.10:/nsconfig/ssl -
On appliance B, open an SSH connection to the appliance by using an SSH client, such as PuTTY.
-
Log on to the appliance, using the administrator credentials.
-
Initialize appliance B as the target appliance. At the command prompt, type:
init ssl fipsSIMtarget <certFile> <keyVector> <targetSecret>
<!--NeedCopy-->
Example:
init fipsSIMtarget /nsconfig/ssl/nodeA.cert /nsconfig/ssl/nodeB.key /nsconfig/ssl/nodeB.secret -
Copy this
<targetSecret>file to appliance A.Example:
scp /nsconfig/ssl/fipslbdal0801b.secret nsroot@198.51.100.20:/nsconfig/ssl -
On appliance A, enable appliance A as the source appliance. At the command prompt, type:
enable ssl fipsSIMSource <targetSecret> <sourceSecret>
<!--NeedCopy-->
Example:
enable fipsSIMsource /nsconfig/ssl/nodeB.secret /nsconfig/ssl/nodeA.secret -
Copy this
<sourceSecret>file to appliance B.Example:
scp /nsconfig/ssl/fipslbdal0801b.secret nsroot@198.51.100.10:/nsconfig/ssl -
On appliance B, enable appliance B as the target appliance. At the command prompt, type:
enable ssl fipsSIMtarget <keyVector> <sourceSecret>
<!--NeedCopy-->
Example:
enable fipsSIMtarget /nsconfig/ssl/nodeB.key /nsconfig/ssl/nodeA.secret -
On appliance A, create a FIPS key, as described in Create a FIPS key.
-
Export the FIPS key to the appliance’s hard disk, as described in Export a FIPS key.
-
Copy the FIPS key to the hard disk of the secondary appliance by using a secure file transfer utility, such as SCP.
-
On appliance B, import the FIPS key from the hard disk into the HSM of the appliance, as described in Import a FIPS key.
Configure FIPS on appliances in an HA setup by using the GUI
- On the appliance to be configured as the source (primary) appliance, navigate to Traffic Management > SSL > FIPS.
- In the details pane, on the FIPS Info tab, click Enable SIM.
- In the Enable SIM for HA Pair dialog box, in the Certificate File Name text box, type the file name. The file name must contain the path to the location at which the FIPS certificate must be stored on the source appliance.
- In the Key Vector File Name text box, type the file name. The file name must contain the path to the location at which the FIPS key vector must be stored on the source appliance.
- In the Target Secret File Name text box, type the location for storing the secret data on the target appliance.
- In the Source Secret File Name text box, type the location for storing the secret data on the source appliance.
- Under Secondary System Login Credential, enter the values for User Name and Password.
- Click OK. The FIPS appliances are now configured in HA mode.
Note: After configuring the appliances in HA, create a FIPS key, as described in Create a FIPS key. The FIPS key is automatically transferred from the primary to the secondary appliance.
Create a certificate signing request by using the CLI
At the command prompt, type:
create ssl certReq <reqFile> (-keyFile <input_filename> | -fipsKeyName <string>) [-keyform ( DER | PEM )  {-PEMPassPhrase }] -countryName <string> -stateName <string> -organizationName<string> [-organizationUnitName <string>] [-localityName <string>] [-commonName <string>] [-emailAddress <string>] {-challengePassword } [-companyName <string>] [-digestMethod ( SHA1 | SHA256 )]
<!--NeedCopy-->
Example:
>create certreq f1.req –fipsKeyName  f1 -countryName US  -stateName CA -organizationName Citrix -companyName Citrix -commonName ctx -emailAddress test@example.com
Done
<!--NeedCopy-->
Create a server certificate by using the CLI
At the command prompt, type:
create ssl cert <certFile> <reqFile> <certType> [-keyFile <input_filename>] [-keyform ( DER | PEM ) {-PEMPassPhrase }] [-days <positive_integer>] [-certForm ( DER | PEM )] [-CAcert <input_filename>] [-CAcertForm ( DER | PEM )] [-CAkey <input_filename>][-CAkeyForm ( DER | PEM )] [-CAserial <output_filename>]
<!--NeedCopy-->
Example:
create cert f1.cert f1.req SRVR_CERT -CAcert ns-root.cert -CAkey ns-root.key -CAserial ns-root.srl -days 1000
Done
<!--NeedCopy-->
The preceding example creates a server certificate using a local root CA on the appliance.
Add a certificate-key pair by using the CLI
At the command prompt, type:
add ssl certKey <certkeyName> (-cert <string> [-password]) [-key <string> | -fipsKey <string> | -hsmKey <string>] [-inform <inform>][-expiryMonitor ( ENABLED | DISABLED ) [-notificationPeriod <positive_integer>]] [-bundle ( YES | NO )]
<!--NeedCopy-->
Example:
add certkey cert1 -cert f1.cert -fipsKey f1

<!--NeedCopy-->
After creating the FIPS key and server certificate, you can add the generic SSL configuration. Enable the features that are required for your deployment. Add servers, services, and SSL virtual servers. Bind the certificate-key pair and the service to the SSL virtual server. Save the configuration.
enable ns feature SSL LB

add server s1 10.217.2.5

add service sr1 s1 HTTP 80

add lb vserver v1 SSL 10.217.2.172 443

bind ssl vserver v1 –certkeyName cert1

bind lb vserver v1 sr1

saveconfig

<!--NeedCopy-->
The basic configuration of your MPX 14000 FIPS appliance is now complete.
For information about configuring secure HTTPS, click Configure FIPS.
For information about configuring secure RPC, click Configure FIPS for the first time.
Update the license on an MPX 14000 FIPS appliance
Any update to the license on this platform requires two reboots.
- Update the license in the
/nsconfig/licensefolder. - Restart the appliance.
- Log on to the appliance.
- Restart the appliance again. Note: Do not add new commands, save the config, or check the system state before the second reboot.
- Log on to the appliance and ensure that FIPS is initialized by running the
show ssl fipscommand.
Support for hybrid FIPS mode on the MPX 14000 FIPS and SDX 14000 FIPS platforms
Note:
This feature is supported only on the new MPX/SDX 14000 FIPS platform containing one primary FIPS card and one or more secondary cards. It is not supported on a VPX platform or a platform containing only one type of hardware card.
On a FIPS platform, the asymmetric and symmetric encryption and decryption are performed on the FIPS card for security reasons. However, you can perform part of this activity (asymmetric) on a FIPS card and offload the bulk encryption and decryption (symmetric) to another card without compromising the security of your keys.
The new MPX/SDX 14000 FIPS platform contains one primary card and one or more secondary cards. If you enable the hybrid FIPS mode, the pre-master secret decryption commands are run on the primary card because the private key is stored on this card. However, the bulk encryption and decryption is offloaded to the secondary card. This offload significantly increases the bulk encryption throughput on an MPX/SDX 14000 FIPS platform as compared to non-hybrid FIPS mode and the existing MPX 9700/10500/12500/15000 FIPS platform. Enabling the hybrid FIPS mode also improves the SSL transaction per second on this platform.
Notes:
The hybrid FIPS mode is disabled by default to meet the strict certification requirements where all the crypto computation must be done inside a FIPS certified module. Enable the hybrid mode to offload the bulk encryption and decryption to the secondary card.
On an SDX 14000 FIPS platform, you must first assign an SSL chip to the VPX instance before you enable the hybrid mode.
Enable hybrid FIPS mode by using the CLI
At the command prompt, type:
set SSL parameter -hybridFIPSMode {ENABLED|DISABLED}

Arguments

hybridFIPSMode

When this mode is enabled, system will use additional crypto hardware to accelerate symmetric crypto operations.

Possible values: ENABLED, DISABLED

Default value: DISABLED
<!--NeedCopy-->
Example:
    set SSL parameter -hybridFIPSMode ENABLED
    show SSL parameter
    Advanced SSL Parameters
    -----------------------
    . . . . . . . . . . . .
    Hybrid FIPS Mode    : ENABLED
    . . . . . . . . . . . .

<!--NeedCopy-->
Enable hybrid FIPS mode by using the GUI
- Navigate to Traffic Management > SSL.
- In the details pane, under Settings, click Change advanced SSL settings.
- In the Change Advanced SSL Settings dialog box, select Hybrid FIPS Mode.
Limitations:
-
Renegotiation is not supported.
-
The
stat ssl parametercommand on an SDX 14000 platform does not display the correct secondary card utilization percentage. It always displays 0.00% utilization.
stat ssl

SSL Summary
# SSL cards present 1
# SSL cards UP  1
# Secondary SSL cards present   4
# Secondary SSL cards UP    4
SSL engine status      1
SSL sessions (Rate)     963
Secondary card utilization (%)     0.00
<!--NeedCopy-->
In this article
- Limitations
- Configure the HSM
- Create a FIPS key
- Import a FIPS key
- Export a FIPS key
- Configure FIPS on appliances in an HA setup
- Prerequisites
- Create a certificate signing request by using the CLI
- Create a server certificate by using the CLI
- Add a certificate-key pair by using the CLI
- Update the license on an MPX 14000 FIPS appliance
- Support for hybrid FIPS mode on the MPX 14000 FIPS and SDX 14000 FIPS platforms