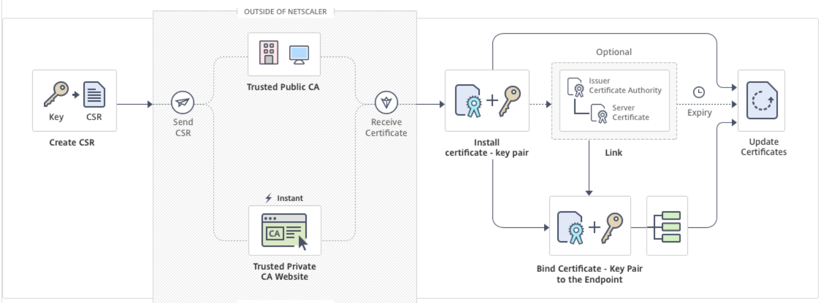
Create a certificate signing request and use SSL certificates on a NetScaler appliance
To install, link, and update certificates, see Install, link, and update certificates.
Perform the following steps to create a certificate and bind it to an SSL virtual server.
- Create a private key.
- Create a certificate signing request (CSR).
- Submit the CSR to a Certificate Authority.
- Create a certificate-key pair.
- Bind the certificate-key pair to an SSL virtual server
The following diagram illustrates the workflow.
Create a private key
The private key is the most important part of a digital certificate. By definition, this key is not to be shared with anyone and must be kept securely on the NetScaler appliance. Any data encrypted with the public key can be decrypted only by using the private key.
The certificate that you receive from the CA is valid only with the private key that was used to create the CSR. The key is required for adding the certificate to the NetScaler appliance.
Important: Limit access to your private key. Anyone who has access to your private key can decrypt your SSL data.
Note: The length of the SSL key name allowed includes the length of the absolute path name if the path is included in the key name.
Create an RSA private key by using the CLI
At the command prompt, type:
create ssl rsakey <keyFile> <bits> [-exponent ( 3 | F4 )] [-keyform (DER | PEM )] [-des | -des3 | -aes256] {-password } [-pkcs8]
<!--NeedCopy-->
Example:
create rsakey RSA_Key 2048 -aes256 -password 123456 -pkcs8
<!--NeedCopy-->
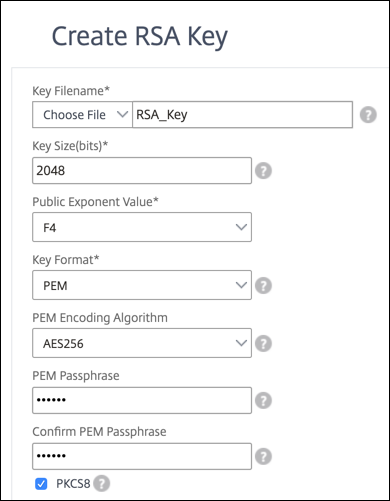
Create an RSA private key by using the GUI
-
Navigate to Traffic Management > SSL > SSL Files.
-
In the SSL Files page, click Keys tab, select Create RSA Key.

-
Enter values for the following parameters and click Create.
- Key Filename - Name for and, optionally, path to the RSA key file. /nsconfig/ssl/ is the default path.
- Key Size - Size, in bits, of the RSA key. Can range from 512 bits to 4096 bits.
- Public Exponent Value - Public exponent for the RSA key. The exponent is part of the cipher algorithm and is required for creating the RSA key.
- Key Format - The format in which the RSA key file is stored on the appliance.
- PEM Encoding Algorithm - Encrypt the generated RSA key by using the AES 256, DES, or Triple-DES (DES3) algorithm. By default, private keys are unencrypted.
- PEM Passphrase - If the private key is encrypted, enter a pass phrase for the key.
Create a certificate signing request
Use the private key to create a certificate signing request and submit to a Certificate Authority.
Create a certificate signing request by using the CLI
At the command prompt, type:
create ssl certreq <reqFile> -keyFile <input_filename> | -fipsKeyName <string>) [-keyForm (DER | PEM) {-PEMPassPhrase }] -countryName <string> -stateName <string> -organizationName <string> -organizationUnitName <string> -localityName <string> -commonName <string> -emailAddress <string> {-challengePassword } -companyName <string> -digestMethod ( SHA1 | SHA256 )
<!--NeedCopy-->
Example:
create ssl certreq priv_csr_sha256 -keyfile priv_2048_2 -keyform PEM -countryName IN -stateName Karnataka -localityName Bangalore -organizationName Citrix -organizationUnitName NS -digestMethod SHA256
<!--NeedCopy-->
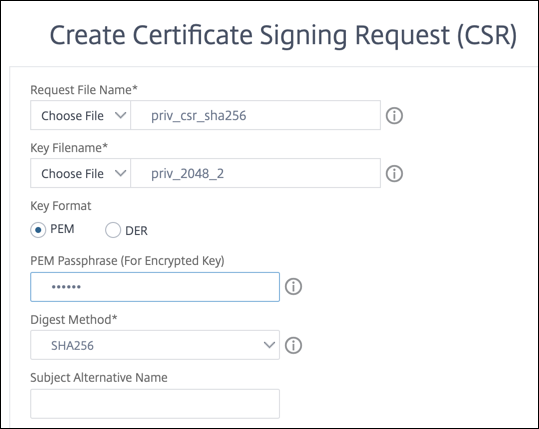
Create a certificate signing request by using the GUI
- Navigate to Traffic Management > SSL.
- In the SSL Files page, click the CSRs tab, and click Create Certificate Signing Request (CSR).
-
Enter values for the following parameters.
-
Request Filename - Name for and, optionally, path to the certificate signing request (CSR). /nsconfig/ssl/ is the default path.
-
Key Filename - Name of and, optionally, path to the private key used to create the certificate signing request, which then becomes part of the certificate-key pair. The private key can either be an RSA key or an ECDSA key. The key must be present in the appliance’s local storage. /nsconfig/ssl is the default path.
- Key Format
- PEM Passphrase (For Encrypted Key)
- Digest Method
- Organization Name
- State or Province
- Country
-
Subject Alternative Name: The subject alternative name (SAN) is an extension to X.509 that allows various values to be associated with a security certificate using a subjectAltName field. These values are called “Subject Alternative Names” (SAN). Names include:
- IP addresses (Prefix with “IP:” Example: IP:198.51.10.5 IP:192.0.2.100)
- DNS names (Prefix with “DNS:” Example: DNS:www.example.com DNS:www.example.org DNS:www.example.net)
Notes:
-
The subject alternative name (SAN) field in a certificate allows you to associate multiple values, such as domain names and IP addresses, with a single certificate. In other words, you can secure multiple domains, such as www.example.com, www.example1.com, www.example2.com, with a single certificate.
-
Some browsers, such as Google Chrome, no longer support a common name in a certificate signing request (CSR). They enforce SAN in all publicly trusted certificates.
- Common Name: The name that you specify is compared to the common name in the server certificate during an SSL handshake. If the two names match, the handshake is successful. If the common names do not match, the common name specified for the service or service group is compared to the SAN field values in the certificate. If it matches one of those values, the handshake is successful. This configuration is especially useful if there are, for example, two servers behind a firewall and one of the servers spoofs the identity of the other. If the common name is not checked, a certificate presented by either server is accepted if the IP address matches.
-
- Click Create.
Submit the CSR to the Certificate Authority
Most certificate authorities (CA) accept certificate submissions by email. The CA returns a valid certificate to the email address from which you submit the CSR.
Add a certificate-key pair
Install the signed certificate received from the Certificate Authority.
Note: Certificates and keys are stored in the /nsconfig/ssl directory by default. If your certificates or keys are stored in any other location, you must provide the absolute path to the files on the NetScaler appliance.
Add a certificate-key pair by using the CLI
add ssl certKey <certkeyName> -cert <string>[(-key <string> [-password]) | -fipsKey <string>] [-inform ( DER | PEM )] [<passplain>] [-expiryMonitor ( ENABLED | DISABLED ) [-notificationPeriod <positive_integer>]]

show ssl certKey [<certkeyName>]
<!--NeedCopy-->
Example:
add ssl certKey rsa_certkeypair -cert server_cert.pem -key RSA_Key.pem -password ssl -expiryMonitor ENABLED -notificationPeriod 30
 Done
<!--NeedCopy-->
Add a certificate-key pair by using the GUI
- Navigate to Traffic Management > SSL > Certificates > Server.
-
Enter the values for the following parameters and click Install.
-
Certificate-Key Pair Name - Name for the certificate and private-key pair.
-
Certificate File Name - Signed certificate received from the Certificate Authority.
-
Key File Name - Name of and, optionally, path to the private-key file that is used to form the certificate-key pair.
-
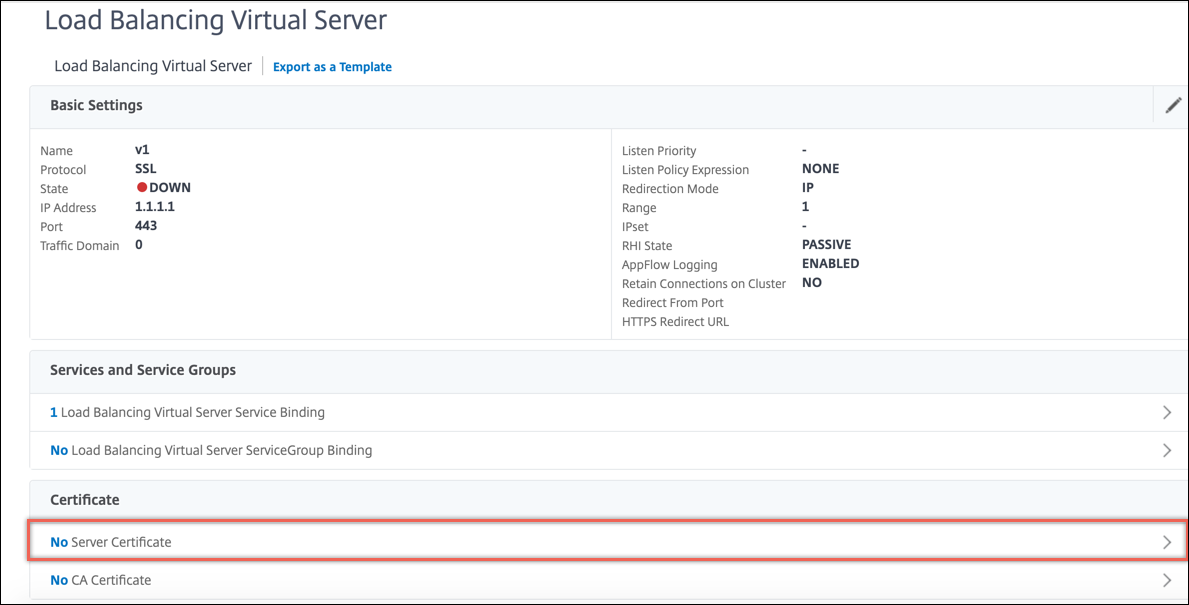
Bind the certificate-key pair to an SSL virtual server
Important: Link any intermediate certificates to this certificate before binding the certificate to an SSL virtual server. For information about linking certificates, see Create a chain of certificates.
The certificate that is used for processing SSL transactions must be bound to the virtual server that receives the SSL data. If you have multiple virtual servers receiving SSL data, a valid certificate-key pair must be bound to each of them.
Bind an SSL certificate-key pair to a virtual server by using the CLI
At the command prompt, type the following commands to bind an SSL certificate-key pair to a virtual server and verify the configuration:
bind ssl vserver <vServerName> -certkeyName <certificate-KeyPairName> -CA -skipCAName
show ssl vserver <vServerName>
<!--NeedCopy-->
Example:
bind ssl vs vs1 -certkeyName cert2 -CA -skipCAName
 Done
sh ssl vs vs1

 Advanced SSL configuration for VServer vs1:

 DH: DISABLED

 Ephemeral RSA: ENABLED Refresh Count: 0

 Session Reuse: ENABLED Timeout: 120 seconds

 Cipher Redirect: DISABLED

 SSLv2 Redirect: DISABLED

 ClearText Port: 0

 Client Auth: DISABLED

 SSL Redirect: DISABLED

 Non FIPS Ciphers: DISABLED

 SNI: DISABLED

 OCSP Stapling: DISABLED

 HSTS: DISABLED

 IncludeSubDomains: NO

 HSTS Max-Age: 0

 SSLv2: DISABLED SSLv3: ENABLED  TLSv1.0: ENABLED  TLSv1.1: DISABLED  TLSv1.2: DISABLED

 Push Encryption Trigger: Always

 Send Close-Notify: YES

 Strict Sig-Digest Check: DISABLED

ECC Curve: P_256, P_384, P_224, P_521

 1) CertKey Name: cert1 CA Certificate OCSPCheck: Optional CA_Name Sent
 2) CertKey Name: cert2 CA Certificate OCSPCheck: Optional CA_Name Skipped
 1) Cipher Name: DEFAULT

Description: Default cipher list with encryption strength >= 128bit
Done
<!--NeedCopy-->
Bind an SSL certificate-key pair to a virtual server by using the GUI
-
Navigate to Traffic Management > Load Balancing > Virtual Servers and open an SSL virtual server. Click inside the Certificate section.
-
Click the arrow to select the certificate-key pair.

-
Select the certificate-key pair from the list.
-
Bind the certificate-key pair to the virtual server.
Troubleshooting
The following are the two common error scenarios with the link to the respective solution articles.
-
If you see the following error when installing a certificate-key pair on the NetScaler appliance, see https://support.citrix.com/article/CTX134233
Error: Invalid private key, or PEM pass phrase required for this private key.
-
If you see the following error when installing an SSL certificate on the NetScaler appliance, see https://support.citrix.com/article/CTX137887
Error: Invalid Certificate.