Quick start
This article steps through how to install and configure Citrix Hypervisor and its graphical, Windows-based user interface, XenCenter. After installation, it takes you through creating Windows virtual machines (VMs) and then making customized VM templates you can use to create multiple, similar VMs quickly. Finally, this article shows how to create a pool of servers, which provides the foundation to migrate running VMs between servers using live migration.
Focusing on the most basic scenarios, this article aims to get you set up quickly.
This article is primarily intended for new users of Citrix Hypervisor and XenCenter. It is intended for those users who want to administer Citrix Hypervisor by using XenCenter. For information on how to administer Citrix Hypervisor using the Linux-based xe commands through the Citrix Hypervisor Command Line Interface (CLI), see Command-line interface.
Terminology and abbreviations
-
Server: a physical computer that runs Citrix Hypervisor
-
Virtual Machine (VM): a computer composed entirely of software that can run its own operating system and applications as if it were a physical computer. A VM behaves exactly like a physical computer and contains its own virtual (software-based) CPU, RAM, hard disk, and NIC.
-
Pool: a single managed entity that binds together multiple Citrix Hypervisor servers and their VMs
-
Storage Repository (SR): a storage container in which virtual disks are stored
Major components
Citrix Hypervisor
Citrix Hypervisor is a complete server virtualization platform, with all the capabilities required to create and manage a virtual infrastructure. Citrix Hypervisor is optimized for both Windows and Linux virtual servers.
Citrix Hypervisor runs directly on server hardware without requiring an underlying operating system, which results in an efficient and scalable system. Citrix Hypervisor abstracts elements from the physical machine (such as hard drives, resources, and ports) and allocating them to the virtual machines (VMs) running on it.
Citrix Hypervisor lets you create VMs, take VM disk snapshots, and manage VM workloads.
XenCenter
XenCenter is a graphical, Windows-based user interface. XenCenter enables you to manage Citrix Hypervisor servers, pools, and shared storage. Use XenCenter to deploy, manage, and monitor VMs from your Windows desktop machine.
The XenCenter Online Help is also a great resource for getting started with XenCenter. Press F1 at any time to access context-sensitive information.
Install Citrix Hypervisor and XenCenter
In this section, you set up a minimum Citrix Hypervisor installation.
What you’ll learn
You’ll learn how to:
- Install Citrix Hypervisor on a single physical server
- Install XenCenter on a Windows computer
- Connecting XenCenter and Citrix Hypervisor to form the infrastructure for creating and running virtual machines (VMs).
Requirements
To get started, you need the following items:
- A physical computer to be the Citrix Hypervisor server
- A Windows computer to run the XenCenter application
- Installation files for Citrix Hypervisor and XenCenter
The Citrix Hypervisor server computer is dedicated entirely to the task of running Citrix Hypervisor and hosting VMs, and is not used for other applications. The computer that runs XenCenter can be any general-purpose Windows computer that satisfies the hardware requirements. You can use this computer to run other applications too. For more information, see System Requirements.
You can download the installation files from Citrix Hypervisor Downloads.
Install the Citrix Hypervisor server
All servers have at least one IP address associated with them. To configure a static IP address for the server (instead of using DHCP), have the static IP address on hand before beginning this procedure.
Tip:
Press F12 to advance quickly to the next installer screen. For general help, press F1.
To install the Citrix Hypervisor server:
-
Burn the installation files for Citrix Hypervisor to a CD or create a bootable USB.
Note:
For information about using HTTP, FTP, or NFS as your installation source, see Install Citrix Hypervisor.
-
Back up data you want to preserve. Installing Citrix Hypervisor overwrites data on any hard drives that you select to use for the installation.
-
Insert the installation media into the system.
-
Restart the system.
-
Boot from the local installation media (if necessary, see your hardware vendor documentation for information on changing the boot order).
-
Following the initial boot messages and the Welcome to Citrix Hypervisor screen, select your keyboard layout for the installation.
-
When the Welcome to Citrix Hypervisor Setup screen is displayed, select Ok.
-
Read and accept the Citrix Hypervisor EULA.
Note:
If you see a System Hardware warning, ensure hardware virtualization assist support is enabled in your system firmware.
-
Select Ok to do a clean installation.
-
If you have multiple hard disks, choose a Primary Disk for the installation. Select Ok.
Choose which disks you want to use for virtual machine storage. Choose Ok.
-
Select Local media as your installation source.
-
Select Skip Verification, and then choose Ok.
Note:
If you encounter problems during installation, verify the installation source.
-
Create and confirm a root password, which the XenCenter application uses to connect to the Citrix Hypervisor server.
-
Set up the management interface to use to connect to XenCenter.
If your computer has multiple NICs, select the NIC which you want to use for management traffic (typically the first NIC).
-
Configure the Management NIC IP address with a static IP address or use DHCP.
-
Specify the host name and the DNS configuration manually or automatically through DHCP.
If you manually configure the DNS, enter the IP addresses of your primary (required), secondary (optional), and tertiary (optional) DNS servers in the fields provided.
-
Select your time zone.
-
Specify how you want the server to determine local time: using NTP or manual time entry. Choose Ok.
-
If using NTP, you can specify whether DHCP sets the time server. Alternatively, you can enter at least one NTP server name or IP address in the following fields.
-
If you selected to set the date and time manually, you are prompted to do so.
-
-
Select Install Citrix Hypervisor.
The installation process starts. This might take some minutes.
-
The next screen asks if you want to install any supplemental packs. Choose No to continue.
-
From the Installation Complete screen, eject the installation media, and then select Ok to reboot the server.
After the server reboots, Citrix Hypervisor displays xsconsole, a system configuration console.
Note:
Make note of the IP address displayed. You use this IP address when you connect XenCenter to the server.
Install XenCenter
XenCenter is typically installed on your local system. You can download the XenCenter installer from the Citrix download site
To install XenCenter:
-
Download or transfer the XenCenter installer to the computer that you want to run XenCenter.
-
Double-click the installer
.msifile to begin the installation. -
Follow the Setup wizard, which allows you to modify the default destination folder and then to install XenCenter.
Connect XenCenter to the Citrix Hypervisor server
This procedure enables you to add a server to XenCenter.
To connect XenCenter to the Citrix Hypervisor server:
-
Launch XenCenter.
The program opens to the Home tab.

-
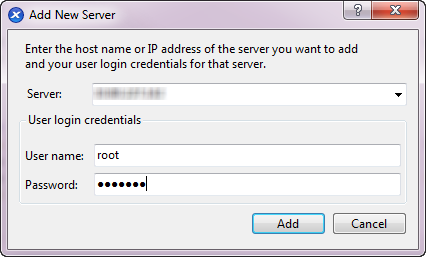
Click the ADD a server icon to open the Add New Server dialog box.
-
In the Server field, enter the IP address of the server. Enter the root user name and password that you set during Citrix Hypervisor installation. Choose Add.
Note:
The first time you add a server, the Save and Restore Connection State dialog box appears. This dialog box enables you to set your preferences for storing your server connection information and automatically restoring server connections.
License Citrix Hypervisor
You can use Citrix Hypervisor without a license (Free Edition). However, this edition provides a restricted set of features.
If you have a Citrix Hypervisor license, apply it now.
For more information, see Licensing.
Create a pool of Citrix Hypervisor servers
A resource pool is composed of multiple Citrix Hypervisor server installations, bound together as a single managed entity.
Resource pools enable you to view multiple servers and their connected shared storage as a single unified resource. You can flexibly deploy of VMs across the resource pool based on resource needs and business priorities. A pool can contain up to 64 servers running the same version of Citrix Hypervisor software, at the same patch level, and with broadly compatible hardware.
One server in the pool is designated as the pool master. The pool master provides a single point of contact for the whole pool, routing communication to other members of the pool as necessary. Every member of a resource pool contains all the information necessary to take over the role of master if necessary. The pool master is the first server listed for the pool in the XenCenter Resources pane. You can find the pool master’s IP address by selecting the pool master and clicking the Search tab.
In a pool with shared storage, you can start VMs on any pool member that has sufficient memory and dynamically move the VMs between servers. The VMs are moved while running and with minimal downtime. If an individual Citrix Hypervisor server suffers a hardware failure, you can restart the failed VMs on another server in the same pool.
If the high availability feature is enabled, protected VMs are automatically moved if a server fails. On an HA-enabled pool, a new pool master is automatically nominated if the master is shut down.
Note:
For a description of heterogeneous pool technology, see Hosts and resource pools.
What you’ll learn
You’ll learn how to:
- Create a pool of servers
- Set up a network for the pool
- Bond NICs
- Set up shared storage for the pool
While Citrix Hypervisor accommodates many shared storage solutions, this section focuses on two common types: NFS and iSCSI.
Requirements
To create a pool with shared storage, you need the following items:
- A second Citrix Hypervisor server, with similar processor type. Connect this server to your XenCenter application.
- A storage repository for IP-based storage
To get you started quickly, this section focuses on creating homogeneous pools. Within a homogeneous pool, all servers must have compatible processors and be running the same version of Citrix Hypervisor, under the same type of Citrix Hypervisor product license. For a full list of homogeneous pool requirements, see System requirements.
Create a pool
To create a pool:
-
On the toolbar, click the New Pool button.

-
Enter a name and optional description for the new pool.
-
Nominate the pool master by selecting a server from the Master list.
-
Select the second server to place in the new pool from the Additional members list.
-
Click Create Pool. The new pool appears in the Resources pane.

Set up networks for the pool
When you install Citrix Hypervisor, you create a network connection, typically on the first NIC in the pool where you specified an IP address (during Citrix Hypervisor installation).
However, you may need to connect your pool to VLANs and other physical networks. To do so, you must add these networks to the pool. You can configure Citrix Hypervisor to connect each NIC to one physical network and numerous VLANs.
Before creating networks, ensure that the cabling matches on each server in the pool. Plug the NICs on each server into the same physical networks as the corresponding NICs on the other pool members.
Note:
If the NICs were not plugged in to the NICs on the server when you installed Citrix Hypervisor:
- Plug the NICs in
- In XenCenter, select <your server> > NICs tab
- Click Rescan for them to appear
For additional information about configuring Citrix Hypervisor networking, see Networking and About Citrix Hypervisor Networks.
To add a network to Citrix Hypervisor:
-
In the Resources pane in XenCenter, select the pool.
-
Click the Networking tab.
-
Click Add Network.
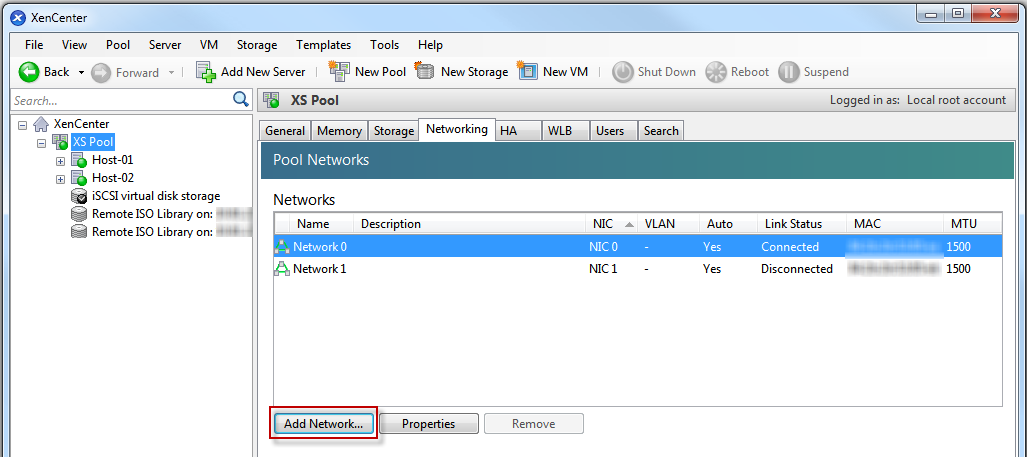
-
On the Select Type page, select External Network, and click Next.
-
On the Name page, enter a meaningful name for the network and description.
-
On the Network settings page, specify the following:
-
NIC: Select the NIC that you want Citrix Hypervisor to use to send and receive data from the network.
-
VLAN: If the network is a VLAN, enter the VLAN ID (or “tag”).
-
MTU: If the network uses jumbo frames, enter a value for the Maximum Transmission Unit (MTU) between 1500 to 9216. Otherwise, leave the MTU box at its default value of 1500.
If you configure many virtual machines to use this network, you can select the Automatically add this network to new virtual machines check box. This option adds the network by default.
-
-
Click Finish.
Bonding NICs
NIC bonding can make your server more resilient by using two or more physical NICs as if they were a single, high-performing channel. This section only provides a very brief overview of bonding, also known as NIC teaming. Before configuring bonds for use in a production environment, we recommend reading more in-depth information about bonding. For more information, see Networking.
Citrix Hypervisor supports the following bond modes: Active/active, active/passive (active/backup), and LACP. Active/active provides load balancing and redundancy for VM-based traffic. For other types of traffic (storage and management), active/active cannot load balance traffic. As a result, LACP or multipathing are better choice for storage traffic. For information about multipathing, see Storage. For more information about bonding, see Networking.
LACP options are not visible or available unless you configure the vSwitch as the network stack. Likewise, your switches must support the IEEE 802.3ad standard. The switch must contain a separate LAG group configured for each LACP bond on the server. For more details about creating LAG groups, see Networking.
To bond NICs:
-
Ensure that the NICs you want to bind together are not in use: shut down any VMs with virtual network interfaces using these NICs before creating the bond. After you have created the bond, reconnect the virtual network interfaces to an appropriate network.
-
Select the server in the Resources pane then open the NICs tab and click Create Bond.
-
Select the NICs you want to bond together. To select a NIC, select its check box in the list. Up to four NICs may be selected in this list. Clear the check box to deselect a NIC. To maintain a flexible and secure network, you can bond either two, three, or four NICs when vSwitch is the network stack. However, you can only bond two NICs when Linux bridge is the network stack.
-
Under Bond mode, choose the type of bond:
-
Select Active-active to configure an active-active bond. Traffic is balanced between the bonded NICs. If one NIC within the bond fails, the server’s network traffic automatically routes over the second NIC.
-
Select Active-passive to configure an active-passive bond. Traffic passes over only one of the bonded NICs. In this mode, the second NIC only becomes active if the active NIC fails, for example, if it loses network connectivity.
-
Select LACP with load balancing based on source MAC address to configure a LACP bond. The outgoing NIC is selected based on MAC address of the VM from which the traffic originated. Use this option to balance traffic in an environment where you have several VMs on the same server. This option is not suitable if there are fewer virtual interfaces (VIFs) than NICs: as load balancing is not optimal because the traffic cannot be split across NICs.
-
Select LACP with load balancing based on IP and port of source and destination to configure a LACP bond. The source IP address, source port number, destination IP address, and destination port number are used to allocate the traffic across the NICs. Use this option to balance traffic from VMs in an environment where the number of NICs exceeds the number of VIFs.
Note:
LACP bonding is only available for the vSwitch, whereas active-active and active-passive bonding modes are available for both the vSwitch and Linux bridge. For information about networking stacks, see Networking.
-
-
To use jumbo frames, set the Maximum Transmission Unit (MTU) to a value between 1500 to 9216.
-
To have the new bonded network automatically added to any new VMs created using the New VM wizard, select the check box.
-
Click Create to create the NIC bond and close the dialog box.
XenCenter automatically moves management and secondary interfaces from secondary bonded NICs to the bond master when the new bond is created. A server with its management interface on a bond is not permitted to join a pool. Before the server can join a pool, you must reconfigure the management interface and move it back on to a physical NIC.
Setting up shared storage for the pool
To connect the servers in a pool to a remote storage array, create a Citrix Hypervisor SR. The SR is the storage container where a VM’s virtual disks are stored. SRs are persistent, on-disk objects that exist independently of Citrix Hypervisor. SRs can exist on different types of physical storage devices, both internal and external. These types include local disk devices and shared network storage.
You can configure a Citrix Hypervisor SR for various different types of storage, including:
-
NFS
-
Software iSCSI
-
Hardware HBA
-
SMB
-
Fibre Channel
-
Software FCoE (deprecated)
This section steps through setting up two types of shared SRs for a pool of servers: NFS and iSCSI. Before you create an SR, configure your NFS or iSCSI storage array. Setup differs depending on the type of storage solution that you use. For more information, see your vendor documentation. Generally, before you begin, complete the following setup for your storage solution:
-
iSCSI SR: You must have created a volume and a LUN on the storage array.
-
NFS SR: You must have created the volume on the storage device.
-
Hardware HBA: You must have done the configuration required to expose the LUN before running the New Storage Repository wizard
-
Software FCoE SR: You must have manually completed the configuration required to expose a LUN to the server. This setup includes configuring the FCoE fabric and allocating LUNs to your SAN’s public world wide name (PWWN).
If you are creating an SR for IP-based storage (iSCSI or NFS), you can configure one of the following as the storage network: the NIC that handles the management traffic or a new NIC for the storage traffic. To configure a different a NIC for storage traffic, assign an IP address to a NIC by creating a management interface.
When you create a management interface, you must assign it an IP address that meets the following criteria:
- The IP address is on the same subnet as the storage controller, if applicable
- The IP address is on a different subnet than the IP address you specified when you installed Citrix Hypervisor
- The IP address is not on the same subnet as any other management interfaces.
To assign an IP address to a NIC:
-
Ensure that the NIC is on a separate subnet or that routing is configured to suit your network topology. This configuration forces the desired traffic over the selected NIC.
-
In the Resource pane of XenCenter, select the pool (or standalone server). Click the Networking tab, and then click the Configure button.
-
In the Configure IP Address dialog, in the left pane, click Add IP address.
-
Give the new interface a meaningful name (for example, yourstoragearray_network). Select the Network associated with the NIC that you use for storage traffic.
-
Click Use these network settings. Enter a static IP address that you want to configure on the NIC, the subnet mask, and gateway. Click OK. The IP address must be on the same subnet as the storage controller the NIC is connected to.
Note:
Whenever you assign a NIC an IP address, it must be on a different subnet than any other NICs with IP addresses in the pool. This includes the primary management interface.
To create a new shared NFS or iSCSI storage repository:
-
On the Resources pane, select the pool. On the toolbar, click the New Storage button.

The New Storage Repository wizard opens.
-
Under Virtual disk storage, choose NFS or iSCSI as the storage type. Click Next to continue.
-
If you choose NFS:
-
Enter a name for the new SR and the name of the share where it is located. Click Scan to have the wizard scan for existing NFS SRs in the specified location.
Note:
The NFS server must be configured to export the specified path to all Citrix Hypervisor servers in the pool.
-
Click Finish.
The new SR appears in the Resources pane, within the pool.
-
-
If you choose iSCSI:
-
Enter a name for the new SR and then the IP address or DNS name of the iSCSI target.
Note:
The iSCSI storage target must be configured to enable every Citrix Hypervisor server in the pool to have access to one or more LUNs.
-
If you have configured the iSCSI target to use CHAP authentication, enter the user name and password.
-
Click the Scan Target Host button, and then choose the iSCSI target IQN from the Target IQN list.
Warning:
The iSCSI target and all servers in the pool must have unique IQNs.
-
Click Target LUN, and then select the LUN on which to create the SR from the Target LUN list.
Warning:
Each individual iSCSI storage repository must be contained entirely on a single LUN and cannot span more than one LUN. Any data present on the chosen LUN is destroyed.
-
Click Finish.
The new SR appears in the Resources pane, within the pool.
-
The new shared SR now becomes the default SR for the pool.
Create virtual machines
Through XenCenter, you can create virtual machines in various ways, according to your needs. Whether you are deploying individual VMs with distinct configurations or groups of multiple, similar VMs, XenCenter gets you up and running in just a few steps.
Citrix Hypervisor also provides an easy way to convert batches of virtual machines from VMware. For more information, see XenServer Conversion Manager.
This section focuses on a few methods by which to create Windows VMs. To get started quickly, the procedures use the simplest setup of Citrix Hypervisor: a single Citrix Hypervisor server with local storage (after you connect XenCenter to the Citrix Hypervisor server, storage is automatically configured on the local disk of the server).
This section also demonstrates how to use live migration to live migrate VMs between servers in the pool.
After explaining how to create and customize your new VM, this section demonstrates how to convert that existing VM into a VM template. A VM template preserves your customization so you can always use it to create VMs to the same (or to similar) specifications. It also reduces the time taken to create multiple VMs.
You can also create a VM template from a snapshot of an existing VM. A snapshot is a record of a running VM at a point in time. It saves the storage, configuration, and networking information of the original VM, which makes it useful for backup purposes. Snapshots provide a fast way to make VM templates. This section demonstrates how to take a snapshot of an existing VM and then how to convert that snapshot into a VM template. Finally, this section describes how to create VMs from a VM template.
What you’ll learn
You’ll learn how to:
- Create a Windows VM
- Install XenServer VM Tools for Windows (formerly Citrix VM Tools)
- Migrate a running VM between servers in the pool
- Create a VM template
- Create a VM from a VM template
Requirements
To create a pool with shared storage, you need the following items:
- The Citrix Hypervisor pool you set up
- XenCenter
- Installation files for Windows
- Installation files for XenServer VM Tools for Windows
Create a Windows 10 (32-bit) VM
Note:
The following procedure provides an example of creating Windows 10 (32-bit) VM. The default values may vary depending on the operating system that you choose.
To create a Windows VM:
-
On the toolbar, click the New VM button to open the New VM wizard.

The New VM wizard allows you to configure the new VM, adjusting various parameters for CPU, storage, and networking resources.
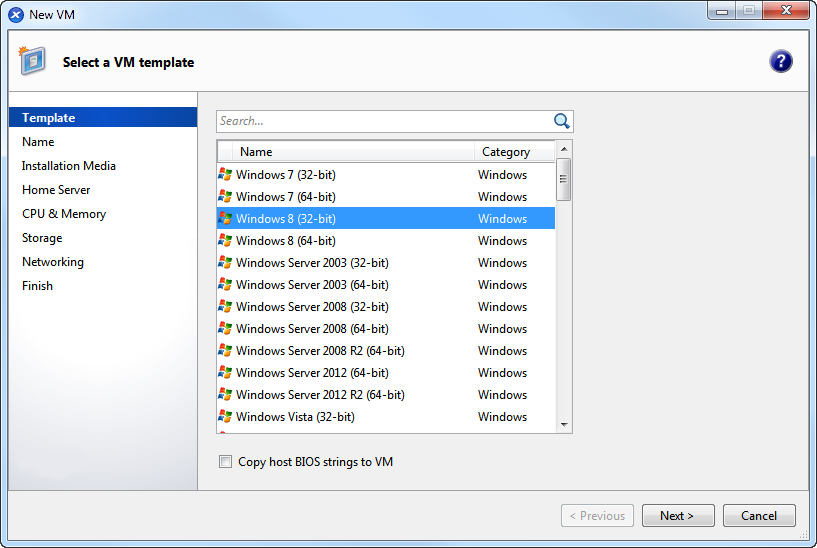
-
Select a VM template and click Next.
Each template contains the setup information for creating a VM with a specific guest operating system (OS), and with optimum storage. This list reflects the templates that Citrix Hypervisor currently supports.
Note:
If the OS you’re installing on your new VM is compatible only with the original hardware, check the Copy host BIOS strings to VM box. For example, use this option for an OS installation CD that was packaged with a specific computer.
After you first start a VM, you cannot change its BIOS strings. Ensure that the BIOS strings are correct before starting the VM for the first time.
-
Enter a name for and optional description of the new VM.
-
Choose the source of the OS media to install on the new VM.
Installing from a CD/DVD is the simplest option for getting started. Choose the default installation source option (DVD drive), insert the disk into the DVD drive of the Citrix Hypervisor server, and choose Next to proceed.
Citrix Hypervisor also allows you to pull OS installation media from a range of sources, including a pre-existing ISO library.
To attach a pre-existing ISO library, click New ISO library and indicate the location and type of ISO library. You can then choose the specific operating system ISO media from the list.
-
The VM runs on the installed server. Choose Next to proceed.
-
Allocate processor and memory resources.
For a Windows 10 VM, the default is 1 virtual CPU, 1 socket with 1 core per socket and 4 GB of RAM. You may choose to modify the defaults if necessary. Click Next to continue.
Note:
Each OS has different configuration requirements which are reflected in the templates.
-
Assign a graphics processing unit (GPU).
The New VM wizard prompts you to assign a dedicated GPU or virtual GPUs to the VM. This option enables the VM to use the processing power of the GPU. It provides better support for high-end 3D professional graphics applications such as CAD, GIS, and Medical Imaging applications.
Note:
GPU Virtualization is available for Citrix Hypervisor Premium Edition customers, or those customers who have access to Citrix Hypervisor through their Citrix Virtual Apps and Desktops entitlement or Citrix DaaS entitlement.
-
Configure storage for the new VM.
Click Next to select the default allocation (24 GB) and configuration, or you might want to:
-
Change the name, description, or size of your virtual disk by clicking Edit.
-
Add a new virtual disk by selecting Add.
Note:
When you create a pool of Citrix Hypervisor servers, you can configure shared storage at this point when creating a VM.
-
-
Configure networking on the new VM.
Click Next to select the default NIC and configurations, including an automatically created unique MAC address for each NIC, or you can:
-
Change the physical network, MAC address, or Quality of Service (QoS) priority of the virtual disk by clicking Edit.
-
Add a new virtual network interface by selecting Add.
Citrix Hypervisor uses the virtual network interface to connect to the physical network on the server. Be sure to select the network that corresponds with the network the virtual machine requires. To add a physical network, see Setting Up Networks for the Pool
-
-
Review settings, and then click Create Now to create the VM and return to the Search tab.
An icon for your new VM appears under the server in the Resources pane.
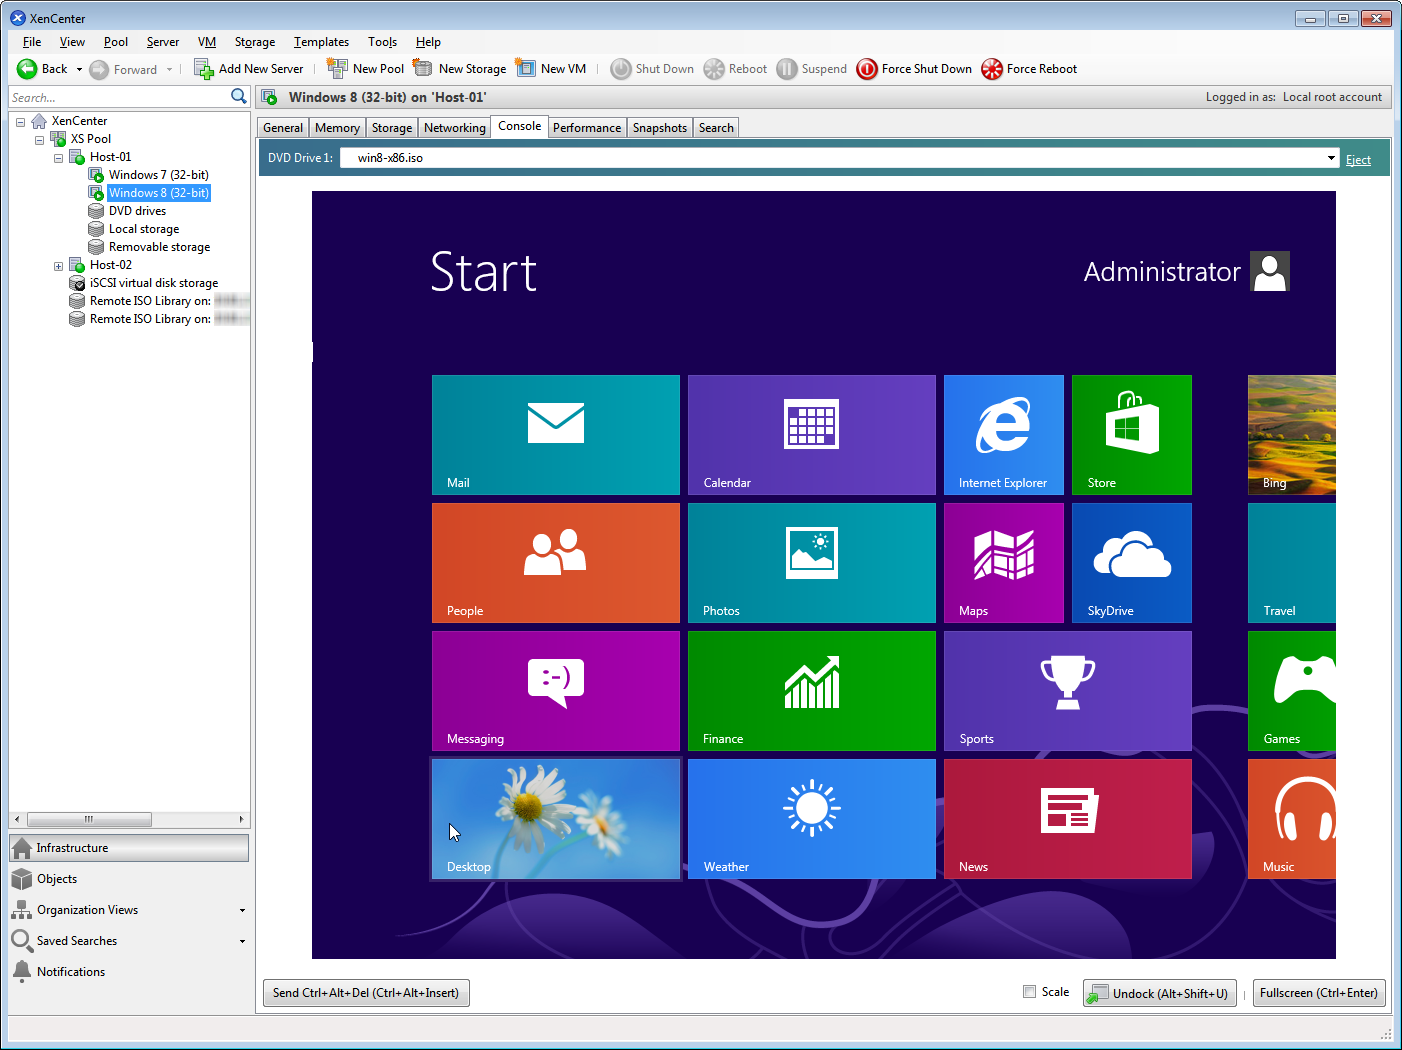
On the Resources pane, select the VM, and then click the Console tab to see the VM console.
-
Follow the OS installation screens and make your selections.
-
After the OS installation completes and the VM reboots, install the XenServer VM Tools for Windows.
Install XenServer VM Tools for Windows
XenServer VM Tools for Windows provide high performance I/O services without the overhead of traditional device emulation. XenServer VM Tools for Windows consists of I/O drivers (also known as paravirtualized drivers or PV drivers) and the Management Agent. XenServer VM Tools for Windows must be installed on each Windows VM for the VM to have a fully supported configuration. A Windows VM functions without them, but performance is hampered. XenServer VM Tools for Windows also enable certain functions and features, including cleanly shutting down, rebooting, suspending and live migrating VMs.
Warning:
Install XenServer VM Tools for Windows for each Windows VM. Running Windows VMs without XenServer VM Tools for Windows is not supported.
We recommend that you snapshot your VM before installing or updating the XenServer VM Tools.
To install XenServer VM Tools for Windows:
-
Download the XenServer VM Tools for Windows file onto your Windows VM. Get this file from the Citrix Hypervisor downloads page.
A 32-bit and a 64-bit version of the tools are available.
-
Run the
managementagent.msifile to begin XenServer VM Tools installation. -
Follow the prompts in the installer.
-
Restart the VM when prompted to complete the installation process.
Note:
I/O drivers are automatically installed on a Windows VM that can receive updates from Windows Update. However, we recommend that you install the XenServer VM Tools for Windows package to install the Management Agent, and to maintain a supported configuration. The following features are available only for Citrix Hypervisor Premium Edition customers, or those customers who have access to Citrix Hypervisor through Citrix Virtual Apps and Desktops entitlement or Citrix DaaS entitlement:
- Ability to receive I/O drivers from Windows Update
- Automatic updating of the Management Agent
After you have installed the XenServer VM Tools for Windows, you can customize your VM by installing applications and performing any other configurations. If you want to create multiple VMs with similar specifications, you can do so quickly by making a template from the existing VM. Use that template to create VMs. For more information, see Creating VM Templates.
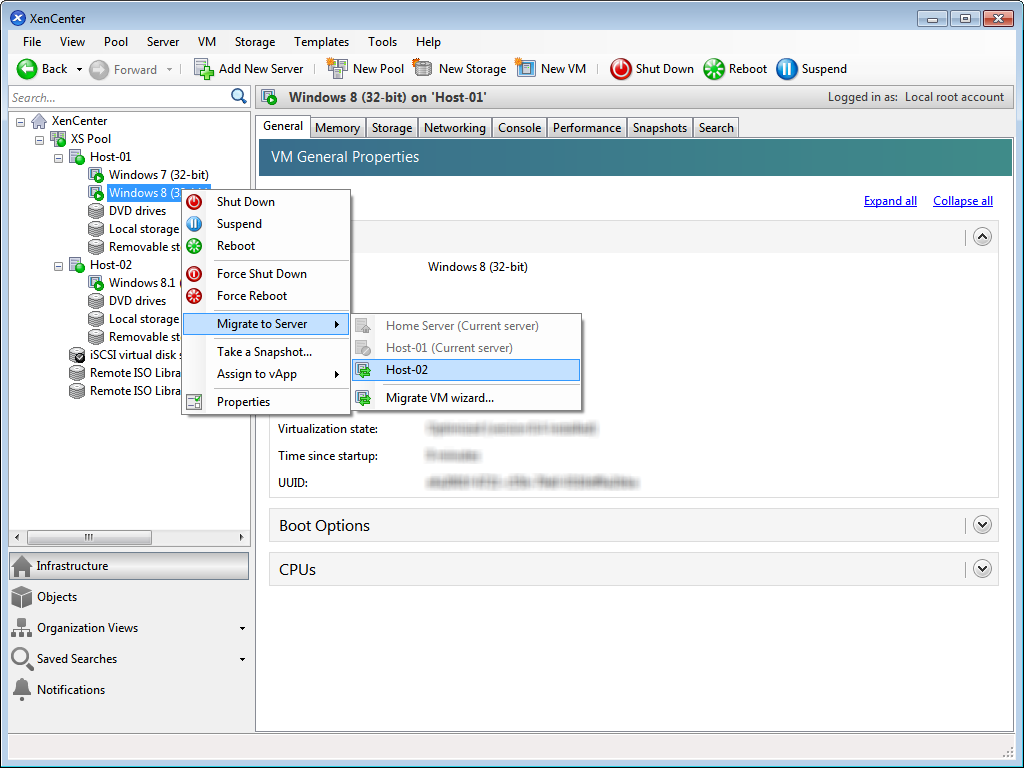
Migrate running VMs between servers in a pool
Using live migration, you can move a running VM from one server to another in the same pool, and with virtually no service interruption. Where you decide to migrate a VM to depends on how you configure the VM and pool.
To migrate a running VM:
-
On the Resources pane, select the VM that you want to move.
Note:
Ensure that the VM you migrate does not have local storage.
-
Right-click the VM icon, point to Migrate to Server, and then select the new VM server.
Tip:
You can also drag the VM onto the target server.
-
The migrated VM displays under the new server in the Resources pane.
Create VM templates
There are various ways to create a VM template from an existing Windows VM, each with its individual benefits. This section focuses on two methods: converting an existing VM into a template, and creating a template from a snapshot of a VM. In both cases, the VM template preserves the customized configuration of the original VM or VM snapshot. The template can then be used to create new, similar VMs quickly. This section demonstrates how to make new VMs from these templates.
Before you create a template from an existing VM or VM snapshot, we recommend that you run the Windows utility Sysprep on the original VM. In general, running Sysprep prepares an operating system for disk cloning and restoration. Windows OS installations include many unique elements per installation (including Security Identifiers and computer names). These elements must stay unique and not be copied to new VMs. If copied, confusion and problems are likely to arise. Running Sysprep avoids these problems by allowing the generation of new, unique elements for the new VMs.
Note:
Running
Sysprepmay not be as necessary for basic deployments or test environments as it is for production environments.
For more information about Sysprep, see your Windows documentation. The detailed procedure of running this utility can differ depending on the version of Windows installed.
Create a VM template from an existing VM
To create a VM template from an existing VM:
Warning:
When you create a template from an existing VM, the new template replaces the original VM. The VM no longer exists.
-
Shut down the VM that you want to convert.
-
On the Resources pane, right-click the VM, and select Convert to Template.
-
Click Convert to confirm.
Once you create the template, the new VM template appears in the Resources pane, replacing the existing VM.
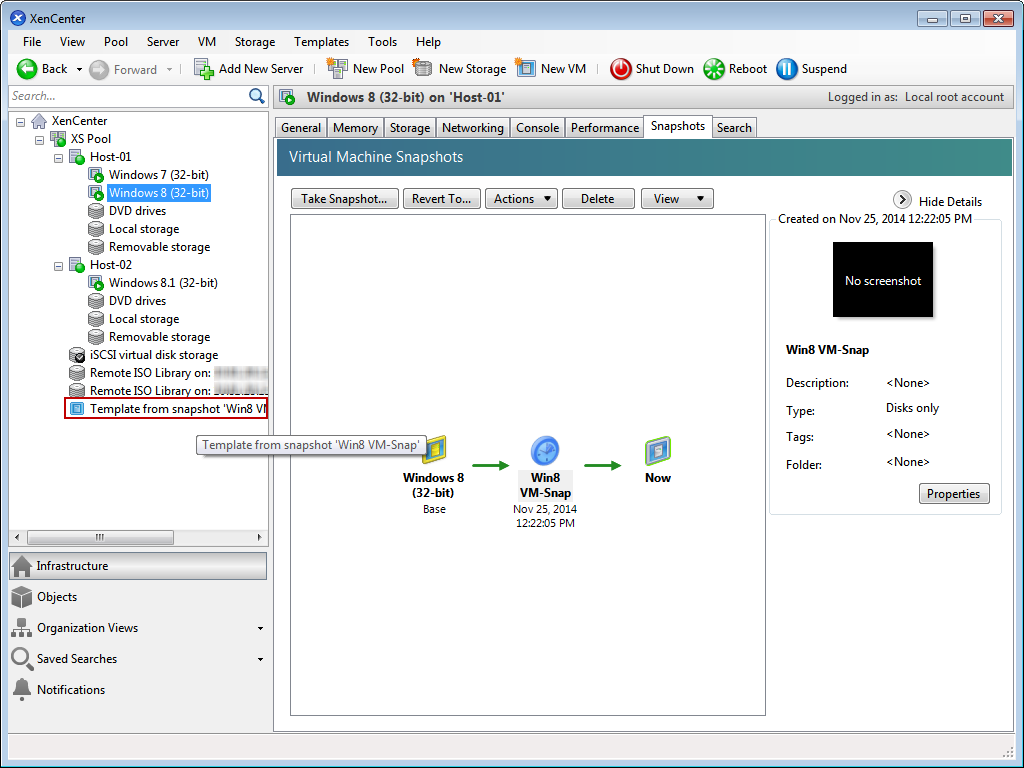
Create a VM template from a VM snapshot
To create a template from a snapshot of a VM:
-
On the Resources pane, select the VM. Click the Snapshots tab, and then Take Snapshot.
-
Enter a name and an optional description of the new snapshot. Click Take Snapshot.
-
Once the snapshot finishes and the icon displays in the Snapshots tab, select the icon.
-
From the Actions list, choose New Template from Snapshot.
-
Enter a name for the template, and then click Create.
Create VMs from a VM template
To create a VM from a customized VM template:
-
On the XenCenter Resources pane, right-click the template, and select New VM wizard.
The New VM wizard opens.
-
Follow the New VM wizard to create a VM from the selected template.
Note:
When the wizard prompts you for an OS installation media source, select the default and continue.
The new VM appears in the Resources pane.
If you are using a template created from an existing VM, you can also choose to select Quick Create. This option does not take you through the New VM wizard. Instead this option instantly creates and provisions a new VM using all the configuration settings specified in your template.