Configure Workload Balancing behavior
After connecting to the Workload Balancing virtual appliance, you can edit the settings Workload Balancing uses to calculate placement and recommendations. Workload Balancing settings apply collectively to all VMs and servers in the pool.
Placement and optimization settings that you can modify include the following:
- Changing the placement strategy
- Configuring automatic optimizations and power management
- Editing performance thresholds and metric weightings
- Excluding servers.
Provided the network and disk thresholds align with the hardware in your environment, consider using most of the defaults in Workload Balancing initially. After Workload Balancing is enabled for a while, we recommend evaluating your performance thresholds and determining whether to edit them. For example, consider the following cases:
-
Getting recommendations when they are not yet required. If so, try adjusting the thresholds until Workload Balancing begins providing suitable recommendations.
-
Not getting recommendations when you expect to receive them. For example, if your network has insufficient bandwidth and you do not receive recommendations, you might have to tweak your settings. If so, try lowering the network critical thresholds until Workload Balancing begins providing recommendations.
Before you edit your thresholds, you can generate a Pool Health report and the Pool Health History report for each physical server in the pool. For more information, see Generate workload reports.
Notes:
- Workload Balancing is available for Citrix Hypervisor Premium Edition customers or those customers who have access to Citrix Hypervisor through their Citrix Virtual Apps and Desktops entitlement or Citrix DaaS entitlement. For more information about Citrix Hypervisor licensing, see Licensing. To upgrade, or to buy a Citrix Hypervisor license, visit the Citrix website.
- Workload Balancing 8.2.2 and later are compatible with Citrix Hypervisor 8.2 Cumulative Update 1.
This article assumes that you already connected your pool to a Workload Balancing virtual appliance. For information about downloading, importing, configuring, and connecting to a Workload Balancing virtual appliance, see Get started.
Adjust the optimization mode
Workload Balancing makes recommendations to rebalance, or optimize, the VM workload in your environment based on a strategy for placement you select. The placement strategy is known as the optimization mode.
You can choose from the following optimization modes:
-
Maximize Performance (default)
Workload Balancing attempts to spread workload evenly across all physical servers in a resource pool. The goal is to minimize CPU, memory, and network pressure for all servers. When Maximize Performance is your placement strategy, Workload Balancing recommends optimization when a server reaches the High threshold.
-
Maximize Density
Workload Balancing attempts to minimize the number of physical servers that must be online by consolidating the active VMs.
When you select Maximize Density as your placement strategy, you can specify parameters similar to the ones in Maximize Performance. However, Workload Balancing uses these parameters to determine how it can pack VMs onto a server. If Maximize Density is your placement strategy, Workload Balancing recommends consolidation optimizations when a VM reaches the Low threshold.
Workload Balancing also lets you apply these optimization modes always, fixed, or switch between modes for specified time periods, scheduled:
Fixed optimization modes
Fixed optimization modes set Workload Balancing to have a specific optimization behavior always. This behavior can be either to try to create the best performance or to create the highest density.
To set a fixed optimization mode, complete the following steps:
-
In XenCenter, select your pool.
-
In the Properties pane of the pool, click the WLB tab.
-
In the WLB tab, click Settings.
-
In the left pane, click Optimization Mode.
-
In the Fixed section of the Optimization Mode page, select one of these optimization modes:
-
Maximize Performance (default). Attempts to spread workload evenly across all physical servers in a resource pool. The goal is to minimize CPU, memory, and network pressure for all servers.
-
Maximize Density. Attempts to fit as many VMs as possible onto a physical server. The goal is to minimize the number of physical servers that must be online.
-
Scheduled optimization modes
Scheduled optimization modes let you schedule for Workload Balancing to apply different optimization modes depending on the time of day. For example, you might want to configure Workload Balancing to optimize for performance during the day when you have users connected. To save energy, you can then specify for Workload Balancing to optimize for Maximum Density at night.
When you configure scheduled optimization modes, Workload Balancing automatically changes to the optimization mode at the beginning of the time period you specified. You can configure Everyday, Weekdays, Weekends, or individual days. For the hour, you select a time of day.
To set a schedule for your optimization modes, complete the following steps:
-
In XenCenter, select your pool.
-
In the Properties pane of the pool, click the WLB tab.
-
In the WLB tab, click Settings.
-
In the left pane, click Optimization Mode.
-
In the Optimization Mode pane, select Scheduled. The Scheduled section becomes available.
-
Click Add New.
-
In the Change to box, select one of the following modes:
-
Maximize Performance. Attempts to spread workload evenly across all physical servers in a resource pool. The goal is to minimize CPU, memory, and network pressure for all servers.
-
Maximize Density. Attempts to fit as many VMs as possible onto a physical server. The goal is to minimize the number of physical servers that must be online.
-
-
Select the day of the week and the time when you want Workload Balancing to begin operating in this mode.
-
Repeat the preceding steps to create more scheduled mode tasks until you have the number you need. If you only schedule one task, Workload Balancing switches to that mode as scheduled, but then it never switches back.
-
Click OK.
To change your schedule settings, complete the following steps.
-
In XenCenter, select your pool.
-
In the Properties pane of the pool, click the WLB tab.
-
In the WLB tab, click Settings.
-
In the left pane, click Optimization Mode.
-
Select the task that you want to delete or disable from the Scheduled Mode Changes list.
-
Do one of the following:
-
Delete the task permanently: Click the Delete button.
-
Stop the task from running temporarily: Right-click the task and click Disable.
Tips:
- You can also disable or enable tasks by selecting the task, clicking Edit, and selecting the Enable Task check box in the Optimization Mode Scheduler dialog.
- To re-enable a task, right-click the task in the Scheduled Mode Changes list and click Enable.
-
Edit the task: Double-click the task that you want to edit. In the Change to box, select a different mode or make other changes as desired.
-
Note:
Clicking Cancel, before clicking OK, undoes any changes you made in the Optimization tab, including deleting a task.
Optimize and manage power automatically
You can configure Workload Balancing to apply recommendations automatically and turn servers on or off automatically. To power down servers automatically (for example, during low-usage periods), you must configure Workload Balancing to apply recommendations automatically and enable power management. Both power management and automation are described in the sections that follow.
Apply recommendations automatically
Workload Balancing lets you configure for it to apply recommendations on your behalf and perform the optimization actions it recommends automatically. You can use this feature, which is known as automatic optimization acceptance, to apply any recommendations automatically, including ones to improve performance or power down servers. However, to power down servers as VMs usage drops, you must configure automation, power management, and Maximum Density mode.
By default, Workload Balancing does not apply recommendations automatically. If you want Workload Balancing to apply recommendations automatically, enable automation. If you do not, you must apply recommendations manually by clicking Apply Recommendations.
Workload Balancing does not automatically apply recommendations to servers or VMs when the recommendations conflict with HA settings. If a pool becomes overcommitted by applying Workload Balancing optimization recommendations, XenCenter prompts you whether you want to continue applying the recommendation. When automation is enabled, Workload Balancing does not apply any power-management recommendations that exceed the number of server failures to tolerate in the HA plan.
When Workload Balancing is running with the automation feature enabled, this behavior is sometimes called running in automated mode.
It is possible to tune how Workload Balancing applies recommendations in automated mode. For information, see Set conservative or aggressive automated recommendations.
To apply optimization recommendations automatically
-
In XenCenter, select your pool.
-
In the Properties pane of the pool, click the WLB tab.
-
In the WLB tab, click Settings.
-
In the left pane, click Automation.
-
Select one or more of the following check boxes:
-
Automatically apply Optimization recommendations. When you select this option, you do not need to accept optimization recommendations manually. Workload Balancing automatically accepts the optimization and placement recommendations that it makes.
-
Automatically apply Power Management recommendations. The behavior of this option varies according to the optimization mode of the pool:
-
Maximum Performance mode: When Automatically apply Power Management recommendations is enabled, Workload Balancing automatically powers on servers when doing so improves server performance.
-
Maximum Density mode: When Automatically apply Power Management recommendations is enabled, Workload Balancing automatically powers off servers when resource utilization drops below the Low threshold. That is, Workload Balancing powers off servers automatically during low usage periods.
-
-
-
(Optional.) Fine-tune optimization recommendations by clicking Advanced in the left pane of the Settings dialog and doing one or more of the following actions:
-
Specifying the number of times Workload Balancing must make an optimization recommendation before the recommendation is applied automatically. The default is three times, which means the recommendation is applied on the third time it is made.
-
Selecting the lowest level of optimization recommendation that you want Workload Balancing to apply automatically. The default is High.
-
Changing the aggressiveness with which Workload Balancing applies its optimization recommendations.
You might also want to specify the number of minutes Workload Balancing has to wait before applying an optimization recommendation to a recently moved VM.
All of these settings are explained in more depth in Set conservative or aggressive automated recommendations.
-
-
(optional) If you want to configure power management, click Automation/Power Management
-
In the Power Management section, select the servers that you want Workload Balancing to recommend powering on and off.
Note:
Selecting servers for power management recommendations without selecting Automatically apply Power Management recommendations causes Workload Balancing to suggest power-management recommendations but not apply them automatically for you.
If none of the servers in the resource pool support remote power management, Workload Balancing displays the message, “No hosts support Power Management.”
-
Click OK.
-
-
To finish configuring the automation, click OK.
Enable Workload Balancing power management
The term power management means the ability to the turn the power on or off for physical servers. In a Workload Balancing context, this term means powering servers in a pool on or off based on the total workload of the pool.
Configuring Workload Balancing power management on a server requires that:
-
The hardware for the server has remote power on/off capabilities.
-
The Host Power On feature is configured for the server. To configure the Host Power On feature for the server, see Configure Host Power On feature.
-
The server has been explicitly selected as a server to participate in Workload Balancing power management.
In addition, if you want Workload Balancing to power off servers automatically, configure Workload Balancing to do the following actions:
-
Apply recommendations automatically
-
Apply power management recommendations automatically
When a server is set to participate in power management, Workload Balancing makes power-on and power-off recommendations as needed.
If you run in Maximum Density mode:
- When Workload Balancing detects unused resources in a pool, it recommends powering off servers until it eliminates all excess capacity.
- If there isn’t enough server capacity in the pool to shut down servers, Workload Balancing recommends leaving the servers on until the pool workload decreases enough.
- When you configure Workload Balancing to power off extra servers automatically, it applies these recommendations automatically and, so, behaves in the same way.
If you run in Maximum Performance mode:
- If you configure Workload Balancing to power on servers automatically, Workload Balancing powers on servers when resource utilization on a server exceeds the High threshold.
- Workload Balancing never powers off servers after it has powered them on.
If you turn on the option to apply power management recommendations automatically, you do so at the pool level. However, you can specify which servers from the pool you want to participate in power management.
Configure Host Power On feature
To configure the Host Power On feature for your server, follow these steps:
-
In Citrix Hypervisor Center, select your server and click Properties.
-
In the left pane, click Power On.
-
For the Power On mode, select Dell Remote Access Controller (DRAC).
-
For the Configuration options, enter your server’s DRAC IP address. This is the IP address of the BMC management port. For more information, see DRAC Card How To Guide [PDF].
-
After the Dell Remote Access Controller (DRAC) is configured, select your pool.
-
In the Properties pane of the pool, click the WLB tab.
-
In the WLB tab, click Settings.
-
In the left pane, click Automation.
-
For Automation, select the following check boxes:
-
Automatically apply Optimization recommendations. When you select this option, you do not need to accept optimization recommendations manually. Workload Balancing automatically accepts the optimization and placement recommendations that it makes.
-
Automatically apply Power Management recommendations. The behavior of this option varies according to the optimization mode of the pool:
-
Maximum Performance mode: When Automatically apply Power Management recommendations is enabled, Workload Balancing automatically powers on servers when doing so improves server performance.
-
Maximum Density mode: When Automatically apply Power Management recommendations is enabled, Workload Balancing automatically powers off servers when resource utilization drops below the Low threshold. That is, Workload Balancing powers off servers automatically during low usage periods.
-
-
-
For Power Management, select the name of the Host Server that you’re currently configuring.
Understand power management behavior
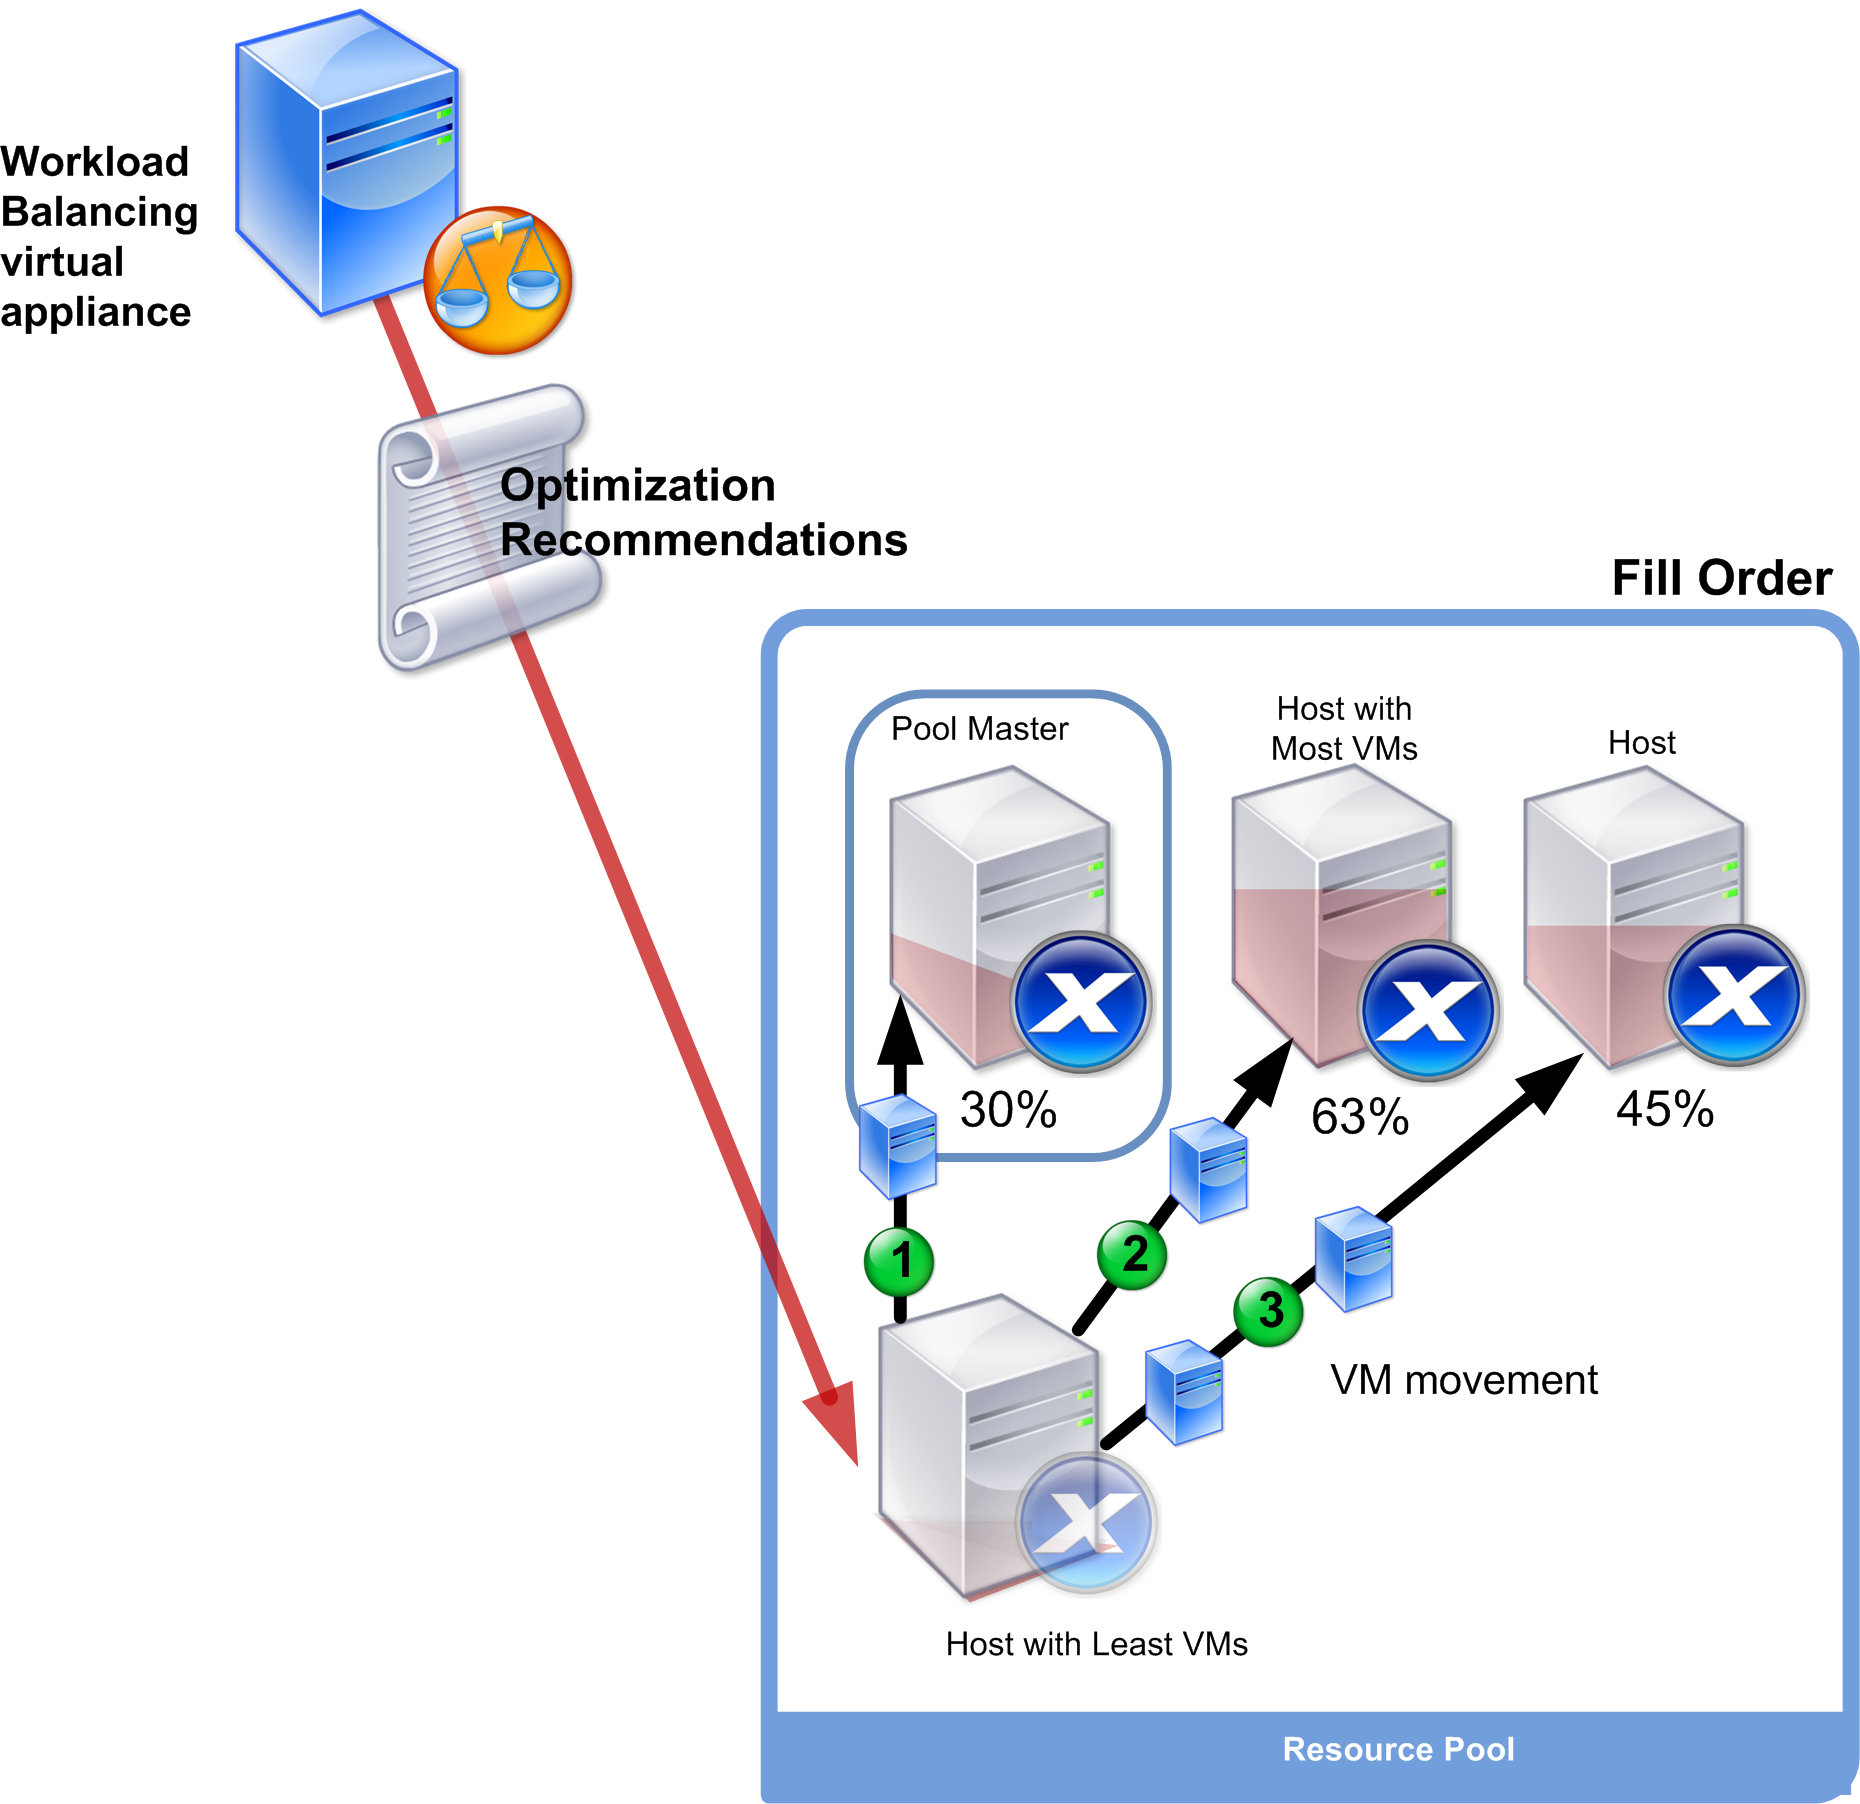
Before Workload Balancing recommends powering servers on or off, it selects the servers to transfer VMs to. It does so in the following order:
- Filling the pool master since it is the server that cannot be powered off.
- Filling the server with the most VMs.
- Filling subsequent servers according to which servers have the most VMs running.
When Workload Balancing fills the pool master, it does so assuming artificially low thresholds for the master. Workload Balancing uses these low thresholds as a buffer to prevent the pool master from being overloaded.
Workload Balancing fills servers in this order to encourage density.
When Workload Balancing detects a performance issue while the pool is in Maximum Density mode, it recommends migrating workloads among the powered-on servers. If Workload Balancing cannot resolve the issue using this method, it attempts to power on a server. Workload Balancing determines which servers to power on by applying the same criteria that it would if the optimization mode was set to Maximum Performance.
When Workload Balancing runs in Maximum Performance mode, Workload Balancing recommends powering on servers until the resource utilization on all pool members falls below the High threshold.
While migrating VMs, if Workload Balancing determines that increasing capacity benefits the overall performance of the pool, it powers on servers automatically or recommends doing so.
Important:
Workload Balancing only recommends powering on a server that Workload Balancing powered off.
Design environments for power management and VM consolidation
When you are planning a Citrix Hypervisor implementation and you intend to configure automatic VM consolidation and power management, consider your workload design. For example, you might want to:
-
Place different types of workloads in separate pools.
If you have an environment with distinct types of workloads, consider whether to locate the VMs hosting these workloads in different pools. Also consider splitting VMs that host types of applications that perform better with certain types of hardware into different pool.
Because power management and VM consolidation are managed at the pool level, design pools so they contain workloads that you want consolidated at the same rate. Ensure that you factor in considerations such as those discussed in Configure advanced settings.
-
Exclude servers from Workload Balancing.
Some servers might need to be always on. For more information, see Exclude servers from recommendations.
Understand when Workload Balancing makes recommendations
Workload Balancing continuously evaluates the resource metrics of physical servers and VMs across the pools that it is managing against thresholds. Thresholds are preset values that function like boundaries that a server must exceed before Workload Balancing can make an optimization recommendation. The Workload Balancing process is as follows:
-
Workload Balancing detects that the threshold for a resource was violated.
-
Workload Balancing evaluates if it makes an optimization recommendation.
-
Workload Balancing determines which servers it recommends function as the destination servers and in what order to make any optimizations. A destination server is the server where Workload Balancing recommends relocating one or more VMs.
-
Workload Balancing makes an optimization recommendation.
When evaluating servers in the pool to make an optimization recommendation, Workload Balancing uses thresholds and weightings as follows:
-
Thresholds are the boundary values that Workload Balancing compares the resource metrics of your pool against. The thresholds are used to determine whether to make a recommendation and what servers are a suitable candidate for hosting relocated VMs.
-
Weightings are a way of ranking resources according to how much you want them to be considered, are used to determine the processing order. After Workload Balancing decides to make a recommendation, it uses your specifications of which resources are important to determine the following:
- Which servers’ performance to address first
- Which VMs to recommend migrating first
For each resource Workload Balancing monitors, it has four levels of thresholds: Critical, High, Medium, and Low. Workload Balancing evaluates whether to make a recommendation when a resource metric on a server:
- Exceeds the High threshold when the pool is running in Maximum Performance mode (improve performance)
- Drops below the Low threshold when the pool is running in Maximum Density mode (consolidate VMs on servers)
- Exceeds the Critical threshold when the pool is running in Maximum Density mode (improve performance)
If the High threshold for a pool running in Maximum Performance mode is 80%, when CPU utilization on a server reaches 80.1%, Workload Balancing evaluates whether to issue a recommendation.
When a resource violates its threshold, Workload Balancing evaluates the resource metric against historical performance to prevent making an optimization recommendation based on a temporary spike. To do so, Workload Balancing creates a historically averaged utilization metric by evaluating the data for resource utilization captured at the following times:
| Data captured | Weight |
|---|---|
| Immediately, at the time threshold was exceeded. That is, real-time data. | 70% |
| 30 minutes before the threshold was exceeded | 25% |
| 24 hours before the threshold was exceeded | 5% |
If CPU utilization on the server exceeds the threshold at 12:02 PM, Workload Balancing checks the utilization at 11:32 AM that day, and at 12:02PM on the previous day. For example, if CPU utilization is at the following values, Workload Balancing doesn’t make a recommendation:
- 80.1% at 12:02 PM that day
- 50% at 11:32 AM that day
- 78% at 12:32 PM the previous day
This behavior is because the historically averaged utilization is 72.5%, so Workload Balancing assumes that the utilization is a temporary spike. However, if the CPU utilization was 83% at 11:32AM, Workload Balancing makes a recommendation since the historically averaged utilization is 80.1%.
Optimization and consolidation process
The Workload Balancing process for determining potential optimizations varies according to the optimization mode - Maximum Performance or Maximum Density. However, regardless of the optimization mode, the optimization and placement recommendations are made using a two-stage process:
- Determine potential optimizations: which VMs to migrate off servers.
- Determine placement recommendations: which servers would be suitable candidates for new VMs.
Note:
Workload Balancing only recommends migrating VMs that meet the Citrix Hypervisor criteria for live migration. One of these criteria is that the destination server must have the storage the VM requires. The destination server must also have sufficient resources to accommodate adding the VM without exceeding the thresholds of the optimization mode configured on the pool. For example, the High threshold in Maximum Performance mode and the Critical threshold for Maximum Density mode.
When Workload Balancing is running in automated mode, you can tune the way it applies recommendations. For more information, see Set conservative or aggressive automated recommendations.
Optimization recommendation process in Maximum Performance mode
When running in Maximum Performance mode, Workload Balancing uses the following process to determine potential optimizations:
-
Every two minutes Workload Balancing evaluates the resource utilization for each server in the pool. It does so by monitoring on each server and determining if each resource’s utilization exceeds its High threshold. For more information, see Change the critical threshold.
In Maximum Performance mode, if a utilization of a resource exceeds its High threshold, Workload Balancing starts the process to determine whether to make an optimization recommendation. Workload Balancing determines whether to make an optimization recommendation based on whether doing so can ease performance constraints, such as ones revealed by the High threshold.
For example, consider the case where Workload Balancing sees that insufficient CPU resources negatively affect the performance of the VMs on a server. If Workload Balancing can find another server with less CPU utilization, it recommends moving one or more VMs to another server.
- If a resource’s utilization on a server exceeds the relevant threshold, Workload Balancing combines the following data to form the historically averaged utilization:
- The resource’s current utilization
- Historical data from 30 minutes ago
- Historical data from 24 hours ago If the historically averaged utilization exceeds the threshold of a resource, Workload Balancing determines it makes an optimization recommendation.
-
Workload Balancing uses metric weightings to determine what servers to optimize first. The resource to which you have assigned the most weight is the one that Workload Balancing attempts to address first. For more information, see Tune metric weightings.
-
Workload Balancing determines which servers can support the VMs it wants to migrate off servers.
Workload Balancing makes this determination by calculating the projected effect on resource utilization of placing different combinations of VMs on servers. Workload Balancing uses a method of performing these calculations that in mathematics is known as permutation.
To do so, Workload Balancing creates a single metric or score to forecast the impact of migrating a VM to the server. The score indicates the suitability of a server as a home for more VMs.
To score server performance, Workload Balancing combines the following metrics:
- The current metrics of the server
- The metrics of the server from the last 30 minutes
- The metrics of the server from 24 hours ago
- The metrics of the VM.
-
After scoring servers and VMs, Workload Balancing attempts to build virtual models of what the servers look like with different combinations of VMs. Workload Balancing uses these models to determine the best server to place the VM.
In Maximum Performance mode, Workload Balancing uses metric weightings to determine what servers to optimize first and what VMs on those servers to migrate first. Workload Balancing bases its models on the metric weightings. For example, if CPU utilization is assigned the highest importance, Workload Balancing sorts servers and VMs to optimize according to the following criteria:
- What servers are running closest to the High threshold for CPU utilization.
- What VMs have the highest CPU utilization or are running the closest to its High threshold.
- Workload Balancing continues calculating optimizations. It views servers as candidates for optimization and VMs as candidates for migration until predicted resource utilization on the server hosting the VM drops below the High threshold. Predicted resource utilization is the resource utilization that Workload Balancing forecasts a server has after Workload Balancing has added or removed a VM from the server.
Consolidation process in Maximum Density mode
Workload Balancing determines whether to make a recommendation based on whether it can migrate a VM onto a server and still run that server below the Critical threshold.
-
When a resource’s utilization drops below its Low threshold, Workload Balancing begins calculating potential consolidation scenarios.
-
When Workload Balancing discovers a way that it can consolidate VMs on a server, it evaluates whether the destination server is a suitable home for the VM.
-
Like in Maximum Performance mode, Workload Balancing scores the server to determine the suitability of a server as a home for new VMs.
Before Workload Balancing recommends consolidating VMs on fewer servers, it checks that resource utilization on those servers after VMs are relocated to them is below Critical thresholds.
Note:
Workload Balancing does not consider metric weightings when it makes a consolidation recommendation. It only considers metric weightings to ensure performance on servers.
-
After scoring servers and VMs, Workload Balancing attempts to build virtual models of what the servers look like with different combinations of VMs. It uses these models to determine the best server to place the VM.
-
Workload Balancing calculates the effect of adding VMs to a server until it forecasts that adding another VM causes a server resource to exceed the Critical threshold.
-
Workload Balancing recommendations always suggest filling the pool master first since it is the server that cannot be powered off. However, Workload Balancing applies a buffer to the pool master so that it cannot be over-allocated.
-
Workload Balancing continues to recommend migrating VMs on to servers until all remaining servers exceed a Critical threshold when a VM is migrated to them.
Change the critical thresholds
You might want to change critical thresholds as a way of controlling when optimization recommendations are triggered. This section provides guidance about:
- How to modify the default Critical thresholds on servers in the pool
- How values set for Critical threshold alter High, Medium, and Low thresholds.
Workload Balancing determines whether to produce recommendations based on whether the averaged historical utilization for a resource on a server violates its threshold. Workload Balancing recommendations are triggered when the High threshold in Maximum Performance mode or Low and Critical thresholds for Maximum Density mode are violated. For more information, see Optimization and consolidation process.
After you specify a new Critical threshold for a resource, Workload Balancing resets the other thresholds of the resource relative to the new Critical threshold. To simplify the user interface, the Critical threshold is the only threshold you can change through XenCenter.
The following table shows the default values for the Workload Balancing thresholds:
| Metric | Critical | High | Medium | Low |
|---|---|---|---|---|
| CPU Utilization | 90% | 76.5% | 45% | 22.5% |
| Free Memory | 51 MB | 63.75 MB | 510 MB | 1020 MB |
| Network Reads | 25 MB/sec | 21.25 MB/sec | 12.5 MB/sec | 6.25 MB/sec |
| Network Writes | 25 MB/sec | 21.25 MB/sec | 12.5 MB/sec | 6.25 MB/sec |
| Disk Reads | 25 MB/sec | 21.25 MB/sec | 12.5 MB/sec | 6.25 MB/sec |
| Disk Writes | 25 MB/sec | 21.25 MB/sec | 12.5 MB/sec | 6.25 MB/sec |
To calculate the threshold values for all metrics except memory, Workload Balancing multiplies the new value for the Critical threshold with the following factors:
- High Threshold Factor: 0.85
- Medium Threshold Factor: 0.50
- Low Threshold Factor: 0.25
For example, if you increase the Critical threshold for CPU utilization to 95%, Workload Balancing resets the other thresholds as follows:
- High: 80.75%
- Medium: 47.5%
- Low: 23.75%
To calculate the threshold values for free memory, Workload Balancing multiplies the new value for the Critical threshold with these factors:
- High Threshold Factor: 1.25
- Medium Threshold Factor: 10.0
- Low Threshold Factor: 20.0
For example, if you increase the Critical threshold for free memory to 45 MB, Workload Balancing resets the other thresholds as follows:
- High: 56.25 MB
- Medium: 450 MB
- Low: 900 MB
To perform this calculation for a specific threshold, multiply the factor for the threshold with the value you entered for the critical threshold for that resource:
High, Medium, or Low Threshold = Critical Threshold * High, Medium, or Low Threshold Factor
While the Critical threshold triggers many optimization recommendations, other thresholds can also trigger optimization recommendations, as follows:
-
High threshold.
-
Maximum Performance. Exceeding the High threshold triggers optimization recommendations to relocate a VM to a server with lower resource utilization.
-
Maximum Density. Workload Balancing doesn’t recommend placing a VM on server when moving that VM to the server causes the server resource utilization to exceed a High threshold.
-
-
Low threshold.
-
Maximum Performance. Workload Balancing does not trigger recommendations from the Low threshold.
-
Maximum Density. When a metric value drops below the Low threshold, Workload Balancing determines that servers are underutilized and makes an optimization recommendation to consolidate VMs on fewer servers. Workload Balancing continues to recommend moving VMs onto a server until the metric values for one of the server’s resources reaches its High threshold.
However, after a VM is relocated, utilization of a resource on the VM’s new server can exceed a Critical threshold. In this case, Workload Balancing temporarily uses an algorithm similar to the Maximum Performance load-balancing algorithm to find a new server for the VMs. Workload Balancing continues to use this algorithm to recommend moving VMs until resource utilization on servers across the pool falls below the High threshold.
-
To change the critical thresholds:
-
In XenCenter, select your pool.
-
In the Properties pane of the pool, click the WLB tab.
-
In the WLB tab, click Settings.
-
In the left pane, select Critical Thresholds. These critical thresholds are used to evaluate server resource utilization.
-
In the Critical Thresholds page, type one or more new values in the Critical Thresholds boxes. The values represent resource utilization on the server.
Workload Balancing uses these thresholds when making VM placement and pool-optimization recommendations. Workload Balancing strives to keep resource utilization on a server below the critical values set.
Tune metric weightings
How Workload Balancing uses metric weightings when determining which servers and VMs to process first varies according to the optimization mode: Maximum Density or Maximum Performance. In general, metric weightings are used when a pool is in Maximum Performance mode. However, when Workload Balancing is in Maximum Density mode, it does use metric weightings when a resource exceeds its Critical threshold.
When Workload Balancing is processing optimization recommendations, it creates an optimization order. Workload Balancing determines the order by ranking the servers according to which servers have the highest metric values for whatever resource is ranked as the most important in the metric weightings page.
Maximum Performance mode
In Maximum Performance mode, Workload Balancing uses metric weightings to determine:
- On which servers to first address the performance
- Which VMs to recommend migrating first
For example, if Network Writes is the most important resource, Workload Balancing first makes optimization recommendations for the server with the highest number of Network Writes per second. To make Network Writes the most important resource move the Metric Weighting slider to the right and all the other sliders to the middle.
If you configure all resources to be equally important, Workload Balancing addresses CPU utilization first and memory second, as these resources are typically the most constrained. To make all resources equally important, set the Metric Weighting slider is in the same place for all resources.
Maximum Density mode
In Maximum Density mode, Workload Balancing only uses metric weightings when a server reaches the Critical threshold. At that point, Workload Balancing applies an algorithm similar to the algorithm for Maximum Performance until no servers exceed the Critical thresholds. When using this algorithm, Workload Balancing uses metric weightings to determine the optimization order in the same way as it does for Maximum Performance mode.
If two or more servers have resources exceeding their Critical thresholds, Workload Balancing verifies the importance you set for each resource. It uses this importance to determine which server to optimize first and which VMs on that server to relocate first.
For example, your pool contains server A and server B, which are in the following state:
- The CPU utilization on server A exceeds its Critical threshold and the metric weighting for CPU utilization is set to More Important.
- The memory utilization on server B exceeds its Critical threshold and the metric weighting for memory utilization is set to Less Important.
Workload Balancing recommends optimizing server A first because the resource on it that reached the Critical threshold is the resource assigned the highest weight. After Workload Balancing determines that it must address the performance on server A, Workload Balancing then begins recommending placements for VMs on that server. It begins with the VM that has the highest CPU utilization, since that CPU utilization is the resource with the highest weight.
After Workload Balancing has recommended optimizing server A, it makes optimization recommendations for server B. When it recommends placements for the VMs on server B, it does so by addressing CPU utilization first, since CPU utilization was assigned the highest weight. If there are more servers that need optimization, Workload Balancing addresses the performance on those servers according to what server has the third highest CPU utilization.
By default, all metric weightings are set to the farthest point on the slider: More Important.
Note:
The weighting of metrics is relative. If all metrics are set to the same level, even if that level is Less Important, they are all be weighted the same. The relation of the metrics to each other is more important than the actual weight at which you set each metric.
To edit metric weighting factors
-
In XenCenter, select your pool.
-
In the Properties pane of the pool, click the WLB tab.
-
In the WLB tab, click Settings.
-
In the left pane, select Metric Weighting.
-
In Metric Weighting page, as desired, adjust the sliders beside the individual resources.
Move the slider towards Less Important to indicate that ensuring VMs always have the highest available amount of this resource is not as vital for this pool.
Exclude servers from recommendations
When configuring Workload Balancing, you can specify that specific physical servers are excluded from Workload Balancing optimization and placement recommendations, including Start On placement recommendations.
Situations when you might want to exclude servers from recommendations include when:
- You want to run the pool in Maximum Density mode and consolidate and shut down servers, but you want to exclude specific servers from this behavior.
- You have two VM workloads that must always run on the same server. For example, if the VMs have complementary applications or workloads.
- You have workloads that you do not want moved: for example, a domain controller or database server.
- You want to perform maintenance on a server and you do not want VMs placed on the server.
- The performance of the workload is so critical that the cost of dedicated hardware is irrelevant.
- Specific servers are running high-priority workloads, and you do not want to use the HA feature to prioritize these VMs.
- The hardware in the server is not the optimum for the other workloads in the pool.
Regardless of whether you specify a fixed or scheduled optimization mode, excluded servers remain excluded even when the optimization mode changes. Therefore, if you only want to prevent Workload Balancing from shutting off a server automatically, consider disabling Power Management for that server instead. For more information, see Optimize and manage power automatically.
When you exclude a server from recommendations, you are specifying for Workload Balancing not to manage that server at all. This configuration means that Workload Balancing doesn’t make any optimization recommendations for an excluded server. In contrast, when you don’t select a server to participate in Power Management, Workload Balancing manages the server, but doesn’t make power management recommendations for it.
To exclude servers from Workload Balancing
Use this procedure to exclude a server in a pool that Workload Balancing is managing from power management, server evacuation, placement, and optimization recommendations.
-
In XenCenter, select your pool.
-
In the Properties pane of the pool, click the WLB tab.
-
In the WLB tab, click Settings.
-
In the left pane, select Excluded Hosts.
-
In Excluded Hosts page, select the servers for which you do not want Workload Balancing to recommend alternate placements and optimizations.
Configure advanced settings
Workload Balancing supplies some advanced settings that let you control how Workload Balancing applies automated recommendations. These settings appear on the Advanced page of the Workload Balancing Configuration dialog. To get to the Advanced page, complete the following steps:
-
In XenCenter, select your pool.
-
In the Properties pane of the pool, click the WLB tab.
-
In the WLB tab, click Settings.
-
In the left pane, select Advanced.
The following sections describe the behaviors that can be configured in the Advanced settings.
Set conservative or aggressive automated recommendations
When running in automated mode, the frequency of optimization and consolidation recommendations and how soon they are automatically applied is a product of multiple factors, including:
- How long you specify Workload Balancing waits after moving a VM before making another recommendation
- The number of recommendations Workload Balancing must make before applying a recommendation automatically
- The severity level a recommendation must achieve before the optimization is applied automatically
- The level of consistency in recommendations (recommended VMs to move, destination servers) Workload Balancing requires before applying recommendations automatically
In general, only adjust the settings for these factors in the following cases:
- You have guidance from Citrix Technical Support
- You made significant observation and testing of the behavior of your pool with Workload Balancing enabled
Incorrectly configuring these settings can result in Workload Balancing not making any recommendations.
VM migration interval
You can specify the number of minutes Workload Balancing waits after the last time a VM was moved, before Workload Balancing can make another recommendation for that VM. The recommendation interval is designed to prevent Workload Balancing from generating recommendations for artificial reasons, for example, if there was a temporary utilization spike.
When automation is configured, it is especially important to be careful when modifying the recommendation interval. If an issue occurs that leads to continuous, recurring spikes, decreasing the interval can generate many recommendations and, therefore, relocations.
Note:
Setting a recommendation interval does not affect how long Workload Balancing waits to factor recently rebalanced servers into recommendations for Start-On Placement, Resume, and Maintenance Mode.
Recommendation count
Every two minutes, Workload Balancing checks to see if it can generate recommendations for the pool it is monitoring. When you enable automation, you can specify the number of times a consistent recommendation must be made before Workload Balancing automatically applies the recommendation. To do so, you configure a setting known as the Recommendation Count, as specified in the Recommendations field. The Recommendation Count and the Optimization Aggressiveness setting let you fine-tune the automated application of recommendations in your environment.
Workload Balancing uses the similarity of recommendations to make the following checks:
- Whether the recommendation is truly needed
- Whether the destination server has stable enough performance over a prolonged period to accept a relocated VM without needing to move it off the server again shortly
Workload Balancing uses the Recommendation Count value to determine whether a recommendation must be repeated before Workload Balancing automatically applies the recommendation. Workload Balancing uses this setting as follows:
- Every time Workload Balancing generates a recommendation that meets its consistency requirements, as indicated by the Optimization Aggressiveness setting, Workload Balancing increments the Recommendation Count. If the recommendation does not meet the consistency requirements, Workload Balancing might reset the Recommendation Count to zero. This behavior depends on the factors described in Optimization aggressiveness.
- When Workload Balancing generates enough consistent recommendations to meet the value for the Recommendation Count, as specified in the Recommendations field, it automatically applies the recommendation.
If you choose to modify this setting, the value to set varies according to your environment. Consider these scenarios:
- If server loads and activity increase rapidly in your environment, you might want to increase value for the Recommendation Count. Workload Balancing generates recommendations every two minutes. For example, if you set this interval to 3, then six minutes later Workload Balancing applies the recommendation automatically.
- If server loads and activity increase gradually in your environment, you might want to decrease the value for the Recommendation Count.
Accepting recommendations uses system resources and affects performance when Workload Balancing is relocating the VMs. Increasing the Recommendation Count increases the number of matching recommendations that must occur before Workload Balancing applies the recommendation. This setting encourages Workload Balancing to apply more conservative, stable recommendations and can decrease the potential for spurious VM moves. The Recommendation Count is set to a conservative value by default.
Because of the potential impact adjusting this setting can have on your environment, only change it with extreme caution. Preferably, make these adjustments by testing and iteratively changing the value or under the guidance of Citrix Technical Support.
Recommendation severity
All optimization recommendations include a severity rating (Critical, High, Medium, Low) that indicates the importance of the recommendation. Workload Balancing bases this rating on a combination of factors including the following:
- Configuration options you set, such as thresholds and metric tunings
- Resources available for the workload
- Resource-usage history.
The severity rating for a recommendation appears in the Optimization Recommendations pane on the WLB tab.
When you configure Workload Balancing to apply recommendations automatically, you can set the minimum severity level to associate with a recommendation before Workload Balancing automatically applies it.
Optimization aggressiveness
To provide extra assurance when running in automated mode, Workload Balancing has consistency criteria for accepting optimizations automatically. This criteria can help to prevent moving VMs due to spikes and anomalies. In automated mode, Workload Balancing does not accept the first recommendation it produces. Instead, Workload Balancing waits to apply a recommendation automatically until a server or VM exhibits consistent behavior over time. Consistent behavior over time includes factors like whether a server continues to trigger recommendations and whether the same VMs on that server continue to trigger recommendations.
Workload Balancing determines if behavior is consistent by using criteria for consistency and by having criteria for the number of times the same recommendation is made. You can configure how strictly you want Workload Balancing to apply the consistency criteria using the Optimization Aggressiveness setting. You can use this setting to control the amount of stability you want in your environment before Workload Balancing applies an optimization recommendation. The most stable setting, Low aggressiveness, is configured by default. In this context, the term stable means the similarity of the recommended changes over time, as explained throughout this section. Aggressiveness is not desirable in most environments. Therefore, Low is the default setting.
Workload Balancing uses up to four criteria to ascertain consistency. The number of criteria that must be met varies according to the level you set in the Optimization Aggressiveness setting. The lower the level (for example, Low or Medium) the less aggressive Workload Balancing is in accepting a recommendation. In other words, Workload Balancing is stricter about requiring criteria to match when aggressiveness is set to Low.
For example, if the aggressiveness level is set to Low, each criterion for Low must be met the number of times specified by the Recommendation Count value before automatically applying the recommendation.
If you set the Recommendation Count to 3, Workload Balancing waits until all the criteria listed for Low are met and repeated in three consecutive recommendations. This setting helps ensure that the VM actually needs to be moved and that the recommended destination server has stable resource utilization over a longer period. It reduces the potential for a recently moved VM to be moved off a server due to server performance changes after the move. By default, this setting is set to Low to encourage stability.
We do not recommend increasing the Optimization Aggressiveness setting to increase the frequency with which your servers are being optimized. If you think that your servers aren’t being optimized quickly or frequently enough, try adjusting the Critical thresholds. Compare the thresholds against the Pool Health report.
The consistency criteria associated with the different levels of aggressiveness is the following:
Low:
- All VMs in subsequent recommendations must be the same (as demonstrated by matching UUIDs in each recommendation).
- All destination servers must be the same in subsequent recommendations
- The recommendation that immediately follows the initial recommendation must match or else the Recommendation Count reverts to 1
Medium:
- All VMs in subsequent recommendations must be from the same server; however, they can be different VMs from the ones in the first recommendation.
- All destination servers must be the same in subsequent recommendations
- One of the next two recommendations that immediately follows the first recommendation must match or else the Recommendation Count reverts to 1
High:
- All VMs in the recommendations must be from the same server. However, the recommendations do not have to follow each other immediately.
- The server from which Workload Balancing recommended that the VM move must be the same in each recommendation
- The Recommendation Count remains at the same value even when the two recommendations that follow the first recommendation do not match
Optimization Aggressiveness example
The following example illustrates how Workload Balancing uses the Optimization Aggressiveness setting and the Recommendation Count to determine whether to accept a recommendation automatically.
Each optimization recommendation issued by Workload Balancing proposes three VM placements. After these proposed placements, the recommendation count associated with each aggressiveness level is the number of times there have been consecutive recommendation at that Optimization Aggressiveness setting.
In the following examples, when the Optimization Aggressiveness setting is set to High, the Recommendation Count continues to increase after Recommendation 1, 2, and 3. This increase happens even though the same VMs are not recommended for new placements in each recommendation. Workload Balancing applies the placement recommendation with Recommendation 3 because it has seen the same behavior from that server for three consecutive recommendations.
In contrast, when set to Low aggressiveness, the consecutive recommendations count does not increase for the first four recommendations. The Recommendation Count resets to 1 with each recommendation because the same VMs were not recommended for placements. The Recommendation Count does not start to increase until the same recommendation is made in Recommendation #5. Finally, Workload Balancing automatically applies the recommendation made in Recommendation #6 after the third time it issues the same placement recommendations.
Recommendation 1:
Proposed placements:
- Move VM1 from server A to server B
- Move VM3 from server A to server B
- Move VM5 from server A to server C
Recommendation counts:
- High Aggressiveness Recommendation Count: 1
- Medium Aggressiveness Recommendation Count: 1
- Low Aggressiveness Recommendation Count: 1
Recommendation 2:
Proposed placements:
- Move VM1 from server A to server B
- Move VM3 from server A to server C
- Move VM7 from server A to server C
Recommendation counts:
- High Aggressiveness Recommendation Count: 2
- Medium Aggressiveness Recommendation Count: 1
- Low Aggressiveness Recommendation Count: 1
Recommendation 3:
Proposed placements:
- Move VM1 from server A to server B
- Move VM3 from server A to server C
- Move VM5 from server A to server C
Recommendation counts:
- High Aggressiveness Recommendation Count: 3 (Apply)
- Medium Aggressiveness Recommendation Count: 1
- Low Aggressiveness Recommendation Count: 1
Recommendation 4:
Proposed placements:
- Move VM1 from server A to server B
- Move VM3 from server A to server B
- Move VM5 from server A to server C
Recommendation counts:
- Medium Aggressiveness Recommendation Count: 2
- Low Aggressiveness Recommendation Count: 1
Recommendation 5:
Proposed placements:
- Move VM1 from server A to server B
- Move VM3 from server A to server B
- Move VM5 from server A to server C
Recommendation counts:
- Medium Aggressiveness Recommendation Count: 3 (Apply)
- Low Aggressiveness Recommendation Count: 2
Recommendation 6:
Proposed placements:
- Move VM1 from server A to server B
- Move VM3 from server A to server B
- Move VM5 from server A to server C
Recommendation counts:
- Low Aggressiveness Recommendation Count: 3 (Apply)
To configure VM recommendation intervals
-
In XenCenter, select your pool.
-
In the Properties pane of the pool, click the WLB tab.
-
In the WLB tab, click Settings.
-
In the left pane, click Advanced.
-
In the VM Recommendation Interval section, do one or more of the following:
-
In the Minutes box, type a value for the number of minutes Workload Balancing waits before making another optimization recommendation on a newly rebalanced server.
-
In the Recommendations box, type a value for the number of recommendations you want Workload Balancing to make before it applies a recommendation automatically.
-
Select a minimum severity level before optimizations are applied automatically.
-
Modify how aggressively Workload Balancing applies optimization recommendations when it is running in automated mode. Increasing the aggressiveness level reduces constraints on the consistency of recommendations before automatically applying them. The Optimization Aggressiveness setting directly complements the Recommendations setting: that is, the recommendations count.
Note:
If you type “1” for the value in the Recommendations setting, the Optimization Aggressiveness setting is not relevant.
-
Adjust the Pool Audit Trail granularity settings
Follow this procedure to modify the granularity settings:
-
In XenCenter, select your pool.
-
In the Properties pane of the pool, click the WLB tab.
-
In the WLB tab, click Settings.
-
In the left pane, click Advanced.
-
On the Advanced page, click the Pool Audit Trail Report Granularity list, and select an option from the list.
Important:
Select the granularity based on your audit log requirements. For example, if you set your audit log report granularity to Minimum, the report only captures limited amount of data for specific users and object types. If you set the granularity to Medium, the report provides a user-friendly report of the audit log. If you choose to set the granularity to Maximum, the report contains detailed information about the audit log report. Setting the audit log report to Maximum can cause the Workload Balancing server to use more disk space and memory.
-
To confirm your changes, click OK.
View Pool Audit Trail reports based on objects in XenCenter
Follow this procedure to run and view reports of Pool Audit Trail based on the selected object:
-
After you have set the Pool Audit Trail Granularity setting, click Reports. The Workload Reports page appears.
-
Select Pool Audit Trail on the left pane.
-
You can run and view the reports based on a specific Object by choosing it from the Object list. For example, choose Host from the list to get the reports based on server alone.
Customize the event objects and actions captured by the Pool Audit Trail
To customize the event objects and actions captured by the Pool Audit Trail, you must sign in to the PostgreSQL database on the Workload Balancing virtual appliance, make the relevant changes to the list of event objects or actions, and then restart the Workload Balancing virtual appliance.
Sign in to the PostgreSQL database
- Log on to the Workload Balancing virtual appliance console.
-
Run the following command:
psql -Upostgres -dWorkloadBalancing <!--NeedCopy--> - Enter the database password. You set the database password when you ran the Workload Balancing configuration wizard after you imported the virtual appliance.
Customize event objects
Note:
In the command syntax that follows,
event_objectrepresents the name of the event object you want to add, update, or disable.
Enable an event object:
select * from update_audit_log_objects('event_object', true);
<!--NeedCopy-->
Disable an event object:
select * from update_audit_log_objects('event_object', false);
<!--NeedCopy-->
Get a list of event objects that are currently disabled:
select * from hv_audit_log_get_event_objects(false);
<!--NeedCopy-->
Get a list of event objects that are currently enabled:
select * from hv_audit_log_get_event_objects(true);
<!--NeedCopy-->
Customize event actions
Note:
In the command syntax that follows,
event_actionrepresents the name of the event action you want to add, update, or disable.
Enable an event action:
select * from update_audit_log_actions('event_action', true);
<!--NeedCopy-->
Disable an event action:
select * from update_audit_log_actions('event_action', false);
<!--NeedCopy-->
Get a list of event actions that are currently disabled:
select * from hv_audit_log_get_event_actions(false);
<!--NeedCopy-->
Get a list of event actions that are currently enabled:
select * from hv_audit_log_get_event_actions(true);
<!--NeedCopy-->
Restart the Workload Balancing virtual appliance
Run the following commands to quit PostgreSQL and restart the Workload Balancing virtual appliance.
\q
<!--NeedCopy-->
systemctl restart workloadbalancing
<!--NeedCopy-->
Set alert level for Workload Balancing alerts in XenCenter
Via XenAPI, you can set the alert level for Workload Balancing alerts in XenCenter.
Complete the following steps:
-
Run the following command on the pool master to set the alert level for each alert code:
xe pool-send-wlb-configuration config:<wlb-alert-code>=<alert-level>
<!--NeedCopy-->
The 4
wlb-alert-codetypes are:- MESSAGE_PRIORITY_WLB_OPTIMIZATION_ALERT - If Workload Balancing gives an optimization recommendation, this alert is raised.
- MESSAGE_PRIORITY_WLB_VM_RELOCATION - If Workload Balancing relocates a VM to other host, this alert is raised.
- MESSAGE_PRIORITY_WLB_HOST_POWER_OFF - If Workload Balancing optimization mode has been configured to
Maximize Densityand a host is powered off because there are no VMs running on the host, this alert is raised. - MESSAGE_PRIORITY_WLB_HOST_POWER_ON - If Workload Balancing optimization mode has been configured to
Maximize Performanceand a host is powered on because doing so improves the host performance, this alert is raised.
The 6
alert-leveltypes are:- 0 - Mute the alert
- 1 - Critical
- 2 - Major
- 3 - Warning
- 4 - Minor
- 5 - Informational
-
Run the following command on the pool master to view the alert levels set for the alert codes:
xe pool-retrieve-wlb-configuration <!--NeedCopy--> -
To test the alerts, raise a Workload Balancing alert and then click the
Notificationspanel to view the alert.