Openmix
Overview
NetScaler Intelligent Traffic Management (ITM) Openmix provides a revolutionary approach to Global Traffic Management/Global Server Load Balancing (GTM/GSLB). For traditional global traffic management, ITM provides a DNS-based approach to Load-balancing. ITM uses DNS CNAME or records where DNS responses are altered in real-time based on the required business logic. Openmix can be integrated into the video workflow and delivery in multiple ways.
GTM or GSLB tools and services rely on proprietary, inextensible, static rule engines to define, and control a narrow set of fixed policies for failover, round-robin, and geo-targeting. The mission of NetScaler ITM is to enable next-generation cloud strategies based on real-time data feeds. The Openmix platform provides a highly robust means to ingest real-time data from various sources. It exposes the metadata as environment “variables” which can be evaluated on each request.
Openmix: Key Benefits
- Eliminate single-vendor dependencies and ensure 100% availability
- Control price/performance trade-offs and banish headaches associated with multi-sourcing
- Remove uncertainties of legacy performance tools and offload traffic selectively and strategically
- Apply specific providers to target individual markets
How Openmix Works
Customers log into the Citrix ITM Portal to deploy their first application. A library of sample apps is available to help get started and a step-by-step wizard tool to help create applications with the most common routing logic. ITM Openmix applications can support two protocols for directing traffic: DNS or HTTP.
Application Defined Control
The globally distributed, on-demand, Openmix platform moves GTM/GSLB decision making close to your application audiences. Each host can have its own custom defined Openmix application that considers current metrics and variables that provide the best optimization for any routing request.
Openmix scripts are programmed in JavaScript, a language that is accessible to most web programmers and network administrators. While this script-based approach is where virtually any business logic can be implemented with minimal coding complexity to use as the basis for truly dynamic traffic management policies. Thanks to the collaborative nature of our customer community, ITM also provides “quick start apps” which are standard applications that don’t require code.
When to Use HTTP or DNS Services
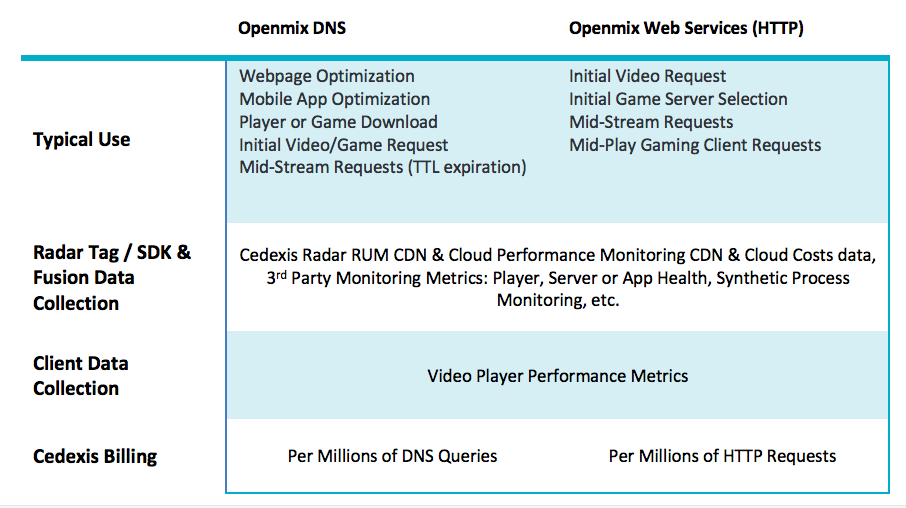
ITM Openmix enables a wide range of content delivery optimization. Which method you use to enable Openmix largely depends on the specifics of your use case. The DNS method is easy to implement, mostly transparent to clients, and usable across a wide variety of content. However, the ability to switch providers is limited by the TTL set on the DNS response and some content cannot be switched to a different provider mid-stream. HTTP provides more integration flexibility and optimization decisions can be made when it is optimal for the client. That more flexibility requires more work to integrate with a CMS or client.
The following table summarizes the customer use case for the DNS and HTTP interfaces.
Openmix: DNS
CNAME Delegation
The easiest integration for ITM customers is to use DNS CNAME delegation. The CNAME delegation works by having the customer point their end-user facing host name (in the following example, www.acme.com) at an ITM host name
www.acme.com  600  IN  CNAME  2-02-123d-000d.cdx.cedexis.net.
<!--NeedCopy-->
On receiving a DNS request from an end-user the ITM system makes a real-time decision. The decision is based on the Radar data, business logic in the application and any third party information. This decision is articulated either as another CNAME record (in our example below acme.cdn1.net) or as an A record such as 111.222.111.222.
By supplying a CNAME record ITM “points” the end-user to the CDN, Cloud, or Data Center of choice. Routes the end-user to use that provider versus another.
2-02-123d-000d.cdx.cedexis.net.  19  IN  CNAME acme.cdn1.net.
<!--NeedCopy-->
Once the CDN or Cloud CNAME is supplied the end-users machine continues the resolution chain. It requests a CDN name server, until an IP address of the node or server is received. Where upon the process of downloading content begins. If a record is supplied as part of the logic the end-users machine receives the IP address. It connects directly to the server and initiates the download of content.
acme.cdn1.net.  132  IN  A  111.222.222.111
<!--NeedCopy-->
Zone Delegation
In addition, Authoritative DNS Zone Delegation is an option to implement Openmix. The customer creates a DNS zone and delegates to a Predictive DNS zone created in the ITM Portal. Create a host name in the delegated zone. Configure it to use an Openmix application or a dynamic Predictive DNS record to generate a response.
The advantage of this option is that there doesn’t need to be a CNAME delegation between the host name and the dynamic response from the ITM platform. Using the preceding example, www.acme.com the host name is directly resolved to the configured value for the optimal CDN, Cloud, or Data Center.
www.acme.com. 19 IN CNAME acme.cdn1.net.
A/AAAA records can also be used instead of CNAMEs, and the host name resolves directly to the record of the optimal destination.
www.acme.com. 19 IN A 111.222.222.111
DNS and Time To Live Implications
Factors such as Time To Live (TTL) values are considered carefully with an appropriate time set for the content and how the decision making must be for users. In most instances ITM recommends a 20 second TTL for page and object content. For video content the ITM consultant works with the customer to find the most appropriate balance based on chunk length and integration method.
Openmix: HTTP
An alternative to DNS is to use the HTTP API. Openmix uses HTTP requests to inform a client such as a video player or CMS on which platform to use at any one point in time.
http://hopx.cedexis.com/zones/1/customers/0/apps/1/decision
< HTTP/1.1 200 OK
< Content-Type: application/json
< Date: Mon, 22 Apr 2015 20:25:24 GMT
< Connection: keep-alive
< Content-Length: 177
<
{
  "providers" : [
    {
    "provider" : "cdn2",
    "host" : "foo.cdn2.net"
    },
    {
    "provider" : "cdn1",
    "host" : "acme.cdn1.net"
    }
  ]
}
<!--NeedCopy-->
The HTTP Openmix service uses the same application logic as its DNS based counterpart. It also includes some additional extensions, allowing further profiling of a client machine. For example, with HTTP Openmix it is possible to look at the headers for User-Agent String, X-Forwarded-For, and Referer. Supply IP overrides using query string parameters. As the payload for HTTP Openmix is more extensible than DNS it is also possible to provide the CDN, cloud or server decision selection in different ways. The most common so far has been an ordered list from most preferred platform to least (as above). A full list allows the decision rank to be supplied to the CMS or Client, yet still allows for internal heuristics to be used in choosing the provider.
CMS Integration
Some customers prefer to handle the provider selection on the server-side rather than implement provider selection in every client. The HTTP API can be used to retrieve an optimization decision from Openmix at request time from the client. It can be used to populate a file that is returned from the CMS to the client.
By default, Openmix HTTP endpoints use the IP of the caller for geo location and decision criteria. If you are calling from a CMS or other system that sits between the end-user client and Openmix, you can specify IP as a parameter to use in the decision.
http://hopx.cedexis.com/zones/1/customers/0/apps/1/decision?ip=1.2.3.4
< HTTP/1.1 200 OK
< Content-Type: application/json
< Date: Mon, 22 Apr 2015 20:25:24 GMT
< Connection: keep-alive
< Content-Length: 177
<
{
  "providers" : [
    {
    "provider" : "cd1",
    "host" : "acme.cdn1.net"
    },
    {
    "provider" : "cdn2",
    "host" : "foo.cdn2.net"
    }
  ]
}
<!--NeedCopy-->
This method allows you to use a CMS integration to pull decisions from Openmix. You can also get the benefits of geo and ISP route optimization for the end user. The host name returned from Openmix is then packaged into the response, such as a video manifest file, and returned by the CMS to the client. The client uses the optimized decision without needing any modification to support Openmix optimization.
Openmix Applications
Openmix Quickstart applications are load balancing and traffic management applications. These applications provide real-time traffic routing to the best provider based on a set of rules.
The applications are processed for each request made to Openmix and a routing decision is made based on the specified logic. A customer can have one application for content that has high business value, and a different application for content that has less value. These requests are separately routed.
When you invoke an application, a single request goes to one of Citrix’s load-balancers. For DNS, it is a single DNS request to the DNS load-balancers. For HTTP, it is a GET or HEAD request to the Openmix HTTP endpoint.
The following apps are currently available through the NetScaler Intelligent Traffic Management Portal.
- Static Routing
- Failover
- Round Robin
- Optimal Round Trip Time (ORTT)
- Throughput
- Static Proximity
Openmix Custom JavaScript applications are used by specialized Openmix servers to respond to DNS or HTTP requests based on the logic in the scripts. Deployment of the scripts is done via the customer portal where the app is configured and published. For more information on the ability to create your own JavaScript scripts, refer to the information at our Developer Exchange.
Before you go ahead with setting up the apps, it is important to understand the following concepts:
Availability Threshold
The availability threshold is the minimum availability score that a platform must meet to be considered for routing. The default minimum availability threshold for all applications is 80%. However, you can modify this percentage and set it to a value that is appropriate for your location, network availability, and reliability.
Note: If no platform meets this minimum Availability threshold (the default of 80%, or the value that you set), random routing is done for Round Robin, ORTT, and Throughput applications.
Fallback
The fallback response is returned if the Openmix application does not run successfully for whatever reason. Or if Sonar confirms that there are no available platforms. Therefore, a valid fallback CNAME/A/AAAA record or IP (or path in HTTP) must be specified with which Openmix can respond. This fallback URL or CNAME record can be for a platform that is pre-configured in Openmix. Fallback sometimes occurs during the following scenarios as well:
- When you switch between versions of your application, you upload and publish a new script. There is a brief millisecond time period of fallback until the new script initializes and the old one is removed.
- If ever there is an overload (which rarely happens), Openmix responds with the fallback CNAME/A/AAAA since the fallback offsets the load on the service.
For fallback, you must enter a valid host name (CNAME/A/AAAA record) or IP address in DNS, and a valid URI (it can be of the form, scheme:[//host[:port]][/path][?query][#fragment]) in HTTP.
TTL
In Openmix, the DNS Time to Live (TTL) for the application tells resolvers how long they must keep the decision before asking Openmix again. The TTL is used to Control the volume of traffic that an Openmix app gets. It also controls how sensitive an app must be to changes in the data that it acts upon. The default TTL is 20 seconds. Although you can modify this value, it is not recommended to do so. If you lower the TTL you get more volume and more real-time DNS queries. It can lead to added costs and lower performance because DNS queries take time on the client. Therefore, it is best not to change the default value of TTL.
Note: The Time to Live applies to Quickstart apps, Custom JS Apps if no TTL is specified in the code, and for all fallback responses
Weights (Used for Round Robin)
You can assign weights for the prioritization and selection of each platform globally and/or by market or country.
For example, say you have three platforms selected for your application - P1, P2, and P3. You give them the weights: 60, 50, and 10 respectively. The Round Robin app converts these values to percentages such as, P1=50%, P2=42%, and P3=8%, that adds up to a 100%. These percentages mean that 50% of the time, users are routed through P1, 42% of the time through P2, and 8% of the time through P3.
The weights you give to the platforms do not have to add up to 100. They can be any integer between 0 and 1,000,000. The weights given to the platforms when converted to percentage (by the app in the back-end), adds up to a 100%. If all selected platforms are given the same weight, traffic will be evenly distributed across them over time. If you have one platform, then that platform is used 100% of the time, regardless of the weight you give it.
Weights are only used for platforms that are considered to be available according to Radar and Sonar availability checks, depending on the configuration of the application. Unavailable platforms cause the distribution to not match the configured weights. For example, if P1 weighs 100 and P2 weighs 0 but P1 fails the Radar Availability check, then all traffic goes to P2.
Handicap (Used for ORTT and Throughput)
The Handicap is a percentage value that can be applied to a platform to modify the radar scores for RTT and throughput that is, artificially increase the response time (in milliseconds) or decrease the throughput (in kbps). Increasing or decreasing these values bring down the performance of the platform such that the likelihood of it being picked becomes low. Handicaps can be added to platforms globally, or separately for specific markets or countries. In cases where one platform is expensive in a specific market or country and you want to reduce its likelihood of being picked when an equivalent provider is close in terms of performance. You put a Handicap value as a multiplier to increase the value of response time or decrease the value of the throughput. As a result, it lowers the probability of a platform being picked.
Following is roughly how Handicap works in the backend:
- Platform RTT with Handicap applied = RTT (Round Trip Time in milliseconds) *( 1 + Handicap) or
- Platform Throughput with Handicap applied = (Throughput in kbps) *(1 – Handicap)
Note: The RTT and Throughput values for the platform are scores from Radar data. The following table shows how Handicap effects the two platforms - P1 and P2. And how the Handicap decreases the likelihood of P1 being picked.
| P1 | P2 | |
|---|---|---|
| RTT without Handicap | 50 milliseconds | 60 milliseconds |
| RTT with 50% (0.5) Handicap for P1, and 0% (0) for P2 | 50(1+0.5)= 75 milliseconds | 60(1+0)= 60 milliseconds |
| Throughput without Handicap | 3000 kbps | 2800 kbps |
| Throughput with 50% (0.5) Handicap for P1, and 0% (0) for P2 | 3000(1-0.5)= 1500 kbps | 2800(1- 0)= 2800 kbps |
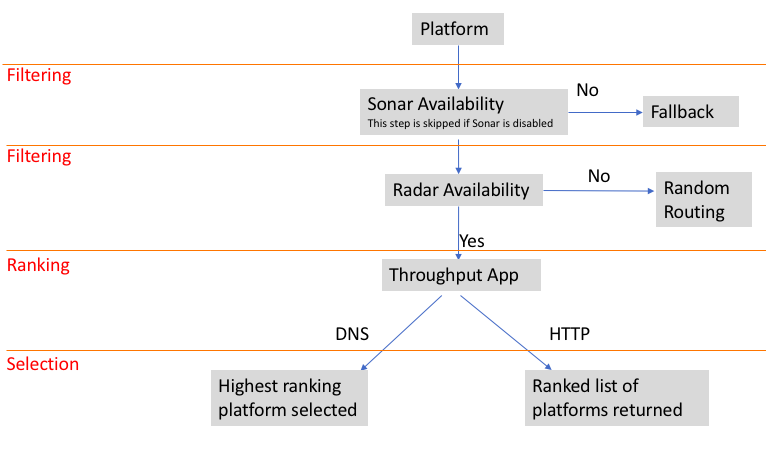
Filtering, Ranking, and Selection Workflow
Sample Flow diagram for Throughput App
Platform Selection Criteria
Openmix Quickstart apps use the following criteria as 1st, 2nd and 3rd level filters to rank and select the best platform.
| Filtration Level | Selection Criteria | ORTT | Throughput | Round Robin | Failover | Static Routing | Static Proximity |
|---|---|---|---|---|---|---|---|
| 1st level | Sonar Availability Check (if enabled) | X | X | X | X | X | X |
| 2nd level | Radar Availability Check (if enabled) | X | X | X | X | X | NA |
| 3rd level | Weights (user defined) | NA | NA | X | NA | NA | NA |
| 3rd level | Round Trip Time (in milliseconds) | X | NA | NA | NA | NA | NA |
| 3rd level | Throughput (in kbps) | NA | X | NA | NA | NA | NA |
Reason Code Reporting
Reason codes provide visibility into why the decision was made and also get to know what part of the app’s code is run. During execution, an app can add something to the reason code field at any time. Reason codes mean different things for each Quickstart App. There is some commonality between the reason codes for each app, but it is not comprehensive.
Note: For reason codes to be displayed correctly, they must not exceed the maximum character limit of 200 characters. If this limit is exceeded, the reason code is displayed as Unknown. If the user has not added a reason code, it displays Unknown.
The following are the reason codes for Quickstart Apps:
| Reason Code | Description | Optimal RTT | Round Robin | Static Routing | Throughput | Static Proximity | Failover |
|---|---|---|---|---|---|---|---|
| Optimal Avail | The best performing provider is available and has been selected. | X | N/A | N/A | X | N/A | X |
| Optimal Unavail-Radar | The best performing provider is unavailable; another eligible provider has been selected which is available according to radar | X | N/A | N/A | X | N/A | X |
| Optimal Unavail-Radar+Sonar | The best performing provider is unavailable due to radar and/or sonar. | X | N/A | N/A | X | N/A | X |
| All Unavail-Radar | All eligible platforms are unavailable according to radar. Request routed to fallback | X | X | N/A | X | N/A | X |
| All Unavail-Sonar | All eligible platforms are unavailable according to sonar. Request routed to fallback. | X | X | N/A | X | N/A | X |
| Data Issue | Denotes missing radar measurements for one or more platforms. The platform is chosen randomly as a result | X | X | N/A | X | N/A | X |
| Geo Default | The default Geo settings are in effect | X | X | N/A | X | X | X |
| Geo Override-Country | A country override is in effect for this decision | X | X | N/A | X | X | X |
| Geo Override-Market | A Market override is in effect for this decision | X | X | N/A | X | X | X |
| All Avail | All eligible platforms are available via sonar and radar | X | X | N/A | X | N/A | N/A |
| Proximal Avail | The closest geographically platform is available and has been selected | X | N/A | N/A | N/A | X | N/A |
| Eligible Unavail-Radar | For Round Robin, the eligible provider is not available according to radar | N/A | X | N/A | N/A | N/A | N/A |
| Persistent app | The decision served a cached response, no logic executed | X | X | X | X | X | X |
| Request Geo Unavailable | The request’s geo cannot be established. Request routed to fallback | X | N/A | N/A | N/A | X | N/A |
| All Unavail-Provider | All providers are unavailable. Request routed to fallback | X | N/A | N/A | N/A | X | N/A |
| Unavail-Provider-Dist | No proximity scores have been found for any provider. Request routed to fallback | X | N/A | N/A | N/A | X | N/A |
Openmix Quickstart Applications
- Log in to the NetScaler Intelligent Traffic Management Portal.
- From the left navigation menu, navigate to Openmix > Application Configuration.
- If you are configuring your Openmix app for the first time, you see the Get Started page, when you click Openmix > Application Configuration.
- To configure a new app, either click the Get Started button or the Add button on the top right corner of the page. If Openmix apps have been configured previously, you see a list of apps on this page.
The following sections walk you through the process of configuring Openmix apps in the portal.
Static Routing
This type of application does not use any evaluative logic to decide which DNS response must be provided to the end-user. The app always selects a single platform here, specified by the user. Therefore, the app uses only a single DNS CNAME or IP address response. The Static Routing application can be configured through the portal on the Application Configuration page.
Note: Before configuring your application, ensure that your platforms are first configured. See Platforms page for platform configuration.
Navigation
- Navigate to Openmix > Application Configuration.
- Click the Add button on the top right
The Basic Information dialog box opens.
Basic Information
Follow these steps to enter Basic Information:
- For Protocol, select DNS or HTTP from the list.
- For Application Type, select Static Routing. Or if you’re configuring another type of app, select it from the list.
- Give a Name to your application (required field); add a Description (optional field); and a Tag (optional field).
- Click Next for Configuration.
Configuration
To configure the app, do the following:
- Select the associated platform from the Platform list. It is the platform that you set up within the Platforms page, representing the CDN, Cloud, or Data Center.
- Enter a CNAME/A/AAAA record (for DNS) or URL (for HTTP). The DNS CNAME or HTTP URL for the selected platform must point to a valid IP address or host name.
- For CORS, in an HTTP protocol select None, All, or Custom for CORS. CORS allows you to control access to your site from other sites. You can either completely restrict access to your site from other sites (by clicking None), allow access from all other sites (by clicking All), or allow access only from specific sites (by clicking Custom).
- Enter a TTL (Time-To-Live) for the response. The default is 20 seconds but it can be overridden.
- Click Complete.
- In the confirmation pop-up click Done or Publish to see your app listed in the Openmix applications page. If you click Publish, your app goes live instantly and have a green status. It means that the application is in production. If you click Done, your app is still listed on the applications page but it’s unpublished, and the status is red.
Failover
The Failover application supports a simple routing logic where a platform is chosen based on its place in line, and its availability. The customer can create a failover chain that decides which platform to select first, second, and so on. This failover chain can be created to either work globally or for individual markets and countries.
The Failover application can be configured within the portal on the Application Configuration page.
Note: Before configuring your application, ensure that your platforms are configured first. Refer to the Platforms page for platform configuration.
Navigation
- Log in to the Portal.
- From the left navigation menu, navigate to Openmix > Application Configuration.
- Click the Add button on the top right to get to the New Openmix Application, Basic Information dialog box.
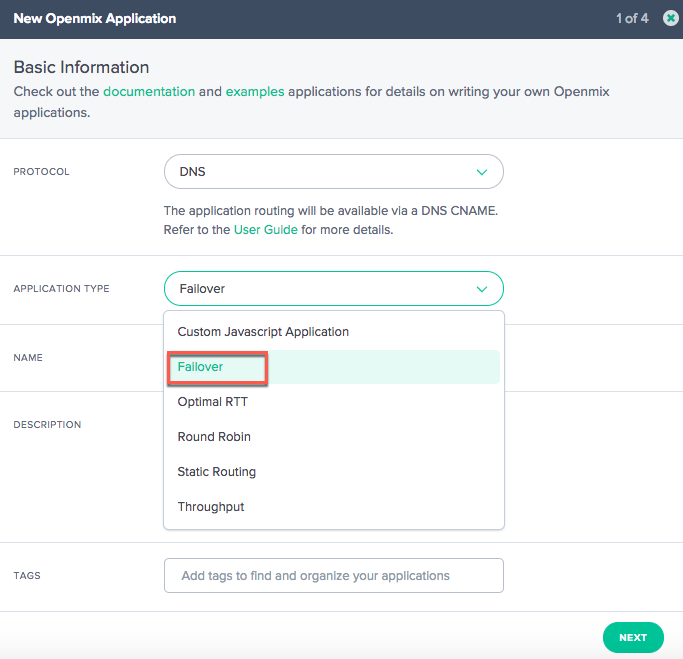
Basic Information
- Select DNS from the Protocol list.
- From the Application Type list, select Failover.
- Give a Name (required field) to your application; add a Description (optional field); and a Tag (optional field).
- When done, click Next.
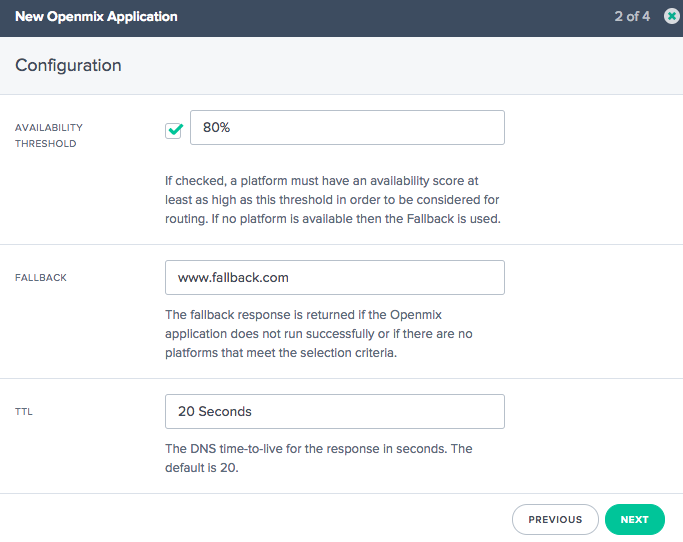
Configuration
- In the Configuration dialog box, select the Availability Threshold check box. The Availability Threshold has a default value of 80%. A platform must have an availability score at least as high as this threshold to be considered for routing.
- If you want to modify the default availability threshold, just type in a new value to replace the default.
- If no platform has an availability score that is equal or greater than the specified threshold, then the fallback CNAME or A or AAAA or IP address is used.
- If the check box is unselected then the platform assumes a zero availability threshold. It means that there is no Radar availability check on this platform.
- Enter a CNAME/A/AAAA or IP address for Fallback. The fallback CNAME/A/AAAA or IP is typically used if the application encounters issues, or errors.
- Enter a TTL (Time-To-Live) for the response. The default is 20 seconds. You can override this value if necessary.
Platform Information
- In the Platform Information dialog box, select a Platform from the list.
- You can select multiple platforms using the Add Platforms button. The idea is to select all available platforms applicable for global and geo (markets and countries) routing.
- The platforms on this list are the ones that you set up in the Platforms page within the portal, representing your CDN, Cloud, or Data Center.
- All Openmix apps require an associated platform to be set up beforehand. If you don’t find a platform in the list, you can set it up in the Platforms page within the portal.
- Enter the CNAME/A/AAAA record for the platform.
- Ensure that the Enabled check box is selected (indicating that the platform is enabled) before moving to the next step.
- If Sonar is configured and you want to use Sonar data to help in the initial decision-making process, make sure to click the Use Sonar for Platform Availability check box. Note: The Sonar check box appears only if Sonar is enabled for that platform.
- Click Next for Location Configuration.
Location Configuration
- In the Location Configuration dialog box, select the required platforms for Global routing.
- Global indicates that you are setting up a chain of platforms for global routing.
- When you click inside the Global field, a list displays all the platforms you selected in the Platform Information step.
- Select the required platforms from the list for availability-based global routing.
- The order in which you place the platform names in this field determine the priority for their selection. For example, if the first platform on your list is unavailable, the second is selected. If none of the platforms on the list are available, then fallback is used.
- You can drag the platform names to change their order of priority.
- Click Markets & Countries if you would like to set up platforms for local geo routing.
- When you click inside the Markets & Countries field, the list displays all the platforms you selected in the Platform Information step.
- Select platforms for local geo routing, separately for each geo (market/country).
- The order in which you place the platform names in this field determine the priority for their selection. For example, in China, you want to use the China POP first, and only if that is not available, you would want your Singapore POP to be used, which you would place next in line, and so on.
- You can drag the platform names to change their order of priority.
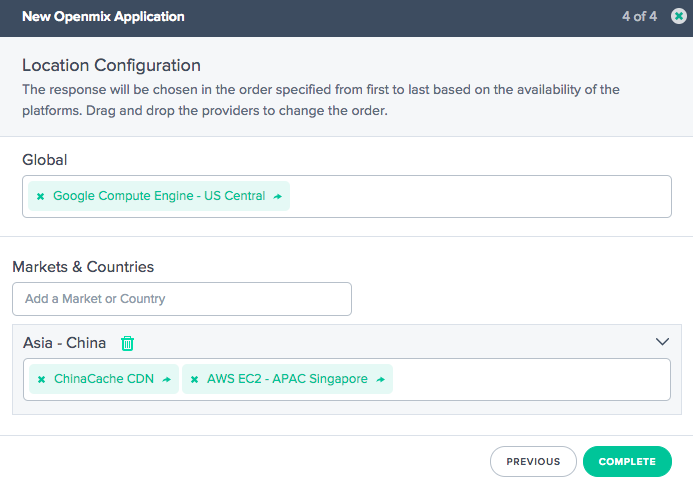
- Click Complete, to finish configuring your app.
- In the confirmation pop-up click Done or Publish to see your app listed on the Openmix page.
- If you click Publish, your app goes live instantly and have a green status. Your application is in production.
- If you click Done, your app is still listed on the Openmix page but it is unpublished, and the status is red.
Round Robin
This application follows a typical Global Server Load-Balancing methodology of Round Robin, where each CNAME alternates being returned to end-users, as DNS requests are made. It uses Sonar data (if Sonar is enabled) and Platform Availability threshold to evaluate the best platform for the requesting user then. Each platform is selected based on the Round Robin distribution methodology. For example, if platforms P1, P2 and P3 meet the availability threshold, the first request is routed to P1, second to P2, and third to P3. The fourth request is routed to P1 again, and so on.
To configure a new Round Robin app, click the Add button on the top right corner of the Openmix page. The Basic Information dialog box opens up.
Navigation
- Log in to the Portal.
- From the left navigation menu, navigate to Openmix > Application Configuration.
- Click the Add button on the top right to get to the New Openmix Application, Basic Information dialog box.
Basic Information
- In the Basic Information dialog box, select DNS as the Protocol for Round Robin.Note: For the Round Robin app, routing is available only via a DNS CNAME.
- Select the Application Type from the list. Give the app a Name (required field), a Description (optional field), and a Tag (optional field).
- Click Next for Configuration.
Configuration
- The Availability Threshold has a default value of 80%. To modify this value, just type in a new value to replace the default.
- Enter a CNAME/A/AAAA or IP address for Fallback. The fallback CNAME/A/AAAA or IP is typically used if the application encounters issues, or errors.
- Enter a TTL (Time-To-Live) for the response. The default is 20 seconds but this value can be overridden if necessary.
- Click Next for Platform Information.
Platform Information
- Select a platform from the Platform list. Note: All Openmix apps require an associated platform set up beforehand. If you don’t find a platform in the list, you can set it up in the Platforms page within the portal.
- Select more platforms by clicking the Add Platform button.
- Enter a CNAME or an A/AAAA record or IP (in DNS), or URL (in HTTP) for this Platform. It must be a valid URL, host name, or IP address. It can be of the form:
scheme:[//host[:port]][/path][?query][#fragment]. - Ensure that the Enabled check box is selected (indicating that the platform is enabled) before moving to the next step.
- If Sonar is available, and you want to use Sonar data to help in the initial decision-making process, make sure to click the Use Sonar for Platform Availability check box.
- Click Save to go to Step 4 to assign appropriate weights for each platform.
Location Configuration
- Assign Weights for the prioritization and selection of each platform globally and/or by market or country.
- To assign platform weights separately for market or country, enter the name in the Markets & Countries search box and choose from the list.
- Click Complete for your application to be created.
- In the confirmation pop-up click Done or Publish to see your app listed on the Openmix page. If you click Publish, your app goes live instantly and have a green status. Your application is in production. If you click Done, your app is still listed on the Openmix page but it is unpublished, and its status is red.
Optimal Round Trip Time (ORTT) App
The ORTT app uses Radar Response Time, Sonar data, if Sonar is enabled, and the Platform Availability threshold to evaluate the best platform for the user the requesting. The availability threshold is the minimum availability (80% is the default value) that the platform must meet to be picked. In addition, the ORTT app also uses a Handicap value that globally or locally allows customers to influence how to route end-users.
The first three steps – Basic Information, Configuration, and Platform Information, are entered in the same manner as the other apps.
Follow these steps to configure location information and enter values for Handicap for each platform, globally, or by location/market.
Location Configuration
-
In the Location Configuration dialog box, enter a value for Handicap for one or all platforms selected. You can enter a handicap value between 0 and 6000. The use of the handicap is to manually lower the chances of a particular platform picked for routing, when there are better platforms available, in terms of cost or convenience. The more the handicap value, the lesser the chance of the platform being picked. You can deselect a platform if required by turning off the Platform Selection button.
-
Click Markets & Countries to select a particular market or country from the list and enter Handicap values separately for each of the associated platforms.
-
Click Complete, to finish configuring your app.
-
In the confirmation pop-up click Done or Publish to see your app listed on the Openmix applications list page. If you click Publish, your app goes live instantly and have a green status. Your application is in production. If you click Done, your app is still listed on the Applications page but it is unpublished, and its status is red.
Throughput
The Throughput app selects the platform based on Sonar data (if Sonar is enabled), highest throughput (using Radar data), and platform availability threshold (which is 80% by default). In addition, this app allows you to add a Handicap value to decrease the throughput for specific platforms and influence how end-users are routed. This optional Handicap value can be assigned globally and/or locally (for specific markets or countries).
The first three steps – Basic Information, Configuration, and Platform Information are entered in the same manner as the other apps. The Location Configuration is entered in the same way as in the ORTT app.
When you’re done, click Complete to return to the Openmix applications list page. Finally, click Publish to publish your application when you are ready to go live.
Status of the application
The status of the app shows its current configuration.
- Red stands for unpublished. When you complete the configuration, if you click Done, your application is listed in the applications page with a red dot, denoting that it has not been published yet.
- Green stands for published. If you click Publish your app goes live instantly, and be denoted with a green dot which means that the application is in production.
- Yellow stands for the latest version that is unpublished. The yellow dot indicates that the application is created and edited, and the last modified settings are not yet published.
Static Proximity
The Static Proximity application responds to the platform that is located close to the latitude and longitude of the requesting user.
Note:
All Openmix apps require a set of associated platforms to be set up beforehand. If you do not find a platform in the list, you can set it up in the Platforms page within the portal.
Navigation
- Log in to the NetScaler Intelligent Traffic Management portal.
- From the left navigation menu, navigate to Openmix > Application Configuration.
- Click the plus button, Add Openmix App on the top right.
- Select Quickstart App.
Basic Information
- In the Basic Information dialog box, select DNS as the Protocol.
- Select Static Proximity as the Application Type. Give the app a Name (required field), a Description (optional field), and a Tag (optional field).
- Click Next for Configuration.
Configuration
- If enabled, the Availability Threshold has a default value of 80%. Enter a new value to replace the default.
- Enter a CNAME/A/AAAA or IP address for Fallback. The fallback CNAME/A/AAAA or IP is typically used if the application encounters issues, or errors. This field cannot be empty.
- Enter TTL (Time-To-Live) for the response. The default is 20 seconds, but this value can be overridden if necessary.
- Click Next for Persistency Controls.
Persistency Controls
Set up Local Persistence. For more information, see Local Persistence. Click Next for Platform Information.
Platform Information
Each platform must have its latitude and longitude setup through the Platforms page. Aliases for community platforms initially inherit geo information from the community platform, although after creating an alias you can change them. Private platforms need to be set up on creating them or afterwards through their config pane. To see the config pane simply click the Platform entry of the table.
Only platforms that belong to the following categories can have Geo info and be part of an opx app’s answer list:
- Cloud Computing
- Cloud Storage
- Data Center
-
Select a platform from the Platform list.
-
Enter a CNAME or an A/AAAA record or IP (in DNS), or URL (in HTTP) for the Platform. It must be a valid URL, host name, or IP address. It can be in the form of:
scheme:[//host[:port]][/path][?query][#fragment] -
Ensure that the Enabled check box is selected indicating that the platform is enabled before moving to the next step.
-
If Sonar is available for this platform and you want to use Sonar data to be considered during DNS resolving, make sure to click the Use Sonar for Platform Availability check box.
-
You can add more platforms by clicking the Add Platform.
-
Click Next for Location Configuration.
Location Configuration
-
In the Global part of the Location Configuration dialog box, you can set up a chain of platforms for global routing. You can enable or disable the selection of each platform globally.
-
In the Markets & Countries, you can create different setups per market or country, effectively having geo fencing rules for them.
-
Click Complete to create your application.
In the confirmation pop-up click Publish, Add another or Done:
-
If you click Publish, your app goes live instantly and the status is green. This means that the application is in production.
-
If you click Done, your app is listed on the Openmix page but it is unpublished, and the status is red.
-
If you click Add another, the status of the app is the same as Done but you restart the same process to create a new app.
Managing Quickstart Applications
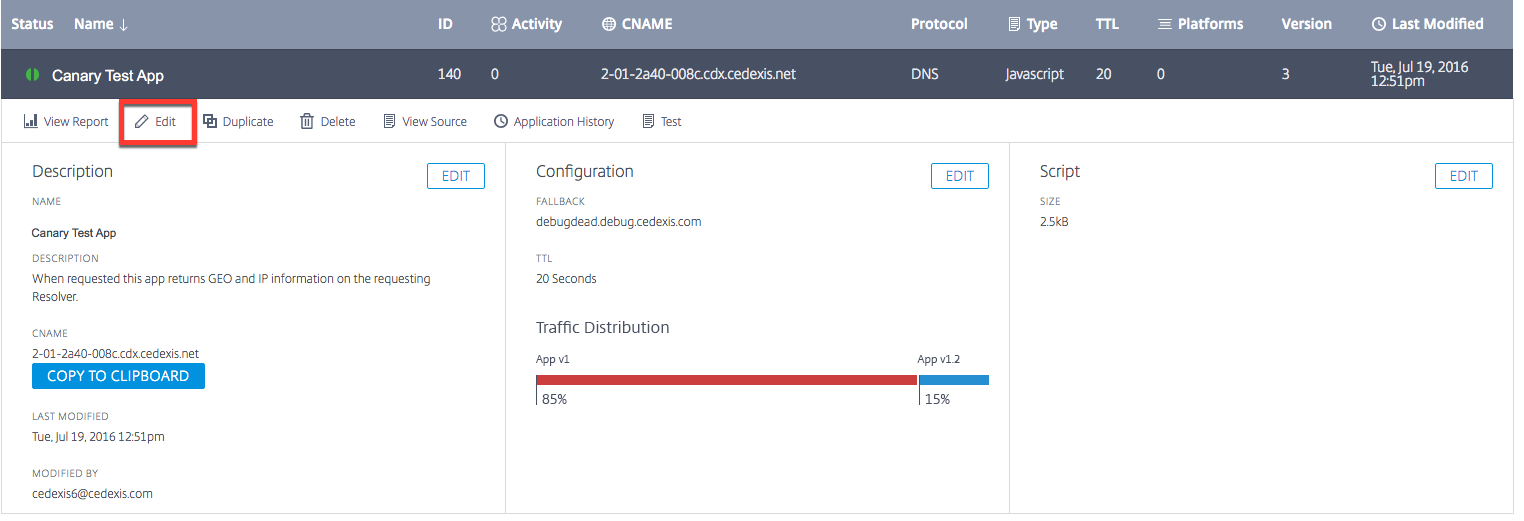
Us the top tabs within the application manager panel to edit, duplicate, delete, test, view reports, view source and view the application’s version history. Click your application in the Openmix applications list page to expand the application manager.

View Report
View Report takes you to the Openmix Decision Reports page where you are able to view the trend of Openmix decisions for each of your applications, platforms, and geographies.
Edit
To edit your Openmix app, simply click the Edit icon on the top of the application manager panel. You can also perform individual edits separately for basic information, configuration, platform, or location information by clicking the Edit buttons within the panel as shown in the figure. When you finish editing, click Done, to list the app with an unpublished status (for more edits later), or click Publish to go live instantly.
Duplicate
Click Duplicate to replicate the configuration of the current application and save it with a new name.
Delete
Click Delete, to remove applications that you no longer need.
Publish
Click Publish to directly publish the application from the Openmix application manager. This option is visible only if the app is not yet published.
Openmix Custom JavaScript Applications
Openmix JavaScript applications are apps with customizable Java scripts. You can create, configure, test, and publish using the UI in the ITM portal.
Note: This guide does not cover the actual creation of the custom script (syntaxes, variables and so on). For more information on creating custom JavaScript, refer to the Developer Exchange.
Navigation
- Log in to the ITM portal.
- From the left navigation menu, go to Openmix.
- Choose Application Configuration.
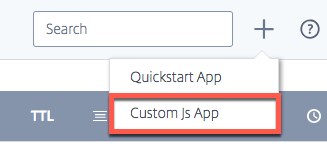
- To configure a new Openmix app, click the add icon on the top right corner.
- Select Custom JS App.
- The Openmix Application Configuration page opens.
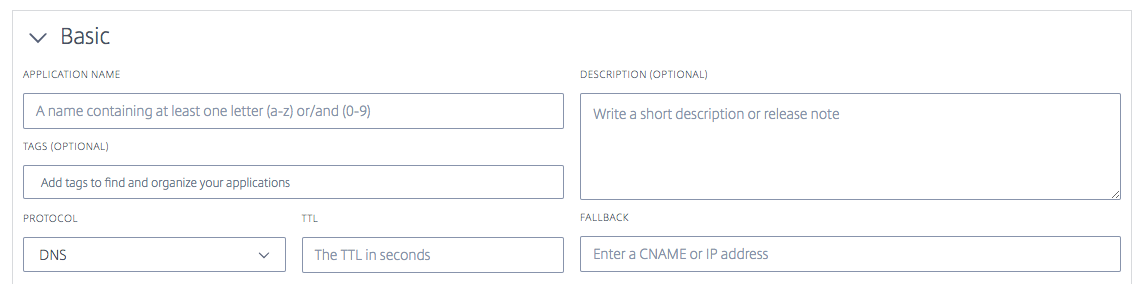
Basic Information
- Application Name: Give a name to your app.
- Description: Give the app a description or add a release note here. It’s an optional field.
-
Tags: Enter an appropriate tag, if necessary. Tags help to identify and organize your app. It’s an optional field.
-
Protocol: Select DNS or HTTP as the protocol.
- DNS: If you select DNS, a TTL value must be entered.
- HTTP: If you select HTTP, you can enable Secure Access.
- TTL: Enter a DNS Time to Live for the application. The recommended value is 20 seconds. Note: This TTL applies if there is no TTL set by the custom JS app or if the response is a fallback value.
-
Fallback: Enter a CNAME/A/AAAA or IP address for Fallback. The fallback CNAME/A/AAAA or IP is typically used if the application encounters issues, or errors.
-
Secure Access: If Secure Access is enabled, the HTTP API must require an Oauth access key from the client when being called. Refer to Securing Openmix HTTP API to learn more.
Note: Enabling secure access, displays a lock icon next to the app name in the list of apps on the Openmix front page.
Custom JavaScript
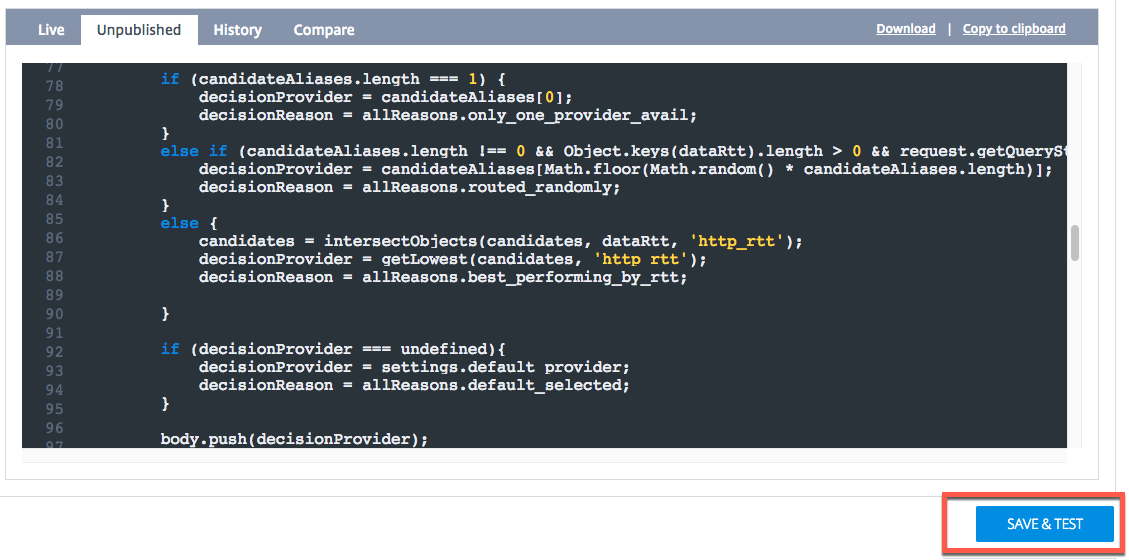
Once you enter the configuration information, you can upload your custom JavaScript.
-
Click the Choose File button and select the JavaScript file that you want to upload. You can upload a new file to overwrite an existing one at any time.
-
Click Save & Test to save your application.
Note: The application is automatically tested using an application checker when it is uploaded and saved. If there are errors, the application checker shows the error information and the location of the error. For more information about the data available from the application checker, see the Application Verification section.
-
Click Cancel to return to the Openmix Applications page or click Publish if you are ready for the application to go live.
Note: If you click Publish, your app goes live instantly and have a green status. Yous application is in production.
If you click Cancel, your app is listed on the applications page but is unpublished, and the status is red. To learn more about status refer to the Status of the Application section.
Staged Application Rollout
You can manage the rollout of your application by sending a small percentage of your web traffic through a new version, sometimes called as Canary Deployment. ITM allows you to send a specified percentage of traffic to the new version of an app to ensure that the application logic behaves as expected. You can report on the behavior of the existing and new versions to evaluate the changes to your app in a live environment. This option allows you to fix any issues or anomalies that occur before routing 100% of your web traffic through the newly edited app. After verifying the desired behavior, you can increase the percentage of traffic to the newest version or deploy the application to all users.
To stage the application rollout and release a test version of your newly modified app, do the following:
- Click the app name (in the Openmix applications list page). The application manager panel opens.
- Click the Edit icon to edit your app.
- Modify your existing app with all necessary changes.
- Once you’re done with the edits, click Save and Test.
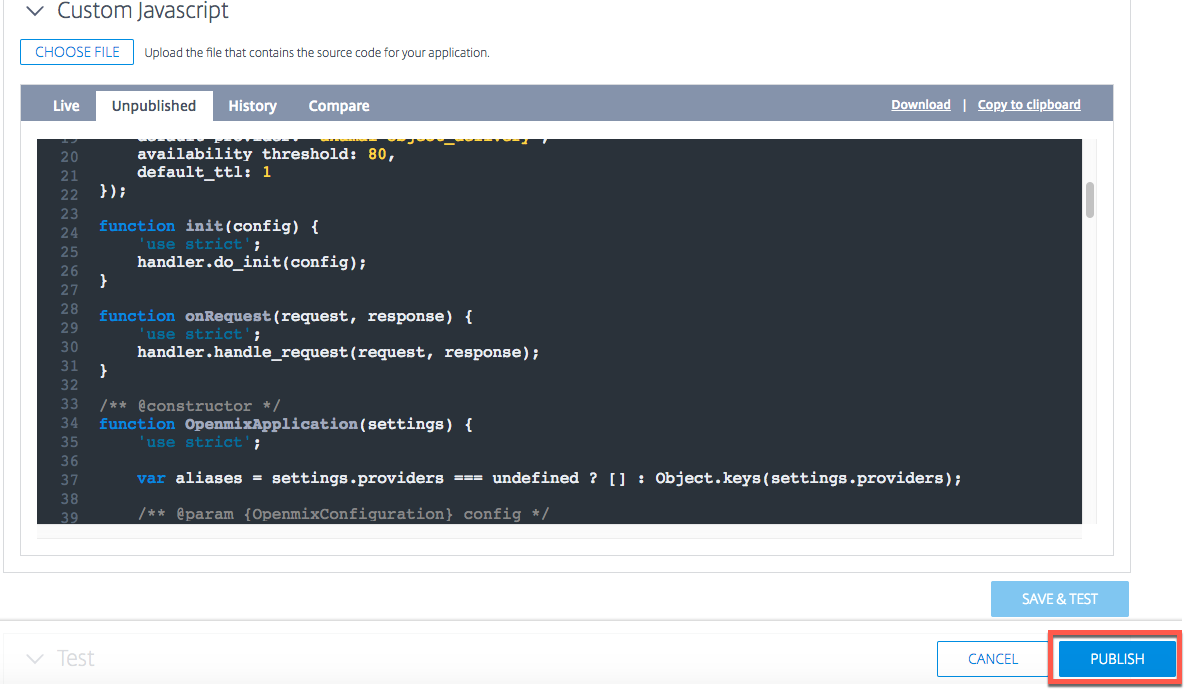
- Scroll down at the bottom of the page with Cancel and Publish buttons. Enter the percentage of web traffic (1% to 99%) that you want to flow through this newly modified version.
- Check the box for partial distribution of traffic through this new version of the application. The remaining traffic is sent to the previous live version.
- Click Publish. This new test version of the app now appears in the list of apps in the Openmix Configuration page with a new Status icon. The new Status icon signifies that only partial web traffic is flowing live through this version.
You can modify the traffic flow to the test version and change the percentage of traffic flow to view performance.
To check the performance of your app, go to the Openmix Decision Report. Select Application as your primary dimension, and Version as your secondary dimension. Then click Apply Filters after selecting your application from the list. The chart shows the performance of different versions of your application.
Once you’re satisfied with the performance of this version of the app, you can go ahead and route 100% of your web traffic through it by clicking the Go Live button.

This version replaces the current live version with the newly edited version.
If you don’t want to go live with this version, click Unpublish. Your changes are saved and appear as an unpublished app in the list of apps in the Openmix Configuration page. Now 100% of your web traffic flows through the current live version of your app.
Test
You can test your JavaScript application using the Test App button before or after publishing.

It enables you to view test results across specific sets of markets, countries, regions, and states. You can query the app from specific IP addresses.
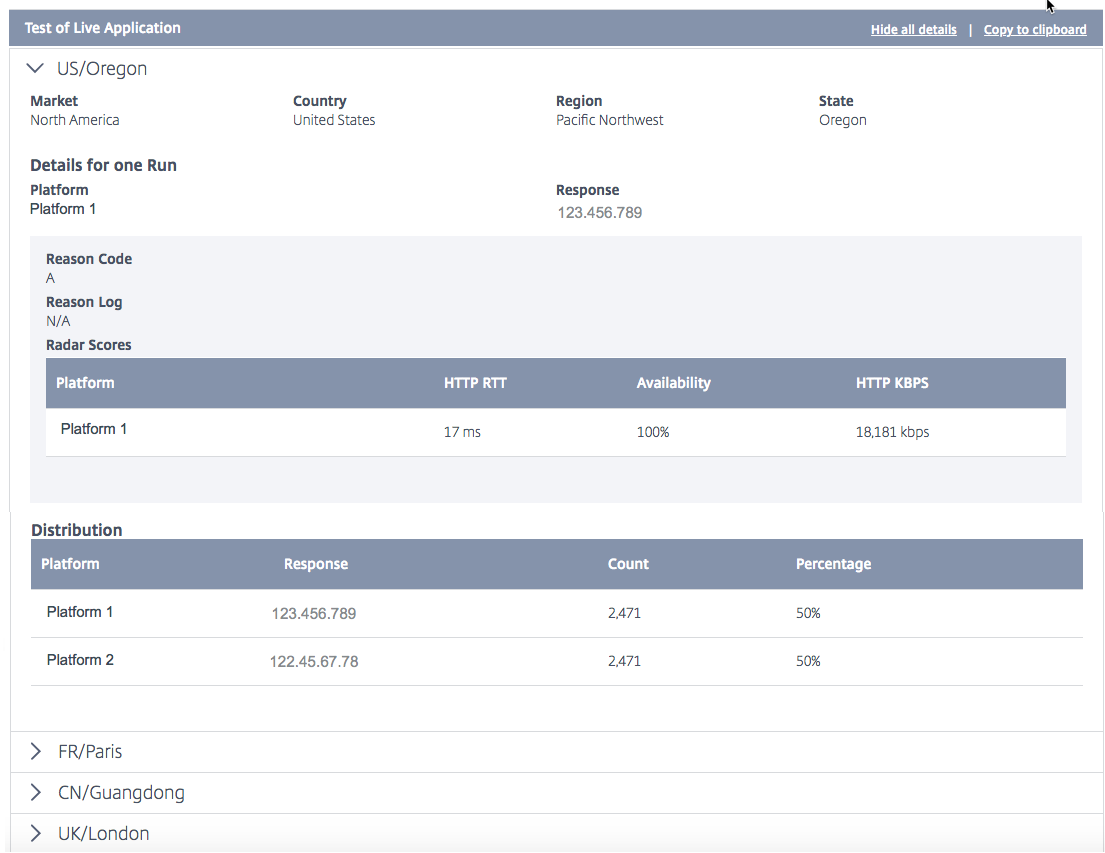
Test results include, Platform selected by the app, Response received, Reason Code, Reason Log, Radar Scores, Distribution and so on
This feature also allows you to view the distribution of decisions across different platforms. For example, if two platforms are used for routing, you can view the number of decisions and the response received for each of them.
Click the Show All Details link to see the test results of your app.
The following values are shown as test results:
| Field | Description |
|---|---|
| Market, Country, Region, and State | The location at which the app was tested. |
| Platform | The platform selected by the app. |
| Response | The CNAME or IP address of the platform selected by the app. |
| Reason Code | Describes the reason behind the decision. |
| Reason Log | Customer-defined output from the app. Enables customers to log information about the app decisions. |
| Radar Score | The Response Time (RTT), Availability, and Throughput measurements recorded for the platform. |
| Distribution | The distribution of platforms that an app selects for each location that is tested. The Count represents the number of times the platform was selected. And the Percentage is the percentage of the total count for platform selection. |
Note: You can run this test on the live app or the unpublished version, that is, if the app is not yet published.
Once your app is published, you have the option of testing the live app by clicking the Test Live App option. If you edit your app or upload a new version, you can test it before publishing by clicking the Test Unpublished App button.

Application Verification
To ensure that custom JavaScript apps behave as expected, run the app through a code and logic verifier when you upload it to the ITM Portal. The application verifier runs the app through a decision server with synthetic traffic to test whether the application compiles and runs successfully.
If the application runs without error, the verifier provides information about the decision distribution and execution characteristics. On the other hand, if the decision server encounters an error while running the app, the verifier provides information about the error. We recommend that the application must be free of errors before publishing.
In errors, you can fix the JavaScript file in your local and reupload it to the Portal by clicking the Choose File button.
Publish
To publish your app and have it go live, click the Publish button. This option is grayed out if the app is not yet saved or already published. When the app goes live, it appears in the Openmix application manager page with a green status. To learn more about app status refer to the Status of the Application section.
Note: The app is published with errors if necessary.
Managing Custom JavaScript Applications
Use the top tabs within the application manager panel to view reports, edit, duplicate, delete, publish, view source, view live version, view history.
Click your app in the Openmix applications list page to expand the application manager panel.

View Report
View Report takes you to the Openmix Decision Reports page where you are able to view the trend of Openmix decisions for each of your apps, platforms, and geographies.
Edit
To edit an Openmix custom Javascript app, click the app name (in the Openmix applications list page). The application manager panel opens. Changes and updates can be made to the configuration by clicking the Edit icon.

View Source
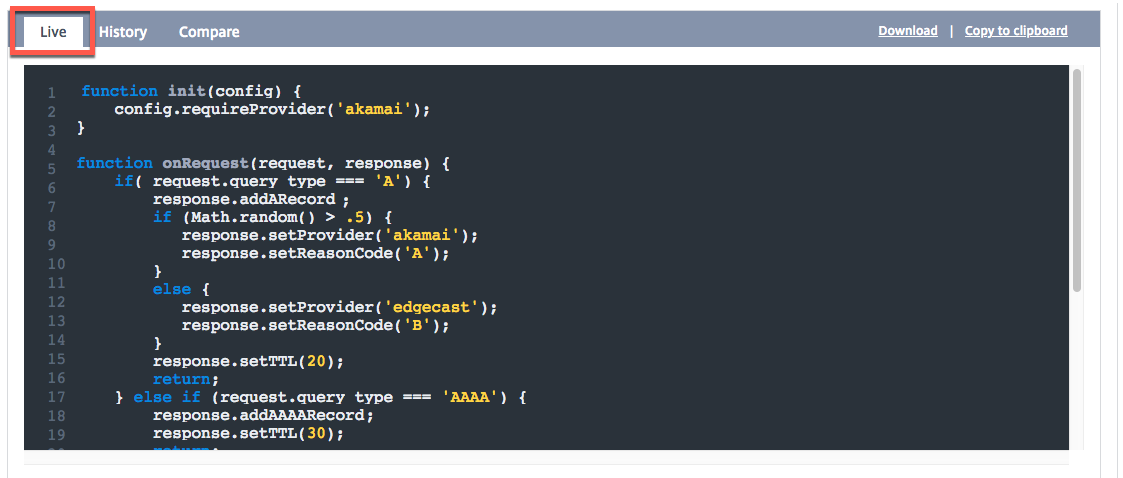
View Source allows you to view the JavaScript source of the app, that is, the latest version of the app whether it was published. This option is only available for custom JavaScript apps.
View Live Version
You can view, copy, and download the latest published version of the app. This option only available for custom JavaScript apps.
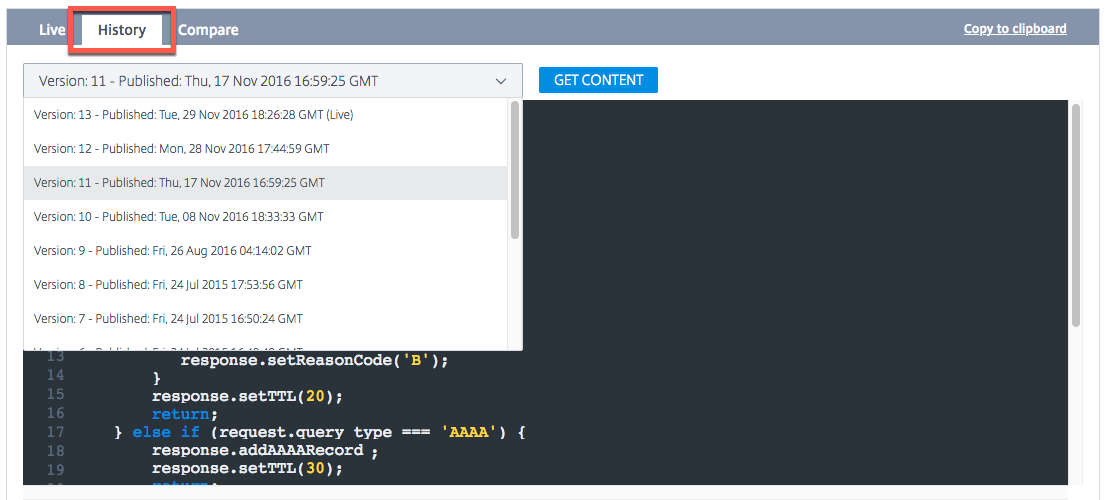
Application History
Application History allows you to view different versions of the app. You can use the Select a Version list to switch from a live version to an older version. Click Get Content to switch to the older version. This option is only available for custom JavaScript apps.
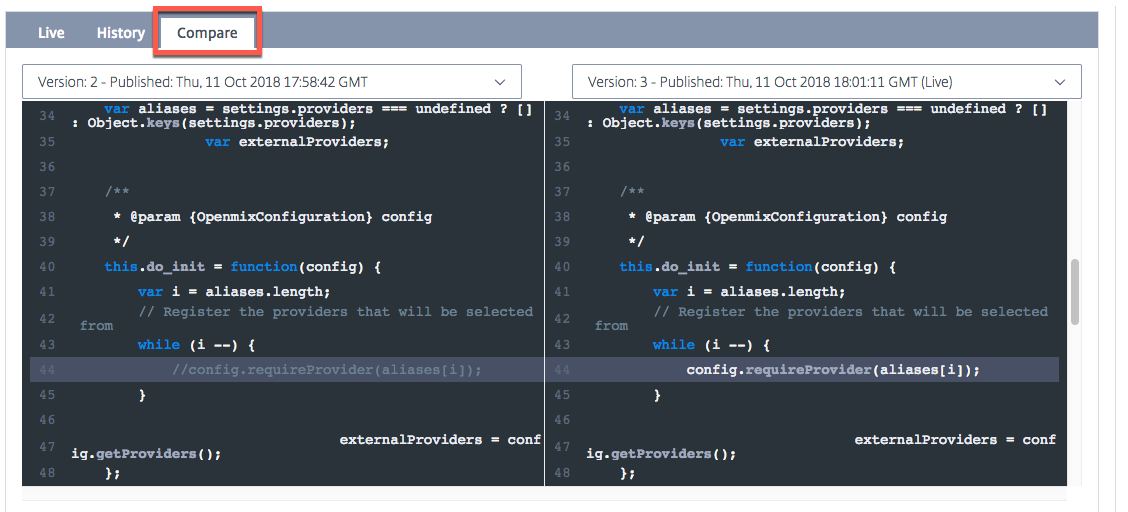
Compare
The Compare feature allows you to compare different versions of your JavaScript file. You can see the differences between the two versions of your app clearly displayed with highlighted lines of script.
Delete
To delete an Openmix app, click the app name (in the Openmix applications list page). The application manager panel opens. Click the Delete icon, and then choose the Delete button in the confirmation dialog box. The app disappears from the list.
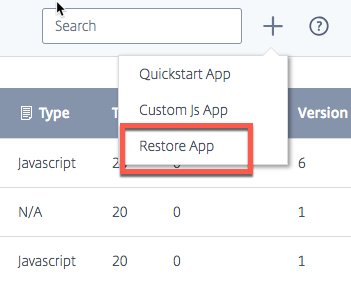
Restore App
The Restore App feature allows you to re-enable an app after it has been deleted. To restore an app, do the following:
- Click the Add + icon on the top right of the page.
-
Choose Restore App from the dropdown menu. The Restore Application window opens.
- Find the app that you want to re-enable from the list and click its corresponding Restore button.
The app is put back on the list in the Openmix page with the same status.
Local Persistence
The Local Persistence feature offers the capability for decision stickiness when it is enabled for an Openmix application. The requests are identified using the IP subnet mask, the length of which is configurable. For example, when a client repeats a request to the same application within a certain period, then the original decision is served back. It can be an essential feature when a client is required not to bounce between different decisions during a particular session. It is available for both DNS or HTTP Openmix applications.
Due to the underlying natural restrictions of the mechanism, persistence is not guaranteed for 100% of the requests. A best effort approach is applied, instead. Tests have shown the expected persistence accuracy to be in the range of 95-97%.
Note:
To enable the Local Persistence feature for your account, open a support ticket or contact your customer success manager. In addition, a Predictive DNS zone is required, configured with name servers
ns5.cedexis.netandns6.cedexis.net. Consider the significant amount of time the DNS zone updates might require to propagate across the internet.
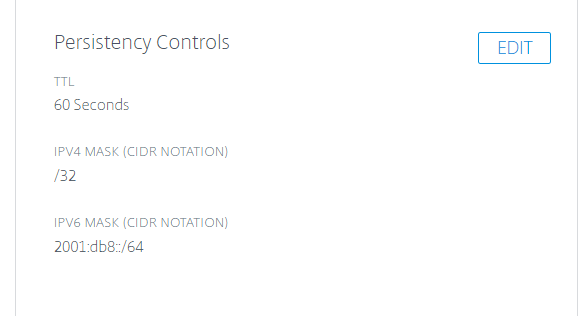
Configuration
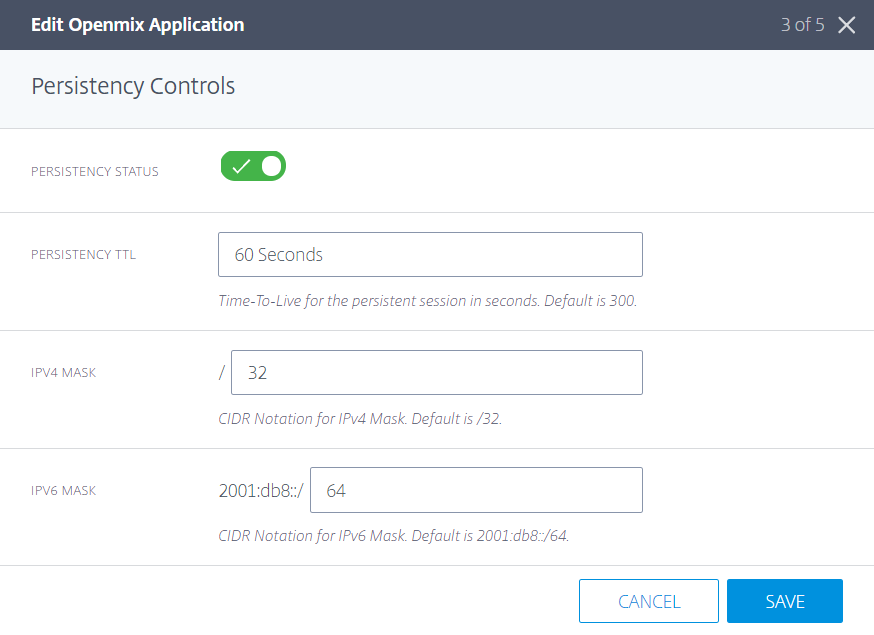
To enable Local Persistence, select Persistency Controls > Edit, under the Openmix application options.
The available settings are as follows:
-
In the Configuration dialog box, enter the Persistency TTL. The default option is 300 seconds. Values between 60 and 1440 are allowed. After an initial request, the DNS decision served is kept for a maximum of 300 seconds. If another request comes from the same IP subnet range in the system before the expiration, it serves the same decision.
-
Both IPv4 and IPv6 masks are provided for setting the granularity of persistency stickiness. Default is “/32” and “/64”, for IPv4 and IPv6, respectively. Permitted values are:
- /8 up to /32, for IPv4
- /32 up to /64, for IPv6
This masking on the client’s IP address determines the persistency key used in the internal data store. For example, if two (or more) client IPs map to the same masked IP address, they are served with the same persistent decision.
The same settings are also available under the predictive application settings.

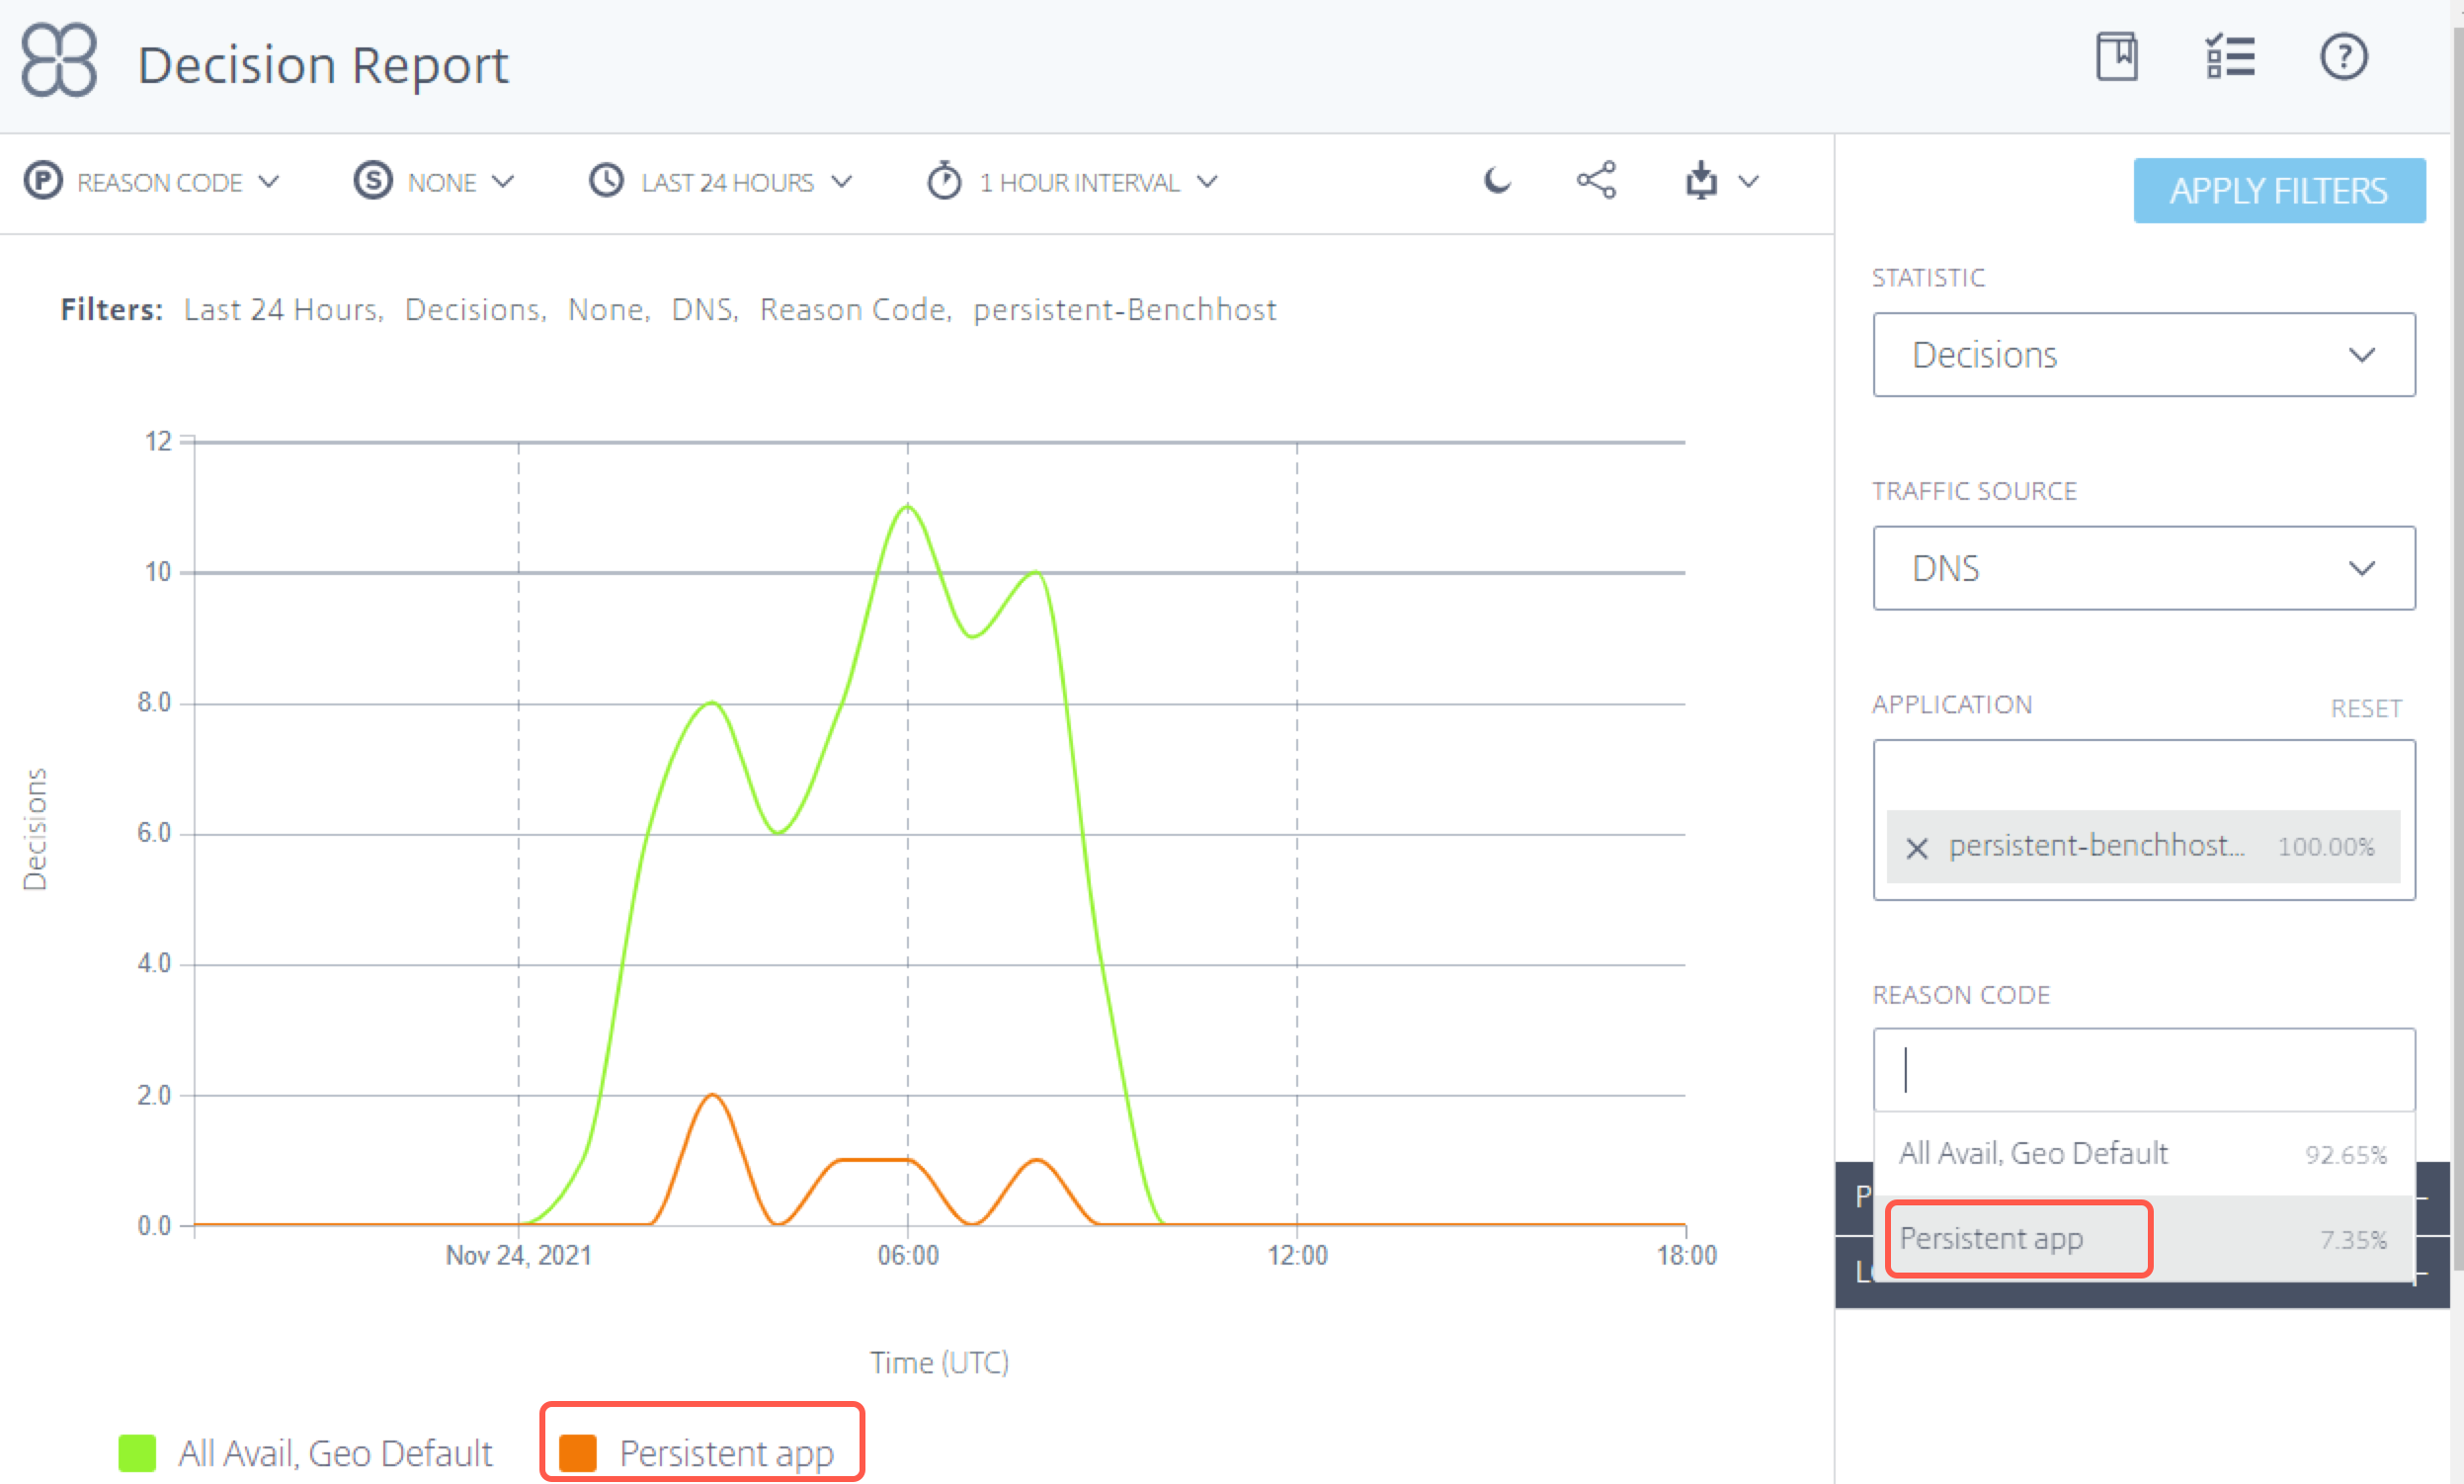
The Openmix decisions that are provided via the internal data store, are reported with the reason code Persistent app in the Decision Report.
Health checks
Decisions served from the persistency cache are subject to extra health checks before they are served:
-
If the application is configured with Sonar Availability Check, then the Sonar availability health is checked before a cached decision is served. If Sonar reports the platform is “down” then the cached decision is ignored and the OpenMix application is run again.
-
If the application is configured with Radar Availability Check, then the Radar availability health is checked before a cached decision is served. If the platform’s availability is less than the configured threshold then the cached decision is ignored.
Note:
For persistence, the maximum threshold for the Radar availability health is set to a fixed 10%.
Securing the Openmix HTTP API
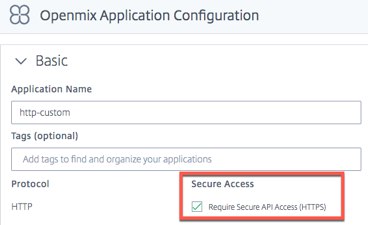
Openmix is available via DNS or an HTTP API for integration into non-DNS workflows. By default, the HTTP API is called over plain HTTP. The API can also be secured via TLS and key authentication. It is done via the UI by checking the box for Require Secure API Access (HTTPS).
Creating API Keys
To enable key authentication, do the following.
-
Select the Require Secure API Access (HTTPS) box in the Openmix Application Configuration page to turn on secure access for each application.
-
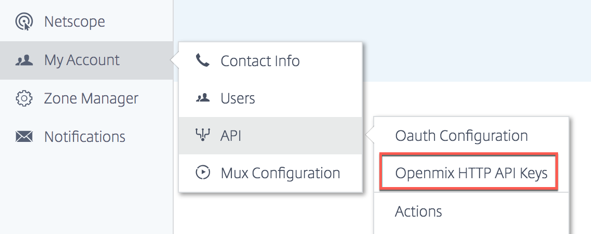
To generate a secure access key, navigate to My Account -> API -> Openmix HTTP API Keys
- If you’re a first-time user, you are prompted to get started by entering your client ID. Enter your Client ID in the New Client dialog, and click Complete.
-
The Client Secret key is displayed beside the Client ID on the Openmix HTTP API Authentication Configuration page.
-
You can now make a request to the Openmix app using basic authentication. Use your Client ID as the user name and the Client Secret as the password to invoke the app on the browser.
To invoke the app using the command line, use the following cURL command:
curl https://hopx.cedexis.com/zones/<zone>/customers/<customer_id>/apps/<app_id>/decision --user <client_key>:<client_secret>
<!--NeedCopy-->
Note: Keys you create gives you access to any of your Openmix applications.
For more information on calling the Openmix HTTP API, refer to the Openmix HTTP API usage documentation.
Deleting API Keys
- To delete a key, navigate to the Openmix HTTP API Authentication Configuration page.
- Click the Client ID.
- Choose Delete in the list. The key is removed from the system. It isn’t valid for authentication or secure access to the Openmix application.
Accessing Logs
Decisions log made by Openmix can be collected and made available for secure download. These logs can help you analyze the decisions made by your Openmix application and debug request behavior. The logs can be turned on/off and secured at the account level. For details on how to enable and download Openmix logs and see that log descriptions go to Netscope.

Openmix Reports
Openmix reports provide powerful visibility into the Openmix decisions that were made for your DNS or HTTP traffic. Each report is defined in the following section, but here are some important aspects about the reports:
Primary and Secondary Dimensions
The primary dimension of the chart is selected through a list above the chart. Use this list as a powerful pivot on the report. A secondary dimension can be chosen as well to further refine the reporting.
Visualization Background Toggle

Charts are set to a white background by default. Toggle the background to a dark color for high contrast monitors using the background toggle.
Data Export

In addition, the end-user is able to download the Chart and Table data via the download link at the top of the report.
Filter: Report Time Range
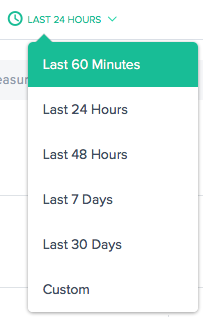
You can generate a report with a time range of last 60 Minutes, 24 Hours, 48 Hours, 7 Days, 30 Days, or a custom range. The default view is the Last 24 Hours.
Filters: Powerful Drill-down Capabilities
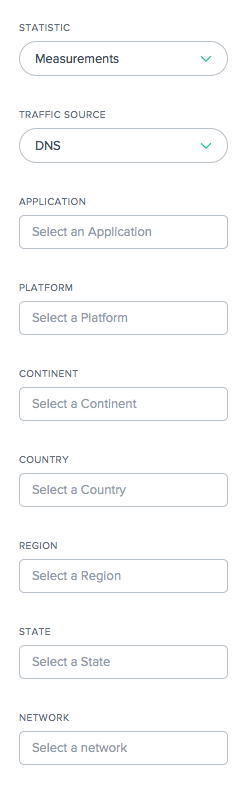
The reports vary slightly in terms of which filters are appropriate based on the data. The following are the most common:
- Statistic - Select the value shown in the chart, most often the number of decisions.
- Traffic Source – Select the type of traffic to display: DNS or HTTP.
- Application – Select one or more Openmix applications to display.
- Platform – Select one or more platforms (provider) to include.
- Continent – Select one or more continents to include.
- Country – Select one or more countries to include.
- Region – Select one or more geographic regions (where applicable) to include.
- State – Select one or more geographic states (where applicable) to include.
- Network – Select one or more networks (ASN) to include.
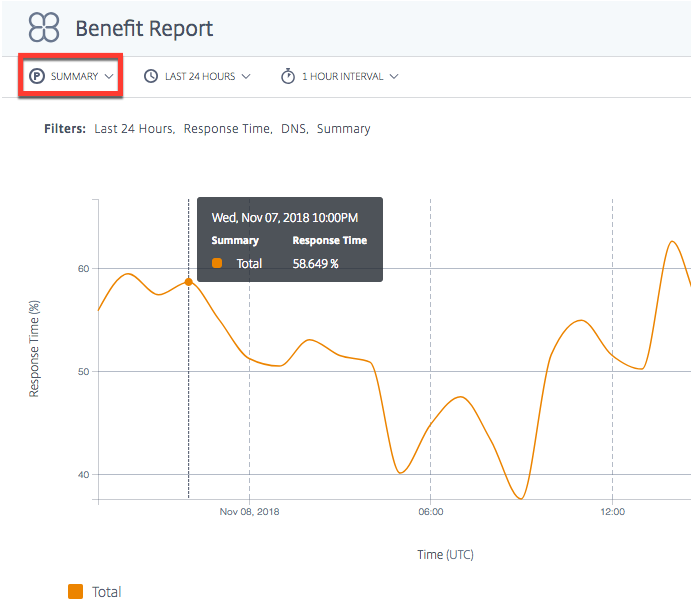
Benefit Report
The Benefit report gives you the overall improvement in the performance of your application delivery when you use the NetScaler Intelligent Traffic Management (ITM) service. The benefit is shown as a percentage improvement in response time and throughput. Choose a specific platform from the pool of candidate platforms to generate the report.
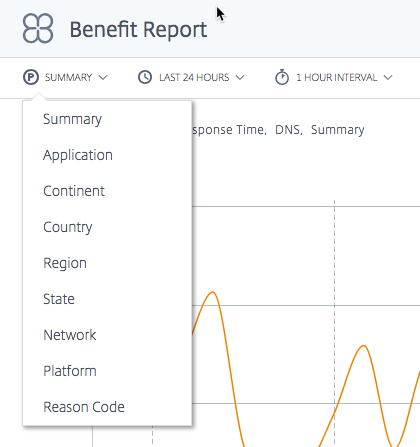
Primary Dimensions for the Benefit Report
Primary dimensions are independent measures based on which the Benefit Report is displayed. The following sections describe each of these primary dimensions in detail.
Summary
Summary is the default primary dimension. The summary chart shows the average of the total percentage benefit (in terms of response time or throughput) received from all the applications.
Note: You can switch between the benefit shown in terms of Response Time or Throughput by using the Statistic filter.
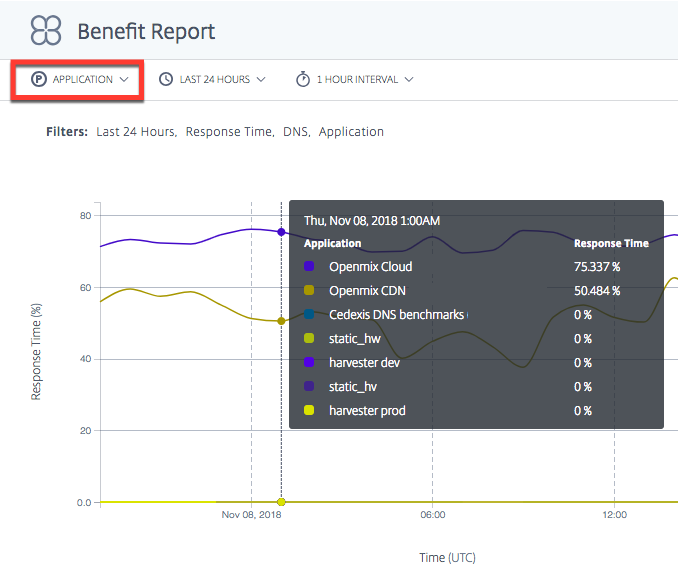
Application
When Application is chosen as the primary dimension, the chart shows each of the applications and the corresponding performance (in terms of response time or throughput) as a percentage benefit in choosing a certain platform over other candidate platforms.
Note: 0% means that there was no extra benefit or improvement in selecting a specific platform over another.
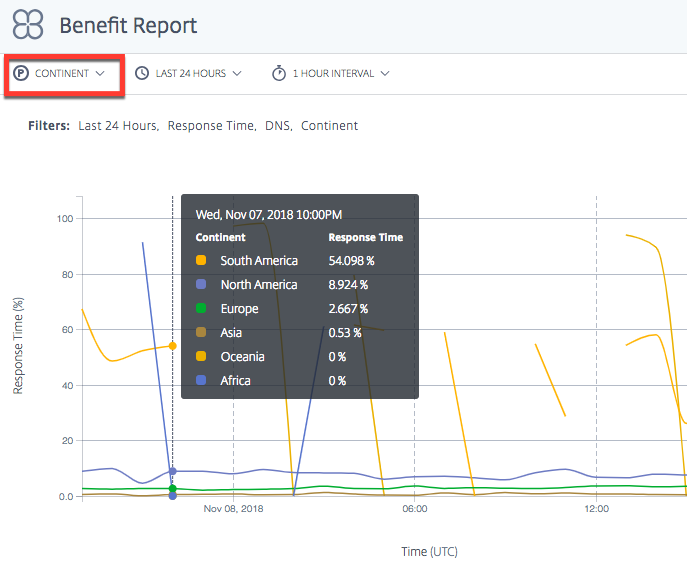
Location (Continent, Country, Region, State)
When location (Continent, Country, Region, or State) is selected as the primary dimension, the benefit report shows the average of the total percentage improvement in performance (in terms of response time or throughput) for each location. You can select location by continent, country, region, or state.
Note: Platforms that are not eligible for selection because of geo rules or any other reason is not counted in the calculation. However, platforms that are geo-fenced for the location in question are counted.
Network
When you select Network as the primary dimension, you see the percentage improvement in performance for users grouped into the specific networks (or service providers) from which users access ITM. It helps you know which groups of users are seeing the performance benefit when coming from those specific networks.

Platform
When you select Platform as a primary dimension, you see individual platforms chosen by different apps and the corresponding improved performance when they’re chosen. The improved performance or benefit is in terms of response time or throughput (in percentage).
Note: The percentage improvement in performance shown when an app chooses that platform. The list on the chart doesn’t necessarily indicate a performance ranking between these platforms.

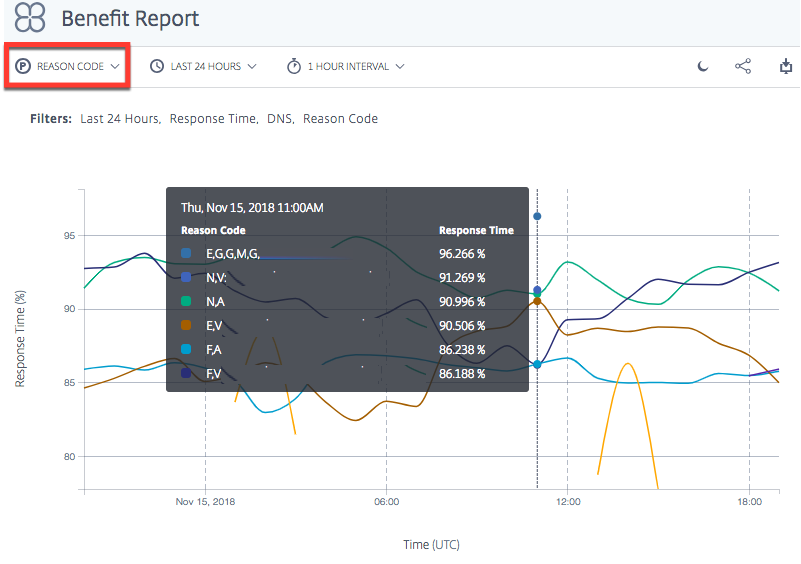
Reason Code
When you select Reason Code as the primary dimension, the percentage shown in the chart is the overall average benefit when decisions are made for a specific reason code.
Ignore Platforms in Benefit Report
To improve the accuracy of Openmix decisions for your benefit report, you can choose to ignore certain platforms and set the app to only select from platforms that are most suitable for comparison.
For example, your application has five platforms to consider for comparison - three in Europe for European traffic, and two in the US for US traffic. Geo rules specify that the European traffic must go via the European platforms and the US traffic through the US platforms.
To ensure that computation is done using the three European platforms, you can set the app to ignore the other two non-European platforms. Use the ignoredProvider() method in your JavaScript.
The method takes the provider’s alias (for example provider-1, provider-2) as the input argument (much like the requireProvider() method). The API must be called once per alias.
Use this sample code in your JavaScript file within the onRequest function:
function onRequest(request, response) {
  response.ignoredProvider('provider-1');
  response.ignoredProvider('provider-2');
  response.setReasonCode('Ignoring provider-1 and provider-2');
  response.setTTL(this.__defaultTTL);
  response.respond('provider-3', 'cmg.test.fake.cname');
}
<!--NeedCopy-->
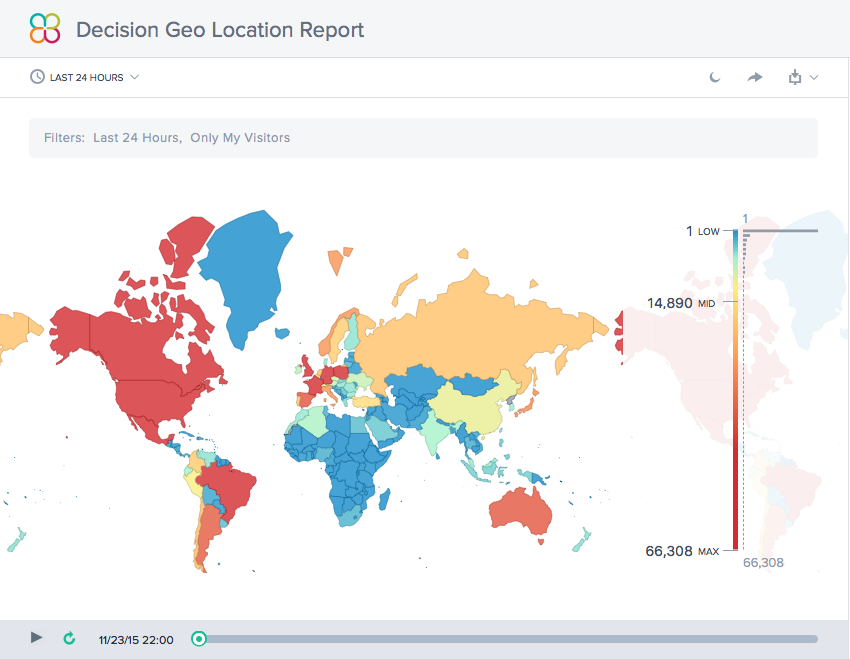
Decision Geo Location Report
This report shows the volume of Openmix decisions for each country. This map view can be viewed over time (based on the time range chosen for the report) by selecting the Play button at the bottom of the chart.
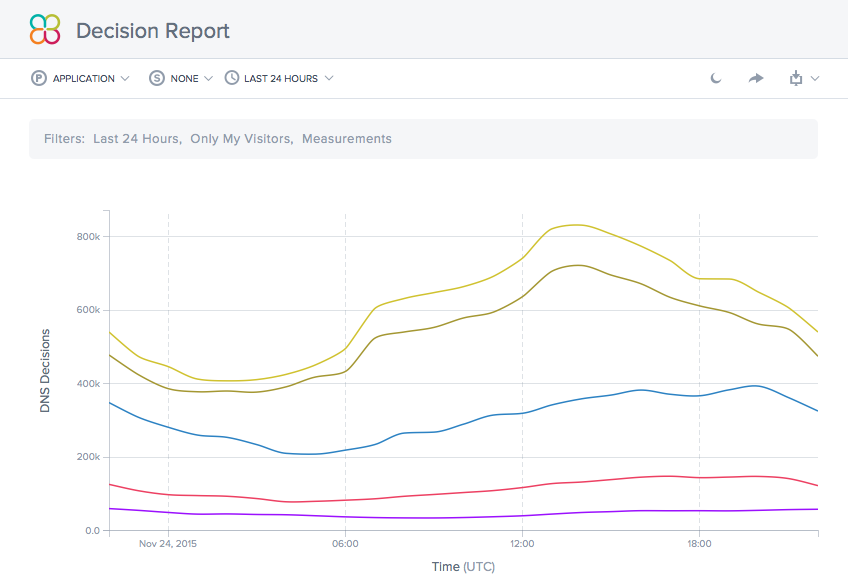
Decision Report
This report shows the trend of Openmix decisions for each of the applications, platforms, and geographies.
In this article
- Overview
- Openmix: Key Benefits
- How Openmix Works
- When to Use HTTP or DNS Services
- Openmix Applications
- Openmix Quickstart Applications
- Managing Quickstart Applications
- Openmix Custom JavaScript Applications
- Managing Custom JavaScript Applications
- Restore App
- Local Persistence
- Securing the Openmix HTTP API
- Accessing Logs
- Openmix Reports
- Benefit Report
- Decision Geo Location Report
- Decision Report