Azure Virtual WAN
Microsoft Azure Virtual WAN and Citrix SD-WAN provide simplified network connectivity and centralized management across hybrid cloud workloads. You can automate the configuration of branch appliances to connect to the Azure Virtual WAN hubs and configure branch traffic management policies according to your business requirements. The built-in dashboard interface provides instant troubleshooting insights that can save time and provides visibility for large-scale site-to-site connectivity.
Microsoft Azure Virtual WAN allows you to enable simplified connectivity to Azure Cloud workloads and to route traffic across the Azure backbone network and beyond. Azure provides 54+ regions and multiple points of presence across the globe. Azure regions serve as hubs that you can choose to connect to the branches. After the branches are connected, use the Azure cloud service through hub-to-hub connectivity. You can simplify connectivity by applying multiple Azure services including hub peering with Azure VNets. Hubs serve as traffic gateways for the branches.
Microsoft Azure Virtual WAN offers the following advantages:
-
Integrated connectivity solutions in hub and spoke - Automate site-to-site connectivity and configuration between on-premises and the Azure hub from various sources including connected partner solutions.
-
Automated setup and configuration – Connect your virtual networks to the Azure hub seamlessly.
-
Intuitive troubleshooting – You can see the end-to-end flow within Azure and use this information to take required actions.
Hub-to-Hub communication
From 11.1.0 release onwards, Azure Virtual WAN supports hub-to-hub communication using Standard type method.
Azure Virtual WAN customers can now use Microsoft’s global backbone network for inter-region hub-to-hub communication (Global transit network architecture). This enables branch to Azure, branch-to-branch over the Azure backbone, and branch to hub (in all Azure regions) communication.
You can use Azure’s backbone for inter-region communication only when you purchase the Standard SKU for Azure Virtual WAN. For pricing details, see Virtual WAN pricing. With the Basic SKU, you cannot use Azure’s backbone for inter-region hub-to-hub communication. For more details, see Global transit network architecture and Virtual WAN.
Hubs are all connected to each other in a Virtual WAN. This implies that a branch, user, or VNet connected to a local hub can communicate with another branch or VNet using the full mesh architecture of the connected hubs.
You can also connect VNets within a hub transiting through the virtual hub, and VNets across the hub, using the hub-to-hub connected framework.
There are two types of Virtual WAN:
-
Basic: Using the Basic method, the hub-to-hub communications happen within one region. The Basic WAN type helps to create a basic hub (SKU = Basic). Basic hubs are limited to site-to-site VPN functionality.
-
Standard: Using the Standard method, hub-to-hub communications happen among different regions. A Standard WAN helps to create a standard hub (SKU = Standard). A Standard hub contains ExpressRoute, User VPN (P2S), full mesh hub, and VNet to VNet transit through the hubs.
Create Azure Virtual WAN service in Microsoft Azure
To create the Azure Virtual WAN resource, perform the following steps:
-
Log into the Azure portal and click Create a resource.

-
Search for Virtual WAN and click Create.
-
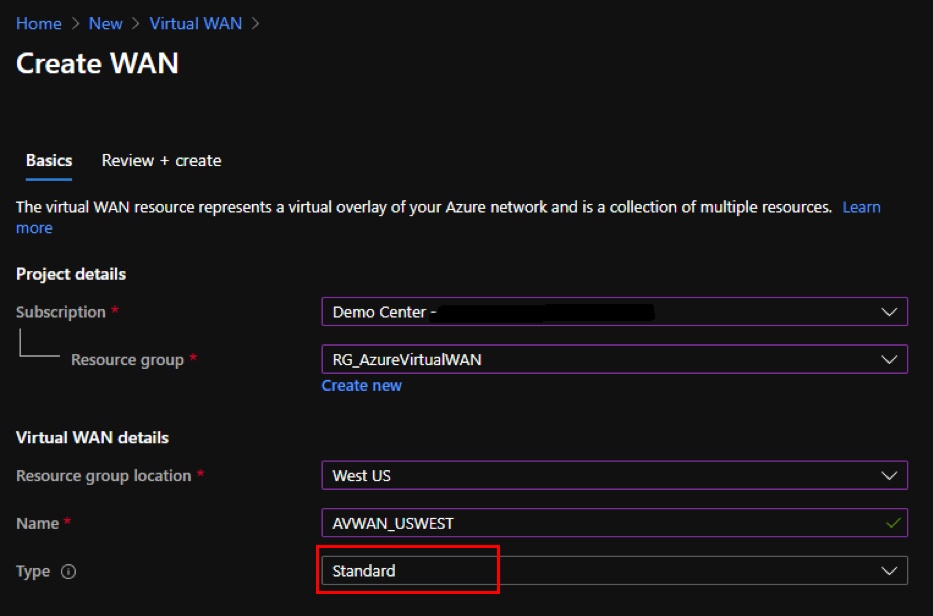
Under Basic, provide the values for the following fields:
-
Subscription: select and provide the subscription detail from the drop-down list.
-
Resource group: Select an existing resource group or create a new one.
Note
When creating the service principal to allow Azure API communication, ensure to use the same resource group that contains the Virtual WAN. Otherwise, the Citrix SD-WAN Orchestrator service will not have sufficient permissions to authenticate to Azure Virtual WAN APIs that enable automated connectivity.
-
Resource group location: Select the Azure region from the drop-down list.
- Name: Provide the name for the new Virtual WAN.
- Type: select Standard type if you want to use hub-to-hub communication between different regions, otherwise select Basic.
-
- Click Review + create.
- Review the details that you entered to create the Virtual Wan and click Create to finish the Virtual WAN creation.
The deployment of the resource takes less than a minute.
Note
You can upgrade from Basic to Standard, but cannot revert from Standard back to Basic. For steps to upgrade a virtual WAN, see Upgrade a virtual WAN from Basic to Standard.
Create a Hub in the Azure Virtual WAN
Perform the following steps to create a hub to enable connectivity from various different endpoints (for example, on-premises VPN devices, or SD-WAN devices):
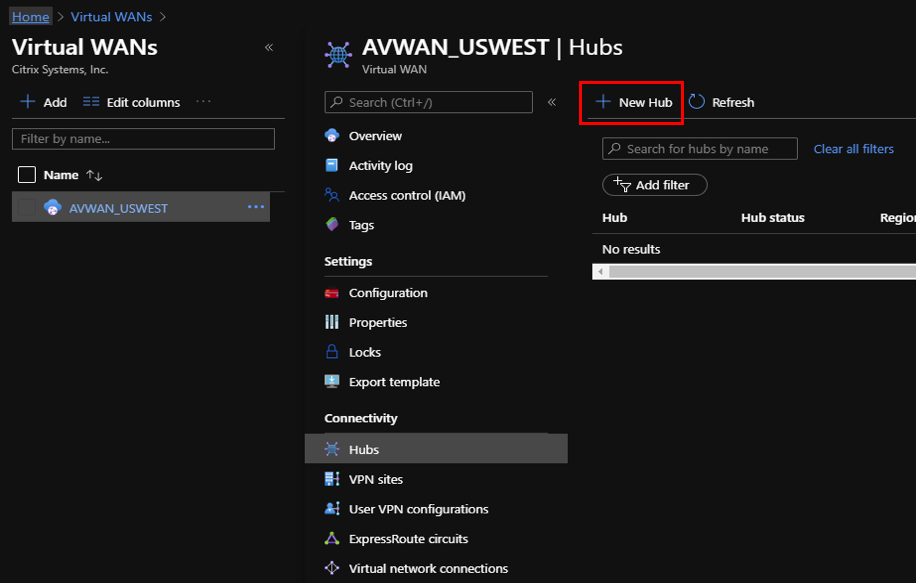
- Select the previously created Azure Virtual WAN.
-
Select Hubs under Connectivity section and click + New Hub.
-
Under Basic, provide the values for the following fields:
- Region – Select the Azure region from the drop-down list.
- Name – Enter the name for the new Hub.
- Hub private address space – Enter the address range in CIDR. Select a unique network that is dedicated for the hub only.
-
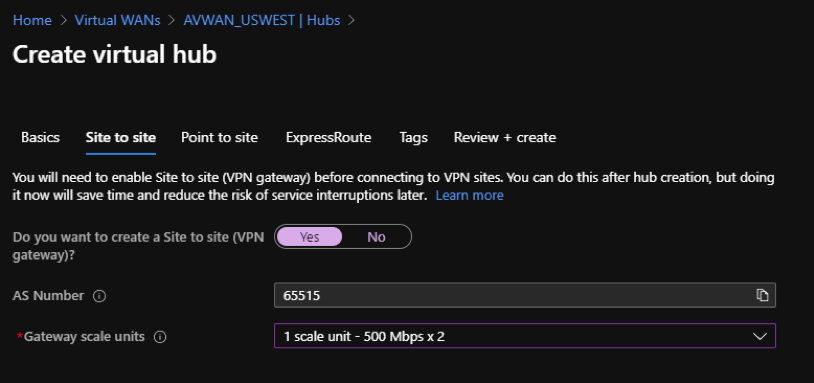
Click Next: Site to Site > and provide the values for the following fields:
- Do you want to create a Site to site (VPN gateway)? – Select Yes.
-
Gateway scale units – Select the scale units from the drop-down list as needed.
- Click Review + create.
- Review the settings and click Create to start the virtual hub creation.
The deployment of the resource can take up to 30 minutes.
Create a service principal for Azure Virtual WAN, and identify IDs
For the Citrix SD-WAN Orchestrator service to authenticate through Azure Virtual WAN APIs and enable automated connectivity, a registered application must be created and identified with the following authentication credentials:
- Subscription ID
- Client ID
- Client Secret
- Tenant ID
Note
When creating the service principal to allow Azure API communication, ensure to use the same resource group that contains the Virtual WAN. Otherwise, the Citrix SD-WAN Orchestrator service will not have sufficient permissions to authenticate to Azure Virtual WAN APIs that enable automated connectivity.
Perform the following steps to create an application registration:
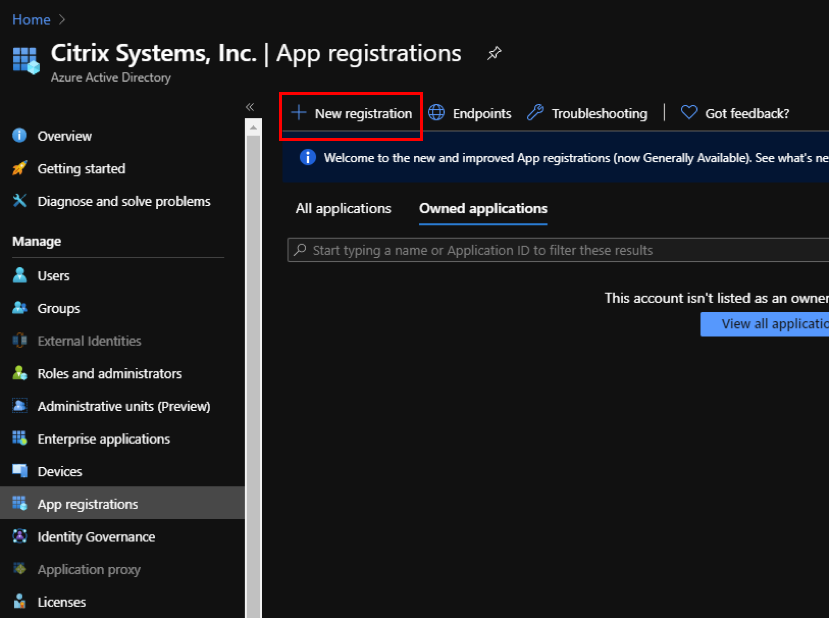
- In the Azure portal, navigate to Azure Active Directory.
- Under Manage, select App registration.
-
Click + New registration.
-
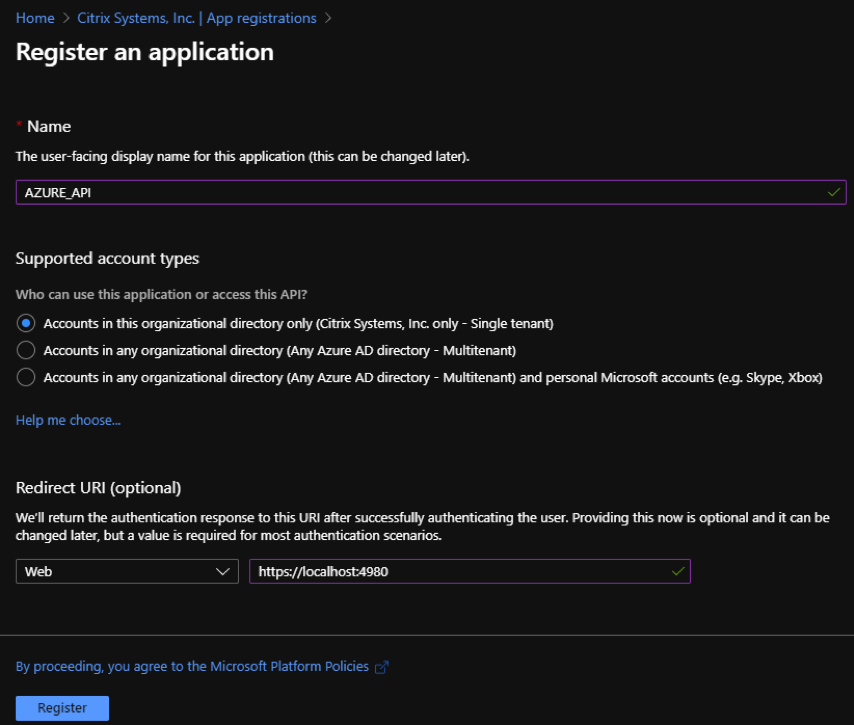
Provide values for the following fields to register an application:
- Name – Provide the name for the application registration.
- Supported account types – select Accounts in this organizational directory only (* - Single tenant) option.
- Redirect URI (optional) – select Web from the drop-down list and enter a random, unique URL (for example, https:// localhost: 4980)
- Click Register.
You can copy and store the Application (client) ID and the Directory (tenant) ID that can be used in the Citrix SD-WAN Orchestrator service for authentication to the Azure subscription for usage of the API.
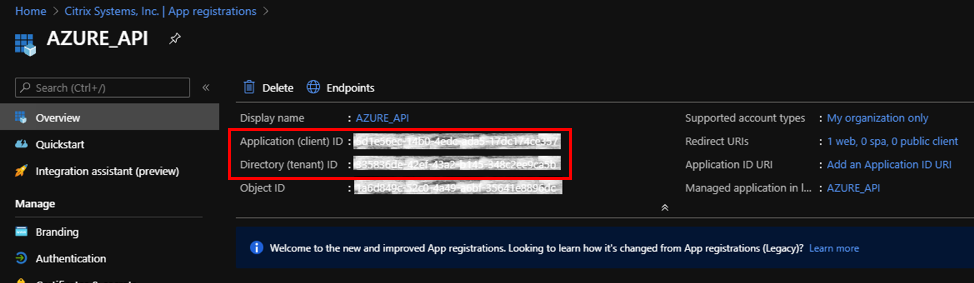
The next step for the application registration, create a service principal key for authentication purposes.
To create the service principal key, perform the following steps:
- In the Azure portal, navigate to Azure Active Directory.
- Under Manage, navigate to App registration.
- Select the registered application (created previously).
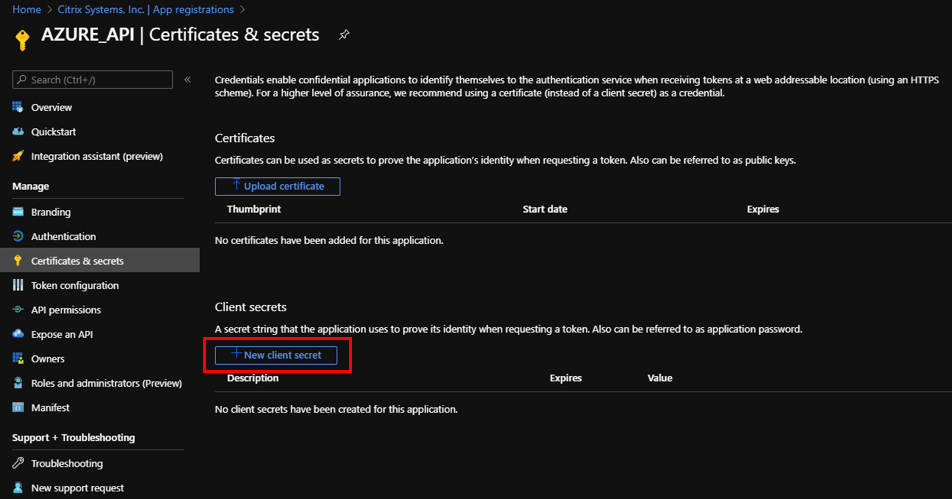
- Under Manage, select Certificates & secrets.
-
Under Client secrets, click + New client secret.
- To add a client secret, provide values for the following fields:
- Description: Provide a name for the service principal key.
- Expires: Select the duration for expiration as needed.
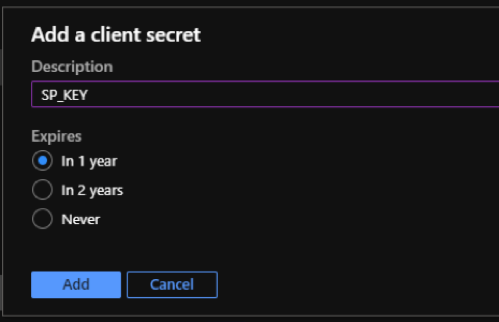
- Click Add.
-
The client secrete is disabled in the Value column. Copy the key to your clipboard. This is the Client Secret that you must enter into the Citrix SD-WAN Orchestrator service.
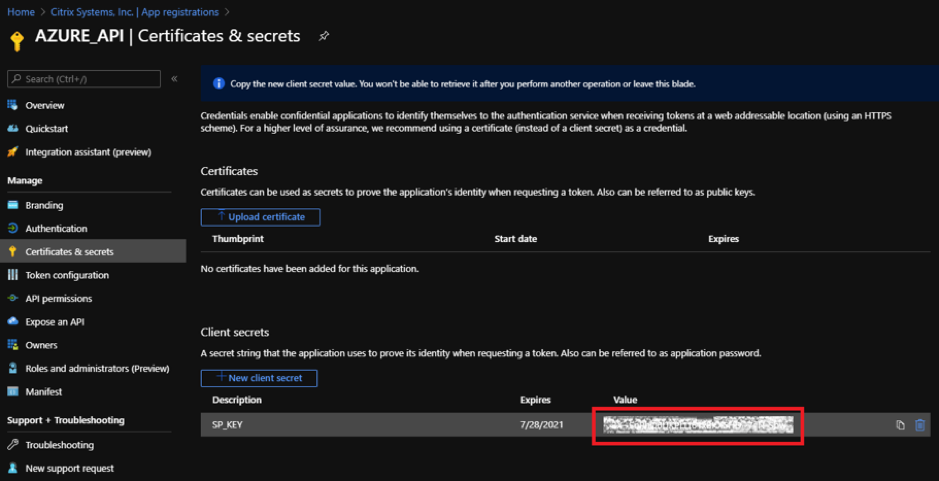
Note
Copy and store the secret key value before reloading the page because, it will no longer be displayed afterwards.
Perform the following steps to assign the appropriate roles for an authentication purpose:
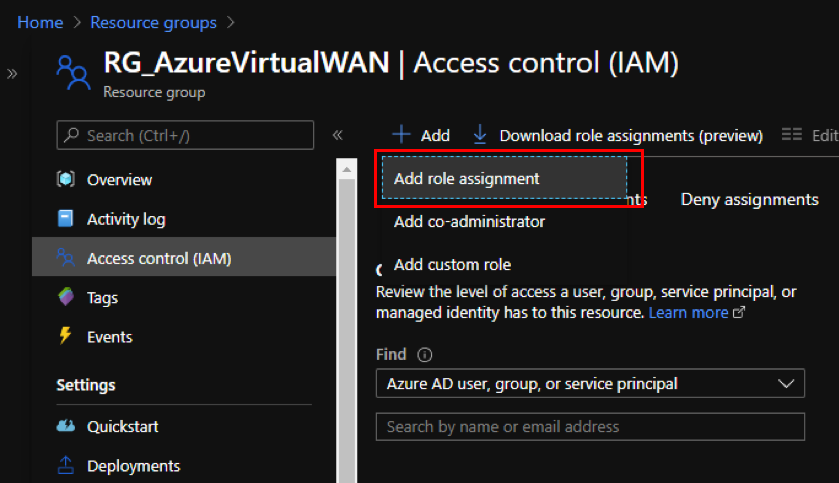
- In the Azure portal, navigate to the Resource Group where the Virtual WAN was created.
- Navigate to Access control (IAM).
-
Click + Add and select Add role assignment.
-
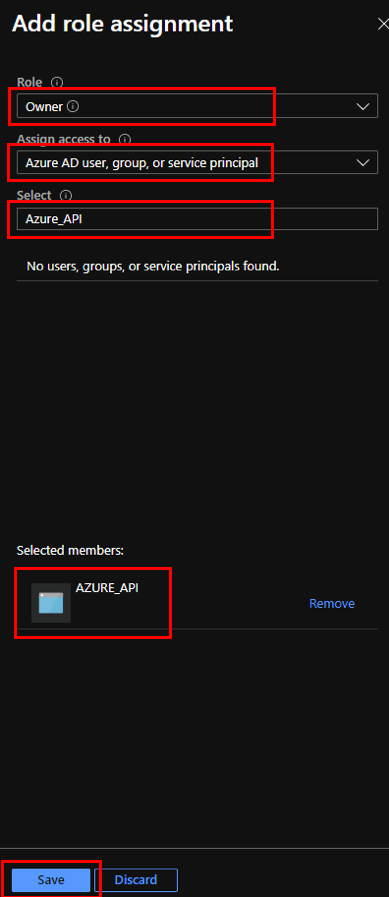
To add role assignment, provide values for the following fields:
- Role – Select Owner from the drop-down list. This role allows management of everything including access to resources.
- Assign access to – select Azure AD user, group, or service principal.
- Select – Provide the name of the registered application created earlier and select the corresponding entry when it appears.
-
Click Save.
Lastly, you need to obtain the Subscription ID for the Azure account. You can identify your Subscription ID by searching for Subscriptions in the Azure portal.

Configure Azure Virtual WAN Delivery Service in Citrix SD-WAN Orchestrator service
Microsoft Azure Virtual WAN and Citrix SD-WAN provide simplified network connectivity and centralized management across cloud workloads. This service provides automatic configuration of branch appliances to connect to the Azure Virtual WAN and configure branch traffic management policies according to your business requirements.
Provide the Azure Service Principal information to map any Citrix SD-WAN sites to Azure Virtual WAN. Before configuring the sites to an Azure Virtual WAN service, you need to create the Azure Virtual WAN Hubs with site-to-site connectivity gateway resource in your respective Azure region. Site-to-site connections are established between Citrix SD-WAN appliances and Azure.
Note
Only the Virtual WAN hubs created in the Azure portal for your subscription are listed for mapping.
As part of mapping Citrix SD-WAN branches to Azure Virtual WANs, a branch site needs to be associated with Azure WAN resources to establish IPsec tunnels with the Azure Virtual Hubs using the preselected IPsec IKE/IPsec settings. The Sites and Azure backbone routes are learned over BGP by default. When Citrix SD-WAN branch sites have multiple internet WAN links configured, two WAN links are automatically chosen to provide redundancy. The chosen Citrix SD-WAN software must have the support to switch between primary and secondary IPsec tunnels, which are supported from the 11.1 release onwards.
Note
One Citrix SD-WAN site can connect to multiple Azure Virtual Hubs in the same or different Azure regions.
Certain Citrix SD-WAN appliances have resource limitation on the number of IPsec tunnels that can be supported. Hence the configuration mapping might fail, if the Citrix SD-WAN appliance tunnel count restrictions are not met.
The following are the IPsec tunnel limit per SD-WAN platform:
| SD-WAN appliances | IPsec Tunnels supported |
|---|---|
| 4100, 5100, 6100 | 256 |
| 1100, 2100 | 128 |
| 110, 210, 410, 1000, 2000 | 8 |
Prerequisites
Perform the following prerequisites before beginning the configuration in the Citrix SD-WAN Orchestrator service:
- Complete setup of Azure infrastructure (peer VNet with Hub, registered application for automation, and so on)
- Obtain access to Citrix SD-WAN Orchestrator service as a cloud-hosted service. Ensure to use a Citrix Cloud account that has gone through the proper onboarding process, otherwise the authentication fails.
- Ensure that the Azure subscription is not already in use with any other Citrix SD-WAN Orchestrator service configuration.
- Have already deployed MCN and branch SD-WAN nodes and confirm Virtual Path over Internet WAN link types. Citrix SD-WAN Orchestrator service automatically enables Intranet Service through the configuration process.
- Ensure that the branch SD-WAN nodes are set to auto-learn the Internet WAN link’s Public IP address.
Perform the following to complete the configuration of Azure Virtual WAN and establish the IPsec tunnels with SD-WAN devices:
-
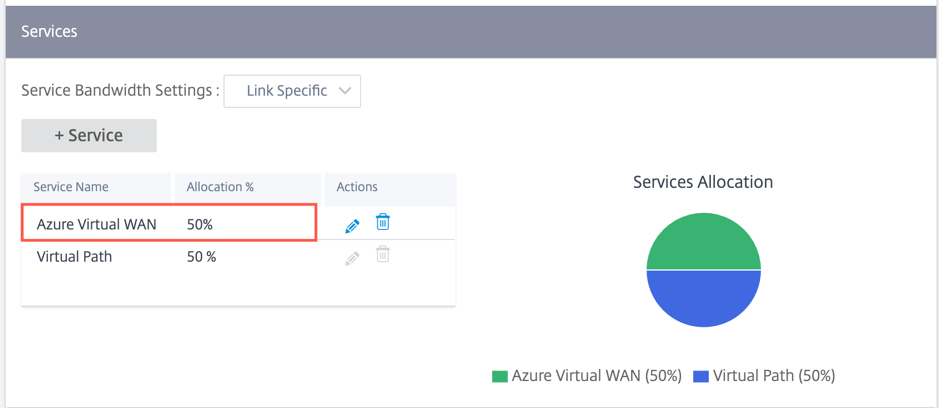
On Citrix SD-WAN Orchestrator service, from the customer level, navigate to Delivery Channels > Bandwidth Alocation. Allocate a percentage of bandwidth for the Azure Virtual WAN delivery service (for example, 20%). You might have to subtract the allocated percentage from any of the other delivery services (for example, Virtual Path), so that the total allocated percentages equal 100.

Note
Provide the subscription bandwidth (in %) for the Azure Virtual WAN service. You can reserve the subscription bandwidth both at global (All Sites > Configuration > Delivery Channels > Bandwidth Allocation) and site (Site > Site Configuration > WAN Links > Services) level.
Optionally, one can also allocate different bandwidth for different sites. For this, perform a link specific configuration for the selected site. To do this, select the appropriate Site > WAN Links tab > Services section. You can overwrite the global bandwidth allocation by selecting Link Specific for Service Bandwidth Settings and allocating the desired bandwidth.
-
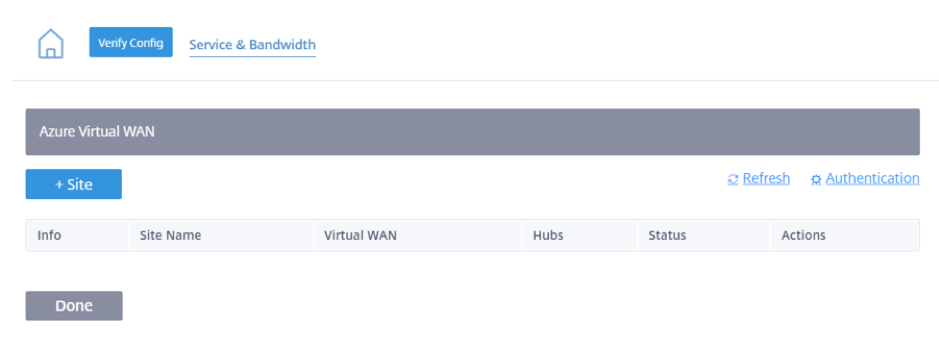
From the customer level, navigate to Configuration > Delivery Channels. In the SaaS and Cloud On-Ramp Services section, click the Azure Virtual WAN tile. The Azure Virtual WAN page is displayed.
You can also navigate to Azure Virtual WAN page from Configuration > SaaS & Cloud On Ramp > Azure Virtual WAN.
-
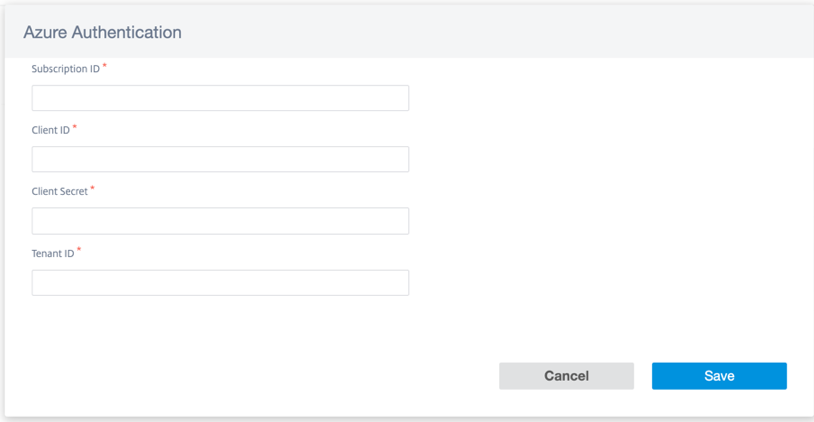
On the top right corner of the Azure Virtual WAN page, click the Authentication link.
-
Provide Azure Subscription ID, Client ID, Client Secret, and Tenant ID captured earlier during the creation of the Azure service principal. If the credentials are not correct, then the authentication fails and further action is not allowed. Click Save.
After authentication is successful, you must associate a branch site with Azure Virtual WAN resources to establish IPsec tunnels. One Branch can be connected to multiple Hubs within an Azure Virtual WAN resource and one Azure Virtual WAN resource can be connected with multiple branch sites.
Note
You can clear the authentication settings by clicking the Clear Authentication link. Ensure that you delete the site mappings before deleting the authentication.
-
After successful Azure authentication, click Add Sites to add a site.
Note
The Add Sites option is disabled if you have not reserved the subscription bandwidth.
-
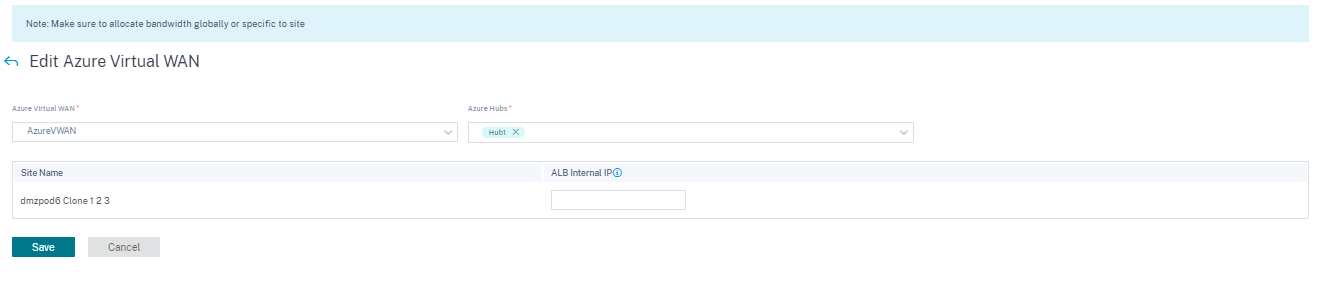
Provide the following details:
-
Filter by Region/Custom Groups – You can select all or selective region/groups.
-
Select Sites – You can select all or selective sites that you want for mapping.
-
Azure Virtual WAN - Select the Azure Virtual WAN from the drop-down list that is associated with the subscription. Same site cannot be connected to multiple WANs.
-
Azure Hubs - Select the Azure hubs. Only Azure Virtual WANs with Azure Virtual hubs are listed for mapping. You can add multiple hubs connected to the same site.
Note
The Azure Virtual WAN field lists the virtual WANs that have a corresponding hub already created.
ALB Internal IP – The Azure Load Balancer (ALB) IP input is required if the particular site is an Azure VPX and deployed in a High Availability (HA) mode. Else this field is optional.
-
-
Click Save
-
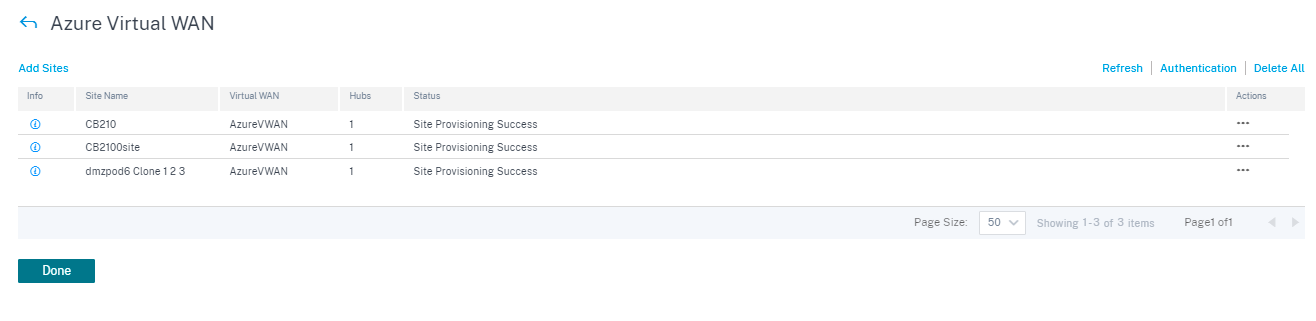
Once the site is deployed, you can see the following information:
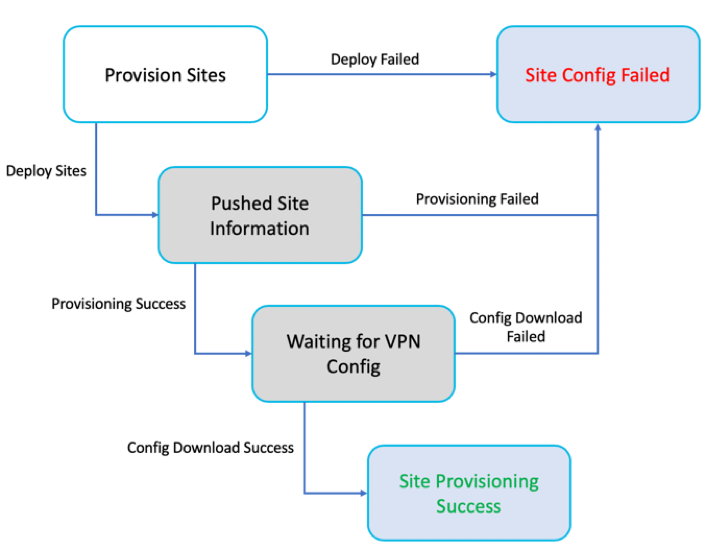
The following diagram describes the high-level workflow of Citrix SD-WAN Orchestrator service and Azure Virtual WAN connection.
- Info - Displays the Azure Virtual WAN Tunnel configuration details and status.
- Site Name – Displays the deployed site name.
- Virtual WAN – Displays the Azure Virtual WAN the corresponding site is mapped with.
- Hubs – Displays the number of hubs.
- Status – Displays the different deployment states with the completion message. If the site is provisioned successfully, then only the IPsec tunnels can be created.
- Action – You can Edit or Delete the configured site.

Mapping of Citrix SD-WAN sites to Azure Virtual WAN hubs might take some time since it involves downloading IPsec configuration from Azure. The branch mapping status shows as Configuration Downloaded after the branch configuration is downloaded. It is recommended to refresh the site status before you activate the configuration to see the updated status.
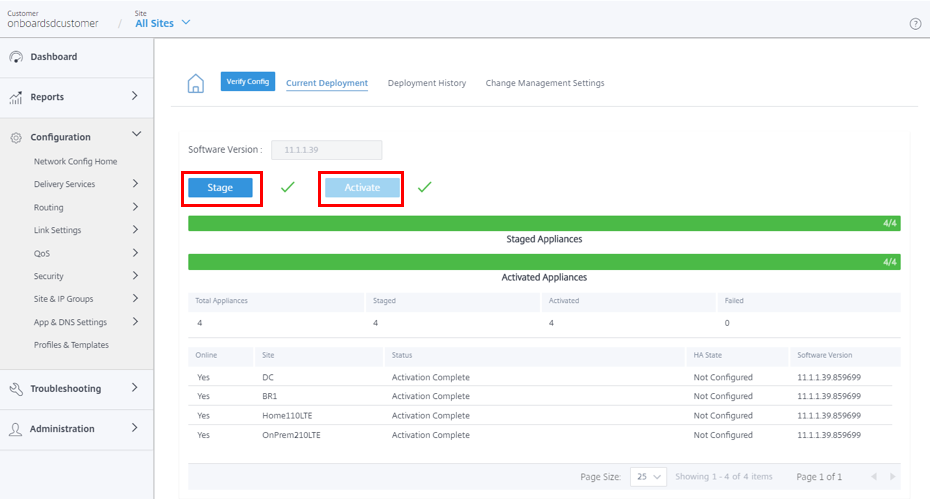
Once the site is successfully provisioned, you need to perform the Verify, Stage, and Active process to create the IPsec tunnels.
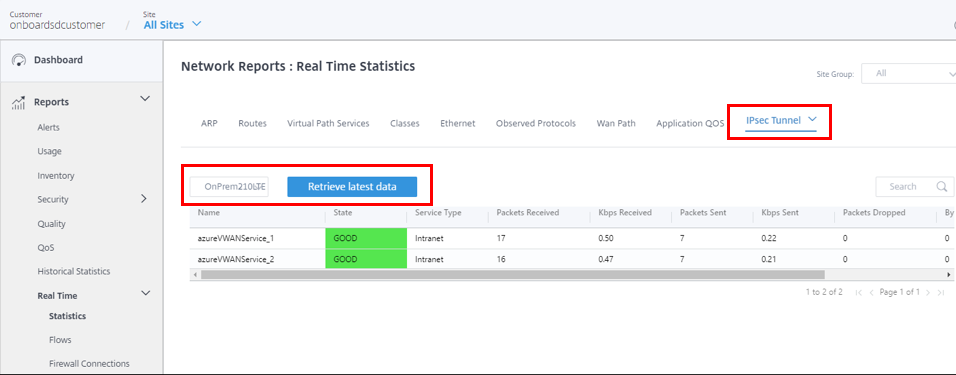
After activation, you can see the state of the tunnels for each site by navigating to All Sites > Reports > Real Time > Statistics > IPsec Tunnel, select the desired site, then click Retrieve latest data. If the configuration is not activated, the tunnels information will not be available. Two tunnels are created for the purpose of redundancy.
Also, you can see the routes to Azure Virtual WAN for each site by navigating to All Sites > Reports > Real Time > Statistics > Routes, select the desired site, then click Retrieve latest data.
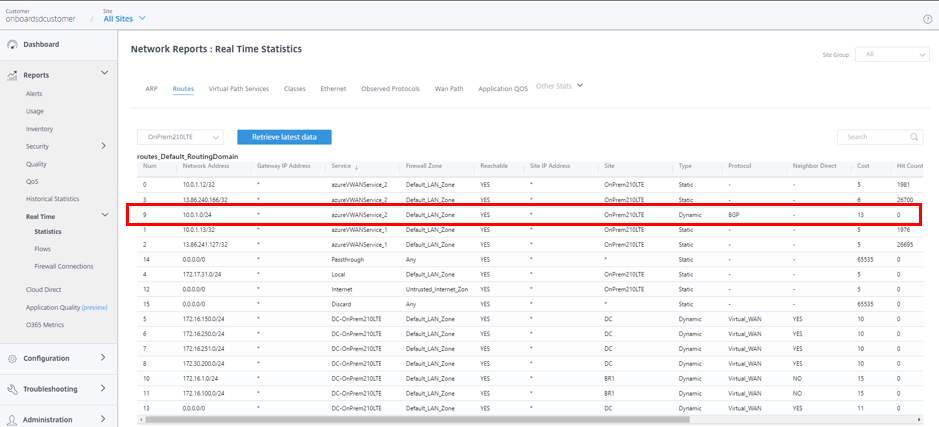
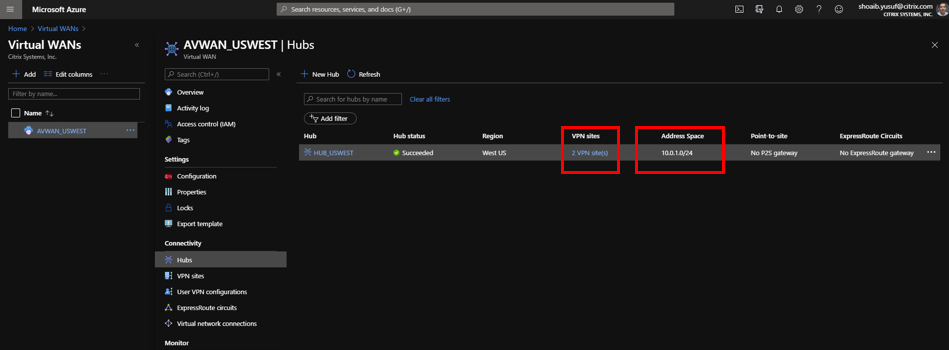
During the initial configuration of Azure Virtual WAN, the 10.0.1.0/24 VNet is associated, and this route has been learned by the on-premises SD-WAN and enter into the route table with azureVWANservice as the delivery service type. Type indicating Dynamic and Protocol indicating BGP can be determined that the route was learned dynamically over BGP.
In the Azure portal, successfully deployed VPN sites can be monitored in the Azure Virtual WAN hub. Also, you will find the Address Space associated with the Hub that was learned by the on-premises SD-WAN device.
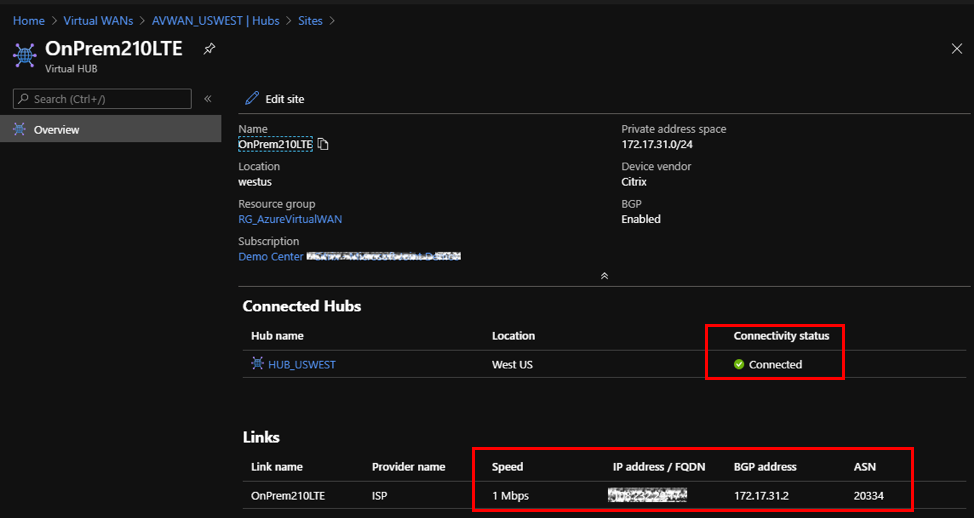
Selecting any of the connected VPN sites provides detail of the connected SD-WAN. Including the public IP Address/FQDN that terminates the IPsec tunnel, the private IP address space, and the BGP address that would be the SD-WAN’s WAN interface VIP address, and more importantly the speed and connectivity status to the hub.
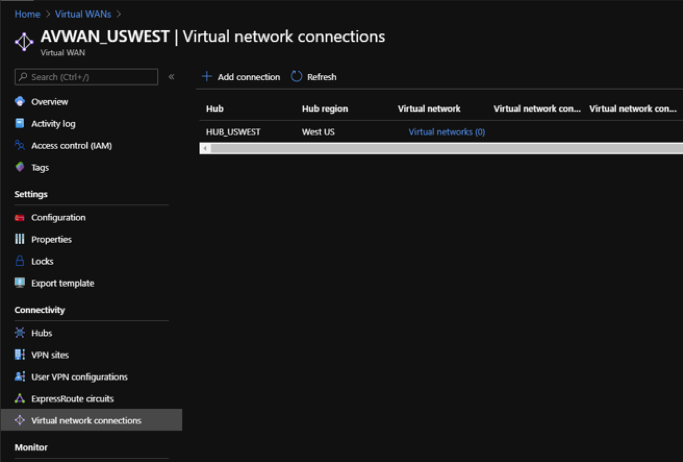
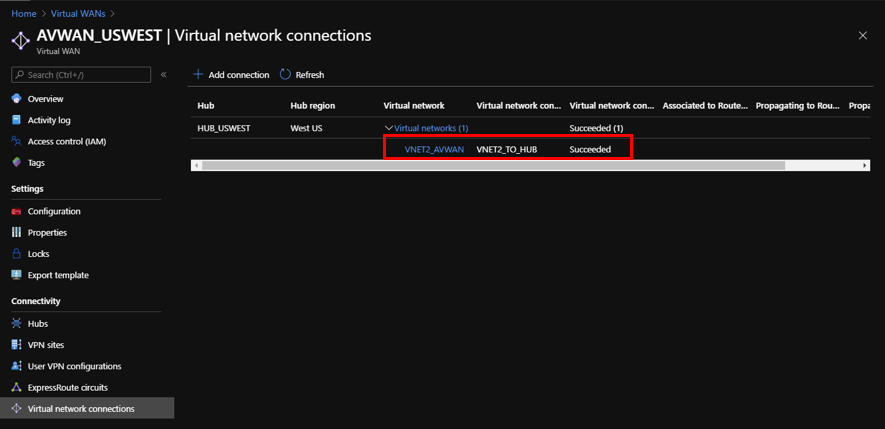
In Azure, virtual network connections can be added to make available resources in Azure by connecting VNets. To complete this configuration, perform the following:
- In the Azure portal, select the Virtual WAN resource.
- Under Connectivity, navigate to Virtual network connections.
-
Click + Add connection.
-
To add connection, specify values for the following fields:
- Connection name – Enter the name for the new connection.
- Hubs – Select from the available hubs in the drop-down list.
- Subscription – Select from the available subscriptions in the drop-down list.
- Resource group – Select the resource group from the drop-down list where the Virtual WAN resource is deployed.
- Virtual network – Select from the available virtual networks in the drop-down list.
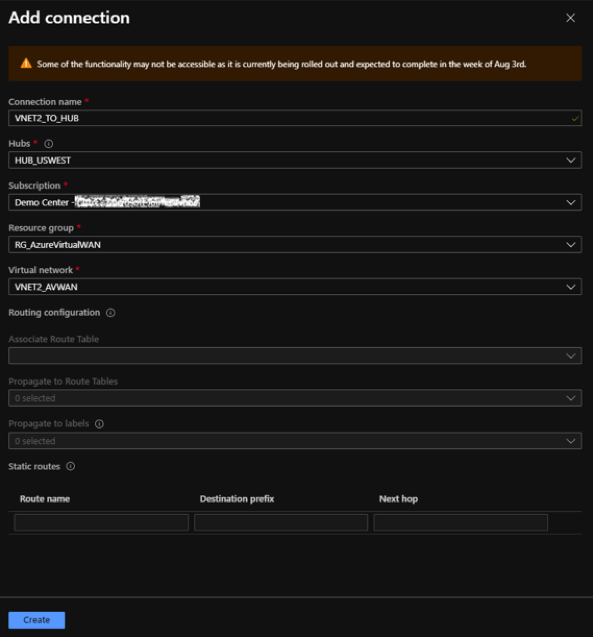
-
Click Create.
With the new VNet peered to the Hub, on-premises SD-WAN devices are dynamically learned the new route through BGP. To retrieve the latest route table for the SD-WAN device in Citrix SD-WAN Orchestrator service, navigate to All Sites > Reports > Real Time > Statistics > Routes. Select the desired site and click Retrieve latest data.

Citrix SD-WAN deployed VPN sites can access resources deployed in VNets peered to the Azure Virtual WAN Hubs through the previously mentioned configuration steps.