Deployment
The Deployment page allows you to change the software version, stage, and deploy the configuration across your network after the sites are configured. You can upgrade the SD-WAN software version on all the appliances and sites across the network.
The Deployment page contains the following sections:
The following sections on the Deployment page provide details of the deployment status:
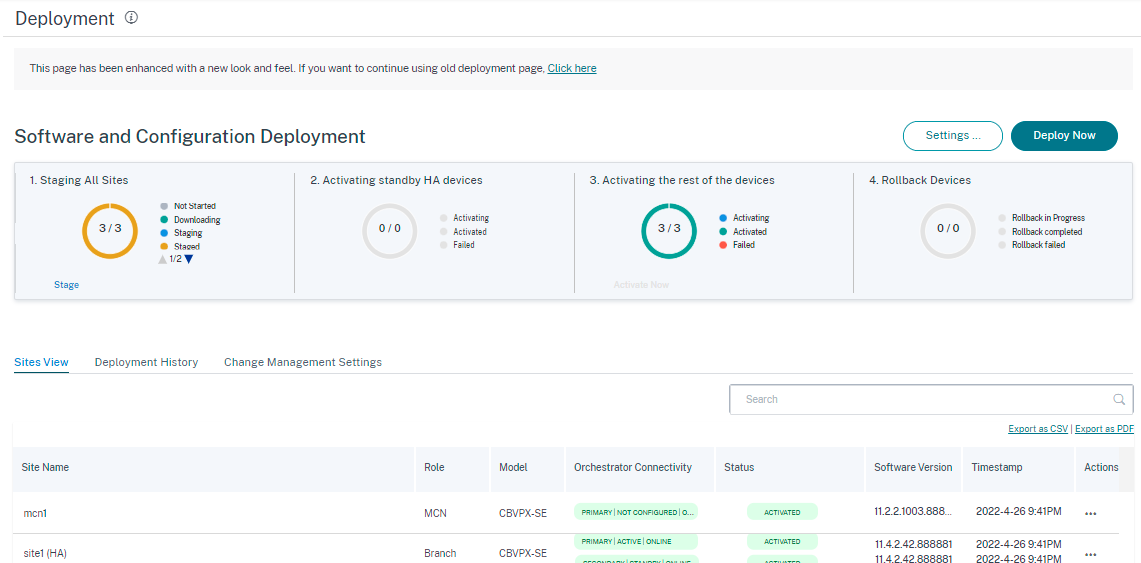
Switch to old deployment view
Select this option if you want to switch to the old Deployment page. For more information about the old Deployment page, see Old Deployment View.
Settings
The Stage All Failed Sites and Restore Previous Version options are available under the Settings… menu.
Stage All Failed Sites
When some sites are not staged successfully, select the Stage All Failed Sites option to reinitiate the staging process. This option is enabled only when staging fails.
Restore previous version
When you restore the previous version, Citrix SD-WAN Orchestrator service initiates a network-wide activation of the previous configuration and restores the previously activated configuration (and/or software) on your network. To restore the previous version, on the Deployment page, navigate to Settings and select Restore Previous Version.

A confirmation message is displayed. Click Proceed to continue.

Note
The Restore previous version action can be performed when the network is not in the staged state. This option is disabled for staged networks.
Deploy now
To initiate the software deployment process on your network, click the Deploy Now icon. For detailed information about the deployment workflow see Deployment workflow.
Software and configuration deployment
This section provides a summary of the most recent deployment:
- Last Deployment Summary: Displays the date and time (in UTC time zone) of the last deployment.
- Software version: Displays the configured software version and the number of sites running the software version.
- Configuration changes: Provides information such as the number of global and site-specific features to which changes were made, and the number of sites that were added and deleted. This column is displayed only if the network contains more than 100 sites.
- Settings: Displays the status of other deployment settings such as Ignore incomplete and Rollback.
Important information about Citrix SD-WAN 11.5
Note the following points before you upgrade to Citrix SD-WAN 11.5:
-
SD-WAN 11.5.0 release is available only via Citrix SD-WAN Orchestrator service and only on selected geographical POPs.
-
SD-WAN Configuration Editor and SD-WAN Center are superseded by Citrix SD-WAN Orchestrator service. Citrix SD-WAN Orchestrator service supports all configurations that are currently done through SD-WAN Configuration Editor.
-
Citrix SD-WAN 11.5 is a Limited Availability release, recommended and supported only for specific customers/ deployments.
- SD-WAN 11.5.0 release does not support Advanced Edition(AE), Premium Edition(PE), WAN Optimization deployments
-
SD-WAN 11.5.0 supports only the platforms mentioned in SD-WAN platform models and software packages.
-
SD-WAN 11.5.0 does not support Citrix SD-WAN Center or Citrix SD-WAN Orchestrator for on-premises.
-
SD-WAN 11.5.0 firmware is not available on the Citrix Downloads page.
- Ensure to get the required approvals and guidance from Citrix Product Management / Citrix Support before deploying 11.5.0 on any production network.
Auto-correction for configuration and software upgrade
In Citrix SD-WAN Orchestrator service, the auto-correction feature is implemented as part of the change management workflow. When the staging fails for a site, and if the site is a control node, you need to restage the site after getting the staging failure message. The Activate now option will not be enabled if the staging fails for the control nodes. If the site that has failed staging is a branch node, you are still allowed to proceed with the activation. But to bring that branch in sync with the network, perform another round of change management.
Note
- The auto-correction check starts only after the Activate now button has been clicked and stops once the next stage is issued from the Citrix SD-WAN Orchestrator service UI.
- The maintenance mode functionality is only applicable for the auto-correction feature. If you initiate a Staging and Activation, the appliance with the maintenance mode enabled also gets updated with the software and configuration changes.
With the auto-correction feature enhancement, when a staging failure happens, the auto-correction mechanism pushes the expected software and configuration version to the failed branch and tries to bring it up in sync with the current network. The auto-correction feature is applicable for staging failure on the branch node and activation failure on any node.
The following are the two trigger points when the auto-correction starts:
- On the Citrix SD-WAN Orchestrator service Deployment page, once you get a Staging Failed or Activation Failed message, the auto-correction starts running in the background. The auto-correction check starts once the activation is completed.
- In the case of a software and configuration mismatch, where the appliance did not come up with the expected software and configuration version, the Citrix SD-WAN Orchestrator service starts pushing the actual required software and configuration copy down to the appliance for activation.
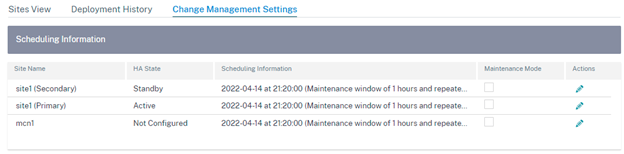
To troubleshoot an appliance manually, enable the Maintenance Mode check box under Change Management Settings. This check box is used to control if the device needs to be checked for auto-correction or not. Once the maintenance mode check box is cleared, auto-correction brings the appliance in sync with the network software and configuration version.
HA near-hitless software upgrade
During software upgrade (11.0.x and earlier versions), the staging, and activation of all the appliances in the network are done at the same time. This includes the High Availability (HA) pair, leading to network downtime. With the HA near-hitless software upgrade feature, the Citrix SD-WAN Orchestrator service ensures that the downtime during the software upgrade (11.1.x and above) process is not more than the HA switch over time.
Note
The HA near-hitless software upgrade is applicable in the following scenarios:
- The sites that are deployed in High Availability (HA) mode. It is not applicable for non-HA sites.
- Citrix SD-WAN Orchestrator service-based deployments only and not for the networks that are managed using the SD-WAN Center or MCN.
- Software upgrade only and not configuration updates. If there is configuration change along with the software as part of the upgrade, the Citrix SD-WAN Orchestrator service does not perform HA near-hitless software upgrade and continues to upgrade in the earlier fashion (single-step upgrade). All the sites get rebooted at the same time (if a reboot is required) as part of the single-step upgrade.
The upgrade sequence summary is as follows:
- Citrix SD-WAN Orchestrator service checks for the HA state of all the appliances in the network.
- Upgrades all the secondary appliances that are in the Standby state.
- HA switch-over is triggered, and the state of the Active and Standby appliances are switched.
- Upgrades the primary appliances that are now in Standby state.
The HA near-hitless software upgrade is a two-step upgrade process:
Step-1: During software upgrade, after the SD-WAN 11.1 release, the Citrix SD-WAN Orchestrator service first performs software upgrade on all the appliances that are in the Standby state across the network. The network is still up and running with the Active appliances in place.
After all the Standby appliances are upgraded to the latest software, the HA switch-over is triggered across the network. The Standby appliances (with the latest software) become Active.
Step-2: The current Standby appliances with an old software version are upgraded to the latest software and will continue to run in Standby mode.
During this software upgrade process, all other non-HA sites will also be activated with the latest software.
For more information, see the FAQs.
You can view the upgrade status by navigating to Sites View.
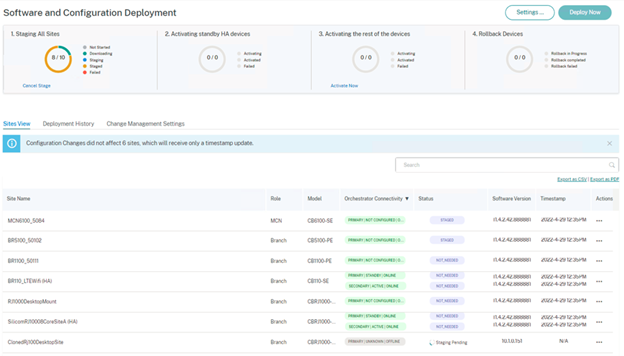
In the case of a configuration-only update, only the sites that have configuration changes are staged and activated. For the remaining sites, the timestamp is updated and processed. The control nodes will get a package staged even if there is no change to the site configuration.
If the software version is being changed, both configuration and software package are staged and activated on all the sites in the network.
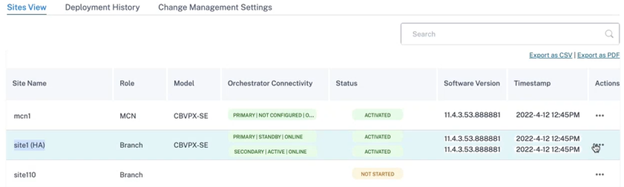
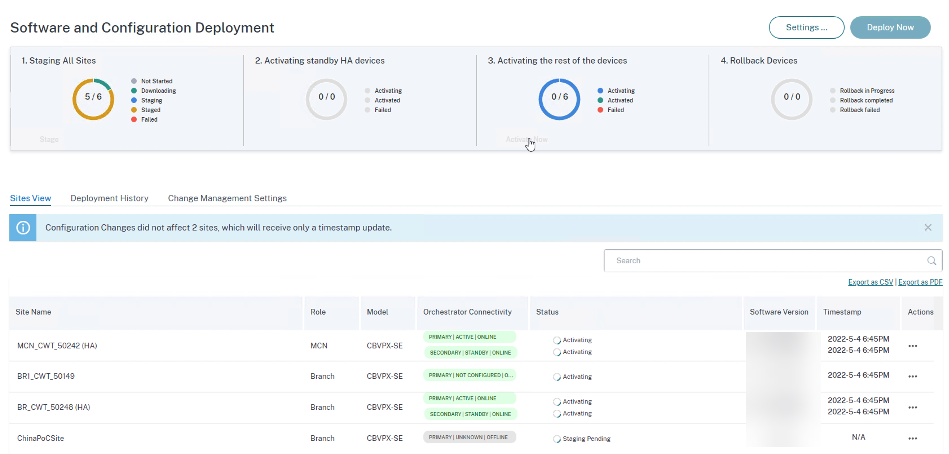
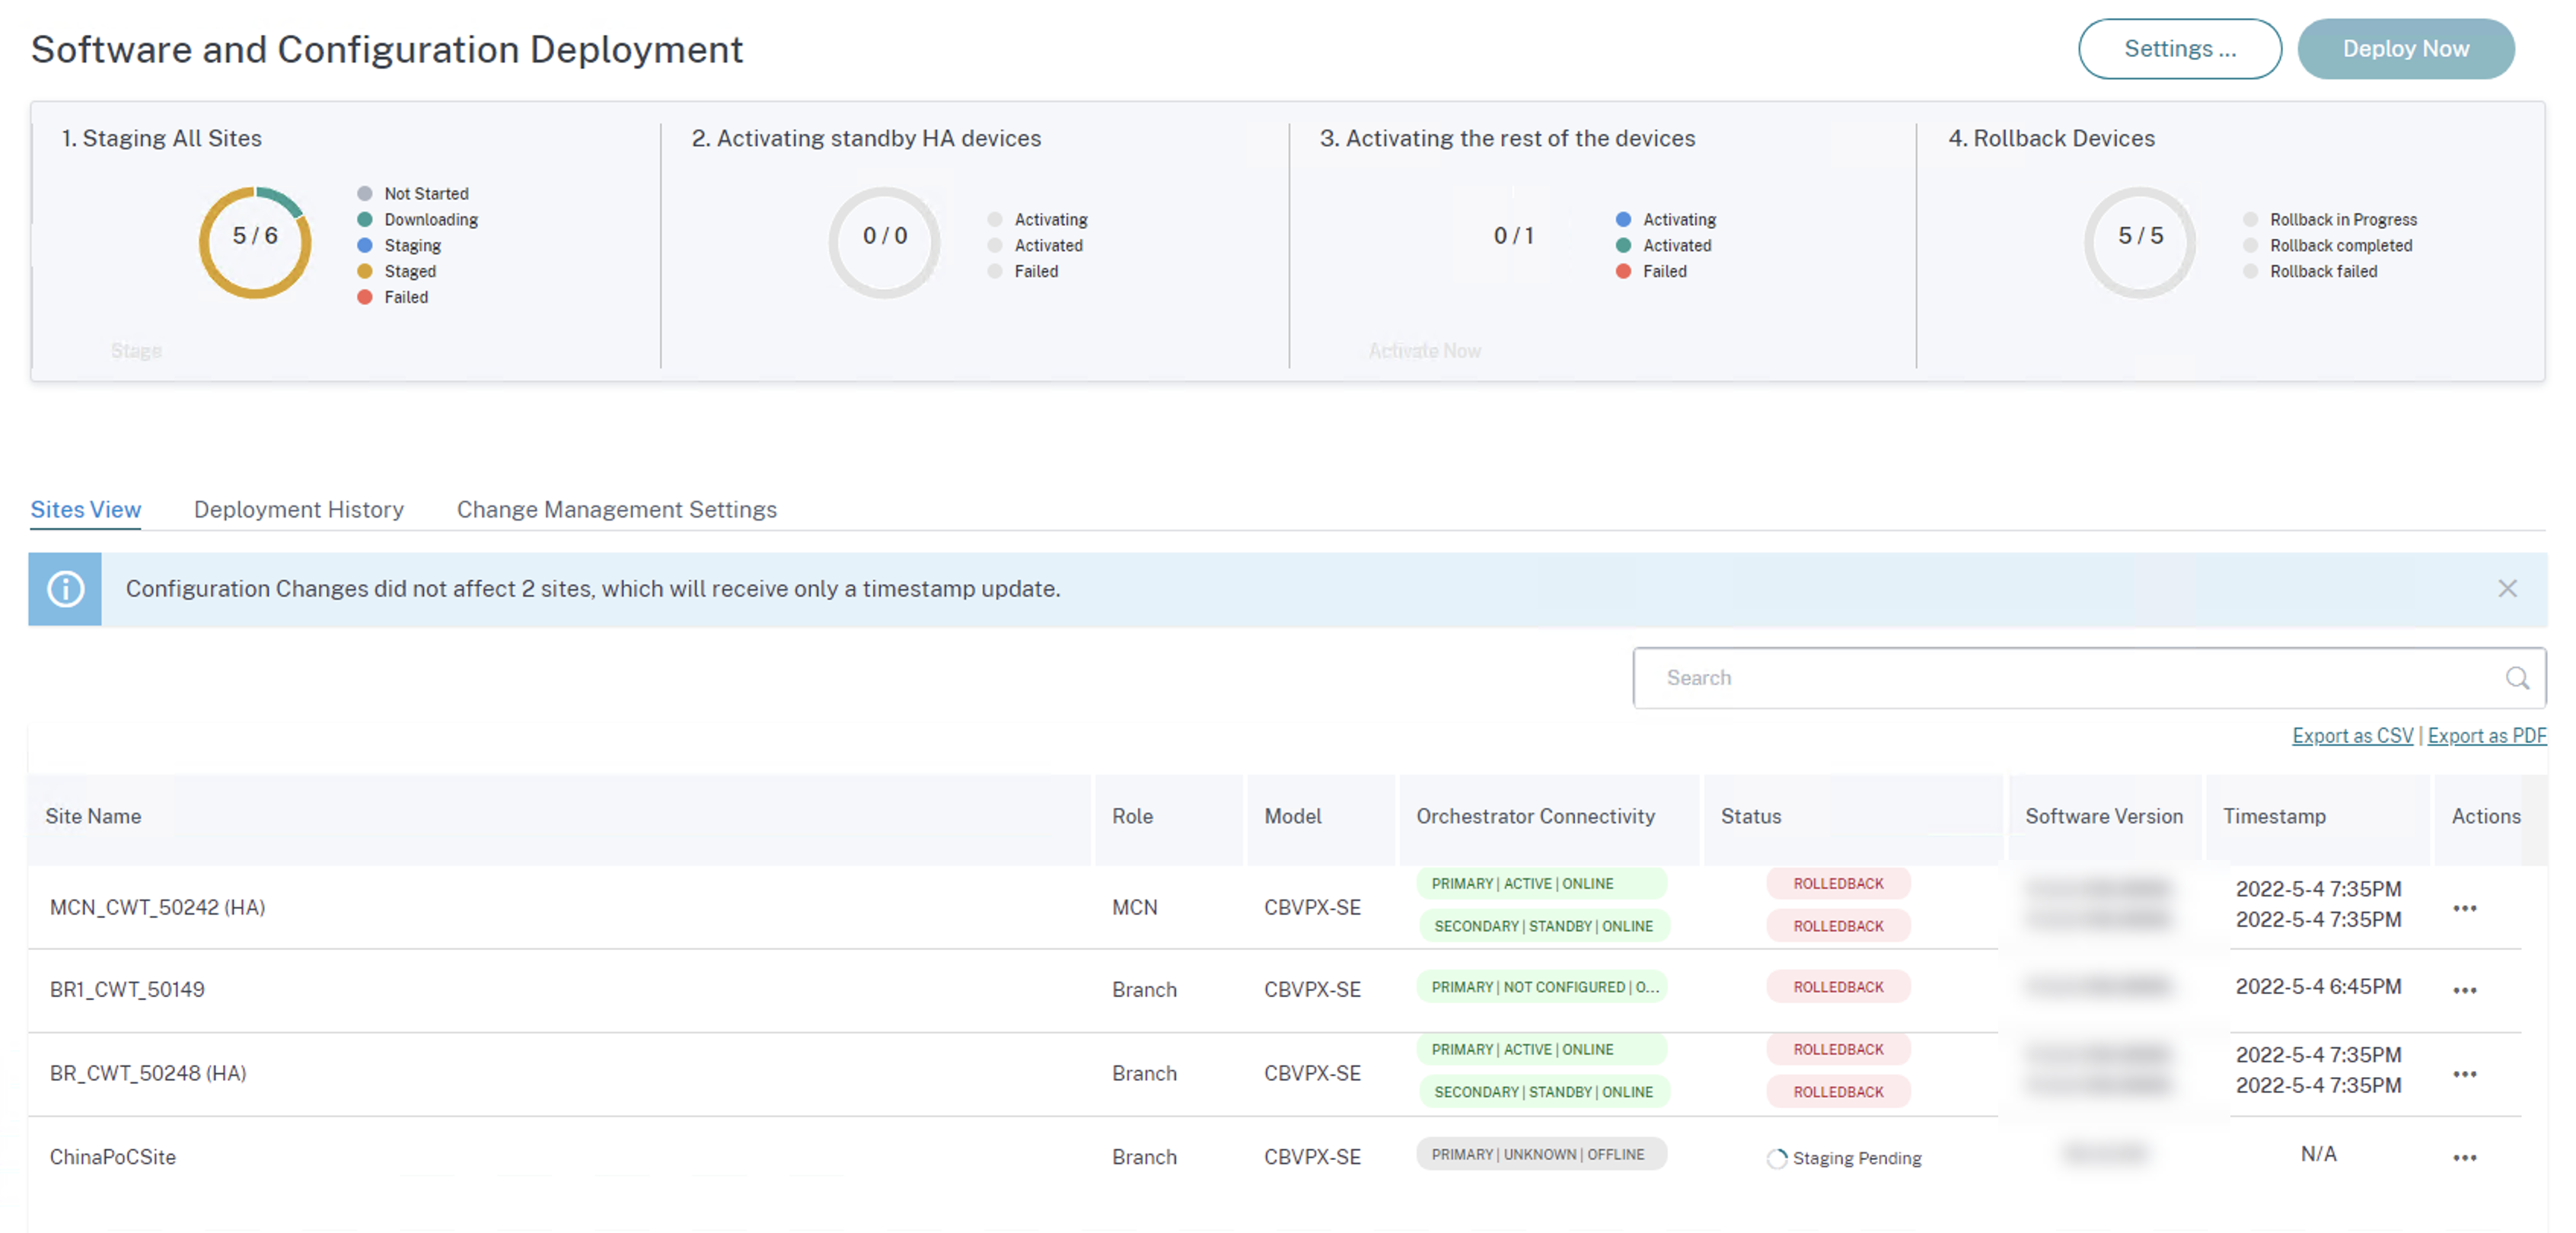
Sites view
The Sites View section provides details about all the devices in the network. The table contains the role of each site, the appliance details, deployment status, Citrix SD-WAN Orchestrator service connectivity status, software version of each appliance, and a timestamp of the running configuration. If the staging process fails at any site, use the Retry Staging (Primary Device) option, under the Actions column, to reinitiate the staging process. For HA appliances, both the options Retry staging (Primary device) and Retry staging (Secondary device) are available.
You can export the site view details into a CSV or PDF file by using the Export as CSV and Export as PDF options. The downloaded CSV and PDF file name is prefixed with Site List followed by the date and time of the file export.
Deployment history
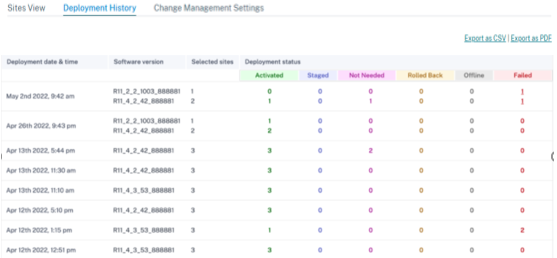
The Deployment History section provides the status of the previous deployment operations and results. If a partial site upgrade is enabled, the section categorizes the sites based on the software version that the appliances are configured to run. If the last activation fails, you can even view details of the failure by clicking the number link on the Failed column.
Note
The reason for failed sites details can be viewed only for the most recent activation. It is not available for the older entries in the Deployment History table.
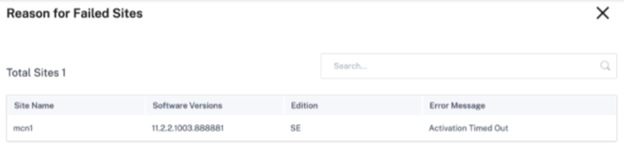
Once you click the number link in the Failed column, the Reason for Failed Sites page is displayed. This page provides details such as site name, software version, appliance edition, and an error message mentioning the reason for the failure.
You can export the deployment history details into a CSV or PDF file by using the Export as CSV and Export as PDF options. The downloaded CSV and PDF file name is prefixed with Deployment History followed by the date and time of the file is export.
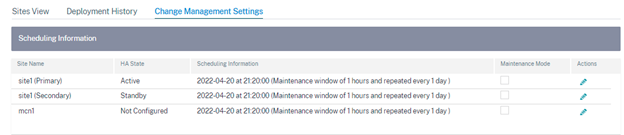
Change management settings
The Change Management Settings View section helps to troubleshoot an appliance manually. Enable the Maintenance Mode check box. This check box is used to control if the device needs to be checked for auto-correction or not. Once the maintenance mode check box is cleared, auto-correction brings the appliance in sync with the network software and configuration version.
Verify configuration
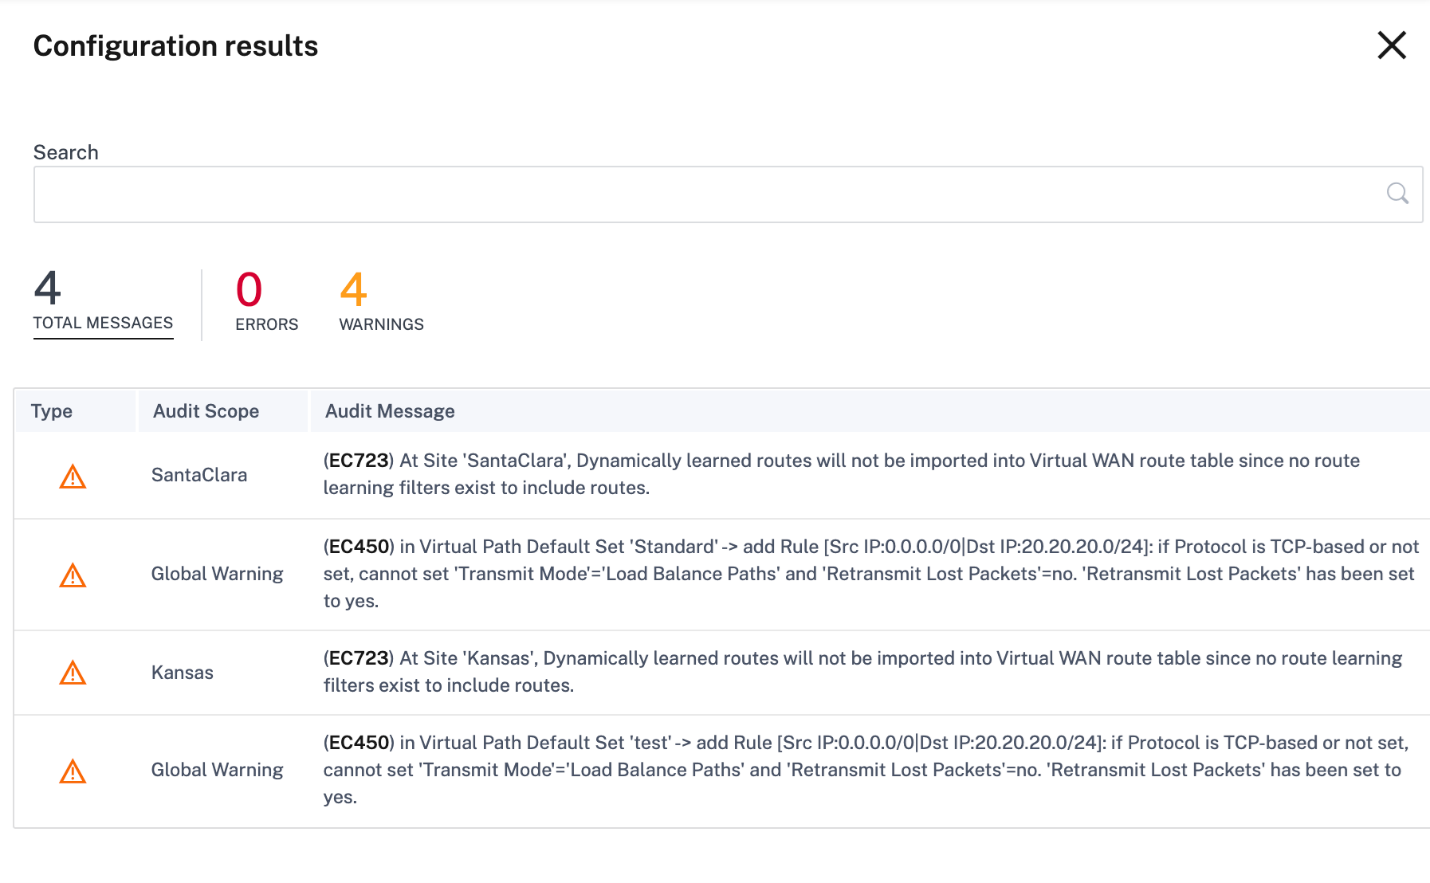
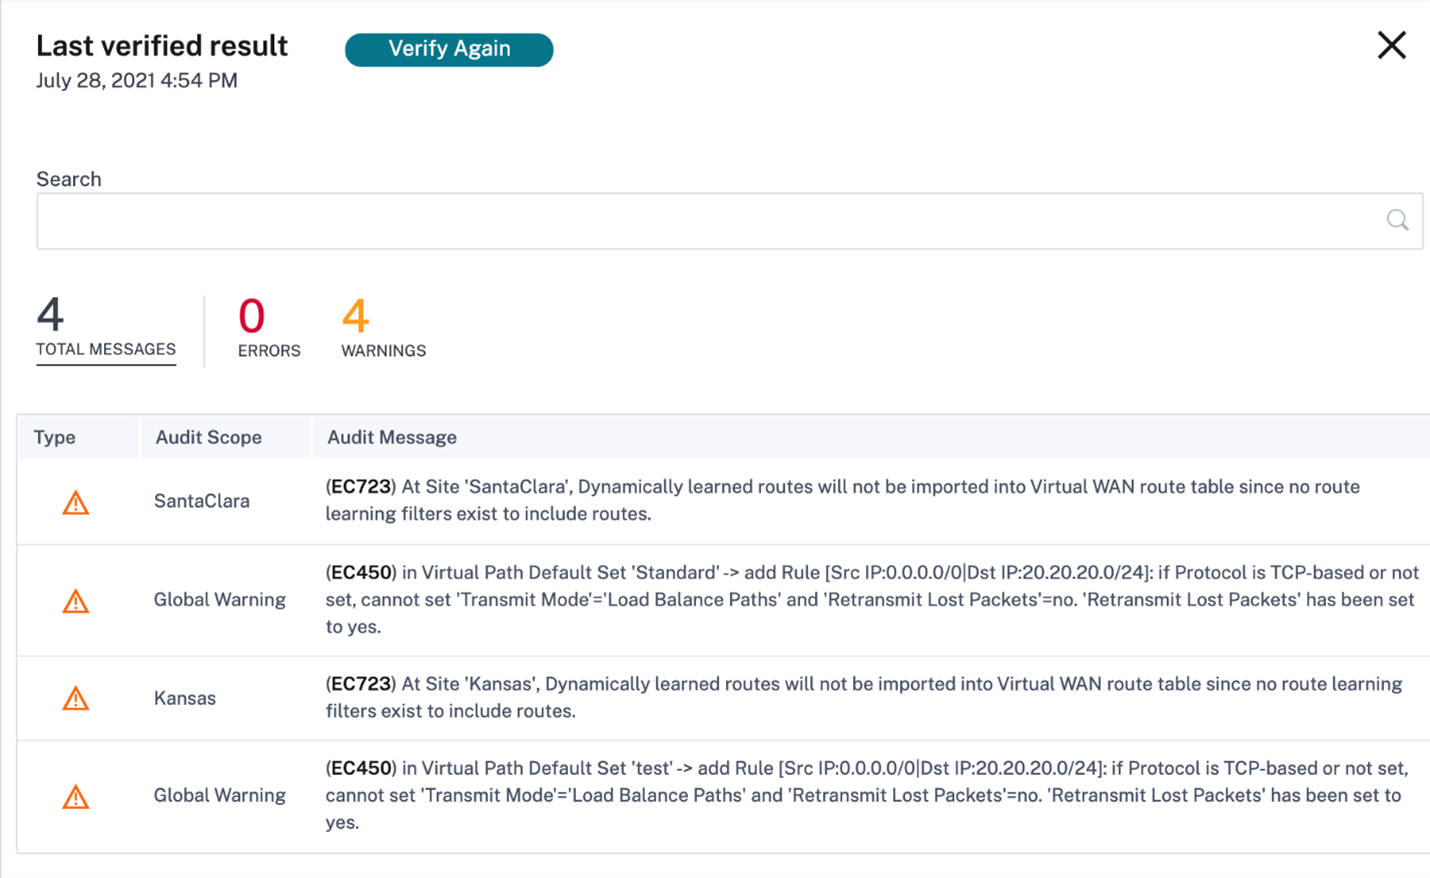
Click Verify Configuration at the top right corner of the Deployment page to validate the network configuration and check for any audit error or warning. The Configuration results page is displayed.

The configuration results display the total number of audit errors and warnings. The results are also filtered based on the audit type (error or warning) and displayed with different color codes. You can click the numbers links to view the filtered results.
The Type column displays an icon to indicate whether it is an error or a warning. The Audit Scope column specifies if the error or warning is for a site or at the network level. If the error or warning is specific to a site, then the name of the site is displayed. If the error or warning is at the global level, then a global error or a global warning is displayed. The Audit Message column contains the error code and the error message.
You can use the search bar to search for any specific errors or warnings based on the type, error code, site name, or error message.
When you click Verify Configuration for the second time, the Configuration results page displays the same results of the previously verified configuration along with the date and time details. If necessary, you can click Verify Again to rerun the validation.
Note
The Verify Configuration button does not display the audit information of site templates.
Deployment workflow
The deployment process involves the following stages:
Software and sites
When you click Deploy Now, the Start deployment > Software & Sites page is displayed. Select the default software version that you want to apply to all the sites across the network. To upgrade or downgrade selected sites, use the Partial site upgrade option.
Default network software
Select the software version for the sites across the network. The software version that you select in the Default network software drop-down list gets applied to all the sites unless there are specific overrides configured.

Partial site upgrade
The Partial Site Upgrade option is used to upgrade or downgrade the selected sites with a different version. This option provides the ability to test a new software version on a site before deploying it across the entire network.
With the Partial Site Upgrade feature, upgrades can be staggered and thereby reducing the impact of software upgrades during business hours.
Note
Partial Site Upgrade can be performed only when all the sites in the network are running Citrix SD-WAN 11.2.2 software version or above.
Any configuration changes for the Partial Site Upgrade need a change management for the changes to take effect. The Partial Site Upgrade picks the lower version and generates the configuration for the same. Any new features cannot be tested while the network is in the Partial Site Upgrade mode.
When you are downgrading from a newer to older version using the Partial Site Upgrade, if a feature which is supported only in the newer version (with the similar configuration present both in the new and older version), audit errors occur. For example, if a new appliance that only supports a newer version is selected, then audit errors are displayed.
To perform the partial site upgrade:
-
Navigate to Software and Configuration Deployment > Deploy Now. The Start deployment page is displayed.
-
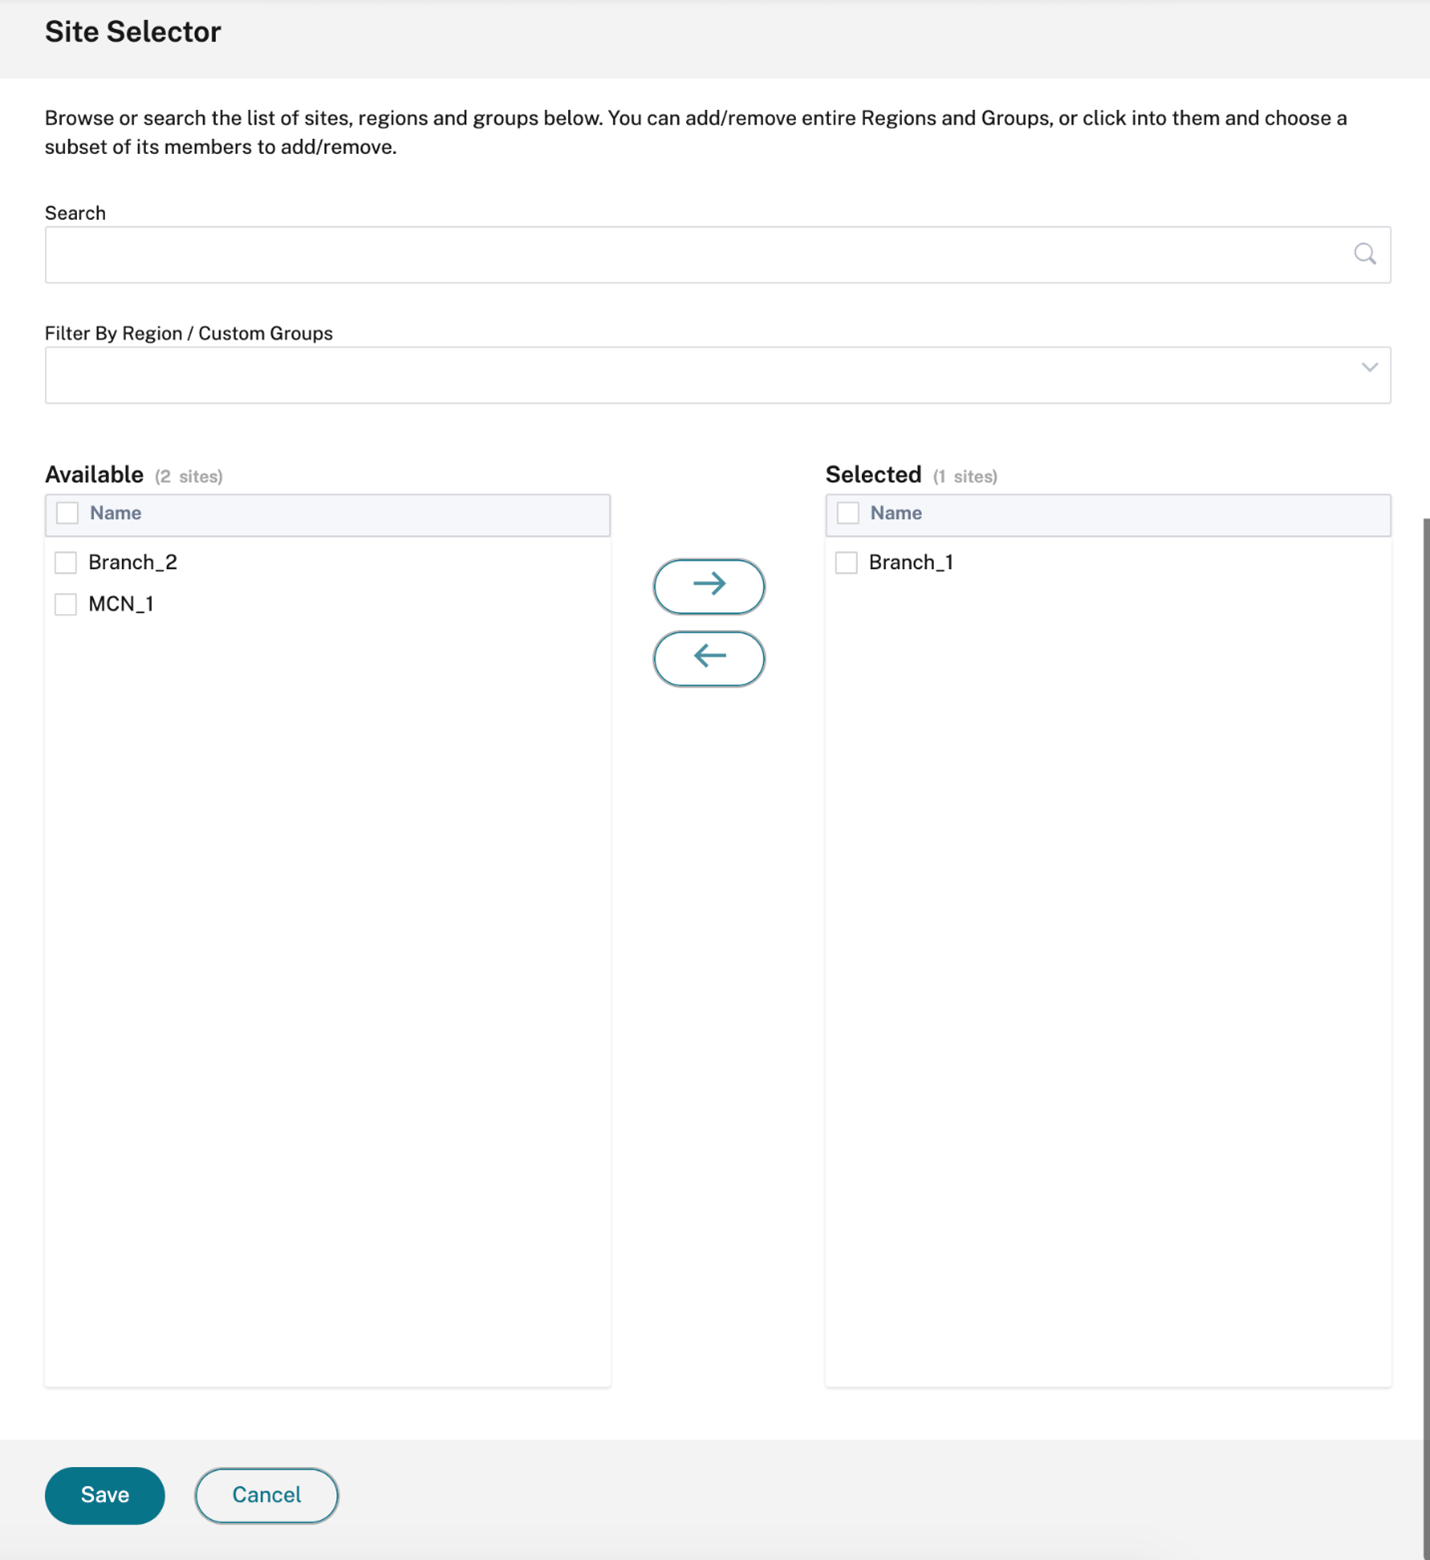
Select the Partial Site Upgrade check box, choose the software version on the Software Version drop-down list, and click Select Sites to add new sites.
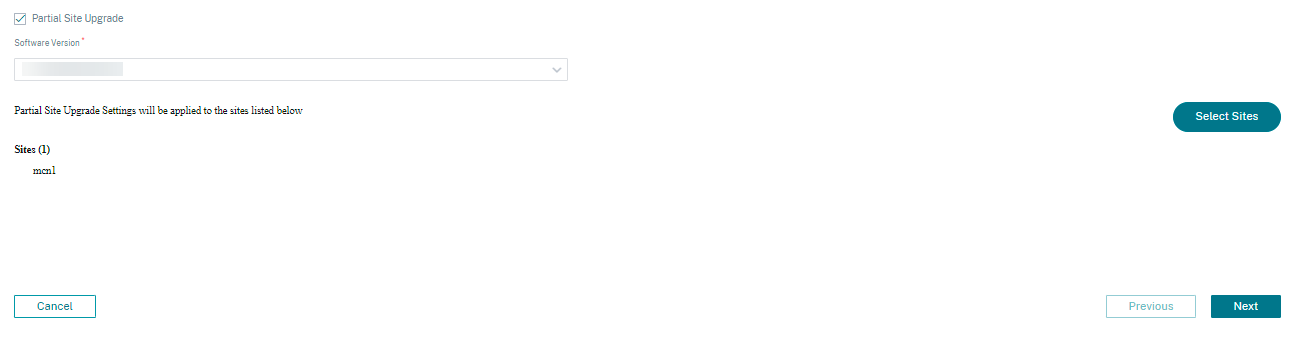
-
Select the sites and click Save.
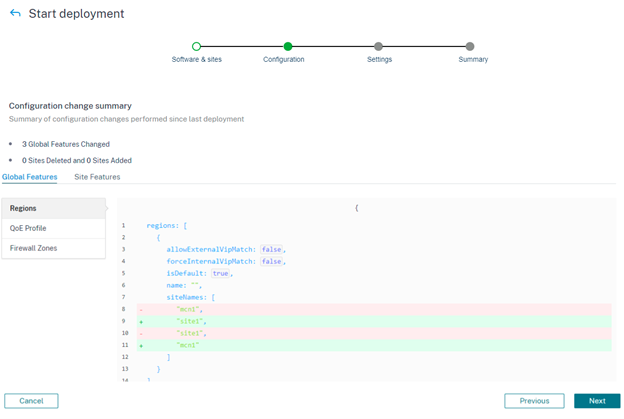
Configuration
The Configuration change summary page provides a diff in between the previously activated configuration and the configuration that you want to deploy now. The diff is displayed in JSON format. This change summary displays both global features and site-specific features.
The previous configuration value appears in red background with a minus symbol and the current configuration value appears in green background with a plus symbol.
Note
The Configuration change summary page is displayed only if the network contains more than 100 sites.
When you are done validating the details on the Configuration page, click Next.
Settings
This page offers the following additional deployment options such as Ignore incomplete and Rollback settings.
Ignore Incomplete
When the Ignore Incomplete checkbox is selected, the offline and the inaccessible sites are skipped during the deployment. The Activate now button is enabled immediately after all the online control nodes (MCN, RCN, Geo MCN, Geo RCN) are staged. If the user chooses to activate at this state, the remaining appliances are activated once they complete staging.
The online branch appliances that fail to get staged are ignored. To enable the Ignore incomplete feature, navigate to Deploy Now > Settings and select the Ignore Incomplete check box.
Note
The Ignore incomplete feature can be only enabled or disabled before you start with the deployment. The configuration cannot be changed after the deployment process has started.
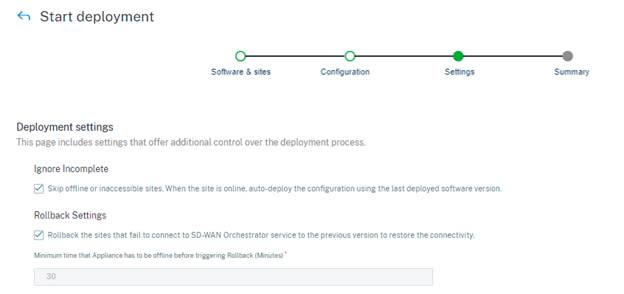
Rollback Settings
With the Rollback Settings feature enabled, sites that fail to connect to Citrix SD-WAN Orchestrator service post performing network activation (as part of deployment), triggers an automatic rollback to the previous version (last staged package) to restore connectivity.
Note
The automatic rollback is only for the site that failed to connect to Citrix SD-WAN Orchestrator service and not for the entire network.
The rollback feature is triggered only when the appliance loses Citrix SD-WAN Orchestrator service connectivity. It is not triggered in scenarios when the virtual path status goes down and so on.
If at least one site in the network initiates a rollback, a warning message displaying a list of sites that are trying to rollback and an option to initiate a network-wide rollback of all the online sites is shown. You can check the progress of these sites and apply the appropriate action.
To enable the rollback on error feature, navigate to Deploy Now > Start Deployment > Settings and select the Rollback Settings check box.

Select the Rollback Settings check box to enable automatic rollback of sites that have failed to connect to Citrix SD-WAN Orchestrator service post activation. Rollback settings can be enabled or disabled before you start the deployment.
When the Rollback setting is enabled, the Rollback Devices section with details about the status of the rollback devices is displayed.

For a site to trigger automatic rollback, it must stay offline for at least 30 minutes (currently non-changeable) post activation. If the site can connect to Citrix SD-WAN Orchestrator service within 30 minutes, then rollback does not get triggered.
Note
Rollback on sites is only performed when the site loses connectivity after activation. Rollback is not triggered in cases where site is online, and activation has failed.
Click Next once you set the Rollback settings enabled.
Use case 1: Non-hitless Upgrade
A site waits for activation to complete for a specified time with the status as Activating.
When the appliance is offline, Citrix SD-WAN Orchestrator service waits for another 30 mins (rollback initiation timeout) to give a chance to the site to connect back. At this stage, the status shows as Activation Timeout, Waiting to Initiate Rollback (remaining time in minutes).
Post the 30 minutes waiting period, the appliance triggers an automatic rollback to the previous configuration or (and) software to try to restore Citrix SD-WAN Orchestrator service connectivity. Citrix SD-WAN Orchestrator service waits for 20 mins (non-configurable setting) for the appliance to connect to Citrix SD-WAN Orchestrator service and during this period, status is shown as Rollback in progress.
If the appliance fails to connect back, in this 20 minute, Citrix SD-WAN Orchestrator service marks the rollback operation as failed and status is shown as Activation Failed or Device Rollback Failed.
In the network, if at least one device has initiated the automatic rollback, a banner is presented to the user as follows:
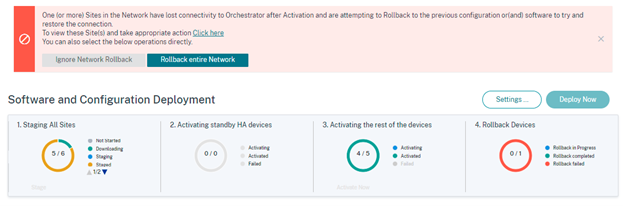
Based on the status of the network Activation, the options displayed perform the following operations:
- Ignore Network Rollback
- For non-Hitless upgrade scenario: Ends the current deployment.
- Rollback entire Network
- For non-Hitless upgrade scenario: Triggers rollback on all the online sites of the network.
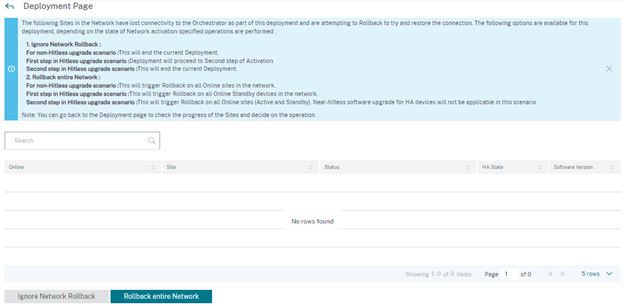
You can select the Click Here hyperlink to view the list of sites for which rollback is in progress or completed and take the above actions for that page.
You can also wait until the sites that have triggered rollback to either succeed or fail before deciding on triggering the network-wide rollback.
If you select the Rollback entire Network option, the following confirmation message is displayed.
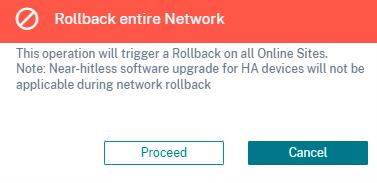
Note
The Near-hitless software upgrade for high availability appliance is not applicable in this scenario. That is, if there are any high availability sites in the network, triggering a network-wide rollback activates both the high availability appliances of that site at once which can cause some network downtime.
Click Proceed to start the network-wide rollback on all the online sites.
Use case 2: Hitless Upgrade
In the case of Hitless upgrade, the standby appliances would be activated first followed by the active and non-high availability appliances.
As part of the first step if the standby appliance goes offline post activation and initiates a rollback, the following options are available:
- Ignore Network Rollback
- For Hitless upgrade scenario: Ignore the standby appliances which are offline and proceed with the activation of the active appliances.
- First step in Hitless upgrade scenario: Deployment proceeds to second step of Activation.
- Second step in Hitless upgrade scenario: Ends the current deployment.
- Rollback entire Network
- For Hitless upgrade scenario: Rollback all the online standby appliances which have completed the activation and end the ongoing deployment. No activation of active and non-high availability appliance is done in this case.
- First step in Hitless upgrade scenario: Triggers rollback on all online standby devices in the network.
- Second step in Hitless upgrade scenario: Trigger rollback on all online sites (active and standby). Near-hitless software upgrade for high availability devices is not applicable in this scenario.
The next step of the hitless upgrade that is activation of active and non-high availability appliance, the same rollback on error workflow is followed as mentioned in Use case 1: Non-hitless Upgrade. In this scenario, if you choose Rollback entire Network, the rollback triggers for all the (both active and standby) appliance.
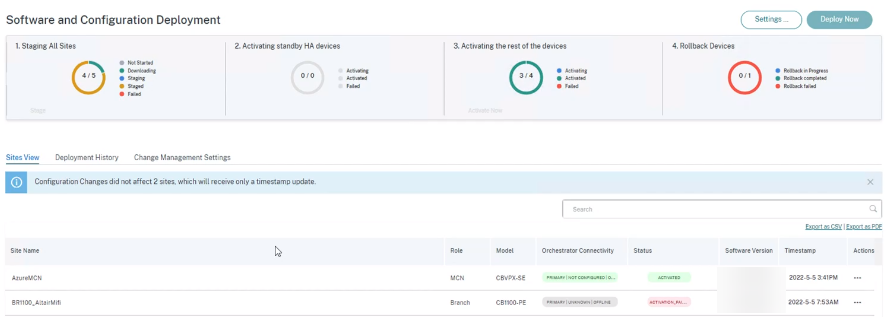
Once the site completes rollback and connects back to Citrix SD-WAN Orchestrator service, the status for that site shows Rolledback and the sites are online.
Limitation
Autocorrection for rolling back or rolled back appliances and network is not supported.
Note
Automatic site rollback is only a backup mechanism to try and restore the lost connectivity to Citrix SD-WAN Orchestrator service. If the appliance still fails to connect to Citrix SD-WAN Orchestrator service, check the network configuration of this appliance.
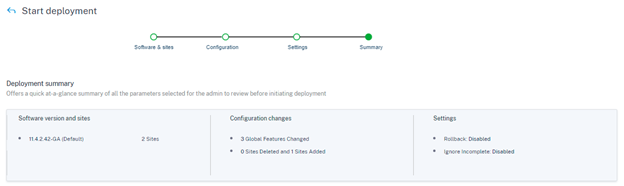
Summary
The Summary section provides details of the deployment settings applied on the Software & Sites, Configuration, and Settings pages. When you are done validating the details on the Summary page, click Deploy. You are redirected to the Software and Configuration Deployment section.
Stage
Once the verification is successful and you click Deploy on the Summary page, the staging process where the configuration files are distributed to all the appliances and sites on your network is automatically triggered. By default, Citrix SD-WAN Orchestrator service waits for all the Control nodes (MCN, RCN, Geo MCN, Geo RCN) and the online branch appliances to get staged before allowing the user to activate them. In the Staging All Sites section, you can view the progress of the staging. The phases of the staging displayed in this section are Not started, Downloading, Staging, Staged, and Failed. Each phase is represented with a unique color code. The donut chart provides a real-time update about the status of the staging.
If the staging process fails at any site, use the Retry Staging (Primary Device) option, under the Sites View > Actions and reinitiate the staging process. For HA appliances, both the options Retry staging (Primary device) and Retry staging (Secondary device) are available.
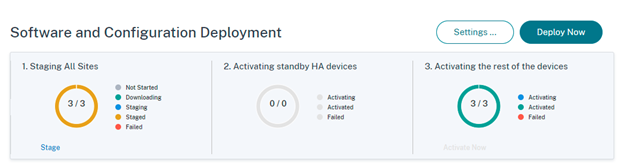
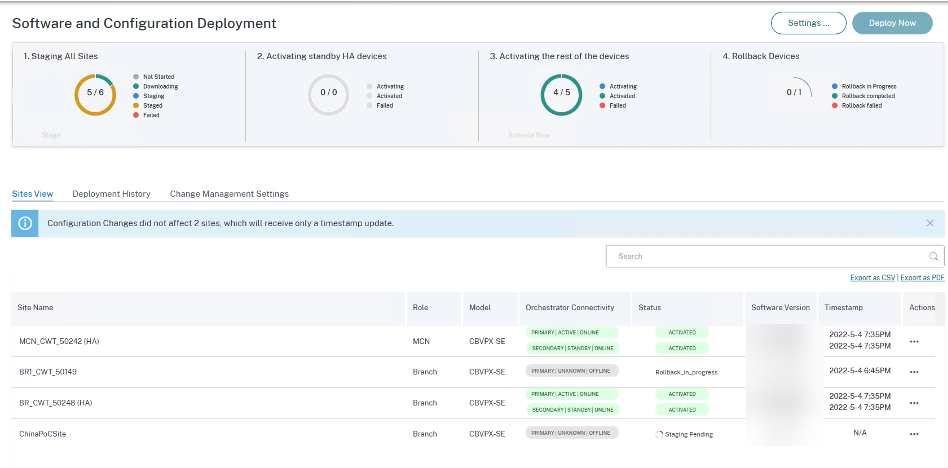
Activate now
Click Activate Now in the Activating the rest of the devices section to activate the staged configuration on all the sites across the network.
Each phase of activation is represented with a unique color code.
-
Activating standby HA devices: This chart provides a real-time update about the standby appliances for SD-WAN devices that are deployed in High Availability mode. To guard against software failure of the SD-WAN instance, you might choose to deploy the instance in high availability mode which deploys two SD-WAN instances in active standby mode. Citrix recommends deploying instances in high availability mode for production networks.
-
Activate the rest of the devices: This chart provides a real-time update about the SD-WAN standalone appliances and the previously active appliances that have switched over to standby mode. In Standalone mode, a single SD-WAN instance is deployed. If the SD-WAN instance fails due to either an issue with the SD-WAN firmware or the underlying Azure infra you cannot reach out to the resources deployed behind the SD-WAN instance in Azure. In other words, the instance behaves in a fail to block mode.
For more information about Standalone and High Availability modes, see Deployment use cases.
When the Rollback settings feature is enabled, an extra section Rollback Devices is displayed. For more information on Rollback, see Rollback Settings.
