PE support: WAN optimization configuration
You can configure and deploy Citrix SD-WAN Premium Edition (PE) through Citrix SD-WAN Orchestrator service. You can now configure WAN Optimization Configurations like Features, Tuning, Applications, and Rules through SD-WAN Orchestrator. Deployment of SD-WAN PE appliances is also now possible through Orchestrator.
NOTE
The Citrix SD-WAN PE is only supported on Citrix SD-WAN 1100, 2100, 5100, and 6100 platforms.
The WAN optimization features can be applied per site wise or globally to all the sites of the network. Citrix SD-WAN Orchestrator service provides step-by-step instructions for enabling and configuring the PE WAN Optimization features for your Virtual WAN.
Note
You must have a Citrix SD-WAN PE license installed to access, enable, configure, and activate WAN Optimization features in your Virtual WAN.
To globally configure PE WAN Optimization features, navigate to Configuration > WAN Optimization at network level. You need to configure the following features to complete the global WAN optimization configuration:
- Features
- Tuning
- WAN Opt Apps
- WAN Opt App Groups
- Rules
Features
To enable the WAN Optimization in the Features settings, navigate to Configuration > WAN Optimization > Features.
You can also accept the default settings pre-selected in the form, or customize the settings. Click the check boxes to select or deselect an option.
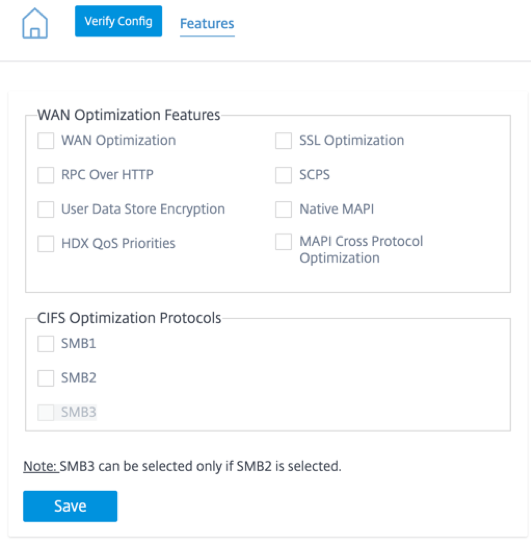
The Features configuration page contains the following two sections:
- WAN Optimization Features
- CIFS Optimization Protocols
WAN Optimization Features
-
WAN Optimization: Enable WAN Optimization for this configuration. This also enables compression, deduplication, and TCP Protocol Optimization.
-
SSL Optimization: Enable optimization for traffic streams with SSL encryption.
-
RPC Over HTTP: Enable optimization of Microsoft Exchange traffic that uses RPC over HTTP.
-
SCPS: Enable TCP Protocol optimization for Satellite Links.
-
User Data Store Encryption: Enable enhanced security of data through the encryption of WAN Optimization compression history.
-
Native MAPI: Enable optimization of Microsoft Exchange traffic.
-
HDX QoS Priorities: Select the check box to enable optimization of ICA traffic based on prioritization of HDX subchannels.
-
MAPI Cross Protocol Optimization: Enable cross-protocol optimization of Microsoft Outlook (MAPI) traffic.
CIFS Optimization Protocols
The CIFS Optimization Protocols options are as follows:
-
SMB1: Select the check box to enable Optimization of Windows File Sharing (SMB1).
-
SMB2: Select the check box to enable Optimization of Windows File Sharing (SMB2).
-
SMB3: Select the check box to enable Optimization of Windows File Sharing (SMB3). You must first select the SMB2 option before you can select SMB3.
Click Save to enable and add the selected Features to the configuration package.
Tuning
To configure the WAN Optimization Tuning settings, navigate to Configuration > WAN Optimization > Tuning.
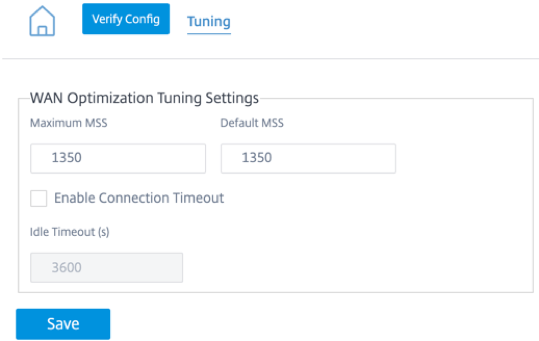
The Tuning settings options are as follows:
- Maximum MSS: Enter the maximum size (in bytes) for the Maximum Segment Size (MSS) for a TCP segment.
- Default MSS: Enter the default size (in octets) for the MSS for TCP segments.
- Enable Connection Timeout: Select the check box to enable automatic termination of a connection when the idle threshold is exceeded.
- Idle Timeout (s): Enter a threshold value (in seconds) to specify the amount of idle time permitted before an idle connection is terminated.
NOTE
You must first select the Enable Connection Timeout check box before the Idle Timeout (s) field can be configured.
Click Save to apply the Tuning settings to the global configuration.
WAN Opt Apps
In the Citrix SD-WAN on-premises appliances, you can see the WAN Opt Apps option as Application Classifiers under the configuration editor. The Application Classifiers option name is changed to WAN Opt Apps in SD-WAN Orchestrator.
To configure the WAN Optimization Applications, navigate to Configuration > WAN Optimization > WAN Opt Apps.
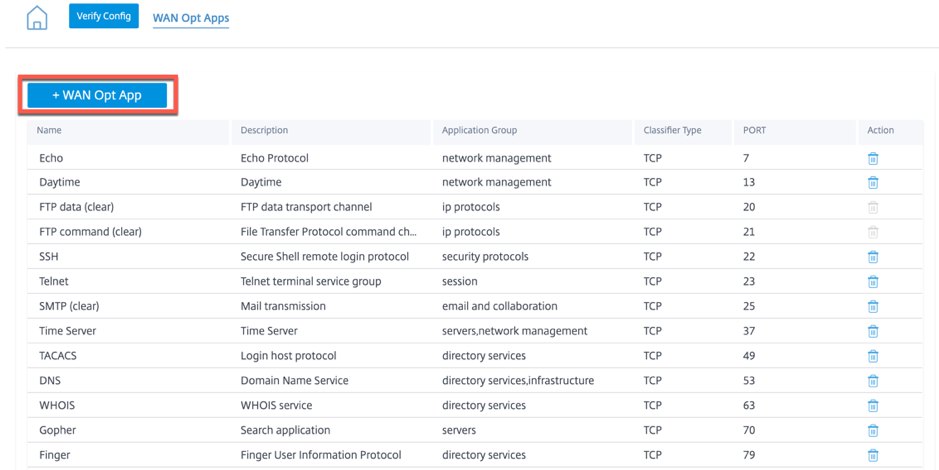
The WAN Optimization Applications page displays some default set of applications.
You can also add a new application.
-
Click + WAN Opt App option.

- Enter an application name and description.
- Provide the port number for the application.
- Select the application group from the drop-down list.
- Click Save.
You can delete an existing application using the trashcan icon under the Action column.
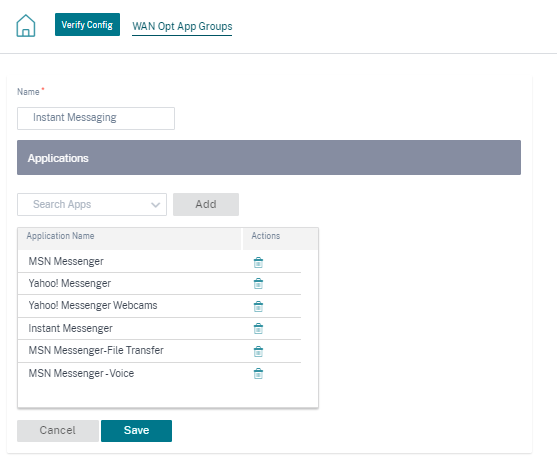
WAN Opt App Groups
The WAN Optimization Application Groups page displays the default set of application groups. Instead of having a large applications list, you can now create an application group with similar application class. For example, ICA application group contains ICA and ICA CGP applications. This page displays the default set of application groups.
You can also create an application group.
-
Click the + WAN Opt App Group option to create an application group.
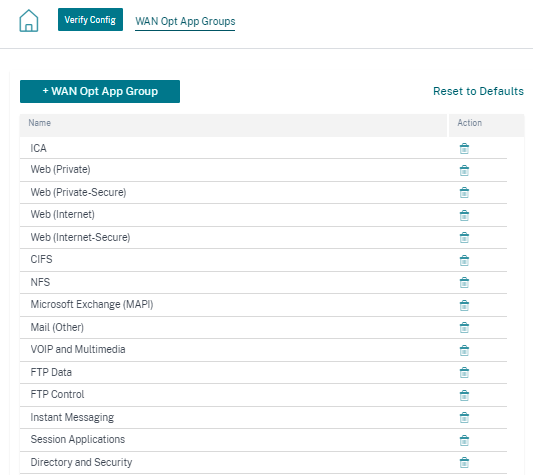
-
Provide a name to your application group. Search the application from the drop-down list and click Add.
-
Click Save.
You can also edit the existing application group. Click the application group row in the existing table to edit. You can add more such applications or delete any application.
Click the Reset to Defaults button to retrieve the list of default WAN optimization application groups. This action deletes the previously created WAN optimization application groups and the modified WAN optimization application groups.
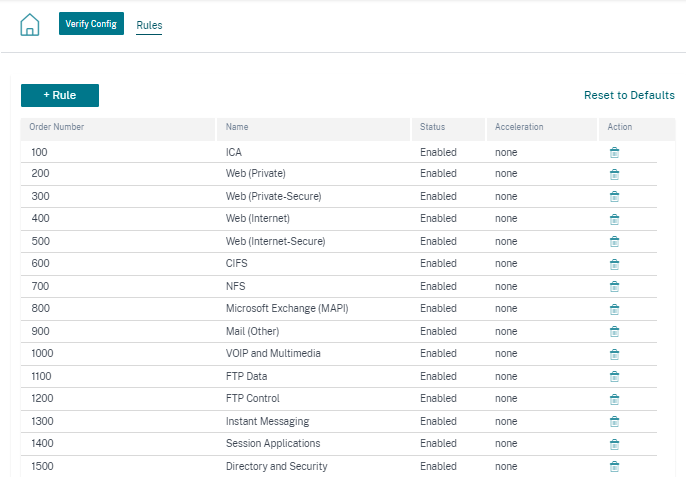
Rules
In the Citrix SD-WAN on-premises appliances, you can see the Rules option as Service Classes under the configuration editor. The Service Classes option name is changed to Rules in SD-WAN Orchestrator. The Rules page displays the default set of pre-created rules. You can also create rule for the application group.
-
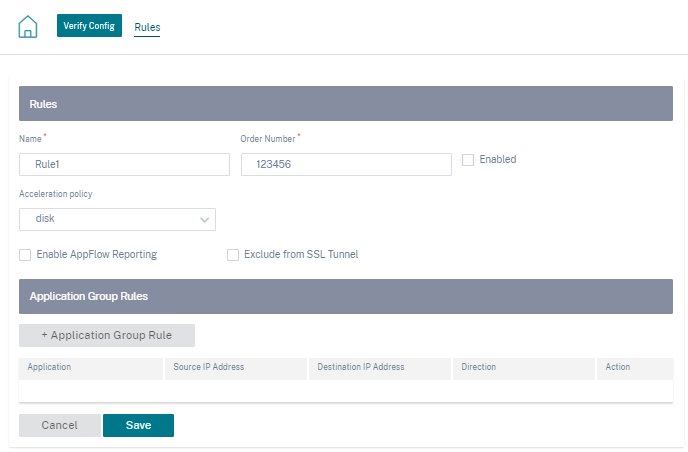
Click + Rule to create a rule.
-
Provide the details for the following basic settings:
- Name: Provide a name to the application.
- Order: Provide the order number.
- Enabled: Select the check box to enable the rule.
-
Acceleration Policy: Select a policy from the drop-down list. You can select one of the following options as needed:
-
none: Select none if you do not want to enable an acceleration policy for this Rule. A policy of none is generally used only for uncompressible encrypted traffic and real-time video.
-
flow control only: Select the flow control only policy to disable compression but enable flow-control acceleration. Select this for rules that are always encrypted, and for the FTP control channel.
-
disk – Select the disk policy to specify the appliance disk as the location for storing the traffic history used for compression. This enables Disk Based Compression (DBC) policy for this Rule. Generally, a policy of disk is usually the best choice, as the appliance automatically selects disk or memory as the storage location, depending on which is more appropriate for the traffic.
-
memory: Select the memory policy to specify memory as the location for storing the traffic history used for compression.
-
-
Enable AppFlow Reporting: Select the check box to enable AppFlow reporting for this Service Class. AppFlow is an industry standard for unlocking application transactional data processed by the network infrastructure. The WAN Optimization AppFlow interface works with any AppFlow collector to generate reports. The collector receives detailed information from the appliance, using the AppFlow open standard.
- Exclude from SSL Tunnel – Select the check box to exclude traffic associated with the Service Class from SSL Tunneling.
-
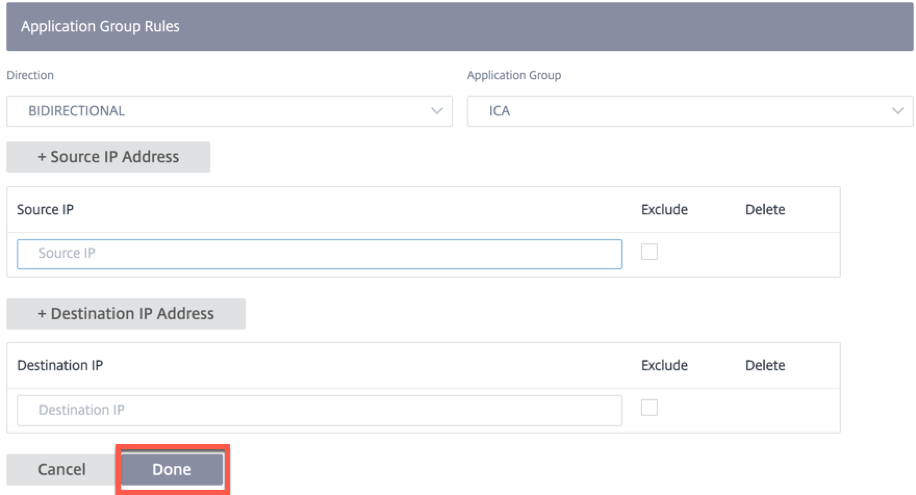
Click + Application Group Rule to attach the pre-created application group and provide the necessary details for the following fields:
-
Direction: Select direction as BIDIRECTIONAL or UNIDIRECTIONAL from the drop-down list.
-
Application Group: Select an application group from the drop-down list.
-
Source IP: Enter the source IP address. Click + Source IP Address to add multiple source IP addresses. Select the Exclude check box to exclude the specified source IP address from this rule. Clear the check box to include the address.
-
Destination IP: Enter the destination IP address. Click + Destination IP Address to add multiple destination IP addresses. Select the Exclude check box to exclude the specified source IP address from this rule. Clear the check box to include the address.
-
-
Click Done.
Click any rule row from the existing table that you want to edit. Make the change as needed and click Save. Also, you can delete the existing Rule.
Click the Reset to Defaults button to retrieve the list of default rules. This action deletes the previously created rules and the modified rules.
Custom rules that are created cannot have an order value greater than 2000. Following are the default pre-defined rules that have fixed order values, and are non-editable:
- Other TCP traffic - 2000
- Unclassified Traffic - 2100
Deployment
All of the WAN optimization configuration settings are entitled to change management. Once the WAN Optimization configuration is done, you can proceed with Staging and Activation to start the virtual machine.
As the WAN optimization runs as a virtual machine, it has a different binary file that has to be downloaded to start the virtual machine. In Citrix SD-WAN Orchestrator service, the binary file transfer happens during the staging in the background and it is tied to the change management.
Note
As the binary file download happens during the staging, it takes some additional time to download.
Prerequisites
To perform the change management, ensure that the following actions are completed:
-
To configure an appliance as PE, the device edition must be set as PE.
-
Apply for a PE license. An appliance must have an appropriate PE license. The license code is provided by the Citrix team.
Go to the Administrator > Licensing. Click Retrieve Licenses option, provide the code, and click Submit.
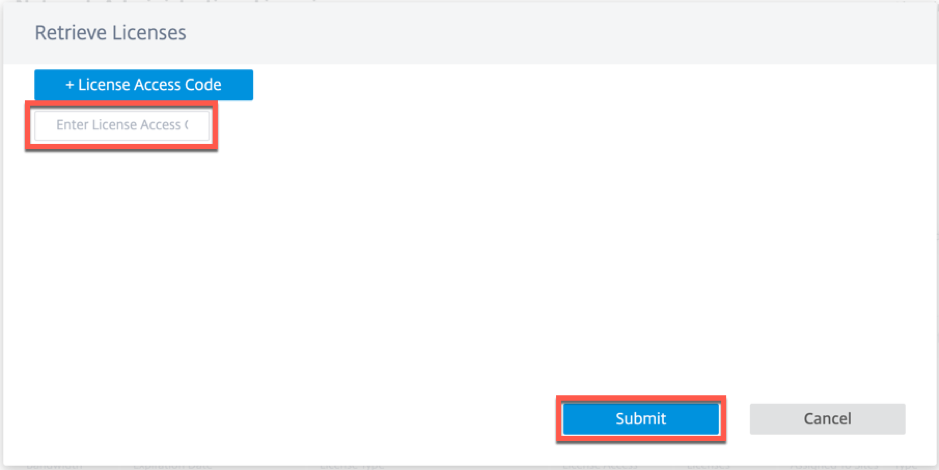
You can see the number of licenses available with the associated device model.

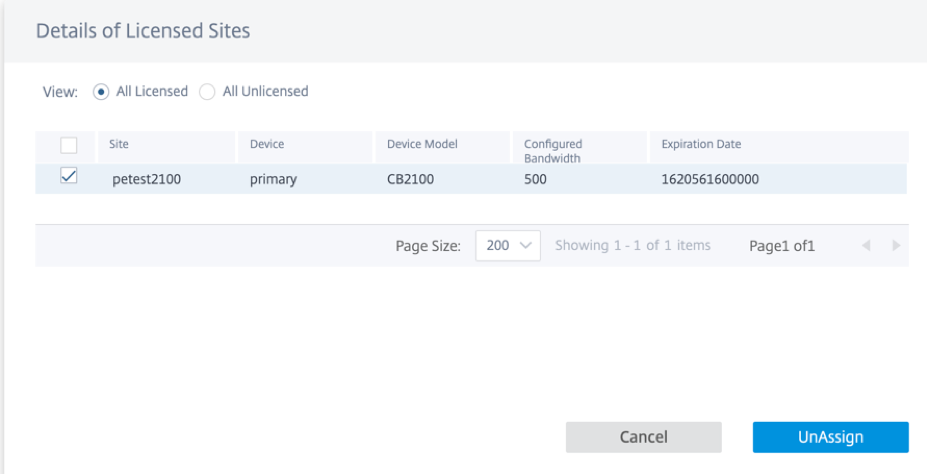
You can Assign or Unassign the license to the PE configured site as needed. You can also get an option to view the licensed and unlicensed site. By default, when you create a site, you get a Standard Edition (SE) grace license for 20 days.
Note
To apply the PE license, it has to match with the site properties (Device Model, Device Edition, and Bandwidth Tier).
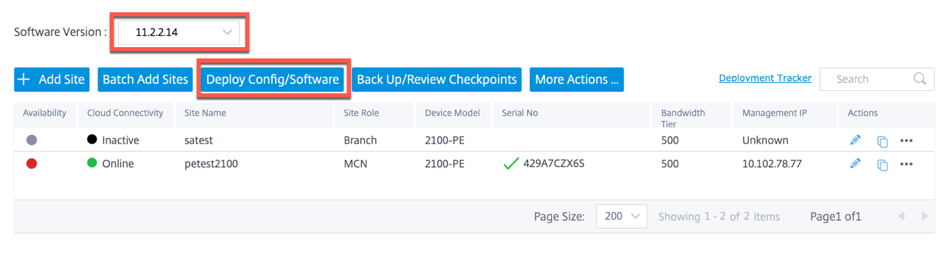
Once you configure the site as PE, select the software version as 11.2.2.14 and click Deploy Config/Software.
Note
Citrix SD-WAN PE Support through SD-WAN Orchestrator is currently only available for SD-WAN software version of 11.2.2.14.
Click Stage and then Activate. The Activate button is available after the staging is completed. It might take some time to complete the staging activity as a binary file around 200 MB gets downloaded in the back end.
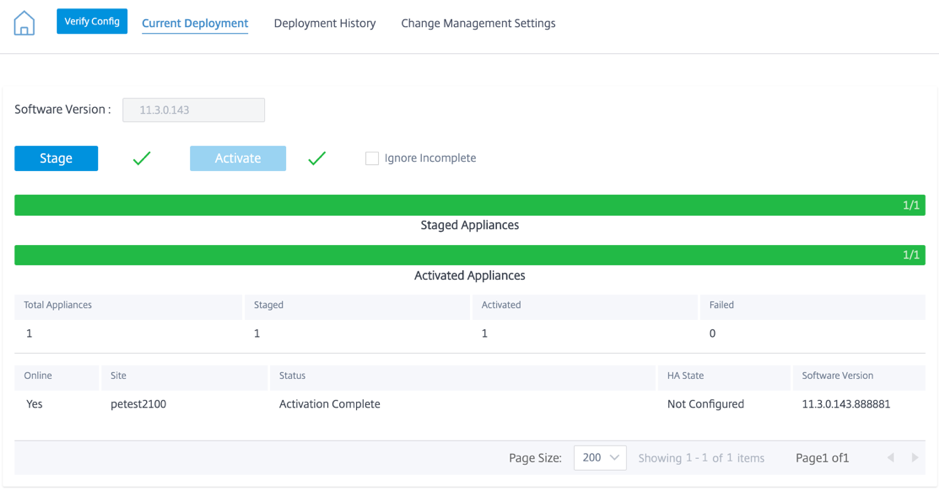
Once the staging and activation process is completed, the WAN optimization virtual machine will not activate immediately. You have to set the scheduling information as part of the Change Management Settings.
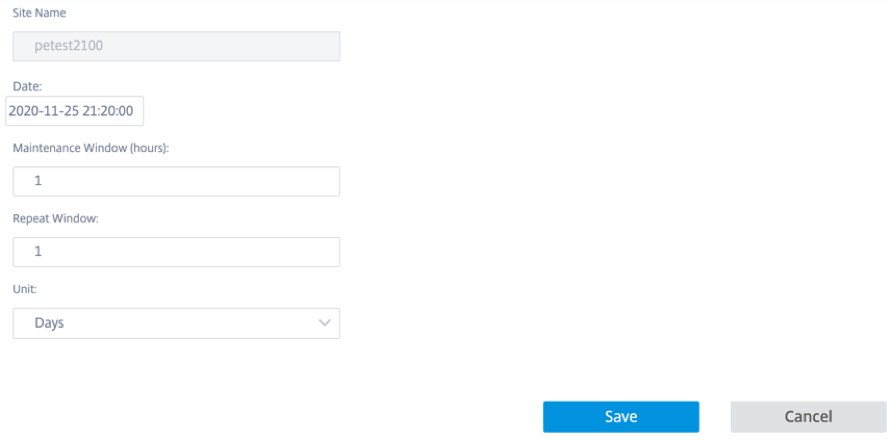
Click Change Management Settings and click the pencil icon under the Action column.
![]()
Provide the schedule information and click Save.
You can enter/edit the following parameters:
-
Site Name: Appliance name as given by the user during the site configuration.
-
Date: Date on which scheduled installation/upgrade will start from. Also, mention the local time of the appliance when the installation must being once the files are received. Valid Format is HH:MM:SS.
-
Maintenance Window: The amount of time given by the user for installation. If the value is provided as 0, then the provision starts immediately after the files are present on the appliance irrespective of the date and time values given in the Date field.
-
Repeat Window: Frequency with which the system checks for a new upgrade version and performs the upgrade only when a new version is available.
-
Unit: Unit chosen to check for new versions can be any one of Hours/Days/Weeks/Months.
The WAN Optimization provision happens as part of the time/date mentioned in the scheduled window. Once the virtual machine is UP, only then the WAN Optimization capabilities can be applied.
NOTE
SD-WAN Orchestrator doesn’t provide the provisioning status of the WAN Optimization Virtual Machine and the WAN Optimization Version. You must use the Citrix SD-WAN appliance UI to view the version and provisioning status.
Limitations
PE Appliance Settings, Monitoring, and Statistics features support will only be available in the upcoming release of SD-WAN Orchestrator.