Configuring the High-Availability Pair
You can configure two newly installed appliances as a high-availability pair, or you can create an high availability pair by adding a second appliance to an existing installation.
Prerequisites: Physical installation and basic configuration procedures
To configure high availability
- Make sure that no more than one appliance is connected to the traffic networks (on the accelerated bridges). If both are connected, disconnect one bridge cable from the active bridges on the second appliance. This will prevent forwarding loops.
- On the Features page of the first appliance, disable Traffic Processing. This disables acceleration until the high availability pair is configured.
- Repeat for the second appliance.
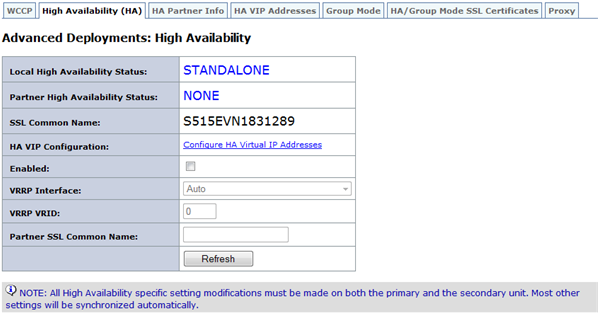
- On the first appliance, go to the Configuration: Advanced Deployments: High Availability tab, show below.
- Select the Enabled Check box.
- Click the Configure high availability Virtual IP Address link and assign a virtual IP address to the apA interface. This address will be used later to control both appliances as a unit.
- Return to the High Availability page and, in the VRRP VRID field, assign a VRRP ID to the pair. Although the value defaults to zero, the valid range of VRRP ID numbers is 1 through 255. Within this range, you can specify any value that does not belong to another VRRP device on your network.
- In the Partner SSL Common Name field, type the other appliance’s SSL Common Name, which is displayed on that appliance’s Configuration: Advanced Deployments: High Availability tab, in the Partner SSL Common Name field. The SSL credentials used here are factory-installed.
- Click Update.
- Repeat steps 3-8 on the second appliance. If you are managing the appliance via an accelerated bridge (such as apA), you may have to reconnect the Ethernet cable that you removed in step 1 to connect to the second appliance. If so, plug this cable in and disconnect the corresponding cable on the first appliance.
- With your browser, navigate to the virtual IP address of the high availability pair. Enable Traffic Processing on the Features page. Any further configuration will be performed from this virtual address.
- Plug in the cable that was left disconnected.
- On each appliance, the Configuration: Advanced Deployments: High Availability page should now show that high availability is active and that one appliance is the primary and the other is the secondary. If this is not the case, a warning banner appears at the top of the screen, indicating the nature of the problem.
Figure 1. High-availability configuration page
Configuring the High-Availability Pair
In this article
Copied!
Failed!