Rack mount the appliance
A SD-WAN 400, 800, 1000, 2000 or 3000 appliance requires one rack unit. These appliances are rack-mount devices that can be installed into two-post relay racks or four-post EIA-310 server racks. Verify that the rack is compatible with your appliance.
To mount the appliance, you must first install the rails and then install the appliance in the rack, as follows:
- Remove the inner rails from the rail assembly.
- Attach the inner rails to the appliance.
- Install the rack rails on the rack.
- Install the appliance in the rack.
To remove the inner rails from the rail assembly
- Place the rail assembly on a flat surface.
- Slide out the inner rail toward the front of the assembly.
- Depress the locking tabs until the inner rail comes all the way out of the rail assembly.
- Repeat steps 1 through 3 to remove the second inner rail.
To attach the inner rails to the appliance
- Position the right inner rail behind the ear bracket on the right side of the appliance.
- Align the holes on the rail with the corresponding holes on the side of the appliance.
- Attach the rail to the appliance with the provided screws.
- Repeat steps 1 through 3 to install the left inner rail on the left side of the appliance.
To install the rack rails
- Position the rack rails at the desired location in the rack, keeping the sliding rail guide facing inward.
- Snap the rails to the rack. Make sure that both rack rails are at same height and that the rail guides are facing inward.
To install the appliance in the rack
- Align the inner rails, attached to the appliance, with the rack rails.
- Slide the appliance into the rack rails, keeping the pressure even on both sides, and push the appliance into the rack rails until it 1. Verify that the appliance is locked in place by pulling it all the way out from the rack.
Figure 1. Rack Mount the Appliance

Note
The above illustration might not represent your actual appliance.
An SD-WAN 1000 or 2000 appliance with Windows Server requires one rack unit. Both are rack-mount devices that can be installed into two-post relay racks or four-post EIA-310 server racks. Verify that the rack is compatible with your appliance.
Figure 2. Rack Mount the Appliance

To mount an SD-WAN appliance, you must first install the rails and then install the appliance in the rack, as follows:
- Remove the inner rails from the rail assembly.
- Attach the inner rails to the appliance.
- Install the rack rails on the rack.
- Install the appliance in the rack.
To remove the inner rails from the rail assembly:
- Place the rail assembly on a flat surface.
- Slide out the inner rail toward the front of the assembly.
- Depress the locking tabs until the inner rail comes all the way out of the rail assembly.
- Repeat steps 1 through 3 to remove the second inner rail.
To attach the inner rails to the appliance:
- Position the right inner rail behind the ear bracket on the right side of the appliance.
- Align the holes on the rail with the corresponding holes on the side of the appliance.
- Attach the rail to the appliance with the provided screws.
- Repeat steps 1 through 3 to install the left inner rail on the left side of the appliance.
To install the rack rails:
- Position the rack rails at the desired location in the rack, keeping the sliding rail guide facing inward.
- Snap the rails to the rack.
Note: Make sure that both rack rails are at same height and that the rail guides are facing inward.
Figure 3. Rack assembly
To install the appliance in the rack:
- Align the inner rails, attached to the appliance, with the rack rails.
- Slide the appliance into the rack rails, keeping the pressure even on both sides, and push the appliance into the rack rails until it locks into place.
-
Verify that the appliance is locked in place by pulling it all the way out from the rack.
Note: The illustration in the following figure might not represent your actual appliance.
Citrix SD-WAN 4000/5000 appliance requires two rack units.
Each appliance ships with a mounting rail kit that contains two rail assemblies, one for the left side and the other for the right side of the appliance, and screws to attach the rails. An assembly consists of an inner rail and a rack rail. The supplied rail kit is 28 inches long (38 inches extended). Contact your Citrix sales representative to order a 23 inch (33 inches extended) rail kit.
Note: The same rail kit is used for both square-hole and round-hole racks. See figure 4 for specific instructions for threaded, round-hole racks.
To mount the appliance, you must first install the rails and then install the appliance in the rack.
Perform the following tasks to mount the appliance:
- Remove the inner rails from the rail assembly.
- Attach the inner rails to the appliance.
- Install the rack rails on the rack.
- Install the appliance in the rack.
To remove the inner rails from the rail assembly
- Place the rail assembly on a flat surface.
- Slide out the inner rail toward the front of the assembly.
- Depress the latch until the inner rail comes all the way out of the rail assembly.
- Repeat steps 1 through 3 to remove the second inner rail.
To attach the inner rails to the appliance
- Position the right inner rail behind the handle on the right side of the appliance.
- Align the holes on the rail with the corresponding holes on the side of the appliance.
- Attach the rail to the appliance with the provided screws: 5 per side, as shown in the following figure.
- Repeat steps 1 through 3 to install the left inner rail on the other side of the appliance.
Figure 1. Attaching inner rails
To install the rack rails on the rack
- If you have a round-hole, threaded rack, skip to step 3.
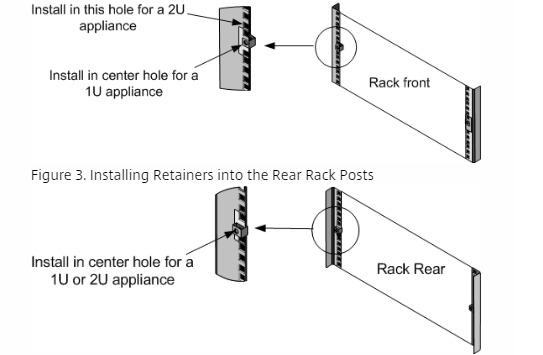
- Install square nut retainers into the front post and back post of the rack as shown in the following figures. Before inserting a screw, be sure to align the square nut with the correct hole for your appliance. The three holes are not evenly spaced.
Figure 2. Installing Retainers into the Front Rack Posts
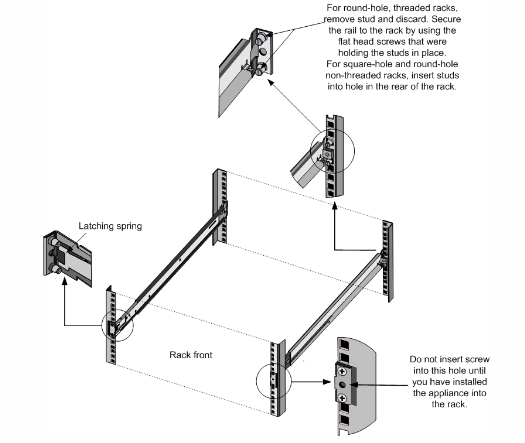
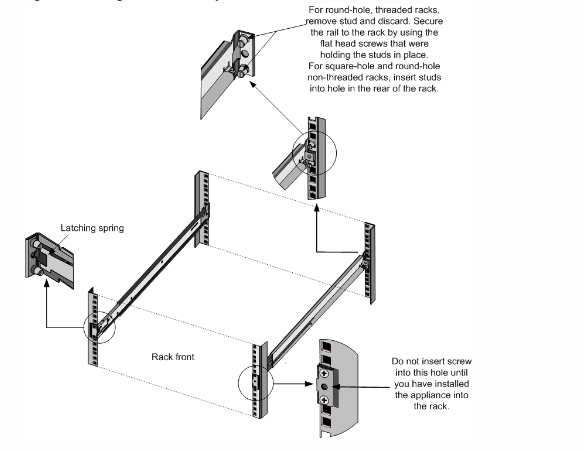
- Install the adjustable rail assembly into the rack as shown in the following figures. Use a screw to lock the rear rail flange into the rack. With the screw securing the rail in place, you can optionally remove the latching spring.
Figure 4: Assembling the Rack
To install the appliance in the rack
- Align the inner rails, attached to the appliance, with the rack rails.
- Slide the appliance into the rack rails, keeping the pressure even on both sides.
- Verify that the appliance is locked in place by pulling it all the way out from the rack.
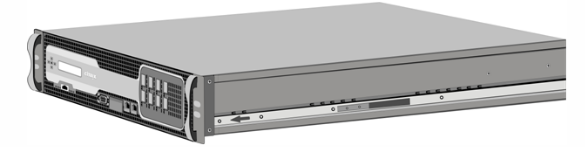
Figure 5. Rack Mounting the Appliance
