Citrix SD-WAN 110 Standard Edition Appliances
The Citrix SD-WAN 110 SE platform is a branch side appliance that can be deployed in micro and small branch offices/ remote sites/ home offices / retail stores, and temporary worksites. A single box-in-branch solution helps to reduce the hardware footprint and eases branch deployment.
The Citrix SD-WAN 110-SE appliance is a desktop form factor appliance. This appliance has 2-core processor with 4 GB memory and 32 GB of storage (SATA-DOM drive).
The Citrix Compliance Regulatory models are:
- SD-WAN 110
- SD-WAN 110-LTE-WiFi
- SD-WAN 110-WiFi
For more information, see the following:
- Citrix SD-WAN platform data sheet
- Citrix SD-WAN 110 LTE Wi-Fi Quick Start Guide: ZTD via the LTE Interface
- Citrix SD-WAN 110 LTE Wi-Fi Unboxing and Installation
- Citrix SD-WAN 110 LTE Wi-Fi Compliance
- Citrix SD-WAN 110 Wi-Fi Compliance
Note
The 110-SE appliance cannot be configured as an MCN.
To log in to the SD-WAN 110 SE management web interface, use the following credentials.
- Default administrator user name: admin
-
Default administrator password: The Serial Number of the appliance, found at the bottom of the appliance chassis.
Note
On a first time login, you are requested to change the default password to a password of your choice.
Citrix SD-WAN 11.1.0 is the minimum software version required for Citrix SD-WAN 110-SE appliance. Citrix SD-WAN 11.3.0 is the minimum software version that supports Wi-Fi capabilities for Citrix SD-WAN 110-LTE-WiFi and Citrix SD-WAN 110-WiFi-SE model.

| LED | Description |
|---|---|
| Ethernet Copper Ports LED | Active/Link: Green |
| Speed 1000: Orange | |
| Speed 100: Green | |
| Speed 10: off | |
| Power LEDs | Power on: Solid Green |
| Power off: Solid Blue | |
| Factory Reset: Flashing blue and green (alternatively) | |
| Software power cycle: Flashing green for ~15 seconds (shutdown time) and then flashing blue for ~25 seconds and then solid green |

Note
Port 1/1 is the default LAN port and port 1/2 is the default WAN port. Port 1/3 is disabled. The default LAN IP on port is 192.168.101.1, it also runs a default DHCP server that provides LAN clients with IP address pool starting from 192.168.0.50 to 192.168.0.250.
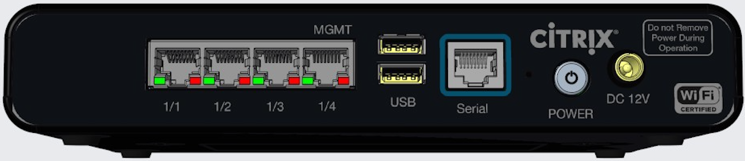
| Port Labels | Type | Description |
|---|---|---|
| 1/1, 1/2, and 1/3 | Traffic | The data ports are used to carry network traffic. |
| 1/4 | Management port | The management port is used to connect directly to the appliance for system administration functions. You can use this port for initial provisioning of the appliance. From Citrix SD-WAN version 11.1.1 and above you can use the port 1/4 as a data port or a management port per the configuration. For more information, see Configurable Management or Data port. |
| USB | 2 USB ports | USB ports |
| Serial | RJ-45/RS-232 | An RS232 serial console port. |
| Power | Power button | Power OFF state: Press the power button and release it immediately: Power on the appliance. |
| Press the power button and hold it for 10+ seconds: Factory resets the appliance. The appliance takes around 7 min for a factory reset. | ||
| Power ON state: Press the power button and release it immediately: Orderly shut down the appliance. | ||
| Press the power button and hold it for 5+ seconds: Force shut down the appliance. | ||
| DC 12 V | DC Power Supply | Refer System Specifications for power supply information. |
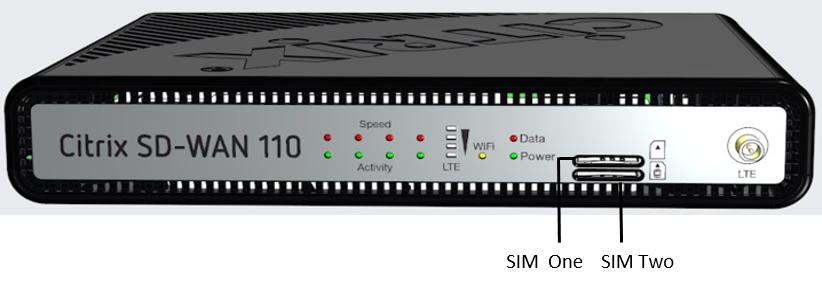
Citrix SD-WAN 110-LTE-WiFi-SE
The Citrix SD-WAN 110-LTE-WiFi-SE platform is a branch side appliance that can be deployed in micro and small branch offices/Remote sites/ retail stores, and temporary worksites. A single box-in-branch solution helps to reduce the hardware footprint and eases branch deployment.
The Citrix SD-WAN 110-LTE-WiFi-SE appliance is a desktop form factor appliance. This appliance has 2-core processor with 4 GB memory and 32 GB of storage (SATA-DOM drive).
Note
The Citrix SD-WAN 110-LTE-WiFi-SE appliance cannot be configured as an MCN.
- As of March 10,2020, the appliance is shipped as Wi-Fi Ready. The Wi-Fi access point functionality can be used with Citrix SD-WAN software version 11.3.0 or higher.
- The Citrix SD-WAN 110-LTE-WiFi-SE appliance can be configured as an access point using SD-WAN Orchestrator. For more details, see Wi-Fi Access Point.
The following figure shows the front panel of the 110-LTE-WiFi-SE appliance.
| LED | Description |
|---|---|
| Ethernet Copper Ports LED | Active/Link: Green |
| Speed: 1000 Orange | |
| Speed 100: Green | |
| Speed 10: off | |
| Power LEDs | Power on: Solid Green |
| Power off: Solid Blue | |
| Factory Reset: Flashing blue and green (alternatively) | |
| Software power cycle: Flashing green for ~15 seconds (shutdown time) and then flashing blue for ~25 seconds and then solid green | |
| Wi-Fi | OFF: Not using Wi-Fi |
| Flashing green: Wi-Fi is configured but not in use | |
| Solid green: Wi-Fi is actively used | |
| LTE | OFF: No signal |
| 1 bar: Poor | |
| 2 bar: Fair | |
| 3 bar: Good | |
| 4 bar: Excellent | |
| SIM Card Slots | Two Mini (2FF) size SIM slots. Use an adapter to use Micro (3FF) and Nano (4FF) size SIMs. Snap the smaller SIM into the adapter. Order the adapter as an FRU. |
| Note: At any given time, only one SIM is active. Power ON the appliance and then insert the SIM card. | |
| LTE | LTE antenna male connector |

Note
Port 1/1 is the default LAN port and port 1/2 is the default WAN port. Port 1/3 is disabled. The default LAN IP on port 1/1 is 192.168.101.1, it also runs a default DHCP server that provides LAN clients with IP address pool starting from 192.168.0.50 to 192.168.0.250. For LTE appliances, the LTE SIM slot is also the default WAN port. The WAN ports are configured as DHCP clients.
| Port Labels | Type | Description |
|---|---|---|
| LTE | Antenna male connector | Connector for LTE antenna. |
| 1/1, 1/2, and 1/3 | Data ports | The data ports are used to carry Network traffic. |
| 1/4 | Management port | The management port is used to connect directly to the appliance for system administration functions. You can use this port for initial provisioning of the appliance. From Citrix SD-WAN version 11.1.1 and above you can use the port 1/4 as a data port or a management port per the configuration. For more information, see Configurable Management or Data port. |
| USB | 2 USB ports | USB 2.0 ports |
| Serial | RJ-45/RS-232 | An RS232 serial console port |
| Power | Power button | Power OFF state: Press the power button and release it immediately: Power on the appliance |
| Press the power button and hold it for 10+ seconds: Factory resets the appliance. The appliance takes around 7 min for a factory reset. | ||
| Power ON state: Press the power button and release it immediately: Orderly shut down the appliance. | ||
| Press power button and hold it for 5+ seconds: Force shut down the appliance. | ||
| DC 12 V | DC Power Supply | Refer System Specifications for the power supply information. |
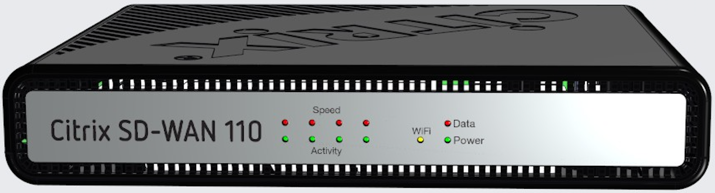
Citrix SD-WAN 110-WiFi-SE
The Citrix SD-WAN 110-WiFi-SE platform is a branch side appliance that can be deployed in micro and small branch offices/Remote sites/ retail stores, and temporary worksites. It is a single box in branch solution that helps to reduce hardware foot print and eases branch deployment.
The Citrix SD-WAN 110-WiFi-SE appliance is a desktop form factor appliance. This appliance has 2-core processor with 4 GB memory and 32 GB of storage (SATA-DOM drive).
Note
- The Citrix SD-WAN 110-WiFi-SE appliance cannot be configured as an MCN.
- The Citrix SD-WAN 110-WiFi-SE appliance can be configured as an access point using SD-WAN Orchestrator. For more details, see Wi-Fi Access Point.
| LED | Description |
|---|---|
| Ethernet Copper Ports LED | Active/Link: Green |
| Speed: 1000 Orange | |
| Speed 100: Green | |
| Speed 10: off | |
| Power LEDs | Power on: Solid Green |
| Power off: Solid Blue | |
| Factory Reset: Flashing blue and green (alternatively) | |
| Software power cycle: Flashing green for ~15 seconds (shutdown time) and then flashing blue for ~25 seconds and then solid green | |
| Wi-Fi | OFF: Not using Wi-Fi |
| Flashing green: Wi-Fi is configured but not in use | |
| Solid green: Wi-Fi is actively used |
Note
Port 1/1 is the default LAN port and port 1/2 is the default WAN port. Port 1/3 is disabled. The default LAN IP is 192.168.101.1. The WAN port is configured as a DHCP client.
| Port Labels | Type | Description |
|---|---|---|
| 1/1, 1/2, and 1/3 | Data ports | The data ports are used to carry Network traffic. |
| 1/4 | Management port | The management port is used to connect directly to the appliance for system administration functions. You can use this port for initial provisioning of the appliance. From Citrix SD-WAN version 11.1.1 and above you can use the port 1/4 as a data port or a management port per the configuration. For more information, see Configurable Management or Data port. |
| USB | 2 USB ports | USB 2.0 ports |
| Serial | RJ-45/RS-232 | An RS232 serial console port |
| Power | Power button | Power OFF state: Press the power button and release it immediately: Power on the appliance |
| Press the power button and hold it for 10+ seconds: Factory resets the appliance. The appliance takes around 7 min for a factory reset. | ||
| Power ON state: Press the power button and release it immediately: Orderly shut down the appliance. | ||
| Press power button and hold it for 5+ seconds: Force shut down the appliance. | ||
| DC 12 V | DC Power Supply | Refer System Specifications for power supply information. |
Mounting the SD-WAN 110 SE appliance
The Citrix SD-WAN 110-SE appliance can be installed in the following installation modes:
- Desk placement
- Wall mount
- Rack mount
Desk placement
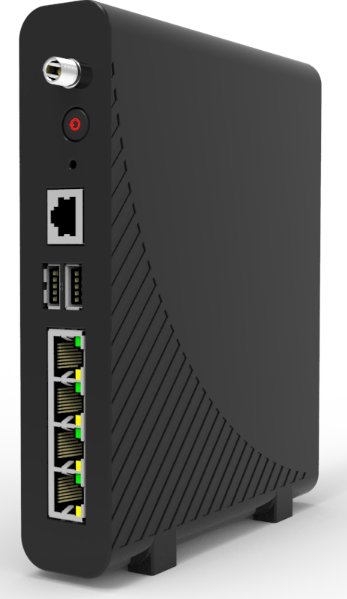
The Citrix SD-WAN 110-SE appliance can be placed on a desk using the rubber feet shipped in the appliance package. You can also fix a plastic stand to the side of the appliance, and place it vertically. The front view and the rear view of the appliance are shown below.
Temperature specifications and recommended placement
The Citrix SD-WAN 110 appliance supports desk placement, wall mount, and rack mount. Citrix recommends a vertical placement of the appliance through the stands or through wall mounting, especially in environments that lack air conditioning and good airflow. If placed horizontally, the underside of the appliance may become hot.
The Citrix SD-WAN 110 appliance and its compliance regulatory models are designed to work in home and office environments where the ambient temperature does not exceed 40 degrees C, and where air flow is not restricted (as it would be in an enclosure without fan cooling). Above 40 degrees C, the appliance may not work as expected. For more information, see Citrix SD-WAN data sheet.
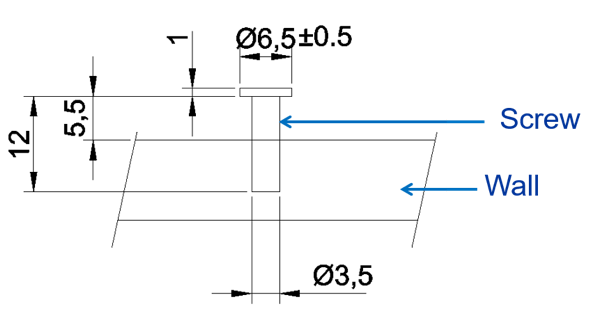
Wall mount
The Citrix SD-WAN 110-SE appliance can be wall mounted by placing and adjusting the appliance screw slots on the wall screws.
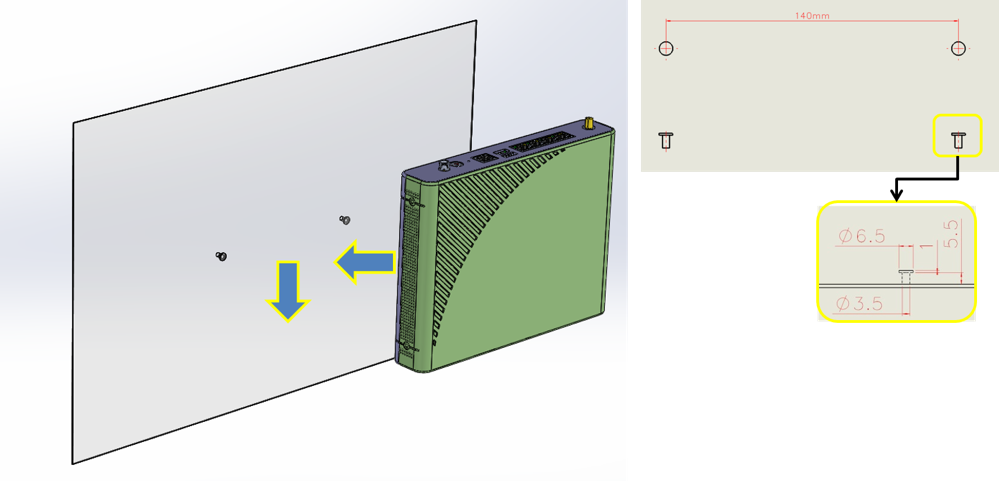
Use two wall mount screws with the following dimensions:
- Screw Length: 12 mm
- Screw out of wall: 5.5 mm
- Screw head: ∅6.0 mm ~ ∅7.5 mm
- Screw body: 3.5 mm
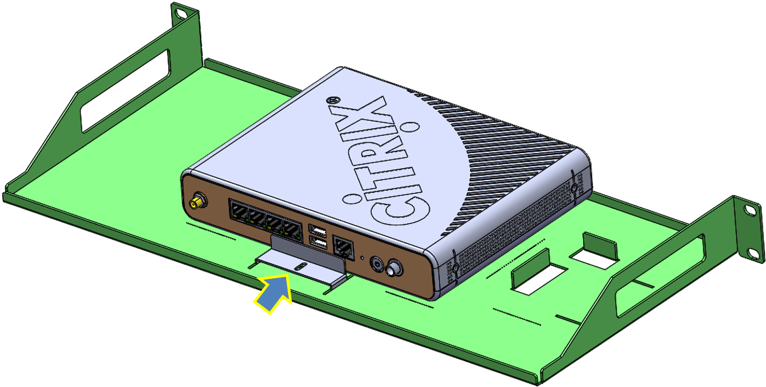
Rack mount
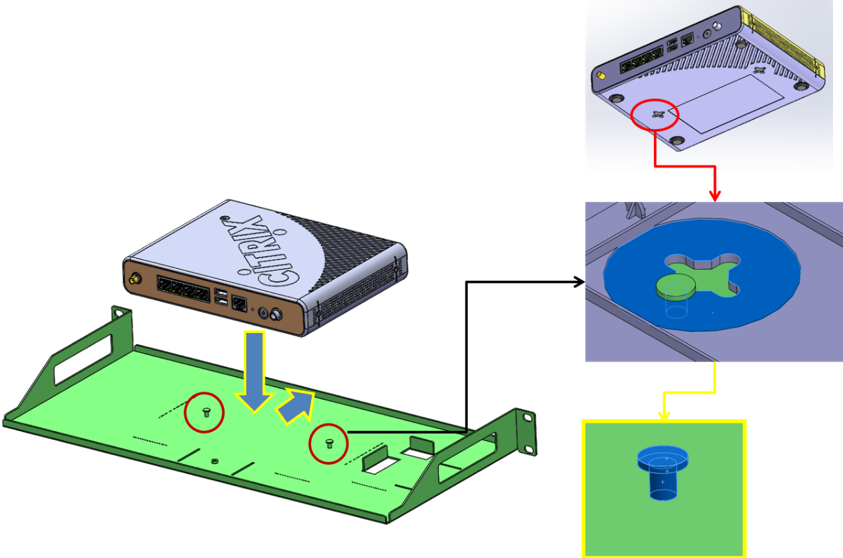
- Fix the shelf to the rack with the provided screws.
-
Install the chassis. Place the appliance screw slots on the positioning screws on the shelf and slide it, to lock it into position.
-
Install the chassis fix bracket to hold the appliance in position. Place the chassis fix bracket on the slot and fix it with a screw.
-
Install the power adapter. Place the power adapter on the adapter slot.
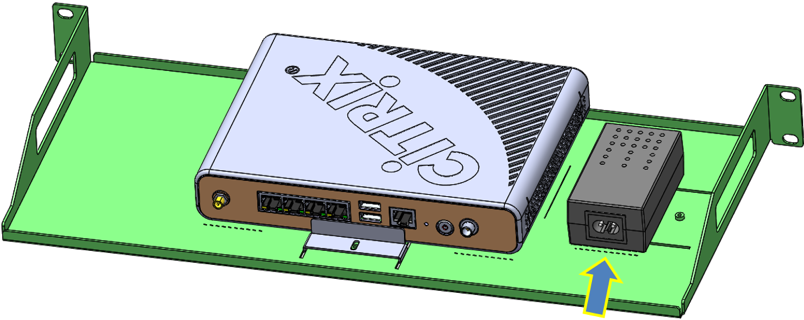
-
Install the adapter fix bracket to hold the power adapter in position. Place the adapter fix bracket on the slot and fix it with a screw.

Installing the LTE antennas
To use the Citrix SD-WAN 110-LTE-WiFi-SE appliance as an LTE modem, install the antennas to the appliance. The antennas are included in the appliance package. The Citrix SD-WAN 110-LTE-WiFi-SE appliance has two SMA coax male connectors at the front and rear of the appliances. The antennas have independent rotating SMA female connectors.
Note
Ensure that both the LTE antennas are installed for better LTE cellular connectivity.
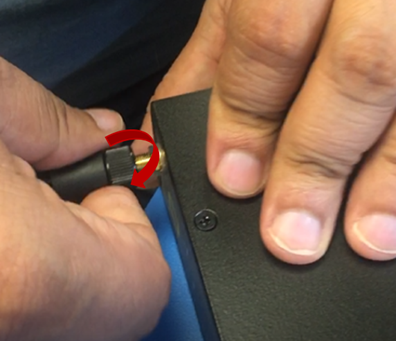
To install the antennas to the appliance:
-
Place the antenna SMA coax connector (F) on the appliance SMA coax connector (M) and rotate the antenna connector clockwise, until the connector is tight.
Note
The recommended torque is 0.20–0.28 newton meters (N m)
-
Adjust the antenna orientation and direction.
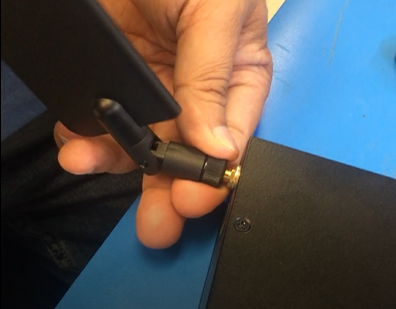
-
Similarly connect the other antenna to the rear SMA coax connector (M) of the appliance.
For more information on configuring the LTE functionality using the GUI and CLI, see Configure LTE functionality on 110 SE LTE appliance.
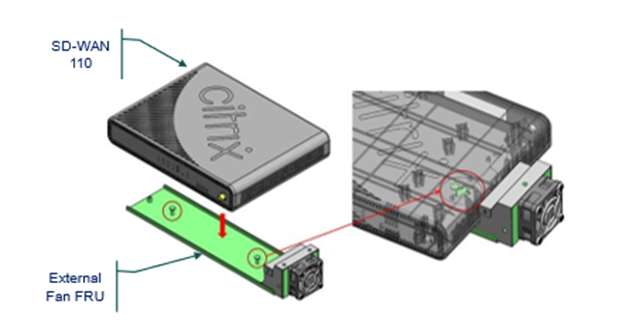
Installing external fan
Before you begin installing the external cooling fan FRU, ensure to remove SD-WAN 110 appliance from the current mounting. Do not remove the power input during the operation.
The components of the external cooling fan FRU are shown below:
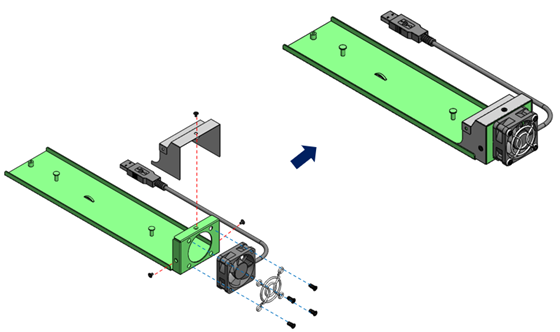
Installation
-
Orient the SD-WAN 110 appliance as shown below. Align mounting holes with the mounting studs on the fan FRU and slide the appliance forward.
-
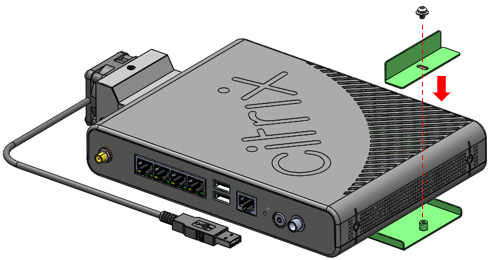
Attach the locking plate to the bottom plate. Slide the plate forward to lock the appliance in place and secure with included screw.
-
Insert a USB cable into the USB slot on the SD-WAN 110 appliance as shown below.
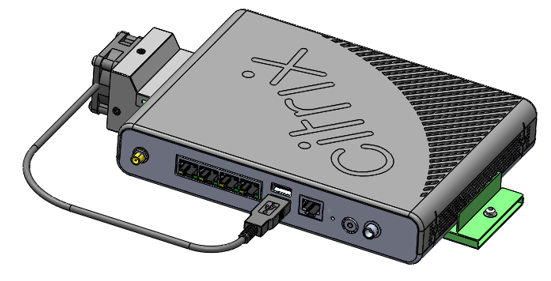
-
Restore power to SD-WAN 110.
Summary of hardware specifications
| Specifications | 110-SE, 110-LTE-WiFi-SE, and 110-WiFi-SE |
|---|---|
| Regulatory Model Number | SD-WAN 110, SD-WAN 110-LTE-WiFi, SD-WAN 110-WiFi |
| Memory | 4 GB |
| Non-Volatile Storage | 32 GB |
| LTE | 3G, 4G. For Citrix SD-WAN 110-LTE-WiFi-SE appliance only. |
| LAN Ports | 4x GbE RJ45 |
| USB 2.0 | 2 |
| SIM Slot | X2 2FF. Adaptors for 3FF and 4FF to be ordered as an FRU. For Citrix SD-WAN 110-LTE-WiFi-SE appliance only. |
| LTE Module | Quectel EG25-G. For Citrix SD-WAN 110-LTE-WiFi-SE appliance only. |
| Power Supply Ratings | |
| Power Supplies | Single (External) |
| Input Voltage / Frequency Ranges (normal) | 100–240 VAC, 50–60 Hz |
| Input Current | 0.6 A |
| Wattage (max) | 24 W |
| Appliance Ratings | |
| Input Voltage | 12 VDC |
| Input current | 2.0 A |
| Wattage (typical) | 10 W |
| Wattage (max) | 15.5 W |
| Thermal Dissipation | |
| Airflow (front to rear) | n/a: fan-less |
| Typical Heat Dissipation | 34BTU |
| Max Heat Dissipation | 53BTU |
| Mechanical | |
| Package Weight (kg) | 0.9 kg |
| Package Dimensions | 38.5 cm L x 25.4 cm W x 9.01 cm H |
| System Weight (kg) | 0.62 kg |
| System Dimensions | 21.59 cm L x 15.87 cm W x 3.81 cm H |
| Environmental and Regulatory | |
| Operating Temperature | 0–40 degree C |
| Humidity Range | 5–90%, Non-condensing |
| Industry Standards | GCF, PTCRB, Wi-Fi CERTIFIED™ |
| Safety Certifications | CB, UL |
| Regulatory Compliance | CE, FCC, ISED (IC), RCM, VCCI & MIC, Anatel, BTK, BSMI & NCC (Taiwan), CITC, CCC, ENACOM, ICASA, IFT, SRRC, WPC, DWLFM & TRA (Bahrain), TRA (UAE), SUBTEL, SDPPI, CAK, MCINET, NCC (Nigeria), CRA |
| Environmental Compliance | RoHS 3, WEEE, REACH |
EG25-G TX (Transmit) output power (dBm) for Quectel EG25-G (LTE)
| Frequency | Maximum Value (in dBm) |
|---|---|
| WCDMA B1/B2/B4/B5/B6/B8/B19 | 24+1/-3dB |
| LTE-FDD B1/B2/B3/B4/B5/B7/B8/B12/B13/B18/B19/B20/B25/B26/B28 | 23+/-2dB |
| LTE-TDD B38/B39/B40/B41 | 23+/-2dB |
EG25-G RX receiving sensitivity (dBm) for Quectel EG25-G (LTE)
| Frequency | Primary (in dBm) |
|---|---|
| WCDMA B1 | -108.2 |
| WCDMA B2 | -109.5 |
| WCDMA B4 | -108.5 |
| WCDMA B5 | -109.2 |
| WCDMA B6 | -109 |
| WCDMA B8 | -109.5 |
| WCDMA B19 | -109 |
| LTE-FDD B1 (10M) | -97.3 |
| LTE-FDD B2 (10M) | -98 |
| LTE-FDD B3 (10M) | -97.5 |
| LTE-FDD B4 (10M) | -97.8 |
| LTE-FDD B5 (10M) | -98 |
| LTE-FDD B7 (10M) | -97.3 |
| LTE-FDD B8 (10M) | -98 |
| LTE-FDD B12 (10M) | -98 |
| LTE-FDD B13 (10M) | -98 |
| LTE-FDD B18 (10M) | -98 |
| LTE-FDD B19 (10M) | -98 |
| LTE-FDD B20 (10M) | -98 |
| LTE-FDD B25 (10M) | -98 |
| LTE-FDD B26 (10M) | -98 |
| LTE-FDD B28 (10M) | -98.1 |
Antenna gain for Quectel EG25-G (LTE)
| Ethertronics LTE antenna 1004112-C003 | |||
|---|---|---|---|
| Part No. 1004112 - Broadband External LTE / Cellular antenna | |||
| Frequency | 690–960 | 1710–2220 | 2500–2700 |
| Peak Gain | 1.18 dBi | 4.5 dBi | 4.0 dBi |
Wireless WAN (LTE) Specifications
| Specifications | 110-SE and 110-LTE-WiFi-SE |
|---|---|
| Modem | Quectel EG25-G |
| Geography | Global |
| LTE Category | Cat4 (Theoretical 150 Mbps DL; 50 Mbps UL) |
| Carrier Aggregation | No |
| SIM Slots | 2 (only 1 active) |
| LTE Bands | B1/B2/B3/B4/B5/B7/B8/B12/B13/B18/B19/B20/B25/B26/B28/B38/B39/B40/B41 |
| Output Power | Class 3 (23 dBm±2 dB) |
| Theoretical Speeds | 150 Mbps downlink/50Mbps uplink |
Wireless LAN (Wi-Fi) Specifications
| Wi-Fi capabilities | 110-WiFi-SE and 110-LTE-WiFi | Antenna peak gain | |
|---|---|---|---|
| Wi-Fi standards | 802.11 a/b/g/n/ac | ||
| Frequency bands* | 2412 MHz, 2417 MHz, 2422 MHz, 2427 MHz, 2432 MHz, 2437 MHz, 2442 MHz, 2447 MHz, 2452 MHz, 2457 MHz, 2462 MHz, 2467 MHz, 2472 MHz | 2.6 dBi | |
| Channel width: 20 MHz | 5180 MHz, 5200 MHz, 5220 MHz, 5240 MHz, 5745 MHz, 5765 MHz, 5785 MHz, 5805 MHz, 5825 MHz | 5.0 dBi | |
| Channel width: 40 MHz | 5190 MHz, 5230 MHz, 5755 MHz, 5795 MHz | 5.0 dBi | |
| Channel width: 20 MHz | 5180 MHz, 5200 MHz, 5220 MHz, 5240 MHz, 5745 MHz, 5765 MHz, 5785 MHz, 5805 MHz, 5825 MHz | 5.0 dBi | |
| Channel width: 80 MHz | 5210 MHz, 5775 MHz | 5.0 dBi | |
| Max simultaneous SSIDs | 4 | ||
*- Some frequency bands/channels and channel widths are not available for some countries, depending on the supported bands per country. Output power of the device is configured to operate within the regulatory limit set by the host country/domain.
The Wi-Fi CERTIFIED™ Logo is a certification mark of Wi-Fi Alliance®.
Troubleshooting Citrix SD-WAN 110 SE network issue
The Citrix SD-WAN 110 SE appliance fails to establish network connectivity under the following conditions.
- Appliance is managed by SD-WAN Orchestrator and/or brought up by zero touch deployment (ZTD).
- Appliance is in factory state and ZTD/SD-WAN Orchestrator agents are not installed.
- Appliance time (CMOS or hardware) is ahead of the actual time.
- Appliance time is set backwards by the NTP daemon before download/installation of the ZTD/SD-WAN Orchestrator agents.
Workaround
After initial installation (or after resetting the unit to its original factory configuration), the end-user installing SD-WAN 110 must verify that the appliance is successfully connected to the organizational network. The end-user must be provided with organization-specific instructions along with the appliance (for example, dial tone on the VoIP phone) to verify network connectivity. If the appliance does not connect to the network, the end-user can follow the instructions provided below:
- Leave the appliance powered on and wait for 30 minutes or longer.
- Briefly but firmly press the Power button (1–2 seconds) to shut it down.
- After the lights on the appliance go dark, press the Power button again to turn the appliance back on. The SD-WAN 110 appliance now restarts and connects to the network.
In this article
- Citrix SD-WAN 110-LTE-WiFi-SE
- Citrix SD-WAN 110-WiFi-SE
- Mounting the SD-WAN 110 SE appliance
- Installing the LTE antennas
- Installing external fan
- Summary of hardware specifications
- EG25-G TX (Transmit) output power (dBm) for Quectel EG25-G (LTE)
- EG25-G RX receiving sensitivity (dBm) for Quectel EG25-G (LTE)
- Antenna gain for Quectel EG25-G (LTE)
- Wireless WAN (LTE) Specifications
- Wireless LAN (Wi-Fi) Specifications
- Troubleshooting Citrix SD-WAN 110 SE network issue