Citrix SD-WAN 210 Standard Edition Appliances
The Citrix SD-WAN 210-SE appliance is a 1U appliance for use in small branch offices. This appliance has 2-core processor with 4 GB memory and 64 GB of storage.
The Citrix Compliance Regulatory models are:
- SD-WAN 210-SE (non-LTE) - NS-SDW-210
- SD-WAN 210-SE LTE - NS-SDW-210-LTE-R1, NS-SDW-210-LTE-R2, NS-SDW-210-LTE-RC
For more information, see the Citrix SD-WAN platform data sheet and for information on the Product Lifecycle support, see Product matrix.
Note
- You can configure Citrix SD-WAN 210-SE and Citrix SD-WAN 210-SE LTE as an MCN only in the SD-WAN Orchestrator managed networks.
- You can configure the Citrix SD-WAN 210-SE appliance using the new user interface. For more information, see User interface for SD-WAN appliances. Provisioning the Citrix SD-WAN 210-SE as an MCN, redirects you to the legacy user interface.
The following figure shows the front panel of the 210 SE appliance.
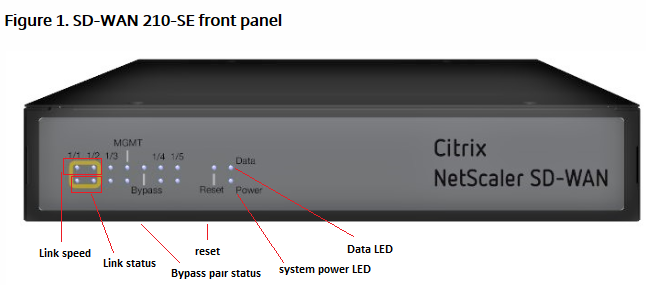
| LED | Description |
|---|---|
| Ethernet Copper Ports LED | Active/Link: Green |
| Speed 1000: Orange | |
| Speed 100: Green | |
| Speed 10: off | |
| SIM Card Slot | Two Mini (2FF) size SIM slots. Use an adapter to use Micro (3FF) and Nano (4FF) size SIMs. Snap the smaller SIM into the adapter. Order the adapter as an FRU. |
| Note: At any given time, only one SIM is active. Power ON the appliance and then insert the SIM card. | |
| Bypass LEDs | Normal Mode: Green |
| Bypass Mode: Orange | |
| Ethernet Fiber Ports | Active/Link: Green |
| Speed: 1000: Orange | |
| Power LEDs | Power on: Green |
| Power off: off |
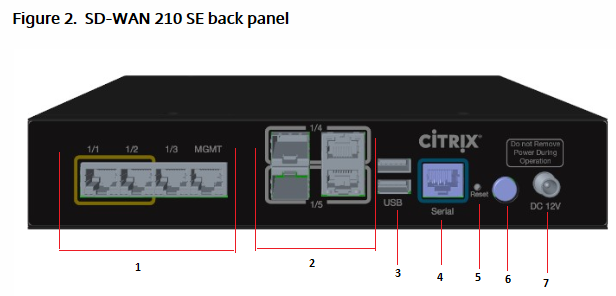
The following components are visible on the back panel of the 210 SE appliance:
| Interface | Port Labels | Type | Description |
|---|---|---|---|
| 1 | 1/1 and 1/2 | Bypass/FTW | Fail-to-Wire |
| 1/3 | Traffic | Network traffic | |
| Management | RJ-45 | A copper Ethernet (RJ45) management port. The management port is used to connect directly to the appliance for system administration functions. You can use this port for initial provisioning of Virtual WAN. | |
| 2 | 1/4 and 1/5 | SFP and Ethernet (combination ports) | Used as a combination of SFP and Ethernet one each on the top and bottom. Supported speeds: 100 Mbps and 1000 Mbps. |
| 3 | USB | 2 | USB ports |
| 4 | Console | RS-232 serial | An RS232 serial console port. |
| 5 | Reset | Reset button | Consult Citrix technical support for more information. |
| 6 | Power | Power button | Power button to power on or off the appliance. Press the switch for five seconds to switch off the power. |
| 7 | Power Supply | DC Power Supply | Single power adapter. Power rating: 40 W, voltage: 12 V, and current: 3.33 A. |
Citrix SD-WAN 210-SE LTE
The 210 SE LTE appliance is a 1U appliance. This appliance has 2-core processor with 4 GB memory and 64 GB of storage.
The following figure shows the front panel of the 210 SE LTE appliance.
Figure 3. 210 SE (LTE) front panel with antenna
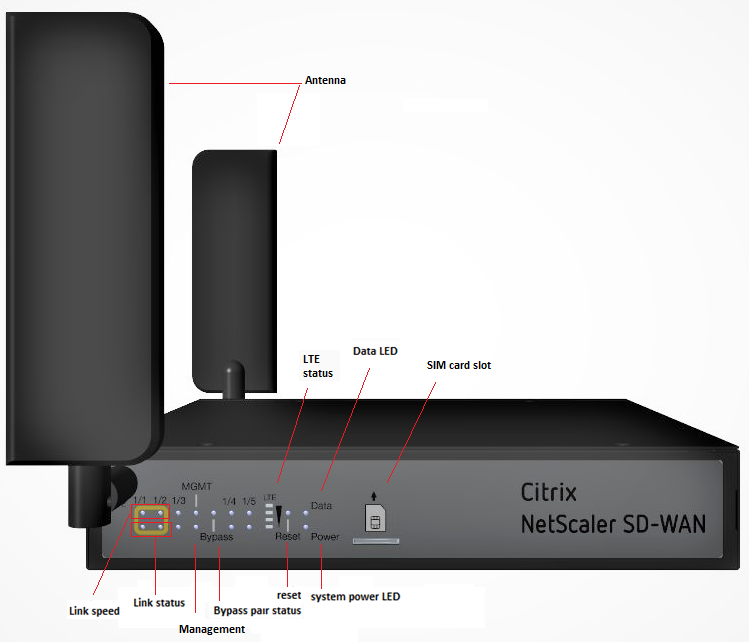
| LED | Description |
|---|---|
| Ethernet Copper Ports LED | Active/Link: Green |
| Speed: 1000 Orange | |
| Speed 100: Green | |
| Speed 10: off | |
| Bypass LEDs | Normal Mode: Green |
| Bypass Mode: Orange | |
| Ethernet Fiber Ports | Active/Link: Green |
| Speed: 1000: Orange** | |
| System and Data LEDs | Sys: Power on: Green |
| Sys: Power off: off | |
| Data access storage: Blue |
Figure 4. 210 SE (LTE) back panel with antenna
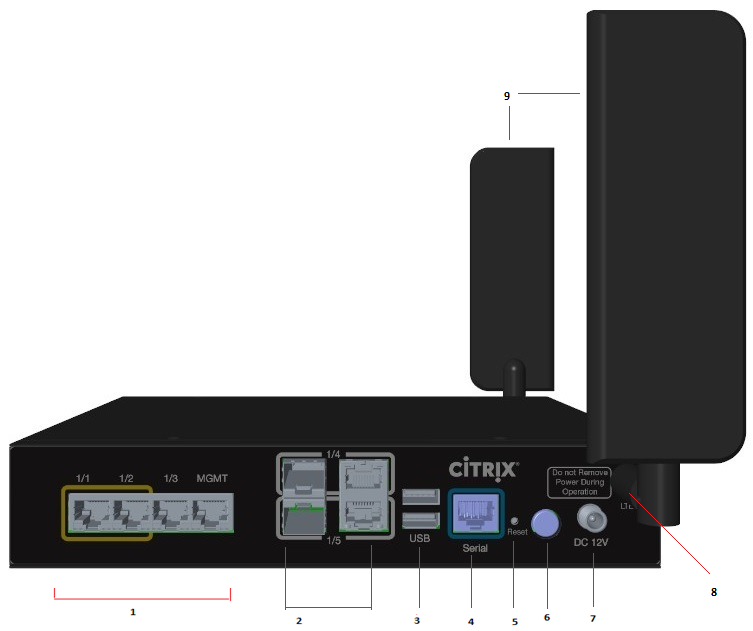
The following components are visible on the back panel of the 210 SE LTE appliance:
| Interface | Port Labels | Type | Description |
|---|---|---|---|
| 1 | 1/1 and 1/2 | Bypass/FTW | FTW ports |
| 1/3 | Traffic | Traffic port | |
| Management | RJ-45 | A copper Ethernet (RJ45) management port. The management port is used to connect directly to the appliance for system administration functions. You can use this port for initial provisioning of Virtual WAN. | |
| 2 | 1/4 and 1/5 | SFP and Ethernet (combination ports) | Used as a combination of SFP and Ethernet one each on the top and bottom. |
| 3 | USB | 2 | USB ports |
| 4 | Console | RS-232 serial | An RS232 serial console port |
| 5 | Reset | Reset button | Consult Citrix technical support for more information. |
| 6 | Power | Power button | Power button to power on or off the appliance. Press the switch for five seconds to switch off the power. |
| 7 | Power supply | DC Power supply | Single power adapter. Power rating: 40 W, voltage: 12 V, and current: 3.33 A. |
| 8 | Antenna connectors | Male connectors | Connectors for antenna |
| 9 | Two antennas | LTE antennas | Antennas shipped with the appliance. |
Installing the LTE antennas
To use the Citrix SD-WAN 210 SE LTE appliance as an LTE modem, install the antennas to the appliance. The antennas are included in the appliance package. The 210 SE LTE appliance has two SMA coax male connectors at the front and rear of the appliances. The antennas have independent rotating SMA female connectors.
Note
Ensure that both the LTE antennas are installed for better LTE cellular connectivity.
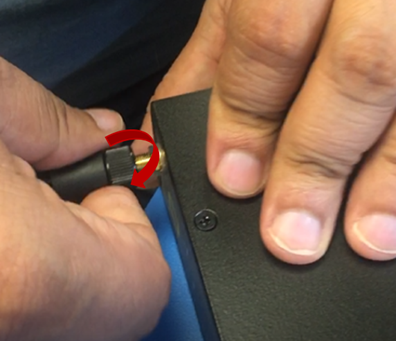
To install the antennas to the appliance:
-
Place the antenna SMA coax connector (F) on the appliance SMA coax connector (M) and rotate the antenna connector clockwise, until the connector is tight.
Note
The recommended torque is 1.8–2.5 Lbs force-inch.
-
Adjust the antenna orientation and direction.

-
Similarly connect the other antenna to the rear SMA coax connector (M) of the appliance.
For more information on configuring the LTE functionality using the GUI and CLI, see Configure LTE functionality on 210 SE LTE appliance.
Citrix SD-WAN 210 platform support for MiRiC-E1T1 FE/GBE SFP
The following two types of MiRiC SFPs are supported on the 210 appliance for SFP ports 1/5 and 1/6.
- MiRiC-E1T1 FE SFPs.
- MiRiC-E1T1 GBE SFPs.
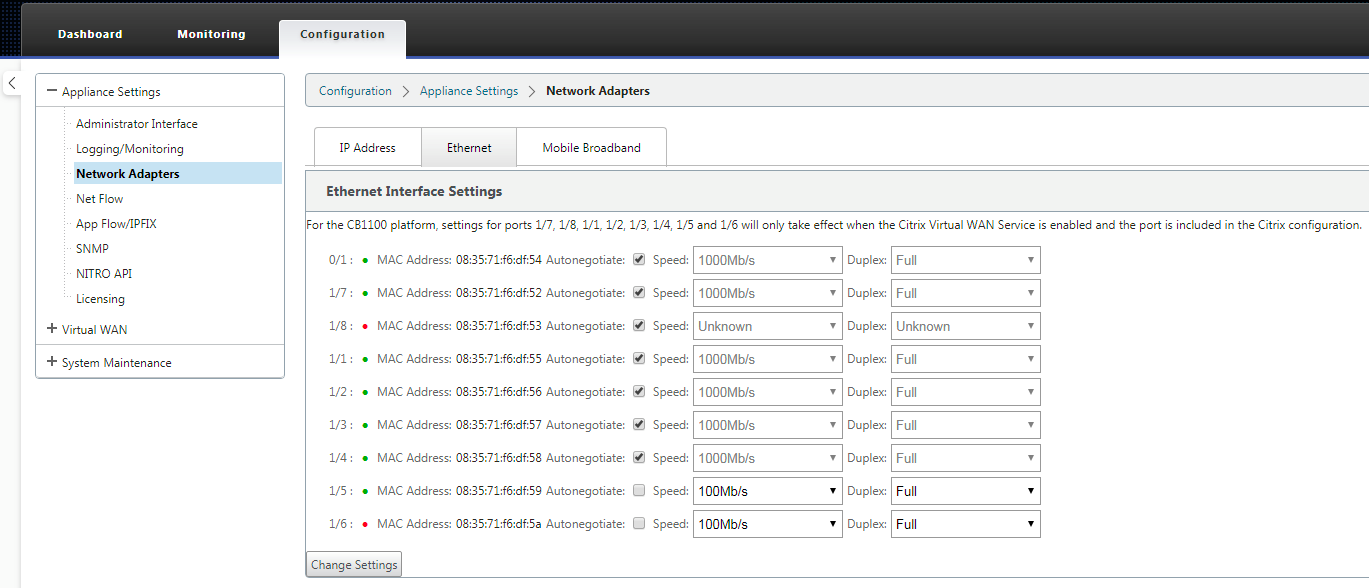
MiRiC-E1T1 FE SFPs must configure with speed as 100 Mbps and duplex as full. MiRiC-E1T1 GBE SFPs must configure with speed as 1 Gbps and duplex as full.
To configure, go to SD-WAN appliance GUI, navigate to Configuration > Network Adapters > Ethernet page.
Access MiRiC SFP web service
- The SFP transceivers have a default management IP address of 192.168.205.1, which can be used for the SFP web service to configure relevant configurations, for example; T1 or E1. The IP address can be modified other than 192.168.205.1. However ensure that you avoid IP address conflicts.
- To enable SFP access to the management:
- Log into the appliance CLI via ssh admin@(ip address)
- Run: sfp_access
- To enable access on 1/5, run one of the following commands.
- enable 1/5 # Works for GBE transceivers only if already configured.
- enable 1/5 100 # - Works only for FE transceivers
- enable 1/5 1000 # - Works only for GBE transceivers
- enable 1/5 100 172.217.43.2 # - For FE transceivers and assumes a user changes the default IP to an IP in 172.217.43.0/24
-
enable 1/5 1000 172.217.43.2 # - For GBE transceivers and assumes a user changes the default IP to an IP in 172.217.43.0/24
Note:
Enabling management access on 1/5 automatically disables management access on 1/6, and conversely.
-
To disable access to the management:
- Log in appliance CLI via ssh admin@(IP address)
- Run: sfp_access
- Run: disable
-
To show the status:
- Log in appliance CLI via ssh admin@(IP address)
- Run: sfp_access
- Run: status
- Ensure that you disable the management access once configuration is done.
- When the appliance is rebooted, the management access is disabled automatically.
- When virtual service is restarted, the management access remains configured until enable or disable operation is done.
- When the appliance is disabled, the management access to the SFPs is lost.
- When the appliance is re-enabled, the management access is regained.
-
To configure E1 or T1 type for SFP transceiver:
- The client machine must be in the same IP subnet as the appliance management subnet.
- The client machine must have a route to the subnet of SFP transceiver IP address, 192.168.205.0/24, with the appliance management IP as the gateway.
- Open a browser and visit SFP transceiver management
- Default user name: su
- Default password: 1234
- To configure Interface Type (E1 or T1), navigate to Configuration > Physical Ports and choose E1 or T1 from the drop down menu, and click Save button.