Mounting the Appliance
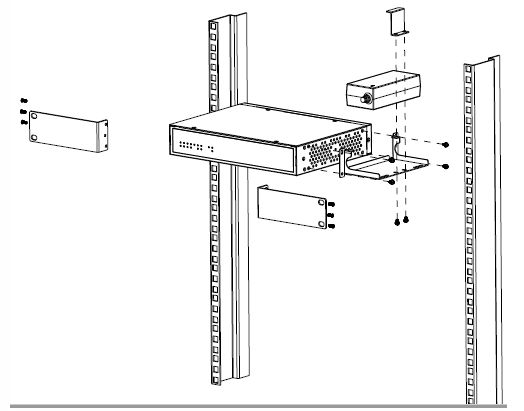
Rack Mount the Appliance
Note: The rack-mount and wall mount kits should be ordered separately and are not included with the appliance.
The rackmount chassis of SD-WAN 210-SE/210-SE LTE appliances fits a standard rack and takes 1U of racking height.
The 210-SE/210-SE LTE appliance can be placed on any flat surface, or mounted in any standard rack unit with the provided rack-mount brackets and screws.
To install the appliance into a rack:
- Ensure that the SD-WAN 210-SE/210-SE LTE appliance is placed on a stable surface prior to rack-mount installation.
- Attach the provided rack-mount brackets to the sides of the appliance using the provided bracket screws.
- If you are installing the appliance into a four-post rack, attach the rack-mount brackets with the handles aligned with the front of the SD-WAN 210-SE/ 210-SE LTE appliance.
- If you are installing the appliance into a two-post rack, attach the rack-mount brackets with the handles aligned with the middle of the SD-WAN 210-SE/210-SE LTE appliance.
- Position the SD-WAN 210-SE/SD-WAN 210-SE LTE appliance in the rack. Ensure that there is enough room around the device to allow for sufficient air flow.
- Line up the rack-mount bracket holes to the holes on the rack and ensure that the SD-WAN 210-SE/210-SE LTE appliance is level.
- Finger tighten four rack-mount screws to attach the appliance to the rack.
- Tighten the rack-mount screws with an appropriate screwdriver.
- Plug the provided power cable.
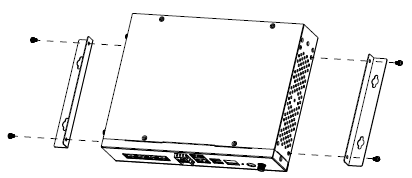
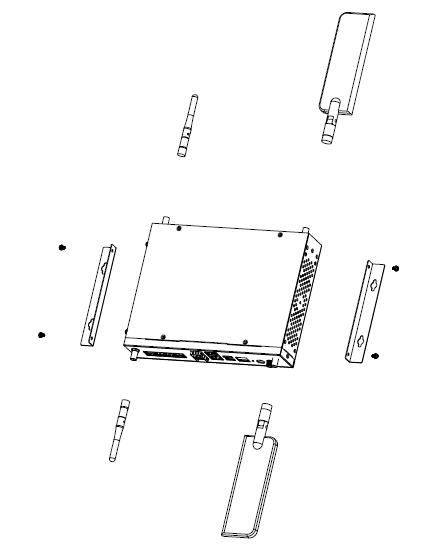
Rack Mount the Appliance with Antenna

Wall Mount the Appliance
To install the appliance into the wall:
- Using the supplied drywall screws and anchors, drill 2 holes into your wall lined up with the two matching screw holes on the rear of the mount housing of the appliance. Hang the appliance with the 4 (2 on each side) screws.
- Align the chassis ears brackets against the front and back of the mounting holes provided and properly attach ears bracket to the SD-WAN chassis by tightening the 4 screws (each side 2) provided.
- Mount the SD-WAN 210-SE/210-SE LTE chassis using the 4 ear brackets (each side 2) as shown below on both sides to the wall.
Wall Mount the Appliance with Antenna
Desktop Mount the Appliance
SD-WAN 210-SE/210-SE LTE appliance can be desktop mounted using the rubber feet shipped in the appliance package.
Rack Mount SD-WAN 400-SE and 410-SE
SD-WAN 400 and 410 SE appliances require one rack unit. These appliances are rack-mount devices that can be installed into two-post relay racks or four-post EIA-310 server racks. Verify that the rack is compatible with your appliance.
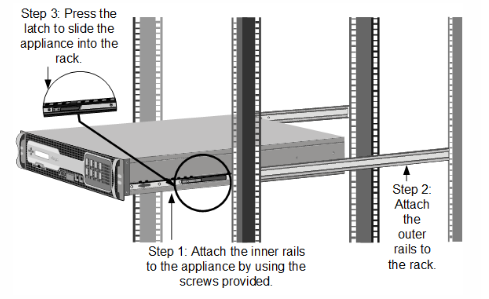
To mount an SD-WAN appliance, you must first install the rails and then install the appliance in the rack, as follows:
- Remove the inner rails from the rail assembly.
- Attach the inner rails to the appliance.
- Install the rack rails on the rack.
- Install the appliance in the rack.
To remove the inner rails from the rail assembly:
- Place the rail assembly on a flat surface.
- Slide out the inner rail toward the front of the assembly.
- Depress the locking tabs until the inner rail comes all the way out of the rail assembly.
- Repeat steps 1 through 3 to remove the second inner rail.
To attach the inner rails to the appliance:
- Position the right inner rail behind the ear bracket on the right side of the appliance.
- Align the holes on the rail with the corresponding holes on the side of the appliance.
- Attach the rail to the appliance with the provided screws.
- Repeat steps 1 through 3 to install the left inner rail on the left side of the appliance.
To install the rack rails:
- Position the rack rails at the desired location in the rack, keeping the sliding rail guide facing inward.
- Snap the rails to the rack. > Note: Make sure that both rack rails are at same height and that the rail guides are facing inward.
To install the appliance in the rack:
- Align the inner rails, attached to the appliance, with the rack rails.
- Slide the appliance into the rack rails, keeping the pressure even on both sides, and push the appliance into the rack rails until it locks into place.
- Verify that the appliance is locked in place by pulling it all the way out from the rack. > Note: The illustration in the following figure might not represent your actual appliance.
Rack Mount the Appliance:
An SD-WAN 1000-SE or 2000-SE appliance requires one rack unit. Both are rack-mount devices that can be installed into two-post relay racks or four-post EIA-310 server racks. Verify that the rack is compatible with your appliance.
Citrix SD-WAN 4000/4100/5100 appliances require two rack units.
Each appliance ships with a mounting rail kit that contains two rail assemblies, one for the left side and the other for the right side of the appliance, and screws to attach the rails. An assembly consists of an inner rail and a rack rail. The supplied rail kit is 28 inches long (38 inches extended). Contact your Citrix sales representative to order a 23 inch (33 inches extended) rail kit.
To mount the appliance, you must first install the rails and then install the appliance in the rack.
Perform the following tasks to mount the appliance:
- Remove the inner rails from the rail assembly.
- Attach the inner rails to the appliance.
- Install the rack rails on the rack.
- Install the appliance in the rack.
Note
The same rail kit is used for both square-hole and round-hole racks. See figure 4 for specific instructions for threaded, round-hole racks.
If you are installing the appliance as the only unit in the rack, mount it at the bottom. If the rack contains other units, make sure that the heaviest unit is at the bottom. If the rack has stabilizing devices available, install them before mounting the appliance.
To remove the inner rails from the rail assembly
- Place the rail assembly on a flat surface.
- Slide out the inner rail toward the front of the assembly.
- Depress the latch until the inner rail comes all the way out of the rail assembly.
- Repeat steps 1 through 3 to remove the second inner rail.
To attach the inner rails to the appliance
- Position the right inner rail behind the handle on the right side of the appliance.
- Align the holes on the rail with the corresponding holes on the side of the appliance.
- Attach the rail to the appliance with the provided screws: 5 per side.
To install the rack rails on the rack
- If you have a round-hole, threaded rack, skip to step 3.
- Install square nut retainers into the front post and back post of the rack as shown in the following figures. Before inserting a screw, be sure to align the square nut with the correct hole for your appliance. The three holes are not evenly spaced.
Figure 2. Installing Retainers into the Front Rack Posts
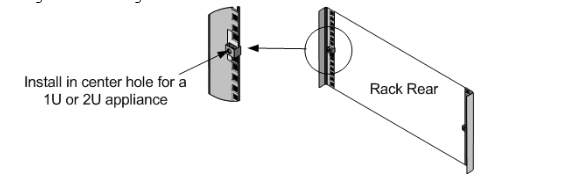
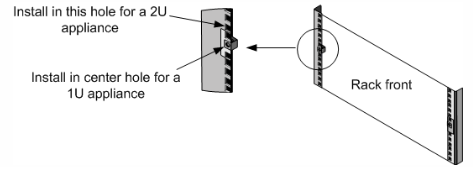 Figure 3. Installing Retainers into the Rear Rack Posts
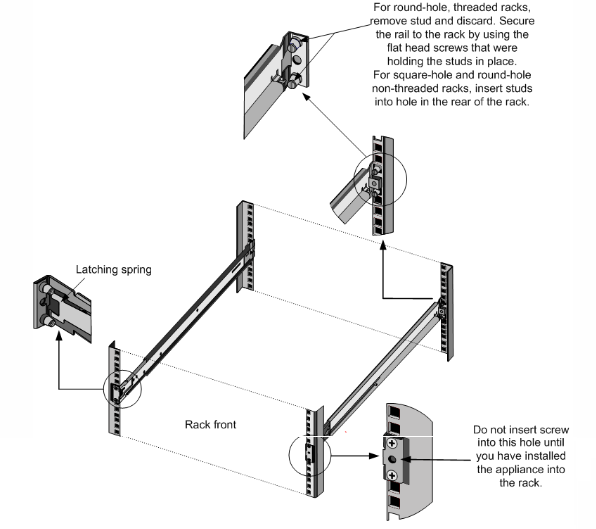
- Install the adjustable rail assembly into the rack as shown in the following figures. Use a screw to lock the rear rail flange into the rack. With the screw securing the rail in place, you can optionally remove the latching spring.
Figure 4. Installing the Rail Assembly to the Rack
To install the appliance in the rack
- Align the inner rails, attached to the appliance, with the rack rails.
- Slide the appliance into the rack rails, keeping the pressure even on both sides.
- Verify that the appliance is locked in place by pulling it all the way out from the rack.
Figure 5. Rack Mounting the Appliance