Installing SD-WAN Appliances on the Microsoft Hyper-V Platform
To install NetScaler SD-WAN virtual appliances on Microsoft Windows Server, you must first install Windows Server, with the Hyper-V role enabled, on a machine with adequate system resources. While installing the Hyper-V role, be sure to specify the network interface cards (NICs) on the server that Hyper-V uses to create the virtual networks. You can reserve some NICs for the host. Use the Hyper-V Manager to perform the SD-WAN VPX installation.
SD-WAN VPX for Hyper-V is delivered in virtual hard disk (VHD) format. It includes the default configuration for elements such as CPU, network interfaces, and hard-disk size and format. After you install an SD-WAN VPX instance, you can configure its network adapters, add virtual NICs, assign the SD-WAN IP address, subnet mask, and gateway, and complete the basic configuration of the virtual appliance.
Microsoft Server Hardware Requirements
- The server’s processor must support Intel Virtualization Technology.
- The server must run 64-bit Windows 2008 R2 SP1 (Standard, Enterprise, or data center Editions), or 2012 (Standard or data center Editions) with a full installation (not a Core installation), and the Hyper-V component enabled.
- Minimum system configuration is 4 GB RAM, 200 GB hard drive, and 2 physical CPU.
- Two physical Ethernet NICs are required. Three are recommended.
Note
The procedure below uses three NICs.
For more information about Windows Server 2008 R2 system requirements, see http://www.microsoft.com/windowsserver2008/en/us/system-requirements.aspx (the exact location is subject to change by Microsoft at any time).
For information about installing Microsoft Server 2008 R2, see Installing Windows Server 2008 R2 (the exact location is subject to change by Microsoft at any time).
Prerequisites for Installing SD-WAN virtual appliances on the Microsoft Hyper-V platform
Before you begin installing a virtual appliance, do the following:
- Enable the Hyper-V role on Windows Server 2008 R2 or 2012. For more information, see Hyper-V Installation (the exact location is subject to change by Microsoft at any time).
- Download the VPX setup files. If you do not have a My Citrix account, access the home page at http://www.mycitrix.com, click the New Users link, and follow the instructions to create a new My Citrix account.
To download the SD-WAN VPX setup files
- In a web browser, go to http://www.citrix.com/ and click My Citrix.
- Type your user name and password.
- Click Downloads.
- In Search Downloads by Product, select NetScaler SD-WAN.
- Under Virtual Appliances, select and download the required SD-WAN VPX distribution.
- Copy the compressed file to your server.
To configure virtual NICs on the SD-WAN VPX
- Log on to the Windows Server as an Administrator, either at a keyboard or VGA console, or through a NIC that you plan to use for managing the virtual appliance (not at one of the ports that you use for the accelerated bridge).
- To start Hyper-V Manager, click Start, point to Administrative Tools, and then click Hyper-V Manager.
- In the navigation pane, under Hyper-V Manager, select the server on which you want to install SD-WAN VPX.
- On the Actions menu, click Virtual Network Manager…
- In the Virtual Network Manager window, in the navigation pane, under Virtual Networks, click New virtual network.
- Choose External as type of virtual network, and then click Add.
- Name the new virtual network as apA Network 1 and select the physical NIC to map it to.
- Click OK to apply the changes.
- The Apply Networking Changes popup displays a caution indicating that pending changes might disrupt network connectivity. Click Yes.
- Repeat steps 5–9 for the second accelerated bridge port. Name it as apA Network 2 and connect it to a different physical port.
- Click Apply to apply the networking changes.
Installing SD-WAN VPX on Microsoft Server with Hyper-V Manager
After you have enabled the Hyper-V role on Microsoft Server and extracted the VPX files, you can use Hyper-V Manager to install SD-WAN VPX. After you import the virtual machine, you must configure the virtual NICs by associating them with the virtual networks created by Hyper-V. Based on the Microsoft server you are using, see the procedures in the following links to complete the installation.
- Microsoft Server 2008 R2
- Microsoft Server 2012
-
Microsoft Server 2012 and 2016
NOTE
-
From 10.2.6 and 11.0.3 release onwards, it is mandatory to change the default admin user account password while provisioning any SD-WAN appliance or deploying a new SD-WAN SE VPX. This change is enforced using both CLI and UI.
-
A system maintenance account - CBVWSSH, exists for development and debugging and has no external login permissions. The account can only be accessed through a regular administrative user’s CLI session.
-
Create a Virtual Machine on the Microsoft Hyper-V Platform using Virtual Hard Disk file
You need to download the SD-WAN Hyper-V setup files:
- In a web browser, go to http://www.citrix.com/ and click My Citrix.
- Type your user name and password.
- Click Downloads.
- In Search Downloads by Product, select Citrix SD-WAN.
- Under Virtual Appliances, select and download the required SD-WAN Hyper-V distribution.
- Copy the compressed file to your server and extract it.
To create a new virtual machine by using Hyper-V Manager:
- Open the SD-WAN Hyper-V setup file and select Virtual Hard Disks folder.
- Copy the hard disk image and paste it in a freshly created folder outside of the Hyper-V setup file.
- Open the Hyper-V Manager > select the Hyper-V ID > right click and select New > Virtual Machine.
-
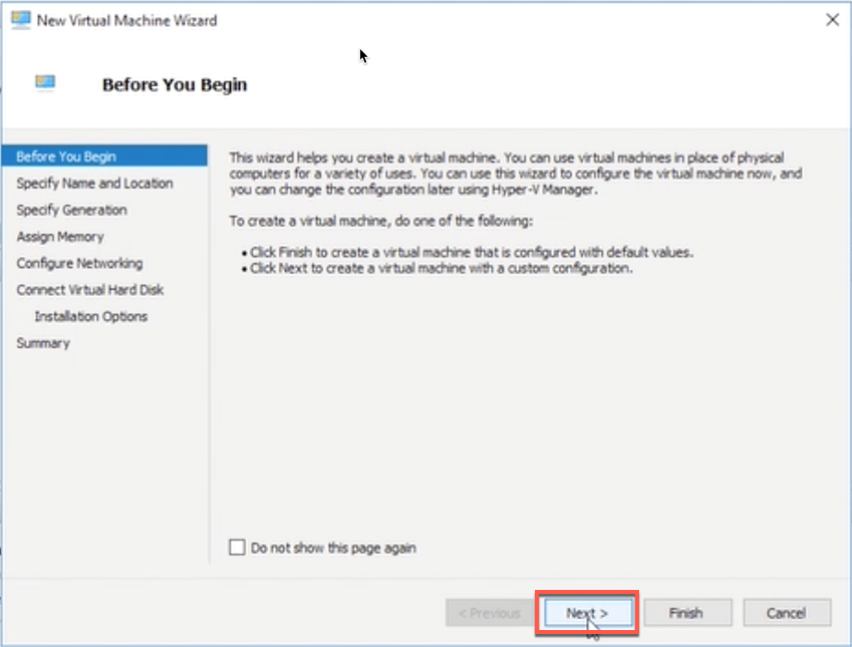
The Virtual Machine Wizard opens, Click Next.
-
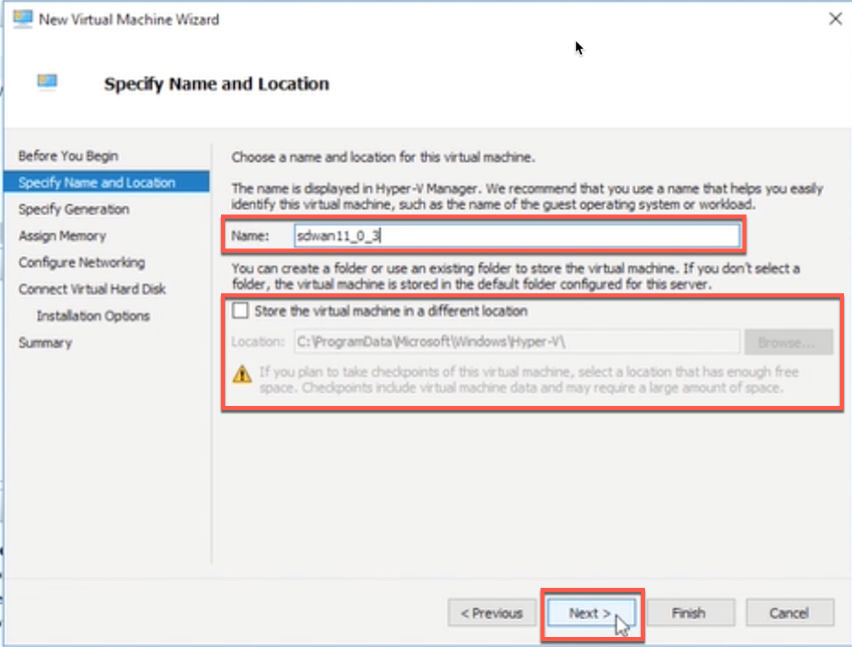
Provide the name and you can also specify a location for the virtual machine. Select the check box to provide a different location to store the virtual machine. Click Next.
-
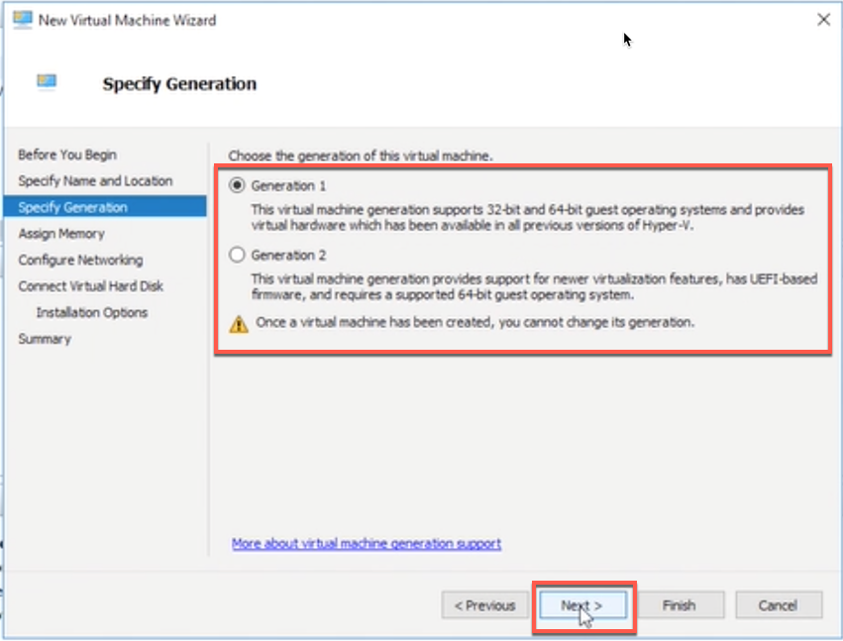
Select the generation for the virtual machine and click Next.
-
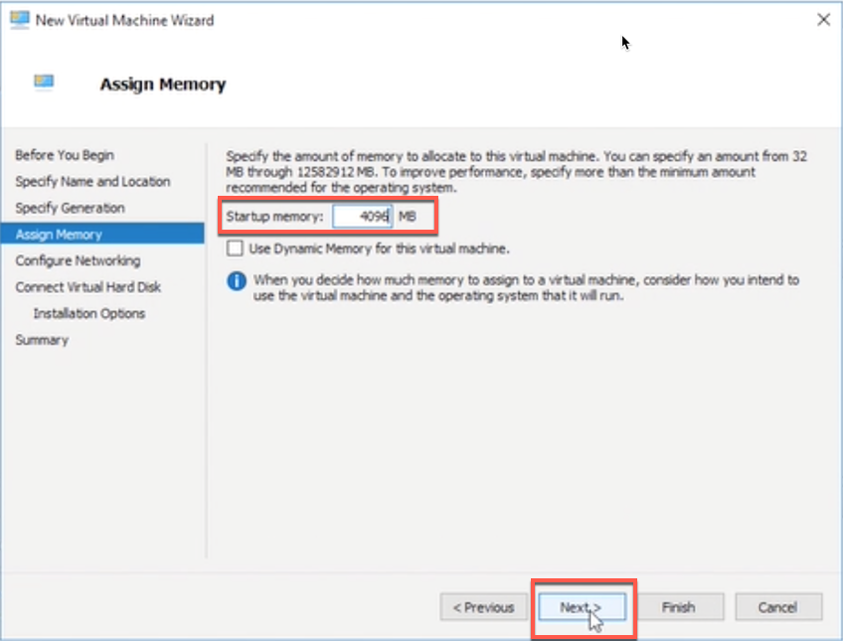
Specify the amount of memory to allocate to the virtual machine and click Next.
-
Select a connection from the drop-down list and click Next. The connection being selected here is for Management port.

-
To connect VHD, select the Use an existing virtual hard disk radio button, browse, and select the VHD file from the extracted zip file and click Next. The virtual hard disk can be found in below location:
**
> ctx-sdw-se-vpx > Virtual Hard Disks** 
-
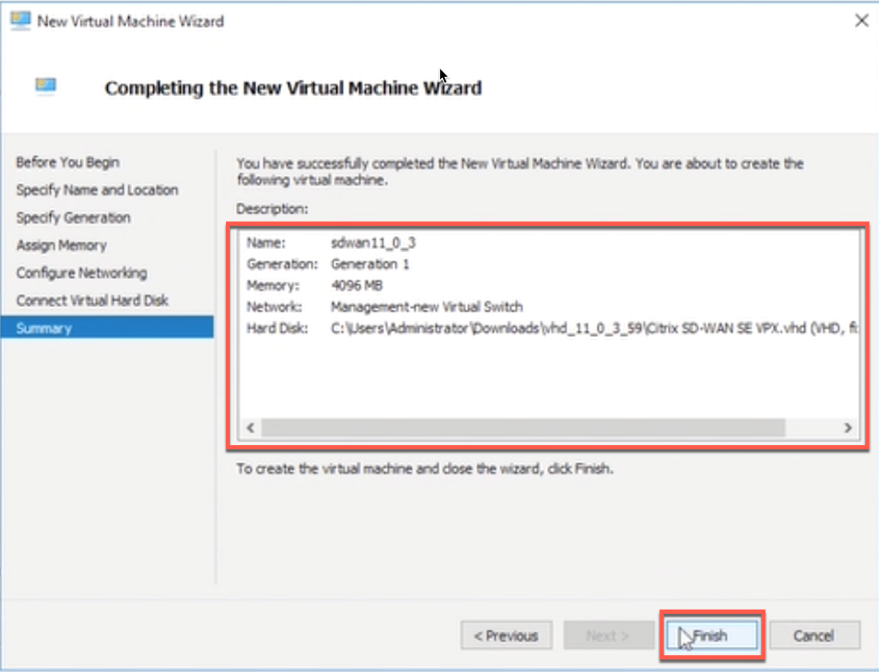
Verify the details on the Summary page and click Finish to complete the creation of the virtual machine.
By default, the virtual machine is in Off sate. The virtual machine created so far has only 1 Interface and 1 core, we have to increase number of cores and add 2 more Interfaces for SD-WAN to work. Perform the following procedure:
- Verify that the virtual appliance that you created is listed under Virtual Machines.
- Right-click the virtual machine, and then click Settings.
- In the Settings window’s navigation pane, under Hardware, select the first network adapter in the list.
- In the Network drop-down menu, select apA1 Network. This is the LAN interface for apA1.
- Make sure that the Enable MAC address spoofing box is selected. If it is not, select it and apply the changes.
- In the Settings window’s navigation pane, under Hardware, select the second network adapter in the list. Repeat the step 10 and step 11, and assign the adapter to apA2 Network. This is the WAN interface for apA2. Important: Do not configure the same Network for both the network adapters. Incorrect configuration creates packet loops, which can bring down the network.
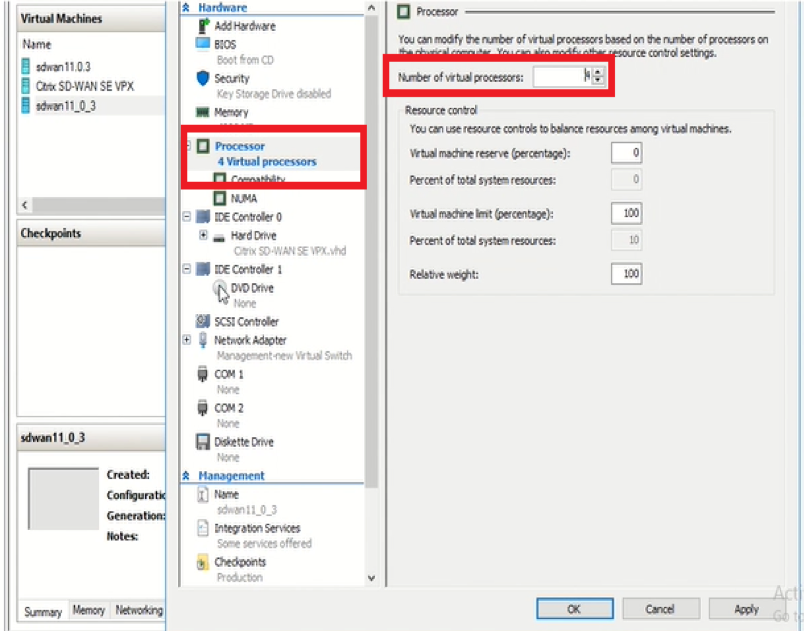
- Increase Number of Virtual CPU cores.
- In the Settings window navigation pane, select Processor.
- Increase Number of virtual processors to at least 4.
- Click Apply.
- Optionally, change the virtual hard disk size:
- In the Settings window navigation pane, under IDE Controller 0, select Hard Drive.
- Click Edit.
- Follow the steps in the Edit Virtual Hard Disk Wizard to increase the allocation to one of the supported sizes, using the Expand option in the wizard.
- Optionally, change the memory size.
- In the Settings window’s navigation pane, under Hardware, select Memory.
- Allocate the RAM space by adjusting the memory to one of the supported sizes.
- Click OK.
- Right click and select start. Once the state is changed to Running, your virtual machine is now ready to use.