-
Get started with Citrix SD-WAN WANOP
-
Configure Citrix SD-WAN WANOP plug-in with Access Gateway VPNs
-
Deploy SD-WAN WANOP VPX on Microsoft Azure
-
-
Manage and monitor using Citrix Application Delivery Management
-
This content has been machine translated dynamically.
Dieser Inhalt ist eine maschinelle Übersetzung, die dynamisch erstellt wurde. (Haftungsausschluss)
Cet article a été traduit automatiquement de manière dynamique. (Clause de non responsabilité)
Este artículo lo ha traducido una máquina de forma dinámica. (Aviso legal)
此内容已经过机器动态翻译。 放弃
このコンテンツは動的に機械翻訳されています。免責事項
이 콘텐츠는 동적으로 기계 번역되었습니다. 책임 부인
Este texto foi traduzido automaticamente. (Aviso legal)
Questo contenuto è stato tradotto dinamicamente con traduzione automatica.(Esclusione di responsabilità))
This article has been machine translated.
Dieser Artikel wurde maschinell übersetzt. (Haftungsausschluss)
Ce article a été traduit automatiquement. (Clause de non responsabilité)
Este artículo ha sido traducido automáticamente. (Aviso legal)
この記事は機械翻訳されています.免責事項
이 기사는 기계 번역되었습니다.책임 부인
Este artigo foi traduzido automaticamente.(Aviso legal)
这篇文章已经过机器翻译.放弃
Questo articolo è stato tradotto automaticamente.(Esclusione di responsabilità))
Translation failed!
Deploy SD-WAN WANOP VPX on Microsoft Azure
Citrix SD-WAN WANOP Edition is now available in the Azure marketplace, enabling WAN optimization between enterprise datacenter/branch and Azure cloud. Since L2 mode support is not available on cloud infrastructures, you cannot deploy Citrix SD-WAN WANOP as a standalone VPX in Azure Cloud. However, you can deploy Citrix SD-WAN WANOP VPX along with Citrix ADC VPX in Azure cloud infrastructure. The Citrix ADC uses cloud connector to create an IPsec tunnel, while the Citrix SD-WAN WANOP VPX accelerates the connections, providing LAN-like performance for applications.
Citrix SD-WAN WANOP in Azure cloud topology

The topology diagram shows a Citrix SD-WAN 4000/5000 deployed in the data center or branch premises. You could also deploy Citrix SD-WAN WANOP and Citrix ADC appliance in two-box mode or it could both be VPX. On the Azure cloud VNET, the Citrix SD-WAN WANOP VPX is deployed in one-arm (PBR) mode with the Citrix ADC VPX.
Deployment overview
To deploy SD-WAN WANOP on Microsoft Azure:
- Deploy a Citrix ADC VPX instance on the Azure cloud. For more information, see Deploy a Citrix ADC VPX instance on Microsoft Azure. Configure four network interfaces in four different subnets and enable IP forwarding on all the network interfaces. The four network interfaces are used as:
- Management interface
- WAN side interface, for IPsec tunnel
- LAN side interface, to connect to the server
- WANOP communication interface, to communicate with the Citrix SD-WAN WANOP VPX on the Azure cloud.
-
Deploy a Citrix SD-WAN WANOP VPX on Azure cloud. For more information, see the deployment procedure below.
Note: Enable IP forwarding on WANOP interface.
-
Configure an IPsec tunnel between the on-premise appliance and the Citrix ADC VPX on Azure cloud, using the public IP address of Citrix ADC WAN interface. For more information on configuring IP tunnels see, IP Tunnels.
-
Configure Citrix ADC VPX to redirect the packets to Citrix SD-WAN WANOP VPX. Use the private IP address of WANOP communication interface and create a load balancing virtual server. For more information, see Create a load balancing virtual server.
- Configure the following route tables on Azure:
- Route table for WANOP facing interface on Citrix ADC VPX – Route table entries should have source and destination address as client and server subnets respectively. The Citrix ADC VPX’s WANOP facing interface IP address is the next hop.
- Route table for Citrix SD-WAN WANOP interface - Route table entries should have source and destination address as client and server subnets respectively. The Citrix SD-WAN WANOP interface IP address is the next hop.
In the above example, when the source tries to access an application on the cloud destination, the packets flow through the established IPsec tunnel. At the Azure cloud VNET end, the Citrix ADC VPX receives the packets, decrypts, and forwards it to the Citrix SD-WAN WANOP VPX. The Citrix SD-WAN WANOP VPX processes the packets, optimizes it, and sends it back to Citrix ADC VPX. The Citrix ADC VPX sends the packet to the destination. On the return path, the Citrix ADC VPX forwards the packets to Citrix SD-WAN WANOP VPX for optimization. The optimized packets are transmitted back to the source through the established IPsec tunnel.
Deploy Citrix SD-WAN WANOP VPX on Microsoft Azure
To deploy Citrix SD-WAN WANOP VPX on Microsoft Azure:
- In Microsoft Azure, navigate to Home > Marketplace > Networking, search for Citrix SD-WAN WANOP and install it.
- On the Citrix SD-WAN WAN OP page, from the drop-down list select Resource Manager and click Create. The Create Citrix SD-WAN WAN Optimization page appears.
-
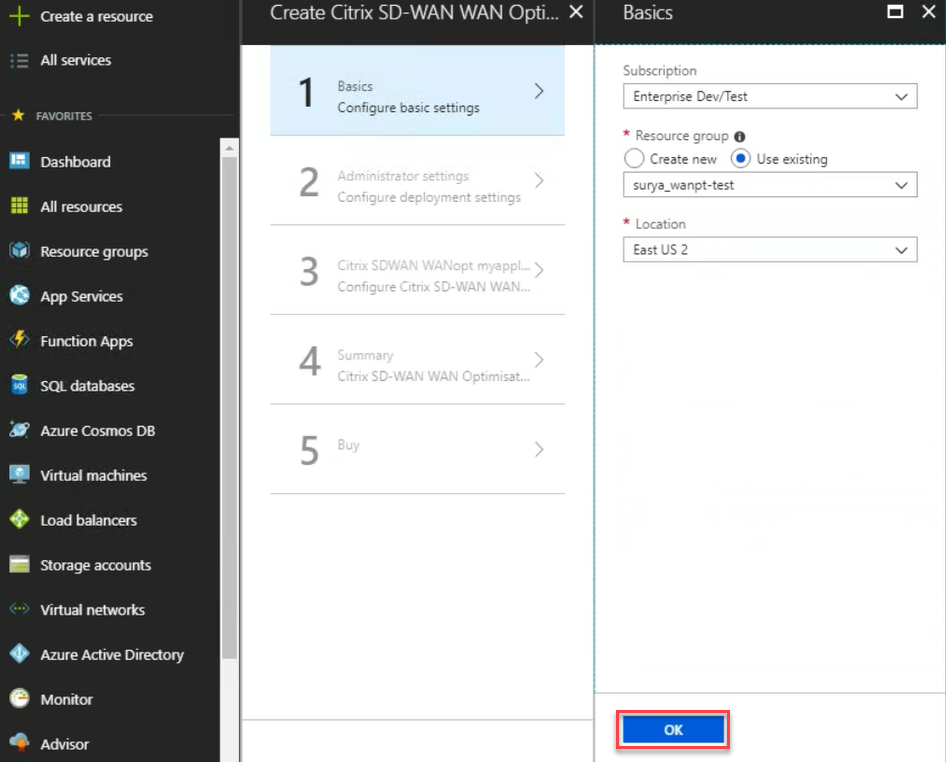
In the Basics section, select the subscription type, resource group, and location. Click OK.
Note:
You can choose to create a resource group. A resource group is a container that holds related resources for an Azure solution. The resource group can include all the resources for the solution, or only those resources that you want to manage as a group.
-
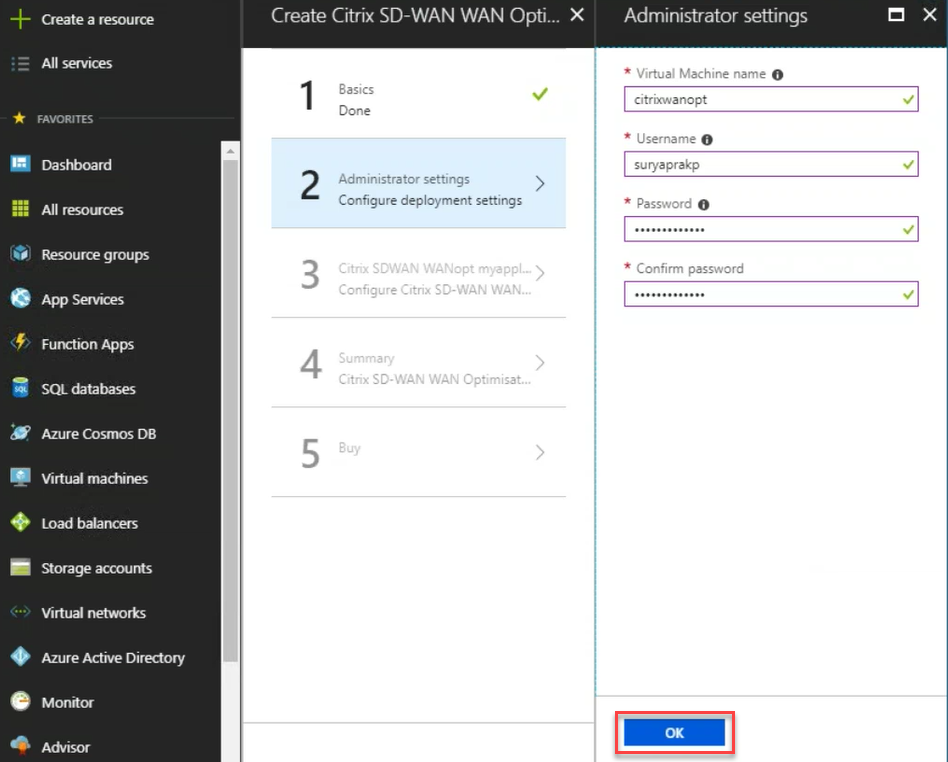
In the Administrator section, enter the name and credentials for the Citrix SD-WAN WANOP virtual machine. Click OK.
-
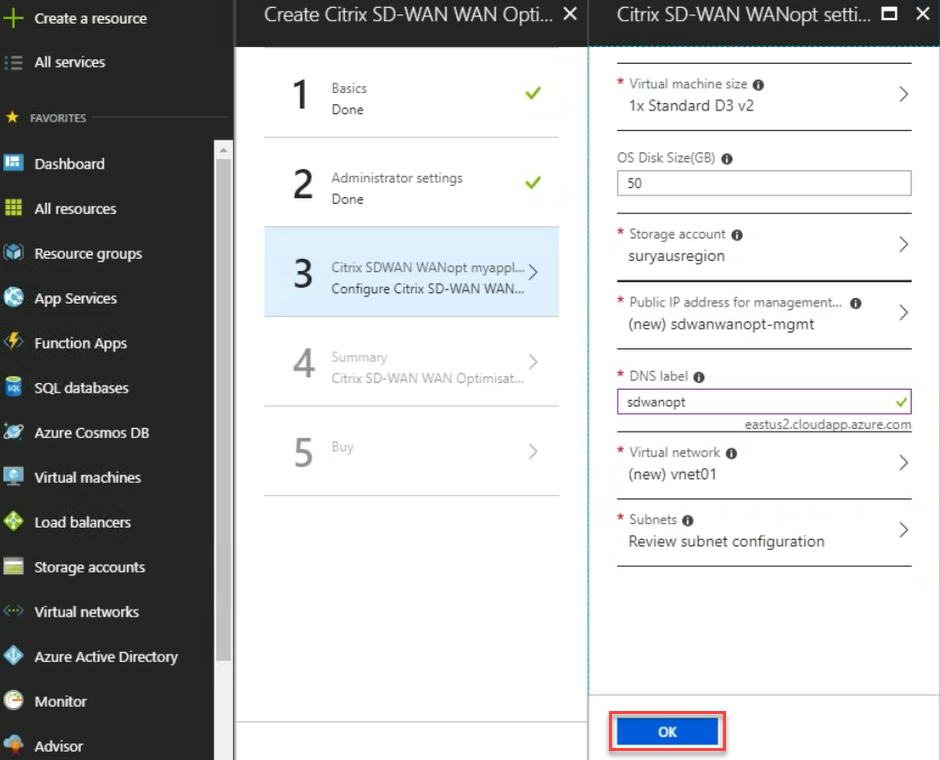
In the Citrix SD-WAN WANOP settings section, configure the setting for the Citrix SD-WAN WANOP VPX as per your requirements. Click OK.
-
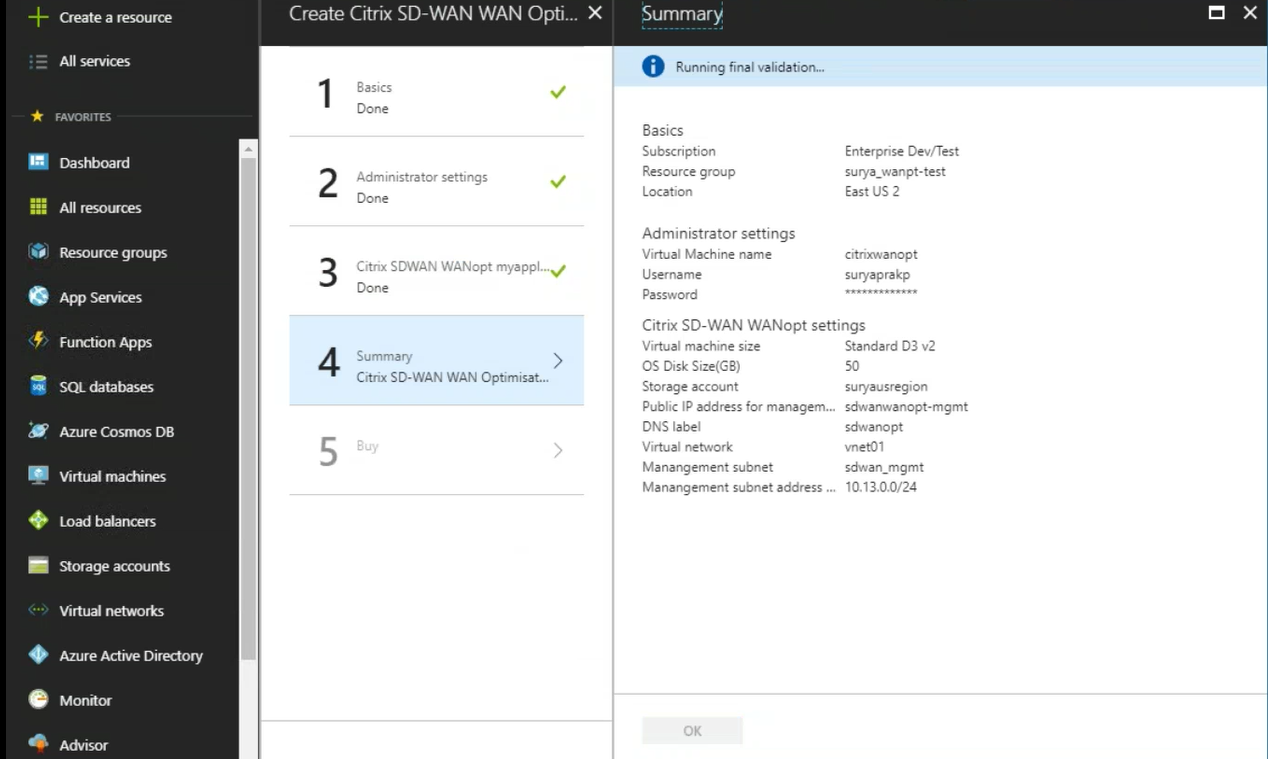
The configuration that you provided in previous steps is validated and applied. If you have configured correctly, the validation passed message appears. Click OK.
-
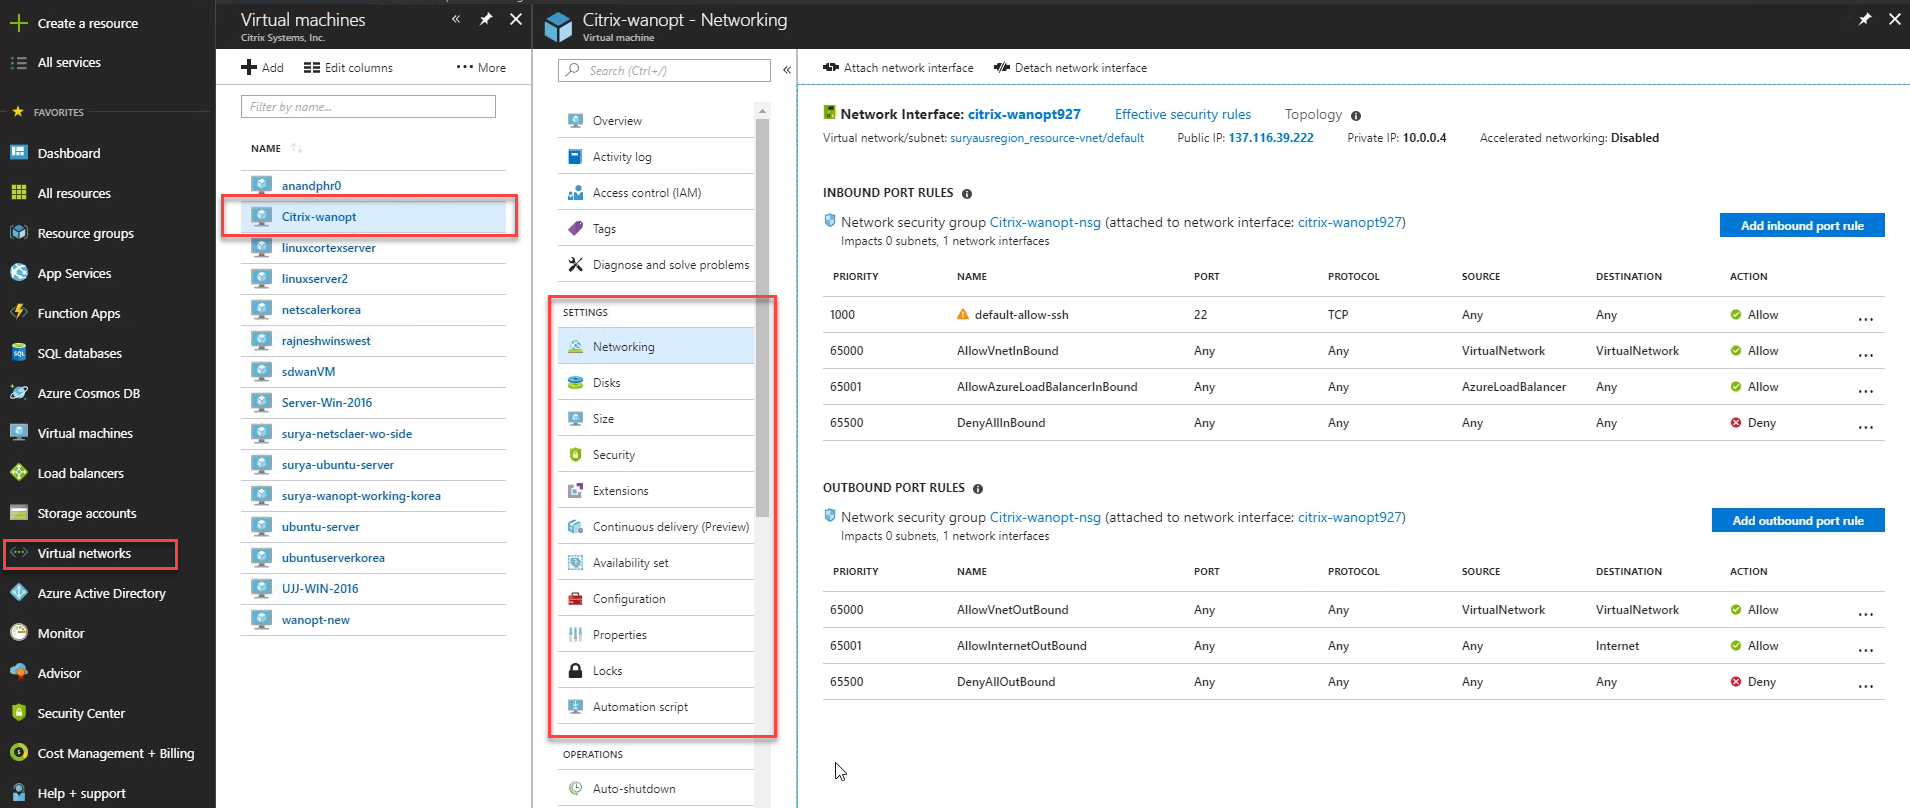
After successful deployment, navigate to Virtual Networks to view the Citrix SD-WAN WANOP VPX. You can further configure the virtual machine parameters using the settings option.
Share
Share
This Preview product documentation is Cloud Software Group Confidential.
You agree to hold this documentation confidential pursuant to the terms of your Cloud Software Group Beta/Tech Preview Agreement.
The development, release and timing of any features or functionality described in the Preview documentation remains at our sole discretion and are subject to change without notice or consultation.
The documentation is for informational purposes only and is not a commitment, promise or legal obligation to deliver any material, code or functionality and should not be relied upon in making Cloud Software Group product purchase decisions.
If you do not agree, select I DO NOT AGREE to exit.