Configure SSL compression
The Citrix SD-WAN WO SSL compression feature enables multisession compression of SSL connections (for example, HTTPS traffic), providing a compression ratios of up to 10,000:1. For more information, see SSL Compression.
For SSL compression to work, the Citrix SD-WAN WANOP appliance needs certificates from either the server or the client. To support multiple servers, multiple private keys can be installed on the appliance, one per SSL profile. Special SSL rules in the service class definitions match up servers to SSL profiles, and thus SSL profiles to private keys.
SSL compression works in split proxy or transparent proxy mode, you can choose the mode as per your requirement. For more information, see How SSL Compression Works.
Note
Transparent proxy mode is currently not supported.
To enable secure access with SSL tunnel, the latest SSL protocol TLS 1.2 is used in SSL proxy. You can choose to use TLS1.2 protocol only or use TLS1.0, TLS1.1 and TLS1.2 protocols.
Note
SSL protocols SSL v3 and SSL v2 are no longer supported.
To configure SSL compression:
-
Acquire copies of your server’s CA certificate and private certificate-key pair and install them on the server-side appliance. These credentials are likely to be application-specific. That is, a server might have different credentials for an Apache Web server than for an Exchange Server running RPC over HTTPS.
-
You can choose to create a split proxy SSL Profile or a Transparent proxy SSL profile.
For information on configuring split proxy SSL profile, see Configuring a Split Proxy SSL Profile section below.
For information on configuring transparent proxy SSL profile, see Configuring Transparent Proxy SSL Profile section below.
Note
Transparent proxy SSL profile is currently not supported.
-
Attach the SSL profile to a service class on the server-side appliance. This can be done by either creating a new service class based on the server IP, or by modifying an existing service class.
For more information see, Creating or Modifying the Service Class section below.
-
Set service classes on the client-side appliance. SSL traffic is not compressed unless it falls into a service class, on the client-side appliance, that enables acceleration and compression. This can be an ordinary service-class rule, not an SSL rule (only the server-side appliance needs SSL rules), but it must enable acceleration and compression. The traffic falls into an existing service class, such as “HTTPS” or “Other TCP Traffic.” If this class’s policy enables acceleration and compression, no additional configuration is needed.
-
Verify operation of the rule. Send traffic that should receive SSL acceleration through the appliances. On the server-side appliance, on the Monitoring: Optimization: Connections: Accelerated Connections tab, the Service Class column should match the service class you set up for secure acceleration, and the SSL Proxy column should list True for appropriate connections.
Configure a split proxy SSL profile
To configure a split proxy SSL profile:
-
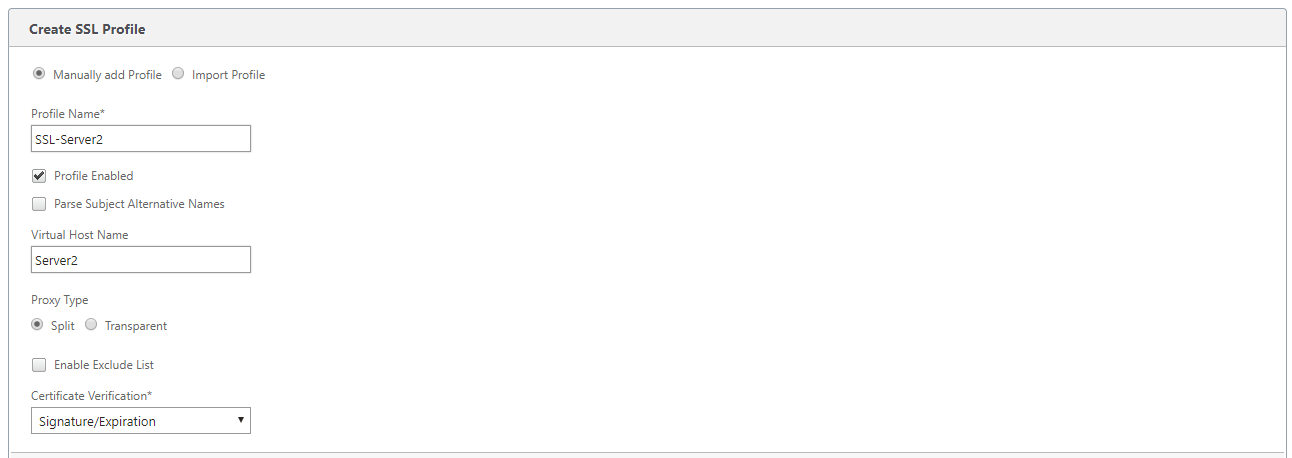
In the server-side Citrix SD-WAN WO appliance, navigate to Configuration > Secure Acceleration > SSL Profile and click Add Profile.
Note
You can either manually add an SSL profile or import one that is stored on your local computer.
-
In the Profile Name field, enter a name for the SSL profile and select Profile Enabled.
-
If your SSL server uses more than one virtual host name, In the Virtual Host Name field, enter the target virtual host name. This is the host name listed in the server credentials.
Note
To support multiple virtual hosts, create a separate SSL profile for each host name.
-
Choose Split proxy type.
-
In the Certificate Verification field, retain the default value (Signature/Expiration) unless your policies dictate otherwise.
-
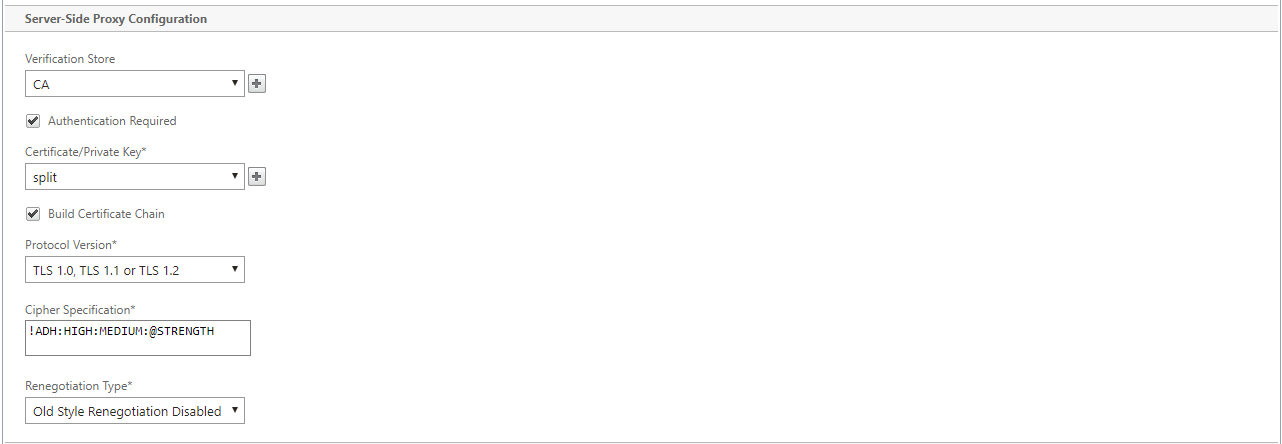
Perform server-side proxy configuration:
In the Verification Store field, select an existing server Certificate Authority (CA), or click + to upload a server CA.
Choose Authentication Required and in the Certificate/Private Key field select a certificate key pair, or click + to upload a certificate key pair.
In the Protocol Version field, select the protocols your server accepts.
Note
Citrix SD-WAN WO supports a combination of TLS1.0, TLS1.1 or TLS1.2, or TLS1.2 only. SSL protocols SSLv3 and SSLv2 are not supported.
If necessary, edit the Cipher Specification string, using the OpenSSL syntax.
If required, select the type of renegotiation from the Renegotiation Type drop-down list to allow client-side SSL session renegotiation.
-
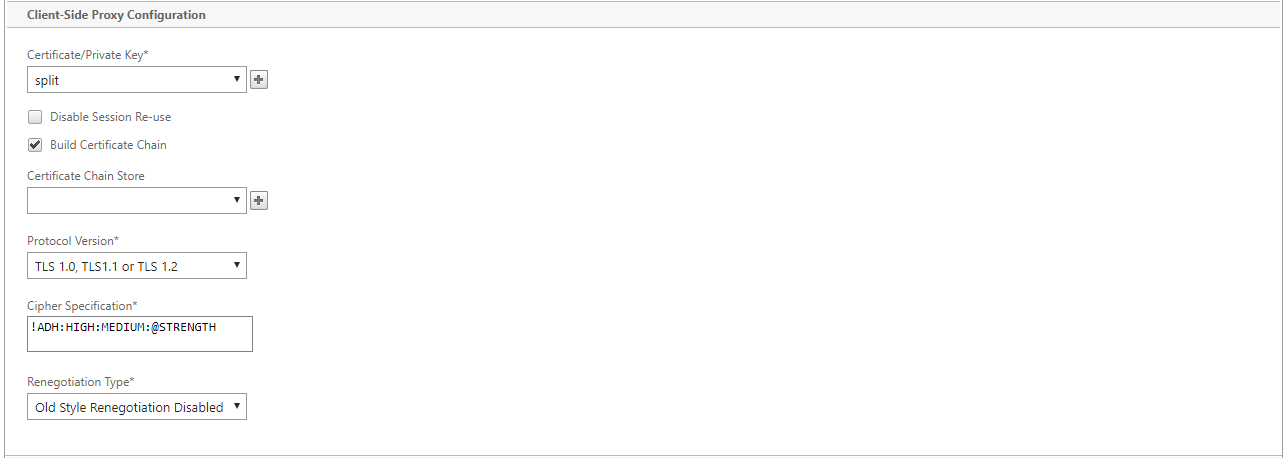
Perform client-side proxy configuration:
In the Certificate/Private Key field, retain the default value.
Choose Build Certificate Chain to allow the server-side appliance to build the SSL certificate chain.
If required, select or upload a CA store to use as the Certificate Chain Store.
In the Protocol Version field, select the protocol versions you want to support on the client side.
Note
Citrix SD-WAN WO supports a combination of TLS1.0, TLS1.1 or TLS1.2, or TLS1.2 only. SSL protocols SSLv3 and SSLv2 are not supported.
If necessary, edit the client-side Cipher Specification.
If required, select the type of renegotiation from the Renegotiation Type drop-down list to allow client-side SSL session renegotiation.
-
Click Create.
Configure transparent proxy SSL profile
To configure a transparent proxy SSL profile:
-
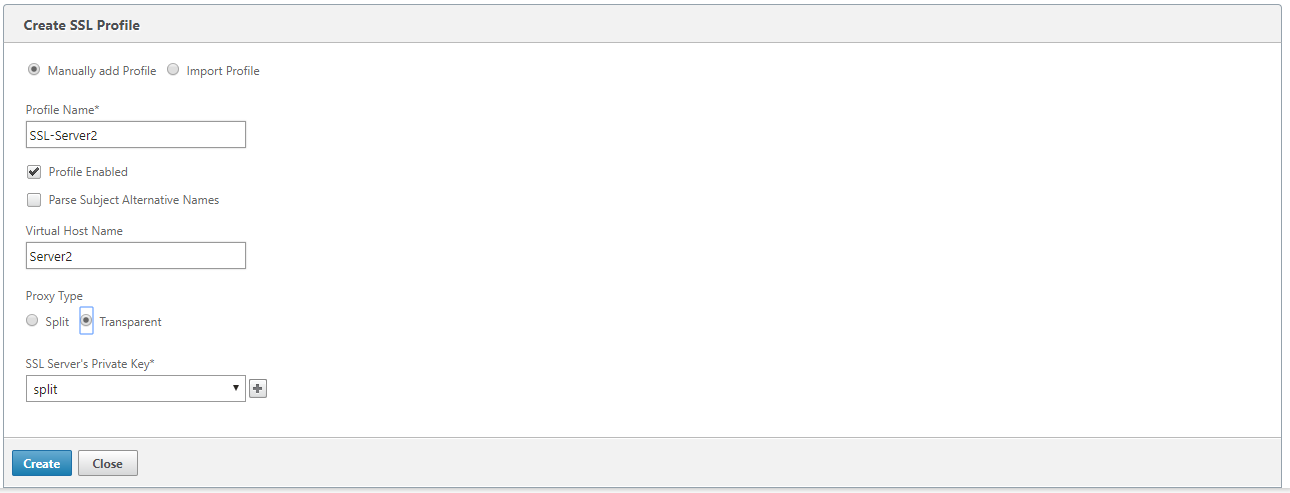
In the server-side Citrix SD-WAN WO appliance, navigate to Configuration > Secure Acceleration > SSL Profile and click Add Profile.
Note
You can either manually add an SSL profile or import one that is stored on your local computer.
-
In the Profile Name field, enter a name for the SSL profile and select Profile Enabled.
-
If your SSL server uses more than one virtual host name, In the Virtual Host Name field, enter the target virtual host name. This is the host name listed in the server credentials.
Note
To support multiple virtual hosts, create a separate SSL profile for each host name.
-
Choose Transparent proxy type.
-
In the SSL Server’s Private Key field, select the server’s private key from the drop-down menu, or click + to upload a new private key.
-
Click Create.
Create or modify the service class
To create or modify the service class and attach the SSL Profile:
-
In the Citrix SD-WAN WO appliance web interface, navigate to Configuration > Optimization Rules > Service Classes and click Add. To edit an existing service class, select the appropriate service class and click Edit.
-
In the Name field, enter a name for the new service class (for example, “Accelerated HTTPS”).
-
Enable compression by setting the Acceleration Policy to Disk, Memory or Flow Control.
-
In the Filter Rules section, click Add.
-
In the Destination IP Address field, type the server’s IP address (for example, 172.16.0.1 or, equivalently, 172.16.0.1/32.
-
In the Direction field, set the rule to Unidirectional. SSL profiles are disabled if Bidirectional is specified.
-
In the SSL Profiles section, select the SSL profile that you created and move it to the Configured section.
-
Click Create to create the rule.
-
Click Create to create the service class.
Updated CLI command
Citrix SD-WAN WO 9.3 supports the latest TLS1.2 SSL protocol. You can choose to use TLS1.2 protocol only or any version of TLS protocols. SSL protocols SSL v3 and SSL v2, and transparent proxy SSL profiles are not supported. The add ssl-profile and set ssl-profile CLI commands are updated to reflect these changes.
add ssl-profile:
*-name “profile-name”*

*\[-state {enable, disable}\]*

*-proxy-type split*

*\[-virtual-hostname “hostname”\]*

*-cert-key “cert-key-pair-name”*

*\[-build-cert-chain {enable, disable}\]*

*\[-cert-chain-store {use-all-configured-CA-stores, “store-name”}\]*

*\[-cert-verification {none, Signature/Expiration, Signature/Expiration/*

*Common-Name-White-List, Signature/Expiration/Common-Name-Black-List}\]*

*\[-verification-store {use-all-configured-CA-stores, “store-name”}\]*

*\[-server-side-protocol { TLS-1.2, TLS-version-any}\]*

*\[-server-side-ciphers “ciphers”\]*

*\[-server-side-authentication {enable, disable}\]*

*\[-server-side-cert-key “cert-key-pair-name”\]*

*\[-server-side-build-cert-chain {enable, disable}\]*

*\[-server-side-renegotiation {disable-old-style, enable-old-style, new-style,*

*compatible}\]*

*\[-client-side-protocol-version { TLS-1.2, TLS-version-any}\]*

*\[-client-side-ciphers “ciphers”\]*

*\[-client-side-renegotiation {disable-old-style, enable-old-style, new-style,*

*compatible}\]*
set ssl-profile:
*-name “profile-name” \[-state {enable, disable}\]*

*\[-proxy-type split\]*

*\[-virtual-hostname “hostname”\]*

*\[-cert-key “cert-key-pair-name”\]*

*\[-build-cert-chain {enable, disable}\]*

*\[-cert-chain-store {use-all-configured-CA-stores, “store-name”}\]*

*\[-cert-verification {none, Signature/Expiration, Signature/Expiration/*

*Common-Name-White-List, Signature/Expiration/Common-Name-Black-List}\]*

*\[-verification-store {use-all-configured-CA-stores, “store-name”}\]*

*\[-server-side-protocol {TLS-1.2, TLS-version-any}\]*

*\[-server-side-ciphers “ciphers”\]*

*\[-server-side-authentication {enable, disable}\]*

*\[-server-side-cert-key “cert-key-pair-name”\]*

*\[-server-side-build-cert-chain {enable, disable}\]*

*\[-server-side-renegotiation {disable-old-style, enable-old-style, new-style,*

*compatible}\]*

*\[-client-side-protocol-version {TLS-1.2, TLS-version-any}\]*

*\[-client-side-ciphers “ciphers”\]*

*\[-client-side-renegotiation {disable-old-style, enable-old-style, new-style,*

*compatible}\]*