-
-
-
Assigning a Management IP Address through the Ethernet Port
-
-
-
Manage and monitor using Citrix Application Delivery Management
-
This content has been machine translated dynamically.
Dieser Inhalt ist eine maschinelle Übersetzung, die dynamisch erstellt wurde. (Haftungsausschluss)
Cet article a été traduit automatiquement de manière dynamique. (Clause de non responsabilité)
Este artículo lo ha traducido una máquina de forma dinámica. (Aviso legal)
此内容已经过机器动态翻译。 放弃
このコンテンツは動的に機械翻訳されています。免責事項
이 콘텐츠는 동적으로 기계 번역되었습니다. 책임 부인
Este texto foi traduzido automaticamente. (Aviso legal)
Questo contenuto è stato tradotto dinamicamente con traduzione automatica.(Esclusione di responsabilità))
This article has been machine translated.
Dieser Artikel wurde maschinell übersetzt. (Haftungsausschluss)
Ce article a été traduit automatiquement. (Clause de non responsabilité)
Este artículo ha sido traducido automáticamente. (Aviso legal)
この記事は機械翻訳されています.免責事項
이 기사는 기계 번역되었습니다.책임 부인
Este artigo foi traduzido automaticamente.(Aviso legal)
这篇文章已经过机器翻译.放弃
Questo articolo è stato tradotto automaticamente.(Esclusione di responsabilità))
Translation failed!
Assigning a Management IP Address through the Ethernet Port
Use the following procedure for initial configuration of every SD-WAN 1000 or 2000 appliance with Windows Server. The procedure accomplishes the following tasks:
- Configure the appliance for use on your site.
- Install the Citrix license.
- Enable acceleration.
- Enable traffic shaping (inline mode only).
With inline deployments, this configuration might be all you need, because most acceleration features are enabled by default and require no additional configuration.
If you want to configure the appliance by connecting it to the computer through the serial console, assign the management service IP address from your Worksheet by completing the Assigning a Management IP Address through the Serial Console procedure, and then run steps 4 through 15 of the following procedure.
Note:
You must have physical access to the appliance.
To configure the appliance by connecting a computer to the SD-WAN appliance’s Ethernet port 0/1
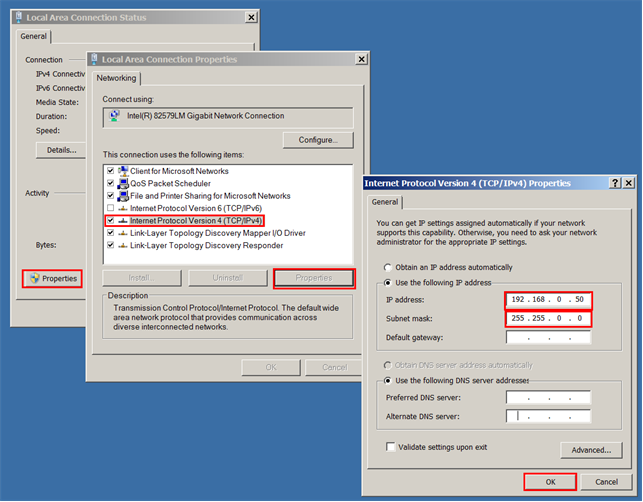
- Set the Ethernet port address of a computer (or other browser-equipped device with an Ethernet port), to 192.168.100.50, with a network mask of 255.255.0.0. On a Windows device, this is done by changing the Internet Protocol Version 4 properties of the LAN connection, as shown below. You can leave the gateway and DNS server fields blank.
- Using an Ethernet cable, connect this computer to the port labeled PRI on the SD-WAN appliance.
- Switch on the appliance. Using the web browser on the computer, access the appliance by using the default management service IP address, which is http://192.168.100.1.
- On the login page, use the following default credentials to log on to the appliance:
- Username: nsroot
- Password: nsroot
- Start the configuration wizard by clicking Get Started.
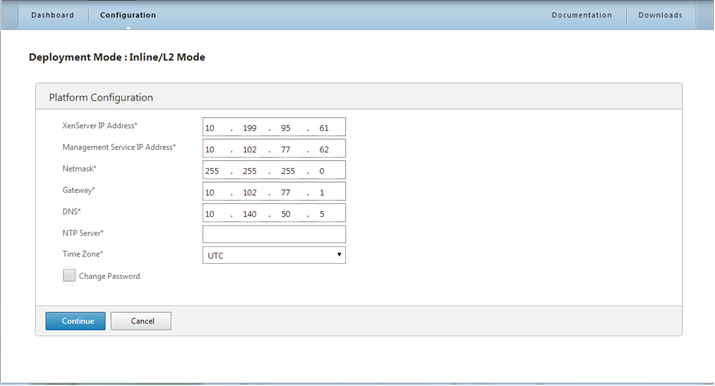
- On the Platform Configuration page, enter respective values from your worksheet, as shown in the following example:
- Click Done. A screen showing the Installation in Progress… message appears. This process takes approximately 2 to 5 minutes, depending on your network speed.
- A Redirecting to new management IP message appears.
- Click OK.
- Unplug your computer from the Ethernet port and connect the port to your management network.
- Reset the IP address of your computer to its previous setting.
- From a computer on the management network, log on to the appliance by entering the new management service IP address, such as
https://<Managemnt_IP_Address>, in a web browser. - To continue the configuration, accept the certificate and continue. The option to continue varies according to the web browser you are using.
- Log on to the appliance by using the nsroot user name and the password from your worksheet.
- To complete the configuration process, see Provisioning the Appliance.
Share
Share
This Preview product documentation is Cloud Software Group Confidential.
You agree to hold this documentation confidential pursuant to the terms of your Cloud Software Group Beta/Tech Preview Agreement.
The development, release and timing of any features or functionality described in the Preview documentation remains at our sole discretion and are subject to change without notice or consultation.
The documentation is for informational purposes only and is not a commitment, promise or legal obligation to deliver any material, code or functionality and should not be relied upon in making Cloud Software Group product purchase decisions.
If you do not agree, select I DO NOT AGREE to exit.