Rules by application name
The Application classification feature allows the Citrix SD-WAN appliance to parse incoming traffic and classify them as belonging to a particular application or application family. This classification allows us to enhance the QoS of individual application or application families by creating and applying application rules.
You can filter traffic flows based on application, application family, or application object match-types and apply application rules to them. The application rules are similar to Internet Protocol (IP) rules. For information on IP rules see, Rules by IP Address and Port Number.
For every application rule, you can specify the mode of transmission. The following are the available transmit modes:
- Load Balance Path: Application traffic for the flow is balanced across multiple paths. Traffic is sent through the best path until that path is used. The remaining packets are sent through the next best path.
- Persistent Path: Application traffic remains on the same path until the path is no longer available.
- Duplicate Path: Application traffic is duplicated across multiple paths, increasing reliability.
The application rules are associated to classes. For information on classes, see Customizing Classes.
By default, the following five pre-defined application rules are available for Citrix ICA applications:
| Rule | Class | Transmit Mode | Retransmit Lost Packets | Enable Packet Aggregation | Enable Packet Resequencing | Resequence Hold Time (ms) | Discard Late Resequencing Packets | Drop Limit (ms) | Drop Depth (bytes) | Enable RED | Disable Limit (ms) | Disable Depth (bytes) |
|---|---|---|---|---|---|---|---|---|---|---|---|---|
| HDX_Priority_0 | 0 (HDX_priority_tag_0) | Load Balance Path | True | False | True | 250 | True | 350 | 30000 | True | 0 | 128000 |
| HDX_Priority_1 | 1 (HDX_priority_tag_1) | Load Balance Path | True | False | True | 250 | True | 350 | 30000 | True | 0 | 128000 |
| HDX_Priority_2 | 2 (HDX_priority_tag_2) | Load Balance Path | True | False | True | 250 | True | 350 | 30000 | True | 0 | 128000 |
| HDX_Priority_3 | 3 (HDX_priority_tag_3) | Load Balance Path | True | False | True | 250 | True | 350 | 30000 | True | 0 | 128000 |
| HDX | 11 (interactive_high_class) | Load Balance Path | True | False | True | 250 | True | 350 | 30000 | True | 0 | 128000 |
How application rules are applied?
In the SD-WAN network, when the incoming packets reach the SD-WAN appliance, the initial few packets do not undergo DPI classification. At this point, the IP rule attributes such as Class, TCP termination are applied to the packets. After DPI classification, the application rule attributes such as Class, transmit mode override the IP rule attributes.
The IP rules have more number of attributes as compared to the application rules. The application rule overrides only a few IP rule attributes, the rest of the IP rule attributes remain processed on the packets.
For example, consider you have specified an application rule for a webmail application such as Google Mail that uses the SMTP protocol. The IP rule set for SMTP protocol is applied initially before DPI classification. After parsing the packets and classifying it as belonging to Google Mail application, the application rule specified for the Google Mail application is applied.
Creating application rules
To create application rules:
-
In the SD-WAN Configuration Editor, navigate to Global > Virtual Path Default Sets.
-
Click Add Default Set, enter a name for the default set, and click Add. In the Section field select Application QoS and click +.
Note
You can also create application rules by navigating to Connections > Virtual Paths > Application QoS or Global > Dynamic Virtual Path Default Set > Application QoS.
-
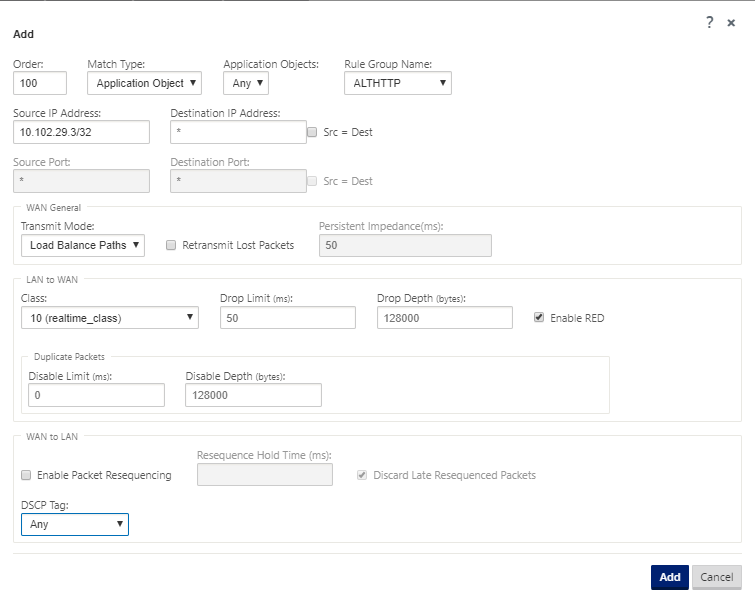
In the Order field, type the order value to define when the rule is applied in relation to other rules.
-
In the Match Type field, choose one of the following match types:
- Application – If this match type is selected, specify the application that is used as a match criteria for this filter.
- Application Family – If this match type is selected, select an application family that is used as a match criteria for this filter.
- Application Object – If this match type is selected, select an application object that is used as a match criteria for this filter.
For more information on application, application family and application object, see Application classification.
-
In the Rule Group Name field, select a rule group. The statistics for rules with the same rule group will be grouped and can be viewed together.
For viewing rule groups, navigate to Monitoring > Statistics, and in the Show field select Rule Groups.
You can also add custom rule groups. For more information, see Add custom applications and enable MOS.
-
Specify the following application rule matching criteria to filter the application traffic. After the filtering, the rule settings are applied to the services matching these criteria.
- Source IP Address: Source IP address and the subnet mask to match against the traffic.
- Destination IP Address: Destination IP address and the subnet mask to match against the traffic.
- Source Port: Source port number or port range to match against the traffic.
- Destination Port: Destination port number or port range to match against the traffic.
Note
Choose Src = Dest, if the source and destination internet protocol address are the same.
-
Configure the following general WAN settings:
-
In the Transmit Mode field, choose one of the following transmit modes:
-
Load Balance Path: Application traffic for the flow is balanced across multiple paths. Traffic is sent through the best path until that path is completely used. The remaining packets are sent through the next best path.
-
Persistent Path: Application traffic remains on the same path until the path is no longer available.
In the Persistent Impedance field, specify the minimum time in milliseconds for which the traffic would remain in the same path, until wait time on the path is longer than the configured value.
-
Duplicate Path: Application traffic is duplicated across multiple paths, increasing reliability.
-
-
Check Retransmit Lost Packets to send traffic that matches this rule to the remote appliance over a reliable service and retransmit lost packets.
-
-
Configure the LAN to WAN settings:
-
Class: Select a class with which to associate this rule.
You can also customize classes before applying rules, for more information, see Customize classes.
- Drop Limit: Length of time after which packets waiting in the class scheduler are dropped. Not applicable for a bulk class.
- Drop Depth: Queue depth threshold after which packets are dropped.
- Enable RED: Random Early Detection (RED) ensures fair sharing of class resources by discarding packets when congestion occurs.
- Disable Limit: Time for which duplication can be disabled to prevent duplicate packets from consuming bandwidth.
- Disable Depth: The queue depth of the class scheduler, at which point the duplicate packets will not be generated.
-
-
Configure the following WAN to LAN behavior for this rule:
- Enable Packets Resequencing: Sequences the packets in the correct order at the destination.
- Resequence Hold Time: Time interval for which the packets are held for resequencing, after which the packets are sent to the LAN.
- Discard Late Resequencing Packets: Discard out-of-order packets that arrived after the packets needed for resequencing have been sent to the LAN.
-
Click Apply.
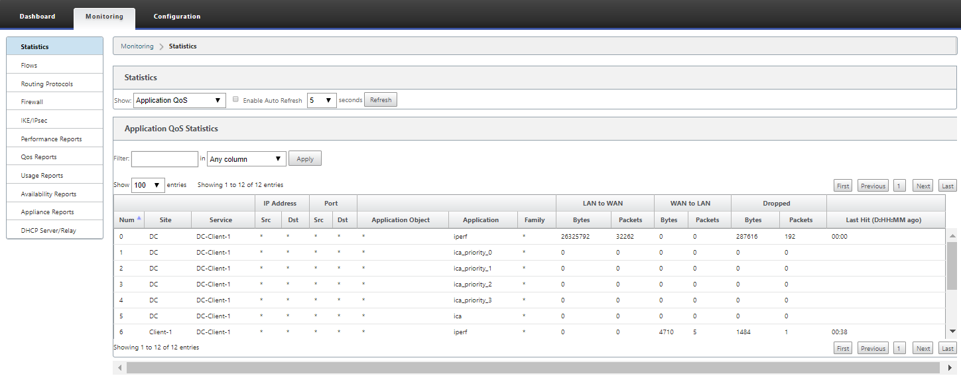
To confirm if application rules are applied to traffic flow, navigate to Monitoring > Flows.
Make a note of the app rule id and check if the class type and transmission mode are as per your rule configuration.

You can monitor the application QoS such as no of packets / bytes uploaded, downloaded, or dropped at each site by navigating to Monitoring > Statistics > Application QoS.
The Num parameter indicates the app rule id. Check for the app rule id obtained from the flow.
Creating custom applications
You can use application objects to define custom applications based on the following match types:
- IP protocol
- Application name
- Application family
The DPI classifier analyzes the incoming packets and classifies it as applications based on the specified match criteria. You can use these classified custom applications in QoS, firewall, and application routing.
Tip
You can specify one or more match types.
You can view the reports for the classified custom applications in SD-WAN Center. For more information, see Application report.
To create custom applications:
-
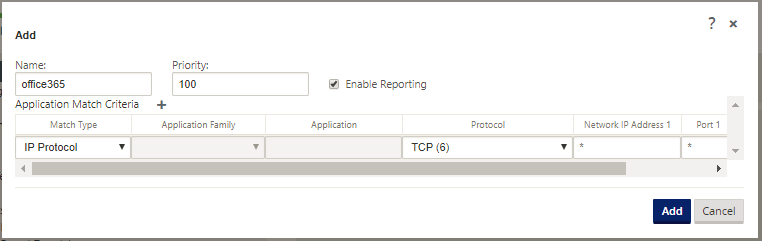
In the Configuration Editor, navigate to Global > Applications > Custom Applications and click +.
-
Set the following parameters:
- Name: Name for the custom application
- Enable Reporting: Allows viewing custom application reports in SD-WAN Center. For more information see, Application report.
- Priority: The priority of the custom application. When the incoming packets match two or more custom application definitions, the custom application definition with the highest priority is applied.
-
Click + in the Application Match Criteria section.
-
Select one of the following match types:
- IP Protocol: Specify the protocol, network IP address, port number, and, DSCP tag.
- Application: Specify the application name, network IP address, port number, and, DSCP tag.
- Application Family: Select an application family and specify the network IP address, port number, and, DSCP tag.
-
Click + to add more application match criteria.
-
Click Apply.