URL filtering
URL Filtering provides policy based control of websites by using the information contained in URLs. This feature helps network administrators monitor and control user access to malicious websites on the network.
Get started
If you are a new user and want to configure URL filtering, you must complete the initial SWG setup. To get started with URL Filtering, you must first log on to the Citrix SWG Wizard. The wizard takes you through a series of configuration steps before you apply the URL Filtering policies.
Note
Before you begin, be sure you have a valid URL Threat Intelligence feature license installed on your appliance. If you are using a trial version, be sure to purchase a valid license to continue using this feature on the SWG appliance.
Log on to SWG wizard
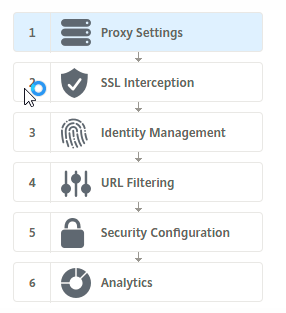
The Citrix SWG Wizard guides you through a series of simplified configuration tasks and the right pane displays the corresponding flow sequence. You can use this wizard to apply URL Filtering policies to a URL list or a predefined list of categories.
Step 1: Configure proxy settings
You must first configure a proxy server through which the client accesses the SWG gateway. This server is of type SSL, and it operates in explicit or transparent mode. For more information about proxy server configuration, see Proxy Modes.
Step 2: Configure SSL interception
After configuring the proxy server, you must configure the SSL interception proxy to intercept encrypted traffic at the Citrix SWG appliance. In the case of URL filtering, the SSL proxy intercepts the traffic and blocks blacklisted URL while all other traffic can be bypassed. For more information about configuring SSL interception, see SSL Interception.
Step 3: Configure identity management
A user is authenticated before being allowed to log on to the enterprise network. Authentication provides the flexibility to define specific policies for a user or a group of users, based on their roles. For more information about user authentication, see User Identify Management
Step 4: Configure URL filtering
The administrator can apply a URL filtering policy either by using the URL Categorization feature or by using the URL List feature.
URL Categorization. Controls access to websites and web pages by filtering traffic on the basis of a predefined list of categories.
URL List. Controls access to blacklisted websites and web pages by denying access to URLs that are in a URL set imported into the appliance.
Step 5: Configure security configuration
This step enables you to configure a reputation score and allow users to control access to the websites by denying access if the score is too low. Your reputation score can range from one to four, and you can configure the threshold at which the score becomes unacceptable. For scores that exceed the threshold, you can select a policy action to allow, block, or redirect traffic. For more information, see Security Configuration.
Step 6: Configure SWG analytics
This step enables you to activate SWG analytics for categorizing web traffic, logging URL category in the user transaction logs and viewing traffic analytics. For more information about SWG Analytics, see Analytics.