Create catalogs using Quick Deploy
Note:
Since July 2023, Microsoft has renamed Azure Active Directory (Azure AD) to Microsoft Entra ID. In this document, any reference to Azure Active Directory, Azure AD, or AAD now refers to Microsoft Entra ID.
Use the procedures in this article to create a catalog of Microsoft Azure machines using the Quick Deploy management interface.
Review the entire procedure before creating a catalog, so you know what to expect.
To create a catalog using the Full Configuration interface, see Create machine catalogs.
Machine types
A Quick Deploy catalog can contain one of the following types of machines:
- Static: The catalog contains single-session static machines (also known as personal, dedicated, or persistent desktops). Static means that when a user starts a desktop, that desktop “belongs” to that user. Any changes that that user makes to the desktop are retained at logoff. Later, when that user returns to Citrix Workspace and starts a desktop, it is the same desktop.
- Random: The catalog contains single-session random machines (also known as non-persistent desktops). Random means that when a user starts a desktop, any changes that that user makes to that desktop are discarded after logoff. Later, when that user returns to Citrix Workspace and starts a desktop, it might or might not be the same desktop.
-
Multi-session: The catalog contains machines with apps and desktops. More than one user can access each of those machines simultaneously. Users can launch a desktop or apps from their workspace. App sessions can be shared. Session sharing is not permitted between an app and a desktop.
- When you create a multi-session catalog, you select the work load: light (such as data entry), medium (such as office apps), heavy (such as engineering), or custom. Each option represents a specific number of machines and sessions per machine, which yields the total number of sessions that the catalog supports.
- If you select the custom work load, you then select from available combinations of CPUs, RAM, and storage. Type the number of machines and sessions per machine, which yields the total number of sessions that the catalog supports.
When deploying desktops, the static and random machine types are sometimes called “desktop types”.
Ways to create a catalog using Quick Deploy
There are several ways to create and configure a catalog:
- Quick create is the fastest way to get started. You provide minimal information, and Citrix DaaS (formerly Citrix Virtual Apps and Desktops service) takes care of the rest. A quick create catalog is great for a test environment or proof of concept.
- Custom create allows more configuration choices than quick create. It’s more suited to a production environment than a quick create catalog.
- Remote PC Access catalogs contain existing machines (usually physical) that users access remotely. For details and instructions about these catalogs, see Remote PC Access.
Here’s a comparison of quick create and custom create:
| Quick create | Custom create |
|---|---|
| Less information to provide. | More information to provide. |
| Fewer choices for some features. | More choices for some features. |
| Citrix-managed Azure Active Directory user authentication. | Choice of: Citrix-managed Azure Active Directory, or your Active Directory/Azure Active Directory. |
| No connection to your on-premises network. | Choice of: No connection to your on-premises network, Azure VNet peering, and SD-WAN. |
| Uses a Citrix prepared Windows 10 image. That image contains a current desktop VDA. | Choice of: Citrix prepared images, your images that you import from Azure, or images you’ve built in Citrix DaaS from a Citrix prepared or imported image. |
| Each desktop has Azure standard disk (HDD) storage. | Several storage options are available. |
| Static desktops only. | Static, random, or multi-session desktops. |
| A power management schedule cannot be configured during creation. The machine hosting the desktop powers off when the session ends. (You can change this setting later.) | A power management schedule can be configured during creation. (A Quick Deploy power management schedule differs from a power management schedule you can create using the Full Configuration management interface.) |
| Must use a Citrix Managed Azure subscription. | Can use the Citrix Managed Azure subscription or your own Azure subscription. |
For procedure details, see:
Important:
When you create a catalog (or an image) using a Citrix Managed Azure subscription for the first time, you are asked to acknowledge and consent to your responsibility for charges incurred. Reminders of that consent can also appear when creating more catalogs or images using the Citrix Managed Azure subscription.
Create a Quick Deploy catalog using quick create
The quick create method uses a Citrix Managed Azure subscription and a Citrix prepared Windows 10 image to create a catalog containing static machines. Power management settings use the Cost Saver preset values. There is no connection to your corporate network. Users must be added using Citrix Managed Azure AD.
- Sign in to Citrix Cloud.
- In the upper left menu, select My Services > DaaS.
- Select Manage > Quick Deploy.
-
If a catalog has not yet been created, you’re taken to the Welcome page. Choose one of:
-
Configure the catalog on this page. Continue with steps 6 through 10.
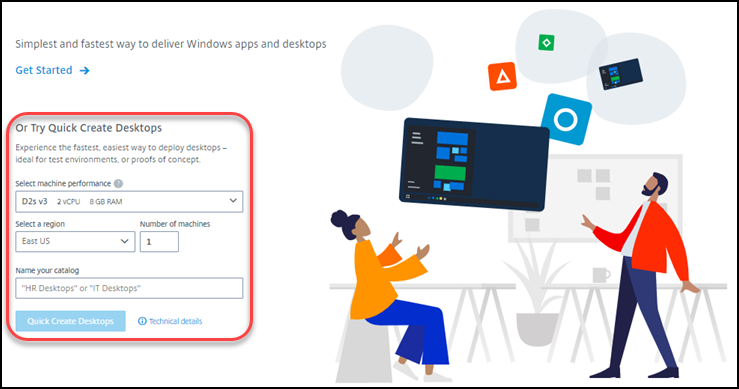
-
Select Get Started. You’re taken to the Manage > Quick Deploy dashboard. Select Create Catalog.
-
-
If a catalog has already been created (and you’re creating another one), you’re taken to the Manage > Quick Deploy dashboard. Select Create Catalog.
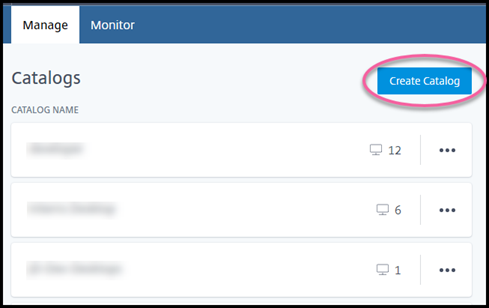
-
Select Quick Create at the top of the page, if it is not already selected.
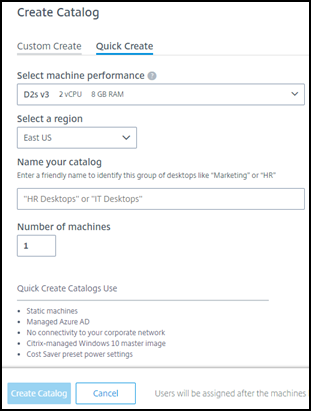
- Machine performance: Select the machine type. Each choice has a unique combination of CPUs, RAM, and storage. Higher-performance machines have higher monthly costs.
- Region: Select a region where you want the machines created. You might select a region that’s close to your users.
- Name: Type a name for the catalog. This field is required, and there is no default value.
- Number of machines: Type the number of machines you want.
-
When you’re done, select Create Catalog. (If you’re creating the first catalog from the Welcome page, select Quick Create Desktops.)
- If this is the first catalog you’re creating using a Citrix Managed Azure subscription, when prompted, acknowledge your responsibility for related charges.
While the catalog is being created, the catalog’s name is added to the list of catalogs, indicating its progress through creation.
Citrix DaaS also automatically creates a resource location and adds two Citrix Cloud Connectors.
What to do next:
- You can add users to the Managed Azure AD directory while the catalog is being created.
- After the catalog is created, add users to the catalog.
Create a Quick Deploy catalog using custom create
If you are using a Citrix Managed Azure subscription, and plan to use a connection to your on-premises network resources, create that network connection before creating the catalog. To allow your users access to your on-premises or other network resources, you also need Active Directory information for that location.
If you do not have a Citrix Managed Azure subscription, you can:
-
Order the Azure Consumption Fund through Azure Marketplace, which provides you with a Citrix Managed Azure subscription.
-
Import (add) one or more of your own Azure subscriptions to Citrix DaaS before creating a catalog.
To create a catalog:
- Sign in to Citrix Cloud.
- In the upper left menu, select My Services > DaaS.
- Select Manage > Quick Deploy.
-
If a catalog has not yet been created, you’re taken to the Welcome page. Select Get Started. At the end of the introduction page, you’re taken to the Manage > Quick Deploy dashboard. Select Create Catalog.

If a catalog has already been created, you’re taken to the Manage > Quick Deploy dashboard. Select Create Catalog.
-
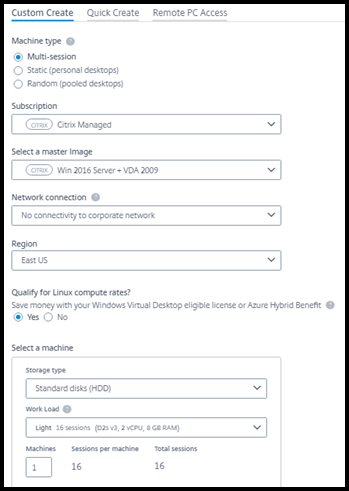
Select Custom Create at the top of the page, if it’s not already selected.
-
Complete the following fields. (Some fields are valid only for certain machine types. The field order might differ.)
-
Machine type. Select a machine type. For details, see Machine types.
-
Subscription. Select an Azure subscription.
-
Master image: Select an operating system image to be used for the catalog’s machines.
-
Network connection: Select the network connection to use for accessing resources in your network.
If you selected a Citrix Managed Azure subscription, the choices are:
- No Connectivity: Users cannot access locations and resources on your on-premises corporate network.
- Connections: Select a previously created connection, such as a VNet peering or SD-WAN connection.
If you selected a customer-managed Azure subscription, select the appropriate resource group, virtual network, and subnet.
-
Region: (Available only if you selected No Connectivity in Network connection. ) Select a region where you want the desktops created. You might select a region that’s close to your users.
If you selected a connection in Network connection, the catalog uses that network’s region.
-
Qualify for Linux compute rates? (Available only if you selected a Windows image.) You can save money when you use your eligible license or Azure Hybrid Benefit.
Windows Virtual Desktop benefit: Eligible Windows 10 or Windows 7 per user licenses for:
- Microsoft 365 E3/ES
- Microsoft 365 A3/AS/Student Use Benefits
- Microsoft 365 F3
- Microsoft 365 Business Premium
- Windows 10 Enterprise E3/E5
- Windows 10 Education A3/A5
- Windows 10 VDA per user
Per user or per device license of RDS CAL with Software Assurance for Windows Server workloads.
Azure Hybrid benefit: Windows Server licenses with active Software Assurance or the equivalent qualifying subscription licenses. See https://azure.microsoft.com/en-us/pricing/hybrid-benefit/.
-
Machine:
- Storage type. HDD or SSD.
-
Machine performance (for Static or Random machine type), or Workload (for multi-session machine type). Choices include only options that match the generation type (gen1 or gen2) of the image you selected.
If you select the custom work load, type the number of machines and sessions per machine in the Machine Performance field.
- Machines. How many machines you want in this catalog.
-
Machine naming scheme: See Machine naming scheme.
-
Name: Type a name for the catalog. This name appears on the Manage dashboard.
-
Power schedule: By default, the I’ll configure this later check box is selected. For details, see Power management schedules. (This power management schedule differs from power management features available in the Full Configuration management interface of Citrix DaaS.)
-
Join the local Active Directory domain: (Available only if you selected an Azure VNet peering connection in Network connection.) Select Yes or No. If you select Yes, enter the:
- FQDN of the domain (for example, Contoso.com).
- Organization Unit: To use the default OU (Computers), leave this field empty.
- Citrix Daas account name: Must be a domain or enterprise administrator in the format name@domain or domain\name.
- Password for Citrix DaaS account name.
- Advanced settings: See Resource location settings when creating a catalog.
-
-
When you’re done, select Create Catalog.
- If this is the first catalog you’re creating using a Citrix Managed Azure subscription, when prompted, acknowledge your responsibility for related charges.
The Manage > Quick Deploy dashboard indicates when your catalog is created. Citrix DaaS also automatically creates a resource location and adds two Citrix Cloud Connectors.
What to do next:
- If you haven’t done it already, configure the authentication method for your users to authenticate to Citrix Workspace.
- After the catalog is created, add users to the catalog.
- If you created a multi-session catalog, add applications (before or after adding users).
Resource location settings when creating a catalog
When creating a catalog, you can optionally configure several resource location settings.
When you select Advanced settings in the catalog creation dialog, Citrix DaaS retrieves resource location information.
-
If you already have a resource location for the domain and network connection selected for the catalog, you can save it for use by the catalog you’re creating.
If that resource location has only one Cloud Connector, another one is installed automatically. You can optionally specify advanced settings for the Cloud Connector you’re adding.
-
If you don’t have a resource location set up for the domain and network connection selected for the catalog, you’re prompted to configure one.
Configure advanced settings:
-
(Required only when the resource location is already set up.) A name for the resource location.
-
External connectivity type: through the Citrix Gateway service, or from within your corporate network.
-
Cloud Connector settings:
-
(Available only when using a customer-managed Azure subscription) Machine performance. This selection is used for the Cloud Connectors in the resource location.
-
(Available only when using a customer-managed Azure subscription) Azure resource group. This selection is used for the Cloud Connectors in the resource location. The default is the resource group last used by the resource location (if applicable).
-
Organizational Unit (OU). The default is the OU last used by the resource location (if applicable).
-
When you’re done with the advanced settings, select Save to return to the catalog creation dialog.
After you create a catalog, several resource location actions are available. For details, see Resource location actions.
Machine naming scheme
To specify a machine naming scheme when creating a catalog, select Specify machine naming scheme. Use from 1-4 wildcards (hash marks) to indicate where sequential numbers or letters appear in the name. Rules:
- The naming scheme must contain at least one wildcard, but not more than four wildcards. All the wildcards must be together.
- The entire name, including wildcards, must be between 2 and 15 characters.
- A name cannot include blanks (spaces), slashes, backslashes, colons, asterisks, angle brackets, pipes, commas, tildes, exclamation points, at signs, dollar signs, percent signs, carets, parentheses, braces, or underscores.
- A name cannot begin with a period.
- A name cannot contain only numbers.
- Do not use the following letters at the end of a name:
-GATEWAY,-GW, and-TAC.
Indicate whether the sequential values are numbers (0-9) or letters (A-Z).
For example, a naming scheme of PC-Sales-## (with 0-9 selected) results in computer accounts named PC-Sales-01, PC-Sales-02, PC-Sales-03, and so on.
Leave enough room for growth.
- For example, a naming scheme with 2 wildcards and 13 other characters (for example,
MachineSales-##) uses the maximum number of characters (15). - Once the catalog contains 99 machines, the next machine creation fails. Citrix DaaS tries to create a machine with three digits (100), but that would create a name with 16 characters. The maximum is 15.
- So, in this example, a shorter name (for example,
PC-Sales-##) allows scaling beyond 99 machines.
If you do not specify a machine naming scheme, Citrix DaaS uses the default naming scheme DAS%%%%%-**-###.
-
%%%%%= five random alphanumeric characters matching the resource location prefix -
**= two random alphanumeric characters for the catalog -
###= three digits.