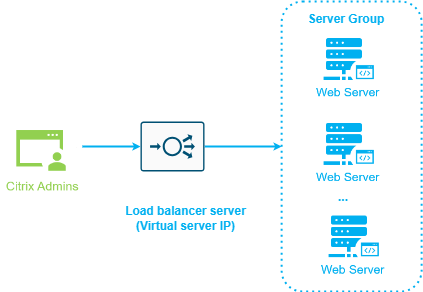
Set up a load-balanced Web Studio deployment
To set up highly available Web Studio deployments, you can choose tools such as NetScaler® ADC or Windows Network Load Balancing. This article provides a step-by-step guide on how to set up a load-balanced Web Studio deployment using a NetScaler ADC appliance.
Certificate requirements
Before buying a certificate from a commercial certificate authority or issuing one from your enterprise certificate authority, consider the following options based on your needs:
| Option | Pros | Cons |
|---|---|---|
| Option 1: Use a *.example.com wildcard certificate on both the NetScaler ADC appliance load balancer server and the Web Studio servers.
|
|
|
| Option 2: Use a certificate with Subject Alternative Names (SANs) on both the NetScaler ADC appliance load balancer server and the Web Studio servers.
|
|
|
| Option 3: Use a certificate for each Web Studio server and the NetScaler ADC appliance load balancer server
|
|
|
Configure the server certificate on the load balancer
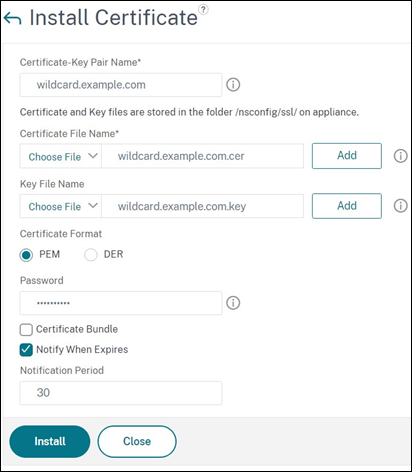
- Log on to the NetScaler ADC appliance management GUI.
- Select Traffic Management > SSL > Certificates > Server Certificates
- Click Install.
-
On the Install Server Certificate page, enter a Certificate-Key Pair Name, click Choose File, and then browse for the certificate file. If the certificate file doesn’t include the private key, select a Key File.
Step 1: Add Web Studio server nodes
Add all Web Studio server nodes (for example, Studio-eu-1 and Studio-eu-2) to the load balancer.
- Log on to the NetScaler ADC management GUI.
-
Navigate to Traffic Management > Load Balancing > Servers. Click Add.
-
Enter the server IP address of a Web Studio server node.
-
Repeat steps 2–3 to add the other Web Studio servers.

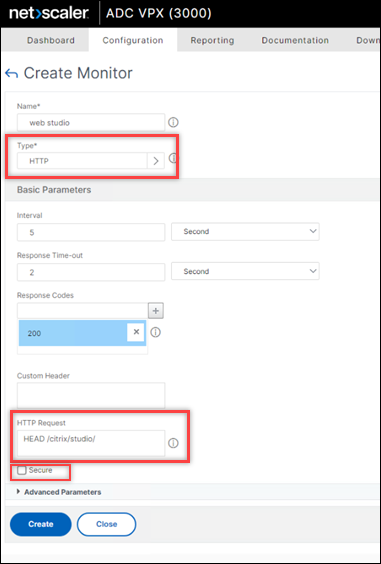
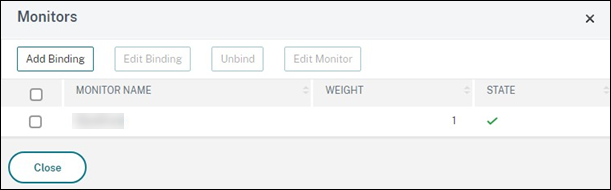
Step 2: Add a monitor for Web Studio server nodes
Set up a monitor in the load balancer to check the status of all Web Studio server nodes.
- Select Traffic Management > Load Balancing > Monitors > Add.
- On the Configuration tab, complete the following settings and leave the other defaults:
- Enter Web Studio for Name.
- Select HTTP or SSL for Type.
- Select the Secure option.
- Enter HEAD/citrix/studio/ for HTTP Request.
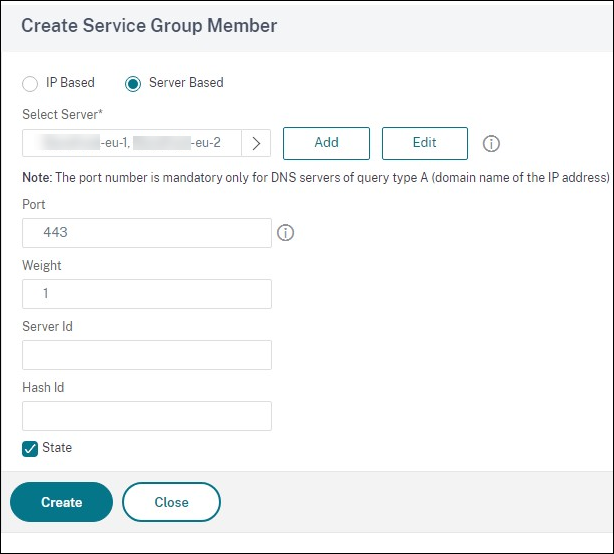
Step 3: Create a service group for Web Studio server nodes
-
Select Traffic Management > Load Balancing > Service Groups > Add. To connect to the Web Studio servers over HTTPS, select a protocol of SSL, leave other settings as default, and then click OK.
-
Within your Service Group, under Service Group Members, click No Service Group Member, and then follow these steps to add members:
- Click Service Based.
- Select all servers that you added previously.
-
Enter 443 for the port.
-
Add the Monitors section and select the Web Studio monitor you created earlier.
-
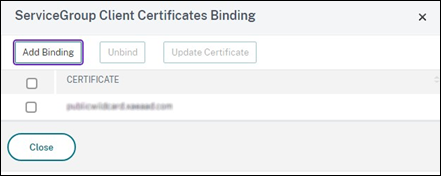
Add the Certificates section and complete the following settings:
- Bind the client certificate.
-
Bind the CA certificate used to sign the server certificate that you imported earlier, and any other CAs that might be part of the PKI chain of trust.
-
Add the Settings section, select Insert Client IP Header, and then enter a header name of X-Forwarded-For. This setting allows the Client IP Address to be used in Policies.
Step 4: Create a virtual server
Create a load-balancer virtual server for users to access the Web Studio server group.
-
Navigate to Traffic Management > Load Balancing > Virtual Servers, and then click Add.
-
Enter a name, select SSL for the Protocol, enter 443 for the Port, and then click OK.

-
Bind the Service Group you created earlier to the load-balancing virtual server.
-
Bind the CA certificate that you bound to the service group in Step 3: Create a service group for Web Studio server nodes.
-
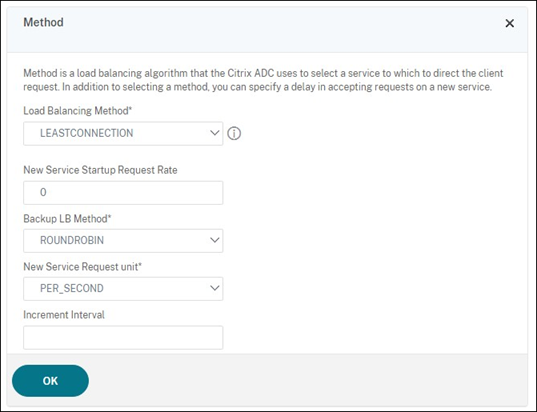
Add the Method section and select the load-balancing method. Common choices for Web Studio load balancing are ROUNDROBIN or LEASTCONNECTION.
-
Add the Persistence section and complete the following settings:
-
Set the persistence method to COOKIEINSERT.
-
Set the time-out to be the same as the Session time-out within Web Studio (by default, 20 minutes).
-
Name the cookie to ease future debugging. For example, NSC_SFPersistence.
-
Set backup persistence to NONE.
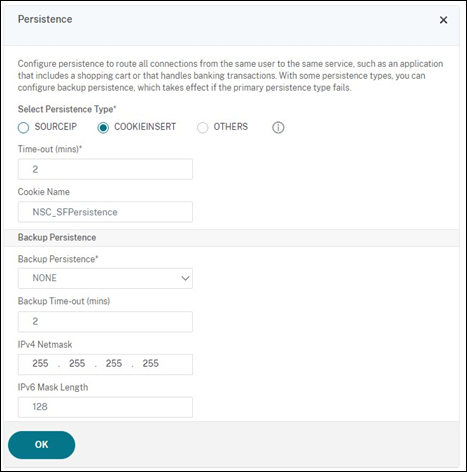
Note:
If the client isn’t allowed to store the HTTP cookie, the subsequent requests don’t have the HTTP cookie, and Persistence is not used.
-
Step 5: Create DNS records for the virtual server
On the Domain Controller, create a DNS and PTR record to map the IP address of the virtual server to an FQDN. Web Studio users within your network use this FQDN to access the Web Studio server group. For example, webstudio.example.com resolves to the load-balancer virtual server IP address (VIP).
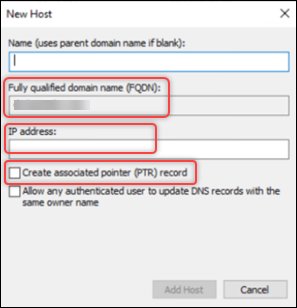
Provide this URL for users to access Web Studio servers: https://<FQDN of the virtual server>/<text you entered in the HTTP Request field when creating a monitor>. Example: https://webstudio.example.com/citrix/studio