Set up smart card authentication for Web Studio
This article outlines the steps required to set up and enable smart card authentication for Web Studio:
Step 1: Install the smart card driver
Step 2: Issue certificates for smart card users
Step 3: Enroll certificates for smart card users
Step 4: Configure Web Studio IIS servers
Step 5 (Optional) Configure authentication delegations for Web Studio
Step 6: Enable smart card authentication for Web Studio
Note:
Smart card authentication is supported only for users from the same Active Directory domain with Web Studio servers.
Step 1: Install the smart card driver
Install the smart card driver on the following machines:
- Domain Controllers where Certificate Service is installed.
- Web Studio servers
- Machines end users use to access Web Studio
- Machines you use to enroll certificates for smart card users
Smart card drivers vary by vendors. For example, if using smartcard hardware provided by ITS, download the SaftNet drivers from https://support.globalsign.com/ssl/ssl-certificates-installation/safenet-drivers.
Step 2: Issue certificates for smart card users
Note:
The following steps are provided as an example to guide you through the process.
On your Domain Controller, follow these steps to complete the task:
-
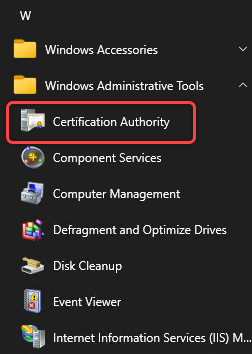
Access your Domain Controller and open Certification Authority.
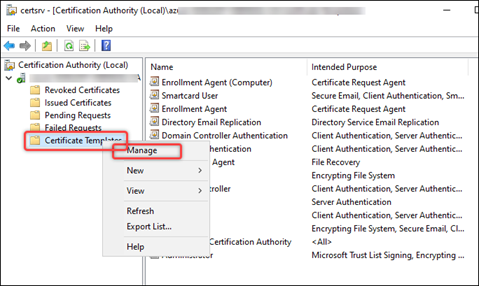
- Duplicate the Enrollment Agent template. Detailed steps are as follows:
-
Right-click Certificate Templates and select Manage.
-
Right-click Enrollment Agent and select Duplicate Template.
-
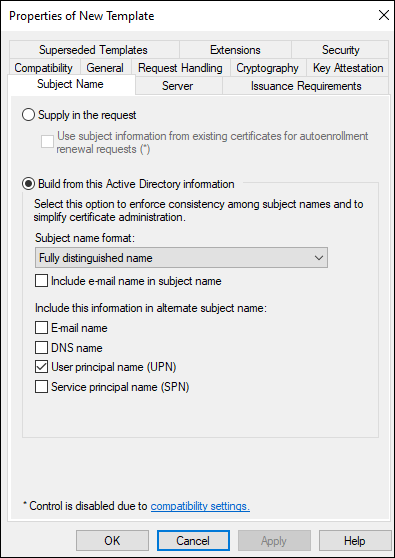
On the Subject Name tab, make sure that Include e-mail in subject name is unselected.
-
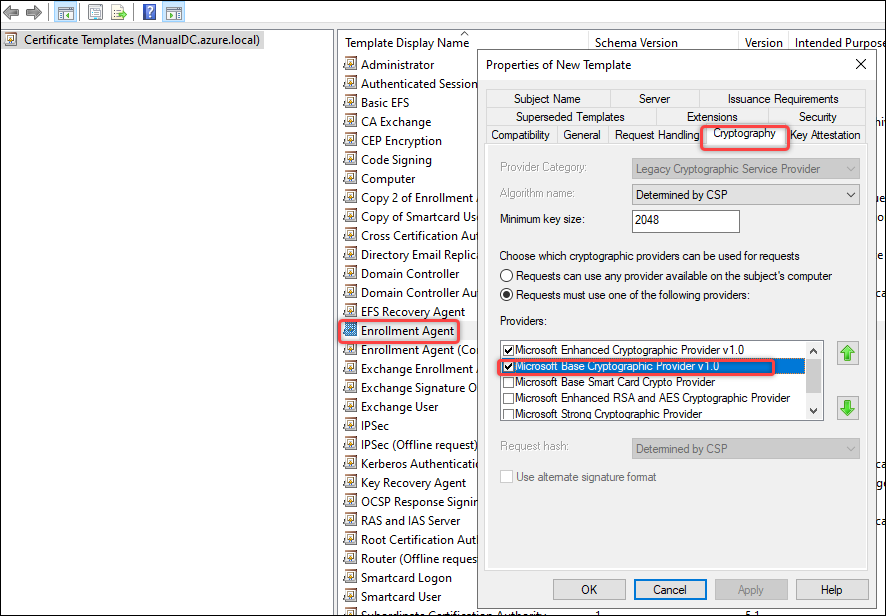
On the Cryptography tab, select Microsoft Base Smart Card Crypto Provider, and then click OK. A template named Copy of Enrollment Agent appears in the Certificate Templates list.
-
- Issue certificates for smart cards. Detailed steps are as follows:
- Right-click Certificate Templates and then select New > Template to Issue.
- Select Copy of Enrollment Agent and Smartcard User.
- Click OK.
Step 3: Enroll certificates for smart card users
Note:
The following steps are provided as an example to guide you through the process.
On a domain-joined physical Windows machine, follow these steps to enroll certificates for each smart card:
- Prepare a domain-joined physical Windows machine for the enrollment use:
- Ensure that the smart card driver is installed.
- Insert a smart card into the machine.
- Log on to the machine using the user account you want to assign to the smart card.
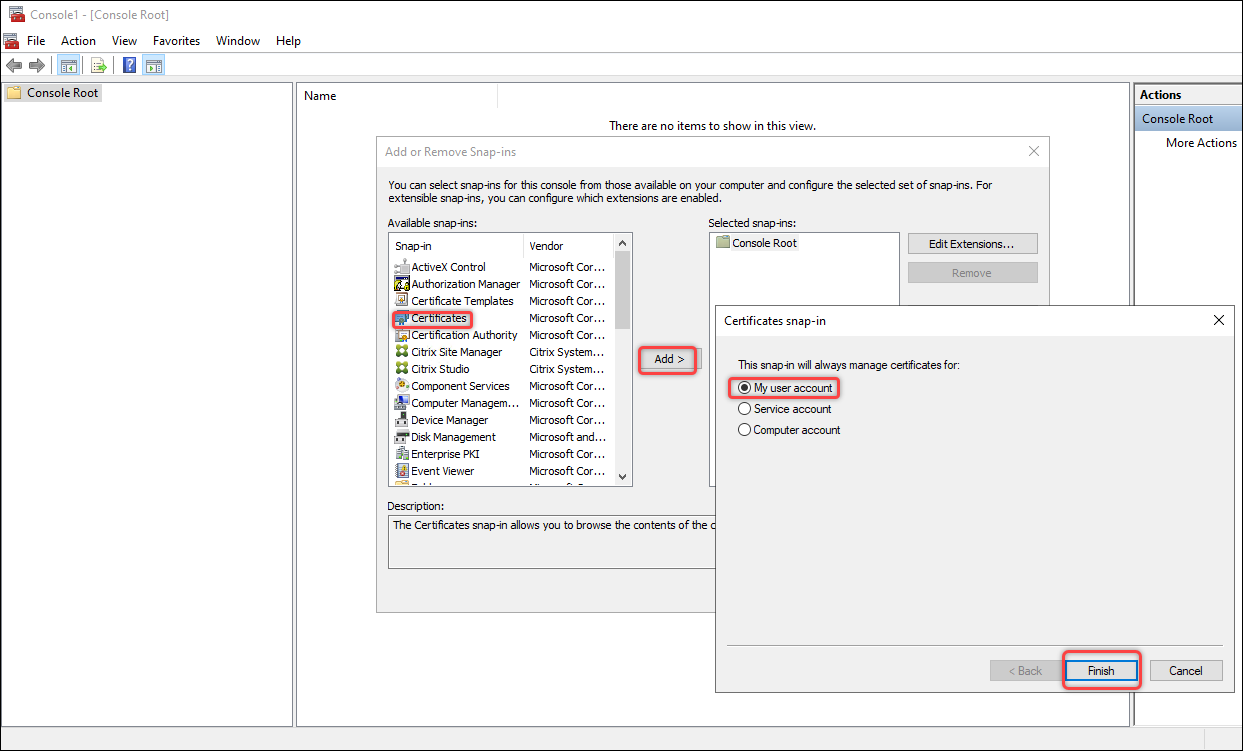
- Add the Certificates snap-in onto the machine that you prepared in step 1. Detailed steps are as follows:
- Open mmc.
- Click File and then click Add/Remove Snap-in.
- In the Add or Remove Snap-ins window that appears, select Certificates and then click Add >.
- In the dialog box that appears, select My user account and click Finish.
-
Click OK.
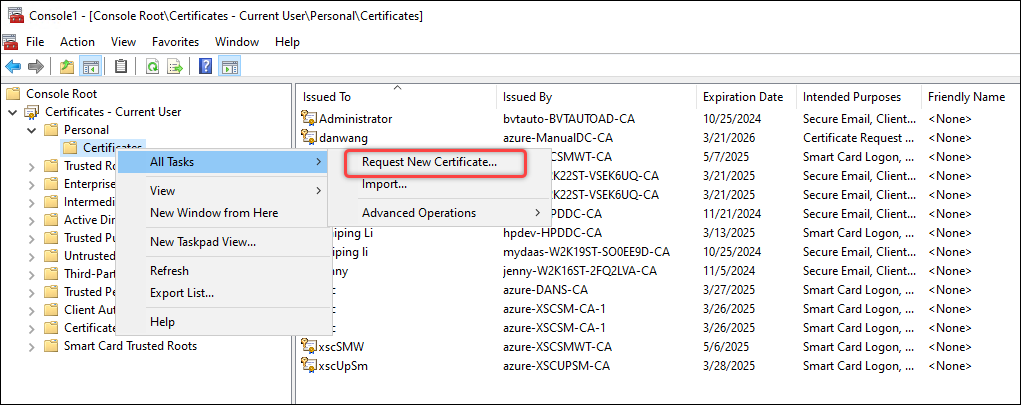
- Request new certificates for the Certificates snap-in. Detailed steps are as follows:
-
Go to Certificates - Current User > Personal, right-click Certificates, then select All Tasks > Request New Certificate.
-
In the Request Certificates dialog box that appears, select Copy of Enrollment Agent and Smartcard User.
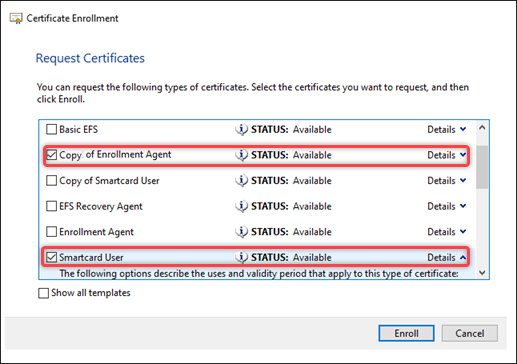
-
In the above dialog box, click Details for Smartcard User and then click Properties. The Certificate Properties dialog box appears.
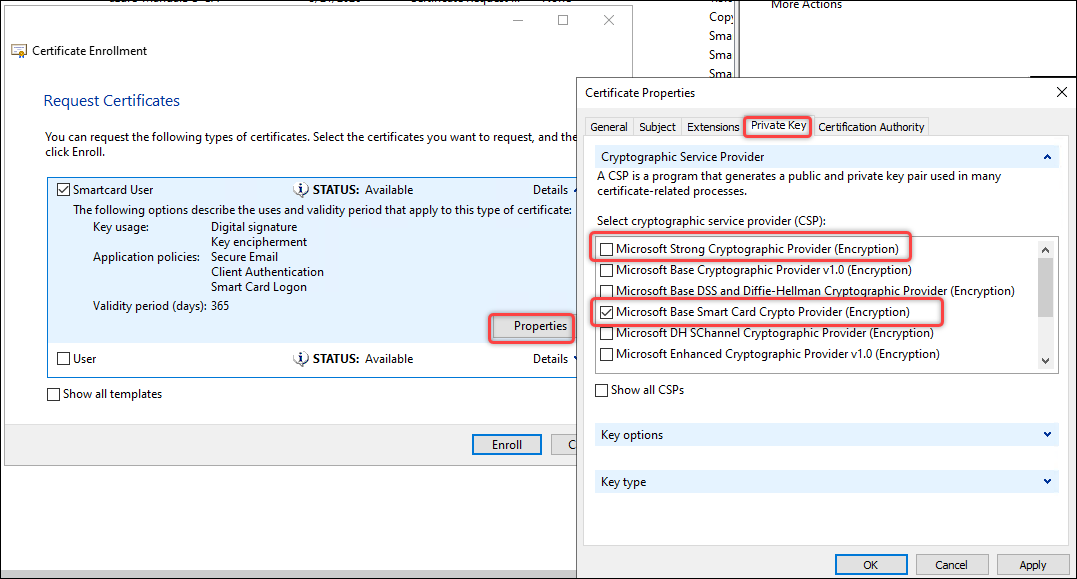
- On the Private Key tab, expand Cryptographic Service Provider, clear Microsoft Strong Cryptographic Provider (Encrption), select only Microsoft Base Smart Card Crypto Provider (Encryption), and then click OK.
- Click Enroll.
-
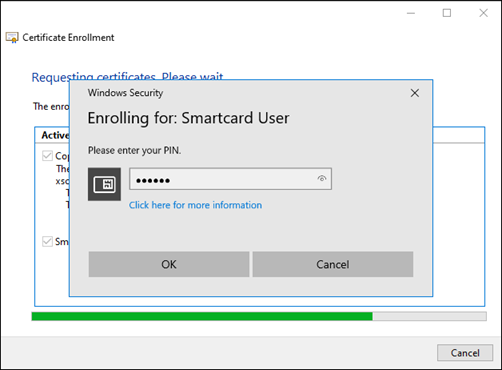
In the Windows Security dialog box that appears, enter the smart card PIN code and click OK. When enrollment completes, click Finish.
-
After successful enrollment, two certificates appear under Certificates - Current User -> Personal -> Certificates, as shown in the following screenshot.

Step 4: Configure Web Studio IIS servers
On each Web Studio server, follow these steps to configure IIS for smart card authentication:
-
Enable Client Certificate Mapping Authentication for the Web Studio machine.
The
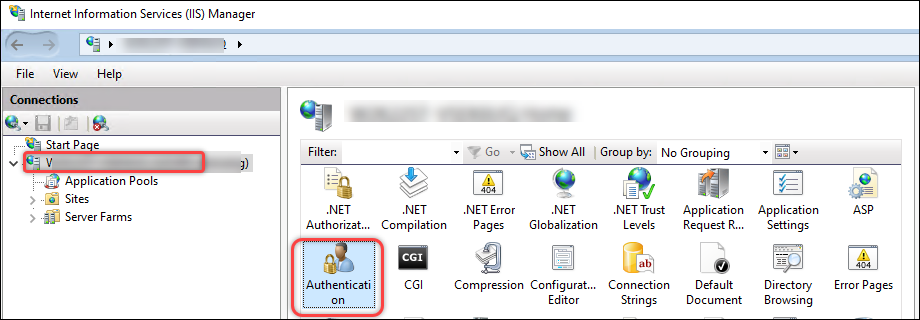
<clientCertificateMappingAuthentication>element is unavailable on the default installation of IIS 7 and later. For more information about installation and enablement, see this Microsoft article. - Start IIS Manager on the Web Studio machine.
-
Enable Active Directory Client Certificate Authentication for the machine. Detailed steps are as follows:
-
Select the machine in the left pane and double-click Authentication.
-
Enable Active Directory Client Certificate Authentication.

-
- Configure the Web Studio Backend module for a more secure HTTPS protocol with client certificate authentication:
-
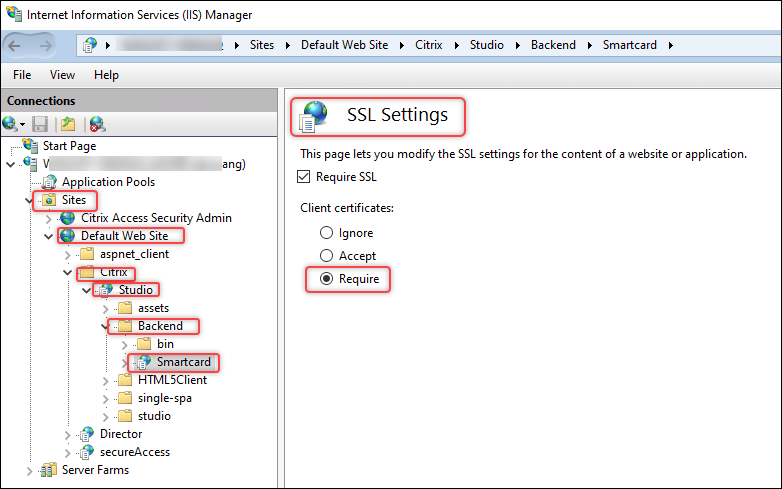
Go to Sites >
the IIS site name where Web Studio is installed (site ID = 1, by default, Default Web Site)> Studio > Backend > Smartcard, then double-click SSL Settings in the IIS section.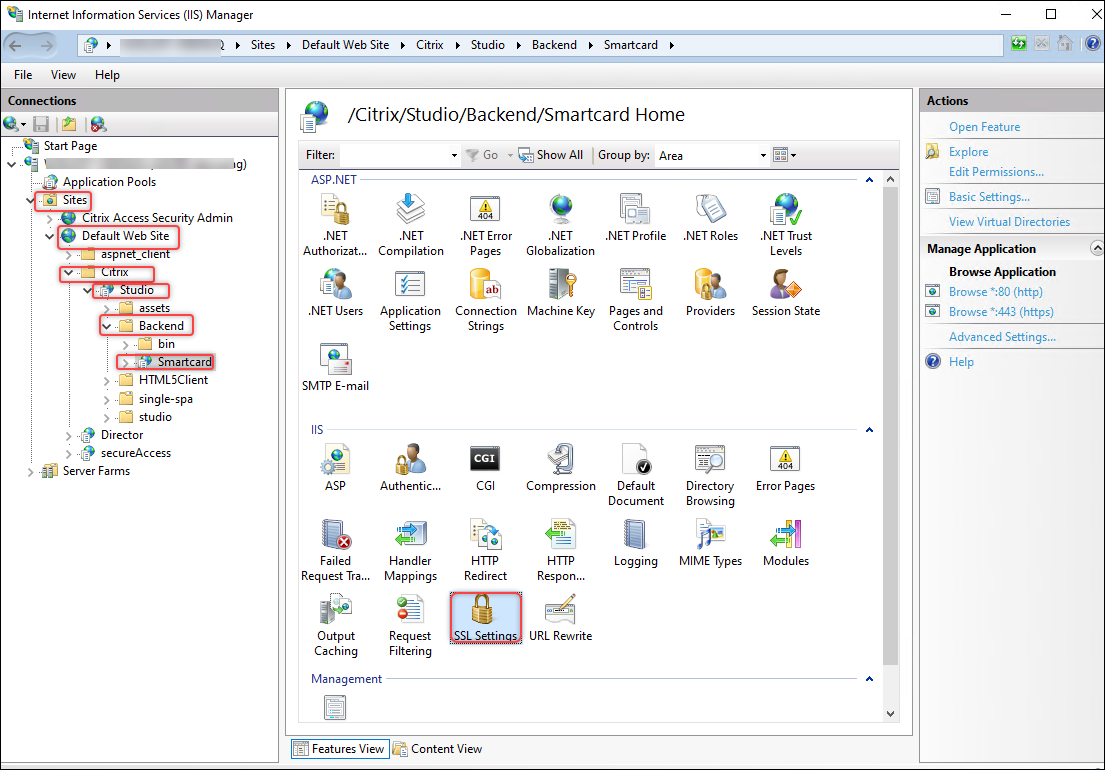
-
Select Require for Client certificates.
-
Return to Sites >
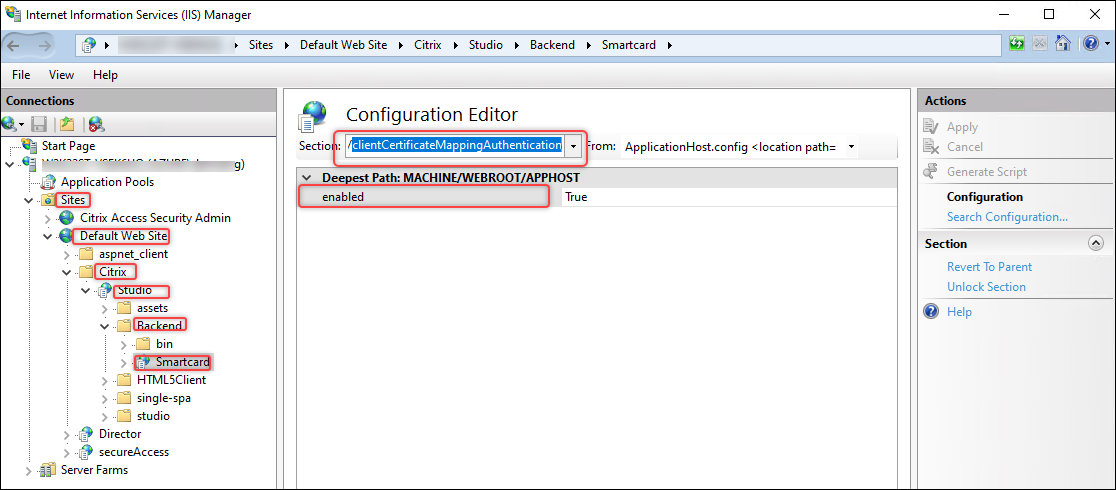
the IIS site name where Web Studio is installed (site ID = 1, by default, Default Web Site)> Studio > Backend > Smartcard and then double-click Configuration Editor in the IIS section.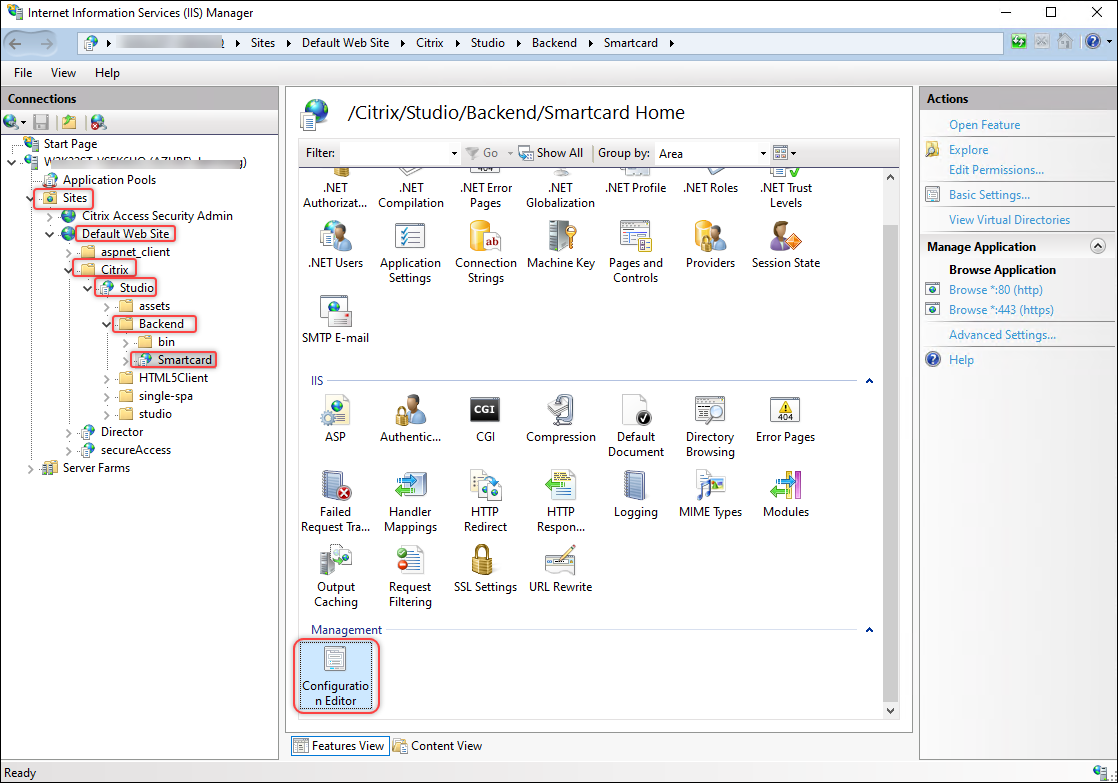
-
Make sure /clientCertificateMappingAuthentication is enabled.
-
-
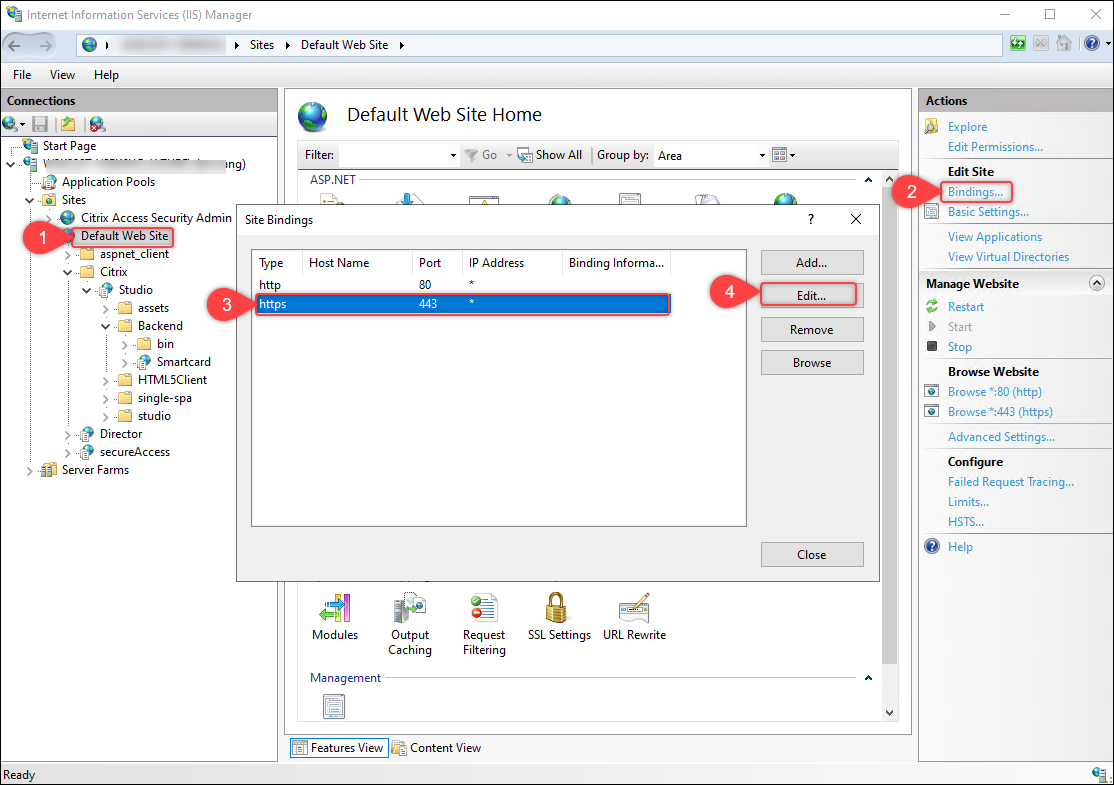
(Windows 2022 only) Disable TLS 3.1 over TCP. Detailed steps are as follows:
- Go to Sites >
the IIS site name where Web Studio is installed (site ID = 1, by default, Default Web Site). - Click Edit Site > Binding.
-
In the Site Bindings dialog box that appears, select the https record, and then click Edit.
-
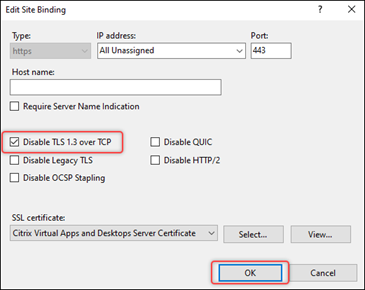
In the Edit Site Binding dialog box that appears, select Disable TLS 1.3 over TCP and then click OK.
- Go to Sites >
Good to know:
Web Studio Backend is a module in Web Studio that provides the following functions:
- Smart card authentication.
- Retrieval of FMA bearer tokens from the Orchestration service using integrated Windows authentication.
Step 5 (Optional) Configure authentication delegations for Web Studio
When Web Studio and Delivery Controllers are installed on different servers, you must configure delegations for each Web Studio server to the Delivery Controllers for HOST and HTTPS services.
Follow these steps to complete the task for each Web Studio sever:
- Import the Delivery Controller™ Orchestration HTTPS Certificate
- Configure delegation for the Web Studio server
- (Optional) Configure delegation for the Web Studio IIS server’s service account
Import the Delivery Controller Orchestration HTTPS Certificate
On the Web Studio server, import the Delivery Controller Orchestration HTTPS certificate to Trusted Root Certification Authorities. Detailed steps are as follows:
- Start Settings > Manage computer certificates.
-
Right-click Trusted Root Certification Authorities > Certificates and select All Tasks > Import.
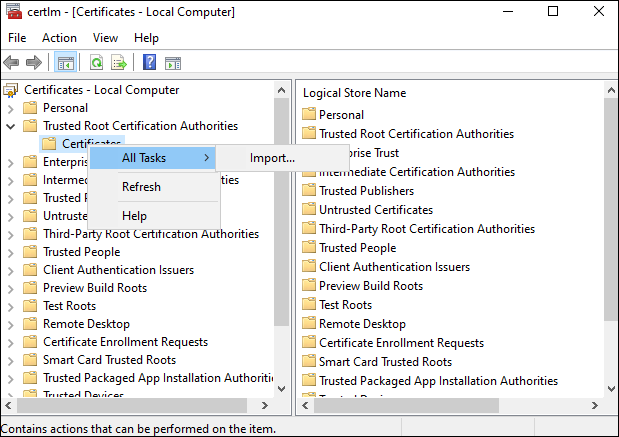
- Follow the onscreen instructions to import the Delivery Controller Orchestration HTTPS certificate.
Configure delegation for the Web Studio server
On the domain controller, configure delegation for the Web Studio server to Delivery Controller for HOST and HTTP services. Follow these steps to complete the task:
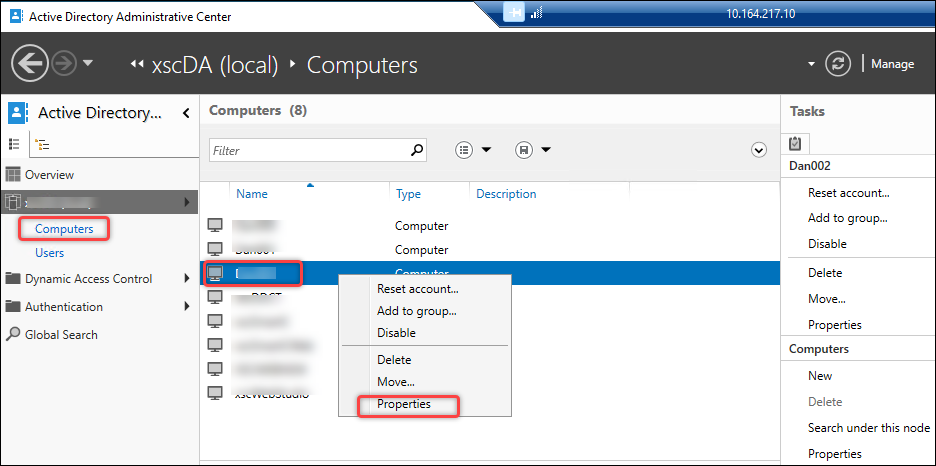
- On the domain controller, start Active Directory Administrative Center.
- Locate the computer account of the Web Studio Server for which you want to configure delegation (for example, Dan002).
-
Right-click the account, select Properties, and then complete the following steps:
-
Go to the Delegation tab.
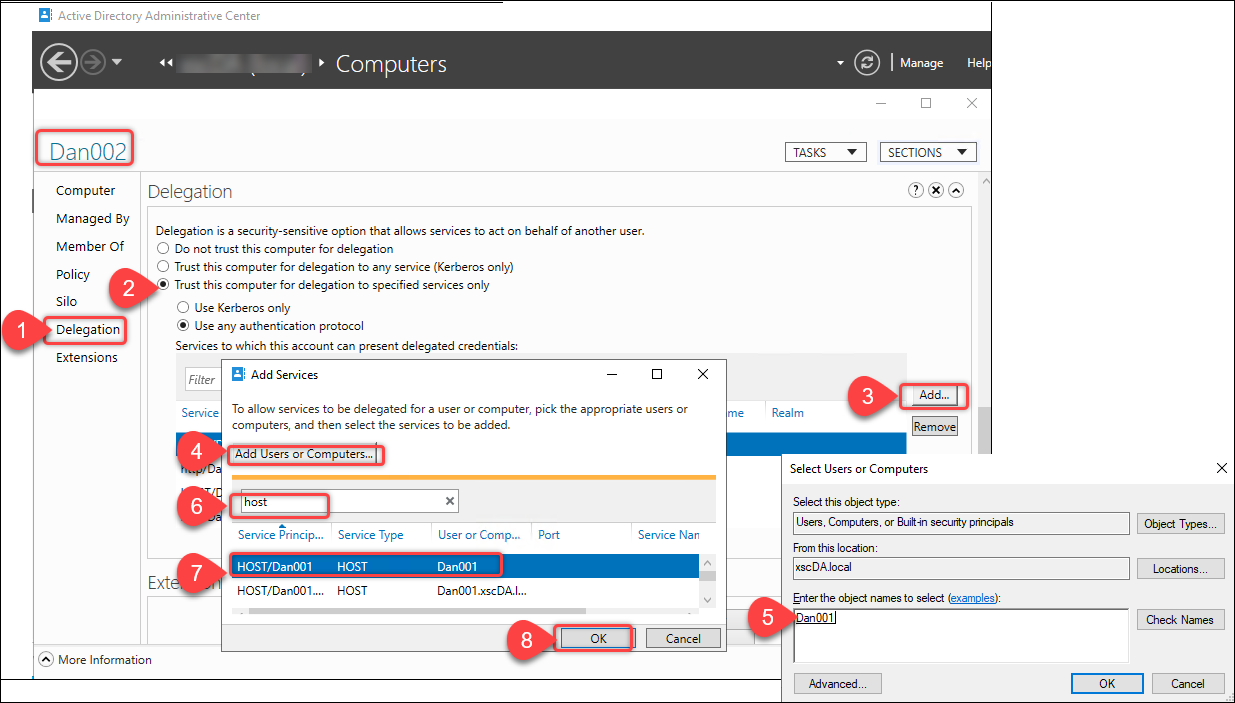
- Select Trust this user for delegation to specified services only > Use any authentication protocol.
- Click Add to specify which services this computer account can be delegated to.
- In the Add Service dialog box that appears, click Add Users or Computers to locate the computer name of the Delivery Controller (for example, Dan001).
- Select the HOST and HTTP services, and then click OK.
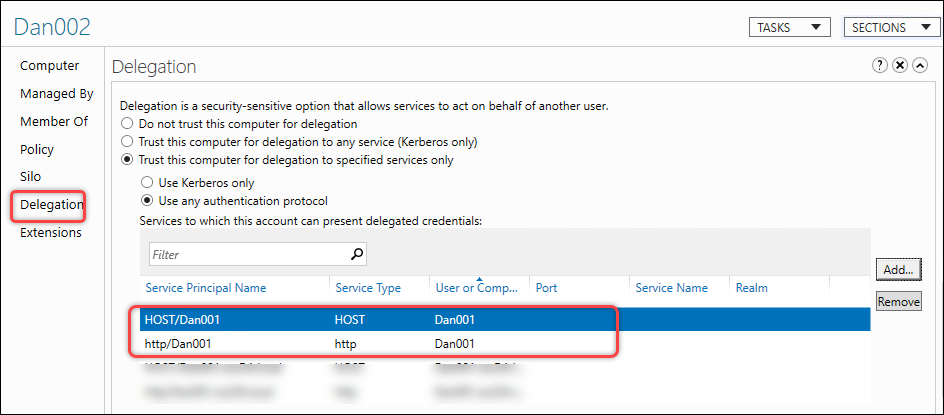
-
The configuration results are shown in the following screenshot.
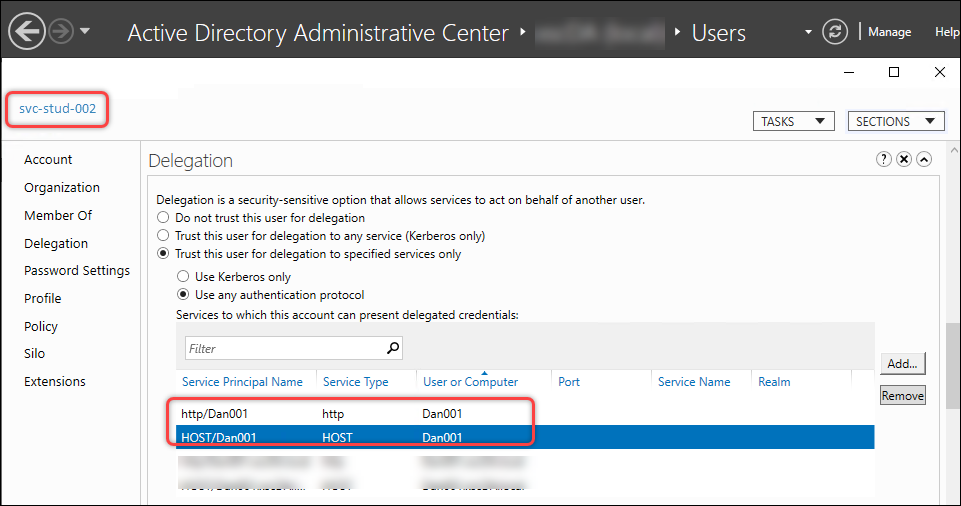
(Optional) Configure delegation for the Web Studio IIS server’s service account
If you’ve configured a service account for the Web Studio IIS server, you also need to configure delegation for this service account to the Delivery Controller for the HOST and HTTP services. With this delegation established, the Web Studio server can use its service account to impersonate the current smart card user to access the Delivery Controller for the HOST and HTTP services. Follow these steps to complete the configuration:
- On the domain controller, start Active Directory Administrative Center.
- Locate the user account of the Web Studio IIS server (service account) for which you want to configure delegation (for example, svr-stud-002).
- Right-click the account and select Properties.
- Follow the procedure described in step 3 of Configure delegation for the Web Studio server to delegate the Web Studio IIS server’s service account to the Delivery Controller for the HOST and HTTP services.
The configuration results are shown in the following screenshot.
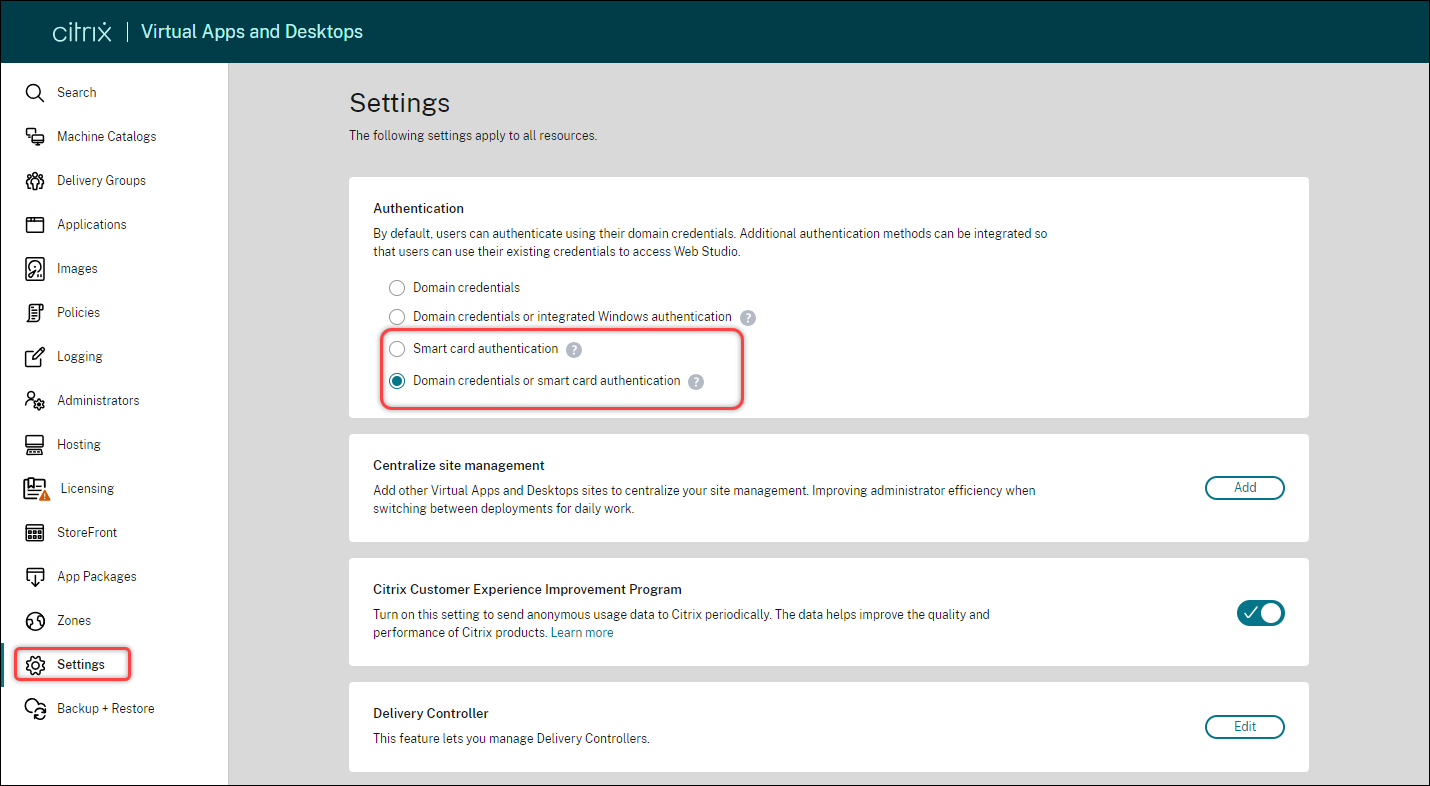
Step 6: Enable smart card authentication for Web Studio
Follow these steps to enable smart card authentication for Web Studio:
- Sign in to Web Studio and select Settings in the left pane.
- Select Smart card authentication or Domain credentials or smart card authentication as needed.
-
Click Apply.
In this article
- Step 1: Install the smart card driver
- Step 2: Issue certificates for smart card users
- Step 3: Enroll certificates for smart card users
- Step 4: Configure Web Studio IIS servers
- Step 5 (Optional) Configure authentication delegations for Web Studio
- Step 6: Enable smart card authentication for Web Studio