This content has been machine translated dynamically.
Dieser Inhalt ist eine maschinelle Übersetzung, die dynamisch erstellt wurde. (Haftungsausschluss)
Cet article a été traduit automatiquement de manière dynamique. (Clause de non responsabilité)
Este artículo lo ha traducido una máquina de forma dinámica. (Aviso legal)
此内容已经过机器动态翻译。 放弃
このコンテンツは動的に機械翻訳されています。免責事項
이 콘텐츠는 동적으로 기계 번역되었습니다. 책임 부인
Este texto foi traduzido automaticamente. (Aviso legal)
Questo contenuto è stato tradotto dinamicamente con traduzione automatica.(Esclusione di responsabilità))
This article has been machine translated.
Dieser Artikel wurde maschinell übersetzt. (Haftungsausschluss)
Ce article a été traduit automatiquement. (Clause de non responsabilité)
Este artículo ha sido traducido automáticamente. (Aviso legal)
この記事は機械翻訳されています.免責事項
이 기사는 기계 번역되었습니다.책임 부인
Este artigo foi traduzido automaticamente.(Aviso legal)
这篇文章已经过机器翻译.放弃
Questo articolo è stato tradotto automaticamente.(Esclusione di responsabilità))
Translation failed!
Install VDAs using SCCM
Note:
Citrix is not responsible for issues that arise caused by the deployment of a Virtual Delivery Agent (VDA) using software distribution tools such as Microsoft System Center Configuration Manager (SCCM) adapted to match customer production environments. For any install related Citrix issues, open a technical support case with the relevant install logs using the Citrix Support portal.
Overview
To successfully deploy a Virtual Delivery Agent (VDA) using Microsoft System Center Configuration Manager (SCCM) or similar software distribution tools, Citrix recommends using the VDA installer in a sequence of steps.
Citrix does not recommend using the VDA Cleanup Utility as part of a VDA installation or upgrade. Use the VDA Cleanup Utility only in the limited case when the VDA installer has previously failed.
Restarts
The required number of restarts during the installation of the VDA depends on the environment. For example:
- A restart might be required for pending updates or restarts from earlier software installations.
- Files previously locked by other processes might need updates, forcing an extra restart.
- Some optional components in the VDA installer (such as Citrix Profile Management and Citrix Files) might require a restart.
The SCCM Task Sequencer manages all required restarts.
Define the task sequence
After identifying all prerequisites and restarts, use the SCCM Task Sequencer to complete the following:
-
The VDA can be installed from an accessible copy of the installation media or from one of the VDA standalone installers:
VDAWorkstationSetup_XXXX.exeVDAServerSetup_XXXX.exeVDAWorkstationCoreSetup_XXXX.exe
For more information about VDA installers, see Installers.
- When upgrading a VDA, the machine on which it is installed must be in maintenance mode, with no sessions.
- When a VDA installation runs for the first time on a machine, the VDA installer being used is copied onto that machine.
- When using a VDA installer other than
VDAWorkstationCoreSetup_XXXX.exe, the VDA installer is copied to%ProgramData%\Citrix\XenDesktopSetup\XenDesktopVdaSetup.exe. - When using
VDAWorkstationCoreSetup_XXXX.exe, the VDA installer is copied to%ProgramData%\Citrix\XenDesktopSetup\XenDesktopRemotePCSetup.exe. `
- When using a VDA installer other than
- The directory location of the VDA installer is also stored in the registry
“HKEY_LOCAL_MACHINE\SOFTWARE\Citrix\MetaInstall” “MetaInstallerInstallLocation”. - Add the command line options
/NOREBOOT,/NORESUME, and/QUIETto your command line options.-
/QUIET: Do not show the user interface during installation, so that SCCM has control of the installation process. -
/NOREBOOT: Suppress the VDA installer from restarting automatically. SCCM triggers restarts when needed. -
/NORESUME: Usually, when a restart is needed during the installation, the VDA installer sets arunonceregistry key (\HKEY_LOCAL_MACHINE\SOFTWARE\Microsoft\Windows\CurrentVersion\RunOnce). When the machine restarts, Windows uses the key to launch the VDA installer. This is an issue for SCCM, because SCCM cannot monitor the installation and capture the exit code.
-
Example installation sequence using SCCM
The following example shows the installation sequence.
-
Restart Computer: Prepare the machine by restarting the machine.
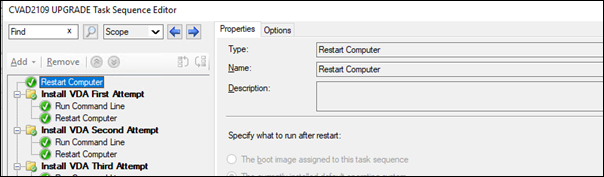
-
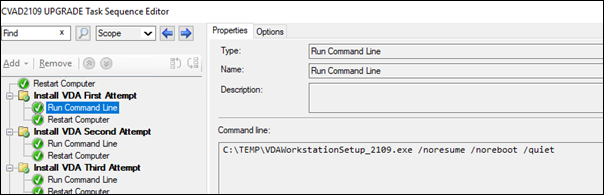
Install VDA First Attempt: Start the VDA installation.
- Add the
/quiet,/noreboot, and/noresumeoptions to your command line options. - Run the VDA installer of your choice (local image or one of the minimal installers).
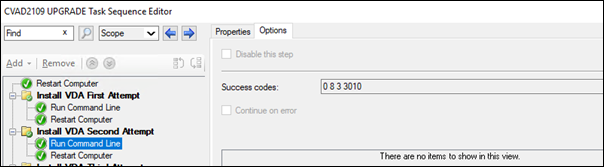
- SCCM must capture the return code.
- If the return code is 0 or 8, the installation is complete, and a restart is needed.
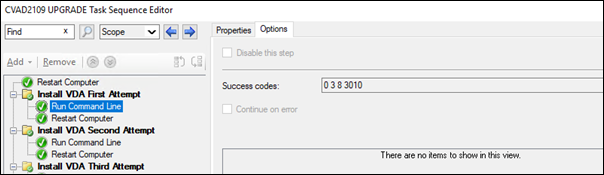
- If a return code is 3, restart the machine and then pass control to Install VDA Second Attempt.

- If the return code is 0 or 8, the installation is complete, and a restart is needed.
- Add the
-
Install VDA Second Attempt: Continue VDA installation.
- After Install VDA First Attempt if the file
%programdata%\Citrix\XenDesktopSetup\CitrixVirtualDesktopAgent.xmlexists, the installation is not complete and must be continued after the restart completes.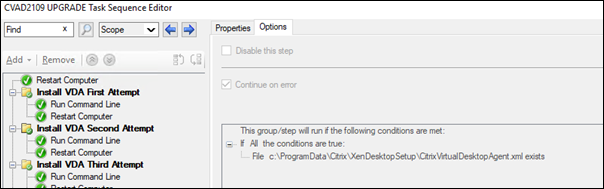
-
Install VDA Second Attempt repeats until the file
%programdata%\Citrix\XenDesktopSetup\CitrixVirtualDesktopAgent.xmldoes not exist or a return code other than 0 or 8 is returned. Treat any other return code as an error, and INSTALL VDA SECOND ATTEMPT should report an error and stop. - Resume the VDA installation by running the appropriate VDA installer (
XenDesktopVdaSetup.exefor most cases, orXenDesktopRemotePCSetup.exeifVDAWorkstationCoreSetup_XXXX.exewas used) from the file%programdata%\ Citrix\XenDesktopSetup\directory with no command-line parameters. (The VDA installer uses the parameters it saved during the first run of the installer.)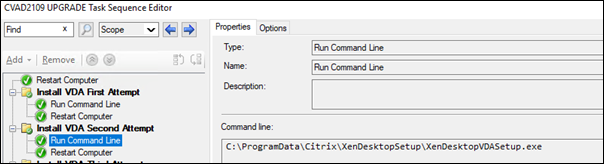
- Watch for the return code from the VDA installer.
- 0 or 8: Success, installation complete, restart required.
- 3: Installation is not complete. Restart the machine and repeat INSTALL VDA SECOND ATTEMPT until the file
%programdata%\ Citrix\XenDesktopSetup\CitrixVirtualDesktopAgent.xmldoes not exist or until a 0 or 8 is returned. Treat any other return code as an error, and INSTALL VDA SECOND ATTEMPT should report an error and end.
- 0 or 8: Success, installation complete, restart required.
- After Install VDA First Attempt if the file
For more information about return codes see Citrix installation return codes.
VDA installation command examples
The available installation options vary, depending on which installer is used. See the following articles for command line option details.
Installation commands for Remote PC Access
-
The following command uses the single-session core VDA installer (
VDAWorkstationCoreSetup.exe):VDAWorkstationCoreSetup.exe /quiet /controllers “control.domain.com” /enable_hdx_ports /noresume /noreboot -
The following command uses the single-session full VDA installer (
VDAWorkstationSetup.exe):VDAWorkstationSetup.exe /quiet /remotepc /physicalmachine /controllers “control.domain.com” /enable_hdx_ports /noresume /noreboot
Installation command for dedicated VDI
-
The following command uses the single-session full VDA installer (
VDAWorkstationSetup.exe):VDAWorkstationSetup.exe /quiet /components vda /controllers “control.domain.com” /enable_hdx_ports /enable_remote_assistance /noresume /noreboot
Share
Share
This Preview product documentation is Citrix Confidential.
You agree to hold this documentation confidential pursuant to the terms of your Citrix Beta/Tech Preview Agreement.
The development, release and timing of any features or functionality described in the Preview documentation remains at our sole discretion and are subject to change without notice or consultation.
The documentation is for informational purposes only and is not a commitment, promise or legal obligation to deliver any material, code or functionality and should not be relied upon in making Citrix product purchase decisions.
If you do not agree, select I DO NOT AGREE to exit.