 View PDF


Auto-Clicker
Aug 14, 2017
Overview
Auto-clicker is an optional feature of Install Capture and Forward Path task scripts that call the Install Capture process. Auto-clicker improves the automation of the Install Capture process by automatically clicking through the steps of a manual installation wherever possible, accepting the default options. This means that you can leave a batch of captures running unattended, even for installers that do not provide a silent switch option.
Sometimes auto-clicker is not able to click through all of the installation steps. For example, if the installer requires you to enter information, such as a license code. When this happens, auto-clicker waits for the information to be entered manually. If no-one enters the information (because, for example, it is part of a batch of captures left to run overnight), Install Capture waits for a configurable time-out period, and then abandons the capture and proceeds to the next capture (if there is one). The Install Capture tab in the Import Applications screen will show the import status as “failed”. You then need to run the capture again without the auto-clicker option.
Auto-clicker automatically takes a screen shot of each installation step that it clicks through and adds them to an HTML page that shows the time at which each one was captured. You can find this in the capture output location. This provides you with a record of the installation and of each option that was chosen.
Note: Auto-clicker is off by default in Self-Provisioning, because Self-Provisioning is primarily aimed at expert users performing the installation manually. However, if required, the administrator can enable auto-clicker by enabling the UseAutoClick replaceable in the Quick Edit Parameter box as described below.
Limitations
- On Windows 7 (32-bit) as a VM, auto-clicker does not work for ManageEngine_NetFlowAnalyzer_9600.exe.
- On Windows 7 (32-bit) as a VM, auto-clicker does not work for soapUI-Pro-x32-4.5.1.exe or soapUI-Pro-x64-4.5.1.exe.
- On Windows 7 (32-bit) as a VM, auto-clicker does not work for aimp_3.10.1074.exe or wlsetup-web.exe.
- On Windows 7 (64-bit) as a VM, auto-clicker does not work for Atmn-Anywhere-Server-setup660.exe.
Enable auto-clicker
The steps that run during Install Capture are defined by execution profiles. For auto-clicker to work, execution profiles must support auto-clicker and have a replaceable called UseAutoClick. Provided this is true for the execution profile you are using, you can turn auto-clicker on and off for the currently selected applications in the Import Applications screen. Simply select the Use Auto Click check box on the toolbar on the Install Capture tab.

For information about configuring the replaceable, for example, to control auto-clicker in a Forward Path task script, see “Configuring the auto-clicker replaceable” below.
Important: If you have recently upgraded, be sure to also upgrade the AppDNA VM Configuration tools on the virtual machine, as explained in Upgrade AppDNA tools. Auto-clicker will not work with earlier versions of these tools.
Execution profile support for auto-clicker
The following table lists the execution profiles that come with AppDNA and indicates whether they support auto-clicker and are automatically updated when you upgrade AppDNA.
| Execution profile | Supports auto-clicker? | Automatically updated on upgrade? |
|---|---|---|
| Snapshot Extended | Yes | Only if you have already activated it |
| App-V 5.0 Sequencer | Yes | Only if you have already activated it |
| App-V 4.6 SP1 Sequencer | Yes | Only if you have already activated it |
For instructions on importing and activating an execution profile, see “To activate an execution profile” in Execution profiles.
Note: Before updating an execution profile during upgrade, AppDNA automatically saves a copy of it with an _old suffix. This means that if you have customized the execution profile, your changes are preserved in this copy.
Configure the time-out period
As mentioned earlier, sometimes auto-clicker cannot click through all of the installation steps. For example, because the installation requires you to enter information, such as a license code. When this happens, Install Capture waits for the information or option to be entered manually. If no-one enters the information, Install Capture waits for a configurable time-out period, and then abandons the capture and proceeds to the next capture (if there is one).
The time-out period is controlled by the “Abort Installation” Timeout option on the virtual machine configuration. By default, this time-out period is set to 40 minutes, because it also controls the time that Install Capture waits for the installation to finish and some large applications take a considerable amount of time to install. You can reduce this time-out period. However, be aware that this may cause the capture of some large applications to fail.
You change the “Abort Installation” Timeout value in the Virtual Machine Configuration Dialog Box.
Configure the auto-clicker replaceable
The UseAutoClick execution profile replaceable controls whether auto-clicker is on by default for that execution profile:
- To turn auto-clicker on by default, set the UseAutoClick replaceable to a value of –use-autoclick.
- To turn auto-clicker off by default, set the UseAutoClick replaceable to an empty string (“”).
There are a number of places where you can set the replaceable, as follows:
-
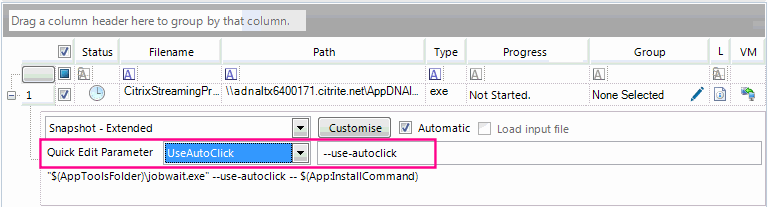
In the Quick Edit Parameter box under the application on the Install Capture or Self-Provisioning tab in the Import Applications screen. For the selected application, this overrides all other options and changes the replaceable. (This is the only way to enable auto-clicker for Self-Provisioning.)
-
On the Replaceables tab in the Edit an execution profile.
-
On the Replaceables tab in the Virtual Machine Configuration Dialog Box.
If more than one of these apply, the highest in the list always take precedence. For example, if you have set the replaceable in the Quick Edit Parameter box, this always takes precedence.
Considerations when running an unattended batch
One of the advantages of auto-clicker is that it enables you to leave a batch of captures running unattended, for example, overnight. Be aware that any problem with the virtual machine configuration can cause the batch to fail. For example, if the virtual machine is identified by its IP address, the batch will fail if the IP address is allocated dynamically and it changes part way through the batch. Similarly the batch will fail if the virtual machine is not configured for automatic logon. Citrix therefore recommends that when you set up the virtual machine, you follow the best practice advice documented in Set up a virtual machine.
As explained in more detail in the “Limitations” section that follows, auto-clicker is not expected to be successful for every single application. You therefore need to check the status of every capture in the batch after it has finished. You can check the status on the Install Capture tab in the Import Applications screen or in the Forward Path Task Sequencing screen, depending on how you ran the batch. You can also view the screenshots that record the steps that auto-clicker clicked through. These are stored in the capture’s output directory. To view them in sequence with the time at which each one was taken, open output.htm in your browser.
Make a careful note of the captures that failed and if the failure was due to the limitations of auto-clicker, run them again manually (without the auto-clicker).
Note: To ensure that the screenshots are available if the capture fails, you need to choose the option to copy rather than stream the results in the Capture Output Location step when you create the virtual machine configuration.
Limitations
There are many different types of installers, which use a variety of different technologies. Citrix has tested auto-clicker with a wide range of installers. This section explains auto-clicker’s known limitations.
-
Non-default options. As mentioned earlier, auto-clicker accepts the installer’s default options. If you want auto-clicker to select other options, you must provide an install command that specifies a silent switch and parameters that select the other options that you require.
You can modify the default install command using the App:InstallCommand option in the Quick Edit Parameter box described earlier.
-
User input is required. Some installers require you to enter something (such as a license code) or to explicitly select an option. When auto-clicker encounters a scenario of this type, it waits for someone to enter the information or perform the required interaction. If no-one does this within the specified time-out period, the capture will fail. You then need to run the capture again manually attending to any required user input.
-
Installer triggers a machine restart. Some installers require the machine to be restarted after the installation has completed. These installers often provide an option to restart the machine automatically. When you are running the installation manually, you are advised not to use this option, because restarting the capture machine before the capture has completed will make the capture fail.
Auto-clicker therefore attempts to ensure that it does not accept an option to restart the machine. Occasionally auto-clicker may fail in this and the restart attempt will commence. Remote Admin will then block the restart and Windows will display a message explaining this. Windows will then wait for the user to respond to the message. As the installation has finished, auto-clicker is unable to respond and unless someone intervenes, eventually the time-out period will be reached and the capture will fail. You then need to run the capture again manually and decline the option to restart the machine.
-
Language support. In this release, auto-clicker has been tested with English language installers only and it is not expected to work with installers in other languages.