 View PDF


Administer
Aug 14, 2017
Use the Self-Provisioning tab in the Import Applications screen to administer and manage the Self-Provisioning process. The procedure differs depending on whether you are using the connected or disconnected mode.
To open the Self-Provisioning tab: From the AppDNA side bar, choose Import & Analyze > Applications and then click the Self-Provisioning tab.
Important: Before you start using Self-Provisioning, you must configure the output path in the Self-Provisioning settings. This defines where the Self-Provisioning instructions are stored. When working in connected mode, this also defines the location where the Self-Provisioning client stores the output. Click Configuration on the Self-Provisioning tab’s toolbar to open the Self-Provisioning settings.
Prepare application for Self-Provisioning
-
Select the installation file(s) that you want to capture. Specify the location of the files using a UNC path, such as \\192.168.50.20\Source\win32-setup.exe. When using the Self-Provisioning client in connected mode, the specified location must also be accessible to the machine that hosts the Self-Provisioning client.
Click Browse to select individual files, click Search to recursively search a directory structure for files, or use the Import from List option.
After you select the files, AppDNA lists them.
-
For each application, click the + to the left of the Filename column to show the application options. In the first drop-down list box, select the execution profile you want to use and optionally enter Quick Edit Parameters.
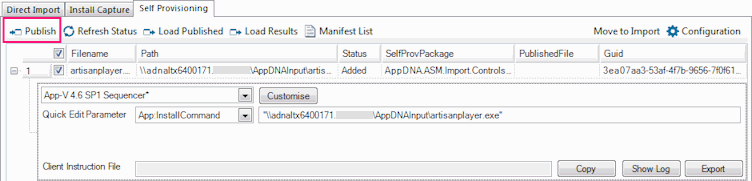
-
Select the application(s) you want to include and then click Publish.
AppDNA presents a warning that this will overwrite the existing status of the selected applications.
-
Click Yes to continue.
AppDNA then updates the screen with the details of the client instruction file for each selected application.
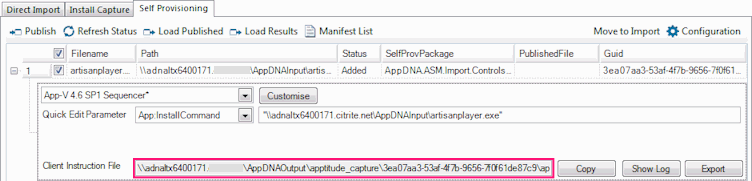
-
If you are using connected mode, send the client instruction file to the user who will perform the Self-Provisioning:
- To the right of the client instruction file, click Copy to copy the name and location of the file to the clipboard.
- Send the copied information to the user who will perform the Self-Provisioning. The user must paste the name and location of the client instruction file into the Self-Provisioning client.
-
If you are using disconnected mode, click Export (to the right of the client instruction file) to create a package to send to the end user who will run the Self-Provisioning client. This opens the Export Self-Provisioning Package dialog box:
- Input file from client perspective. Specify the name and location of the application’s installation package, relative to the Self-Provisioning client machine.
- Folder where the capture results are to be stored. Specify the default location where the Self-Provisioning client will write the output of the application capture. The end user can specify a different location during the application capture. Make sure you specify this relative to the Self-Provisioning client machine.
- Exported package path. Specify the name and location of the package that is to be sent to the end user who will run the Self-Provisioning client.
You now need to send the package and the installation file(s) to the user who will perform the Self-Provisioning in the stand-alone Self-Provisioning client.
Monitor status
To see the status of connected operations in the Self-Provisioning client:
- On the toolbar, click Refresh status. When you are working in connected mode, this updates the Status column with the results of the operation in the Self-Provisioning client.
- If the Status changes to Completed, you can import the application into AppDNA. See “Import Completed Applications” below for step-by-step instructions.
- If the operation failed, click the + to the left of the File name column to show the application options. Then click Show Log to see the processing log.
Load results into AppDNA when using disconnected mode
When you are working in disconnected mode, the Self-Provisioning client creates an output file with a name of the form installer.exe.appcapture_pkg.result, where installer.exe is the name of the installation file.
-
The end user sends the results file to you, for example, by FTP.
-
Save the results file in a suitable location.
-
If necessary, launch AppDNA.
-
From the side bar, choose Import & Analyze > Applications.
-
Click the Self-Provisioning tab.
-
On the Self-Provisioning tab toolbar, click Load Results.
-
In the Search for applications, specify the location of the output files and click Search.
This changes the status from Published to Completed for the applications for which output files were found.
-
You can now import applications that have a Completed status into AppDNA as described next.
Import completed applications
- Select the applications that you want to import into AppDNA (these need to have a Completed status).
- Click Move to Import. This moves the application to the Direct Import tab and removes it from the Self-Provisioning tab. You can import the application into AppDNA on the Direct Import tab in the normal way.